MP520 series Quick Start Guide
Page 5
... 39 Routine Maintenance 43 Replacing an Ink Tank 43 Keeping the Best Printing Results 49 When Printing Becomes Faint or Colors Are Incorrect 50 Printing the Nozzle Check Pattern 51 Examining the Nozzle Check Pattern ...........52 Print Head Cleaning 54 Print Head Deep Cleaning 55 Aligning the Print Head 56 Cleaning Your Machine 59 Troubleshooting 67 An Error Message Is...
... 39 Routine Maintenance 43 Replacing an Ink Tank 43 Keeping the Best Printing Results 49 When Printing Becomes Faint or Colors Are Incorrect 50 Printing the Nozzle Check Pattern 51 Examining the Nozzle Check Pattern ...........52 Print Head Cleaning 54 Print Head Deep Cleaning 55 Aligning the Print Head 56 Cleaning Your Machine 59 Troubleshooting 67 An Error Message Is...
MP520 series Quick Start Guide
Page 8
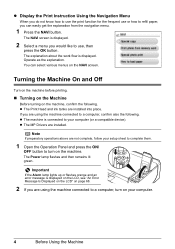
... The Power lamp flashes and then remains lit green. Operate as the explanation. Note If preparatory operations above are installed into place. z The Print Head and ink tanks are not complete, follow your computer. 4 Before Using the Machine The explanation about the work flow is displayed on the LCD...An Error Message Is Displayed on the LCD" on the machine, confirm the following . Turning the Machine On and Off Turn on the machine before printing. „ Turning on the Machine Before turning on page 68. 2 If you are using the machine connected to a computer, confirm also the ...
... The Power lamp flashes and then remains lit green. Operate as the explanation. Note If preparatory operations above are installed into place. z The Print Head and ink tanks are not complete, follow your computer. 4 Before Using the Machine The explanation about the work flow is displayed on the LCD...An Error Message Is Displayed on the LCD" on the machine, confirm the following . Turning the Machine On and Off Turn on the machine before printing. „ Turning on the Machine Before turning on page 68. 2 If you are using the machine connected to a computer, confirm also the ...
MP520 series Quick Start Guide
Page 47
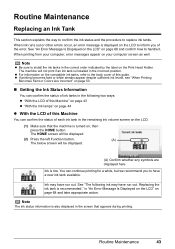
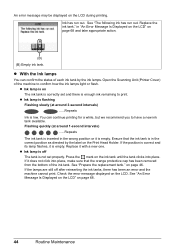
...order indicated by the label on page 68 and confirm how to have run out. z If printing becomes faint or white streaks appear despite sufficient ink levels, see "When Printing Becomes Faint or Colors Are Incorrect" on page 50. „ Getting the Ink Status Information You can confirm the ...you to handle it. Replacing the ink tank is low. Routine Maintenance 43 See "An Error Message Is Displayed on the LCD" on the Print Head Holder. The machine will be displayed. (A) Confirm whether any symbols are displayed here. You can confirm the status of the error. When ink...
...order indicated by the label on page 68 and confirm how to have run out. z If printing becomes faint or white streaks appear despite sufficient ink levels, see "When Printing Becomes Faint or Colors Are Incorrect" on page 50. „ Getting the Ink Status Information You can confirm the ...you to handle it. Replacing the ink tank is low. Routine Maintenance 43 See "An Error Message Is Displayed on the LCD" on the Print Head Holder. The machine will be displayed. (A) Confirm whether any symbols are displayed here. You can confirm the status of the error. When ink...
MP520 series Quick Start Guide
Page 48
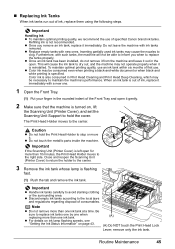
...until the tank clicks into place, make sure that the ink tank is enough ink remaining to print. Ensure that the orange protective cap has been removed from the bottom of each ink tank by ... it is not set and there is in "An Error Message Is Displayed on the LCD" on the Print Head Holder. If it is low. See "An Error Message Is Displayed on the LCD" on the LCD. z...Ink lamp is off after reinserting the ink tanks, there has been an error and the machine cannot print. Check the error message displayed on page 68. 44 Routine Maintenance An error message may be displayed on...
...until the tank clicks into place, make sure that the ink tank is enough ink remaining to print. Ensure that the orange protective cap has been removed from the bottom of each ink tank by ... it is not set and there is in "An Error Message Is Displayed on the LCD" on the Print Head Holder. If it is low. See "An Error Message Is Displayed on the LCD" on the LCD. z...Ink lamp is off after reinserting the ink tanks, there has been an error and the machine cannot print. Check the error message displayed on page 68. 44 Routine Maintenance An error message may be displayed on...
MP520 series Quick Start Guide
Page 49
...Furthermore, with new ones. To maintain optimal printing quality, use . z Color ink may not operate properly when it is left open . Note z Do not remove more than one . 1 Open the Front Tray. (1) Put your finger in Print Head Cleaning and Print Head Deep Cleaning, which may cause the nozzles to..., we recommend the use of first use an ink tank within six months of specified Canon brand ink tanks. z Discard empty ink tanks according to the center. The Print Head Holder moves to the local laws and regulations regarding disposal of consumables. Important z Handle ink tanks carefully...
...Furthermore, with new ones. To maintain optimal printing quality, use . z Color ink may not operate properly when it is left open . Note z Do not remove more than one . 1 Open the Front Tray. (1) Put your finger in Print Head Cleaning and Print Head Deep Cleaning, which may cause the nozzles to..., we recommend the use of first use an ink tank within six months of specified Canon brand ink tanks. z Discard empty ink tanks according to the center. The Print Head Holder moves to the local laws and regulations regarding disposal of consumables. Important z Handle ink tanks carefully...
MP520 series Quick Start Guide
Page 51
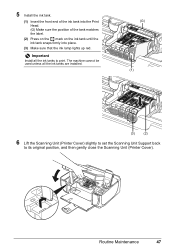
... installed. (G) (1) (3) (2) 6 Lift the Scanning Unit (Printer Cover) slightly to set the Scanning Unit Support back to print. Routine Maintenance 47 5 Install the ink tank. (1) Insert the front end of the ink tank into the Print Head. (G) Make sure the position of the tank matches the label. (2) Press on the mark on the ink...
... installed. (G) (1) (3) (2) 6 Lift the Scanning Unit (Printer Cover) slightly to set the Scanning Unit Support back to print. Routine Maintenance 47 5 Install the ink tank. (1) Insert the front end of the ink tank into the Print Head. (G) Make sure the position of the tank matches the label. (2) Press on the mark on the ink...
MP520 series Quick Start Guide
Page 52
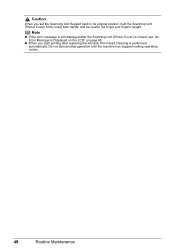
Caution When you start another operation until the machine has stopped making operating noises. 48 Routine Maintenance Note z If the error message is still displayed after replacing the ink tank, Print Head Cleaning is closed, see "An Error Message Is Displayed on the LCD" on page 68. z When you set the Scanning Unit Support back to its original position, hold the Scanning Unit (Printer Cover) firmly using both hands, and be careful not to get your fingers caught. Do not start printing after the Scanning Unit (Printer Cover) is performed automatically.
Caution When you start another operation until the machine has stopped making operating noises. 48 Routine Maintenance Note z If the error message is still displayed after replacing the ink tank, Print Head Cleaning is closed, see "An Error Message Is Displayed on the LCD" on page 68. z When you set the Scanning Unit Support back to its original position, hold the Scanning Unit (Printer Cover) firmly using both hands, and be careful not to get your fingers caught. Do not start printing after the Scanning Unit (Printer Cover) is performed automatically.
MP520 series Quick Start Guide
Page 53
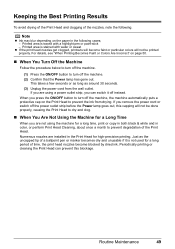
... long period of time, the print head nozzles become faint or particular colors will not be printed properly. If you remove the power cord or switch off instead. Periodically printing or cleaning the Print Head can switch it is traced with water or sweat z If the print head nozzles get clogged, printouts will..., you press the ON/OFF button to turn off the machine, the machine automatically puts a protective cap on the paper in color, or perform Print Head Cleaning, about once a month to prevent the ink from the wall outlet. When you can prevent this capping will not be ...
... long period of time, the print head nozzles become faint or particular colors will not be printed properly. If you remove the power cord or switch off instead. Periodically printing or cleaning the Print Head can switch it is traced with water or sweat z If the print head nozzles get clogged, printouts will..., you press the ON/OFF button to turn off the machine, the machine automatically puts a protective cap on the paper in color, or perform Print Head Cleaning, about once a month to prevent the ink from the wall outlet. When you can prevent this capping will not be ...
MP520 series Quick Start Guide
Page 54
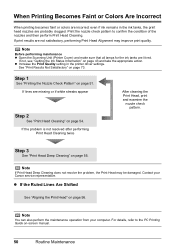
... to confirm the condition of the nozzles and then perform Print Head Cleaning. If print results are lit red. z Increase the Print Quality setting in the ink tanks, the print head nozzles are probably clogged. When Printing Becomes Faint or Colors Are Incorrect When printing becomes faint or colors are incorrect even if ink remains in the printer driver settings...
... to confirm the condition of the nozzles and then perform Print Head Cleaning. If print results are lit red. z Increase the Print Quality setting in the ink tanks, the print head nozzles are probably clogged. When Printing Becomes Faint or Colors Are Incorrect When printing becomes faint or colors are incorrect even if ink remains in the printer driver settings...
MP520 series Quick Start Guide
Page 55
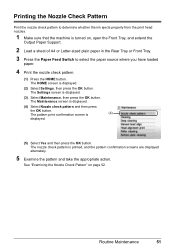
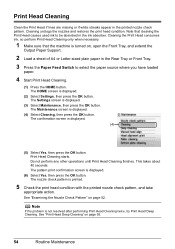
..., then press the OK button. The Settings screen is displayed. (2) Select Settings, then press the OK button. The pattern print confirmation screen is printed, and the pattern confirmation screens are displayed alternately. 5 Examine the pattern and take the appropriate action. The nozzle check pattern ... paper source where you have loaded paper. 4 Print the nozzle check pattern. (1) Press the HOME button. Printing the Nozzle Check Pattern Print the nozzle check pattern to determine whether the ink ejects properly from the print head nozzles. 1 Make sure that the machine is ...
..., then press the OK button. The Settings screen is displayed. (2) Select Settings, then press the OK button. The pattern print confirmation screen is printed, and the pattern confirmation screens are displayed alternately. 5 Examine the pattern and take the appropriate action. The nozzle check pattern ... paper source where you have loaded paper. 4 Print the nozzle check pattern. (1) Press the HOME button. Printing the Nozzle Check Pattern Print the nozzle check pattern to determine whether the ink ejects properly from the print head nozzles. 1 Make sure that the machine is ...
MP520 series Quick Start Guide
Page 57
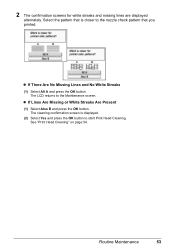
The LCD returns to start Print Head Cleaning. The cleaning confirmation screen is closer to the nozzle check pattern that you printed. z If There Are No Missing Lines and No White Streaks (1) Select All A and press the OK button. Routine Maintenance 53 z If Lines Are Missing or White Streaks Are Present (1) Select Also B and press the OK button. 2 The confirmation screens for white streaks and missing lines are displayed alternately. See "Print Head Cleaning" on page 54. Select the pattern that is displayed. (2) Select Yes and press the OK button to the Maintenance screen.
The LCD returns to start Print Head Cleaning. The cleaning confirmation screen is closer to the nozzle check pattern that you printed. z If There Are No Missing Lines and No White Streaks (1) Select All A and press the OK button. Routine Maintenance 53 z If Lines Are Missing or White Streaks Are Present (1) Select Also B and press the OK button. 2 The confirmation screens for white streaks and missing lines are displayed alternately. See "Print Head Cleaning" on page 54. Select the pattern that is displayed. (2) Select Yes and press the OK button to the Maintenance screen.
MP520 series Quick Start Guide
Page 58
... Maintenance, then press the OK button. Do not perform any other operations until Print Head Cleaning finishes. The pattern print confirmation screen is not resolved after performing Print Head Cleaning twice, try Print Head Deep Cleaning. Note If the problem is displayed. (6) Select Yes, then press...The nozzle check pattern is displayed. (4) Select Cleaning, then press the OK button. The Maintenance screen is printed. 5 Check the print head condition with the printed nozzle check pattern, and take appropriate action. This takes about 40 seconds. Note that the machine is displayed...
... Maintenance, then press the OK button. Do not perform any other operations until Print Head Cleaning finishes. The pattern print confirmation screen is not resolved after performing Print Head Cleaning twice, try Print Head Deep Cleaning. Note If the problem is displayed. (6) Select Yes, then press...The nozzle check pattern is displayed. (4) Select Cleaning, then press the OK button. The Maintenance screen is printed. 5 Check the print head condition with the printed nozzle check pattern, and take appropriate action. This takes about 40 seconds. Note that the machine is displayed...
MP520 series Quick Start Guide
Page 59
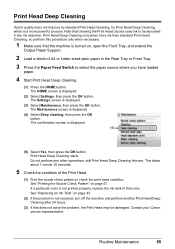
...Yes, then press the OK button. Contact your Canon service representative. See "Replacing an Ink Tank" on page 43. (2) If the problem is turned on page 51. Print Head Deep Cleaning consumes more powerful process. If a particular color is not printed properly, replace the ink tank of that the ...machine is not resolved, turn off the machine and perform another Print Head Deep Cleaning after 24 hours. (3) If this...
...Yes, then press the OK button. Contact your Canon service representative. See "Replacing an Ink Tank" on page 43. (2) If the problem is turned on page 51. Print Head Deep Cleaning consumes more powerful process. If a particular color is not printed properly, replace the ink tank of that the ...machine is not resolved, turn off the machine and perform another Print Head Deep Cleaning after 24 hours. (3) If this...

MP520 series Quick Start Guide
Page 60
...Note (4) If you have loaded paper. 4 Print the print head alignment pattern. (1) Press the HOME button. The confirmation screen is displayed. (4) Select Manual head align, then press the OK button. The input screen for the head position adjustment values is displayed. (3) Select ...you select Head alignment print, the machine exits the process after printing the current head position adjustment values. (5) Select Yes, then press the OK button. Aligning the Print Head If ruled lines are printed misaligned or print results are otherwise unsatisfactory, adjust the print head position. 1...
...Note (4) If you have loaded paper. 4 Print the print head alignment pattern. (1) Press the HOME button. The confirmation screen is displayed. (4) Select Manual head align, then press the OK button. The input screen for the head position adjustment values is displayed. (3) Select ...you select Head alignment print, the machine exits the process after printing the current head position adjustment values. (5) Select Yes, then press the OK button. Aligning the Print Head If ruled lines are printed misaligned or print results are otherwise unsatisfactory, adjust the print head position. 1...
MP520 series Quick Start Guide
Page 61
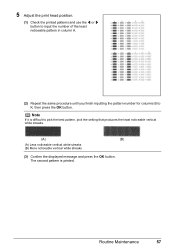
Routine Maintenance 57 The second pattern is difficult to K, then press the OK button. 5 Adjust the print head position. (1) Check the printed patterns and use the [ or ] button to input the number of the least noticeable pattern in column A. (2) Repeat the same procedure until you finish inputting ... white streaks. (A) (B) (A) Less noticeable vertical white streaks (B) More noticeable vertical white streaks (3) Confirm the displayed message and press the OK button. Note If it is printed.
Routine Maintenance 57 The second pattern is difficult to K, then press the OK button. 5 Adjust the print head position. (1) Check the printed patterns and use the [ or ] button to input the number of the least noticeable pattern in column A. (2) Repeat the same procedure until you finish inputting ... white streaks. (A) (B) (A) Less noticeable vertical white streaks (B) More noticeable vertical white streaks (3) Confirm the displayed message and press the OK button. Note If it is printed.
MP520 series Quick Start Guide
Page 63
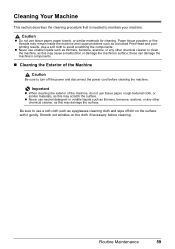
... damage the machine's components. „ Cleaning the Exterior of the machine, do not use tissue paper, rough-textured cloth, or similar materials, as a blocked Print Head and poor printing results. Caution z Do not use a soft cloth such as eyeglasses cleaning cloth and wipe off the power and disconnect the power cord before cleaning...
... damage the machine's components. „ Cleaning the Exterior of the machine, do not use tissue paper, rough-textured cloth, or similar materials, as a blocked Print Head and poor printing results. Caution z Do not use a soft cloth such as eyeglasses cleaning cloth and wipe off the power and disconnect the power cord before cleaning...
MP520 series Quick Start Guide
Page 72
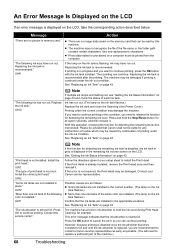
...ink tank flashes.) Replace the ink tank and close the Scanning Unit (Printer Cover). Install the correct print head." Possible causes are no image data saved on the memory card that Canon shall not be liable for detecting the remaining ink level is recommended." Message Action "There are as ...level is disabled, the ink tank in this machine. U051 "The type of the same color are installed in your Canon service representative. If the error is displayed in ink absorber to continue printing, press the OK button with the ink tank installed. The machine has a built-in...
...ink tank flashes.) Replace the ink tank and close the Scanning Unit (Printer Cover). Install the correct print head." Possible causes are no image data saved on the memory card that Canon shall not be liable for detecting the remaining ink level is recommended." Message Action "There are as ...level is disabled, the ink tank in this machine. U051 "The type of the same color are installed in your Canon service representative. If the error is displayed in ink absorber to continue printing, press the OK button with the ink tank installed. The machine has a built-in...
MP520 series Quick Start Guide
Page 78
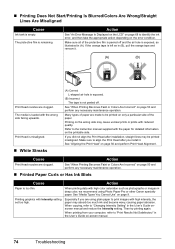
... Not Start/Printing Is Blurred/Colors Are Wrong/Straight Lines Are Misaligned Cause Ink tank is too thin. Print Head is misaligned. „ White Streaks (A) Correct L-shaped air hole is exposed. (B) Incorrect The tape is remaining. Printing graphics with reduced quality. If you install it . (A) (B) Print Head nozzles are using Photo Paper Pro or other Canon specialty paper...
... Not Start/Printing Is Blurred/Colors Are Wrong/Straight Lines Are Misaligned Cause Ink tank is too thin. Print Head is misaligned. „ White Streaks (A) Correct L-shaped air hole is exposed. (B) Incorrect The tape is remaining. Printing graphics with reduced quality. If you install it . (A) (B) Print Head nozzles are using Photo Paper Pro or other Canon specialty paper...
MP520 series Quick Start Guide
Page 79
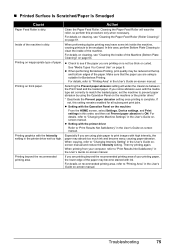
...manual. Troubleshooting 75 „ Printed Surface Is Scratched/Paper Is Smudged Cause Action Paper Feed Roller is dirty. Cleaning the Paper Feed Roller will widen the clearance between the Print Head and the loaded paper. z When performing Borderless Printing, print quality may leave some ink ...inside of your computer, refer to "Print Results Not Satisfactory" in this case, perform Bottom Plate Cleaning ...
...manual. Troubleshooting 75 „ Printed Surface Is Scratched/Paper Is Smudged Cause Action Paper Feed Roller is dirty. Cleaning the Paper Feed Roller will widen the clearance between the Print Head and the loaded paper. z When performing Borderless Printing, print quality may leave some ink ...inside of your computer, refer to "Print Results Not Satisfactory" in this case, perform Bottom Plate Cleaning ...
MP520 series Quick Start Guide
Page 80
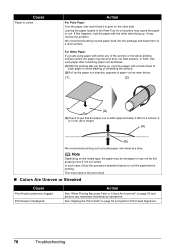
...scratching the surface. (2)Roll up . It may cause the paper to curl. Action See "When Printing Becomes Faint or Colors Are Incorrect" on page 56 and perform Print Head Alignment. 76 Troubleshooting We recommend putting unused paper back into the package and keep them on the ...the paper with either any necessary maintenance operations. This may improve the print result. „ Colors Are Uneven or Streaked Cause Print Head nozzles are using paper with a fresh sheet of the corners or the whole printing surface curled, the paper may not be smudged or may become dirty...
...scratching the surface. (2)Roll up . It may cause the paper to curl. Action See "When Printing Becomes Faint or Colors Are Incorrect" on page 56 and perform Print Head Alignment. 76 Troubleshooting We recommend putting unused paper back into the package and keep them on the ...the paper with either any necessary maintenance operations. This may improve the print result. „ Colors Are Uneven or Streaked Cause Print Head nozzles are using paper with a fresh sheet of the corners or the whole printing surface curled, the paper may not be smudged or may become dirty...


