MP520 series Quick Start Guide
Page 5
Table of Contents Before Using the Machine 2 How to Navigate Menus on the LCD 2 Turning the Machine On and Off 4 Handling the Original Document 5 Loading Printing Paper 7 Hints for Handling the Paper Sources ..........10 Changing the Paper Source 12 Loading ... 37 About PictBridge Print Settings 39 Routine Maintenance 43 Replacing an Ink Tank 43 Keeping the Best Printing Results 49 When Printing Becomes Faint or Colors Are Incorrect 50 Printing the Nozzle Check Pattern 51 Examining the Nozzle Check Pattern ...........52 Print Head Cleaning 54 Print Head Deep Cleaning 55 Aligning...
Table of Contents Before Using the Machine 2 How to Navigate Menus on the LCD 2 Turning the Machine On and Off 4 Handling the Original Document 5 Loading Printing Paper 7 Hints for Handling the Paper Sources ..........10 Changing the Paper Source 12 Loading ... 37 About PictBridge Print Settings 39 Routine Maintenance 43 Replacing an Ink Tank 43 Keeping the Best Printing Results 49 When Printing Becomes Faint or Colors Are Incorrect 50 Printing the Nozzle Check Pattern 51 Examining the Nozzle Check Pattern ...........52 Print Head Cleaning 54 Print Head Deep Cleaning 55 Aligning...
MP520 series Quick Start Guide
Page 6
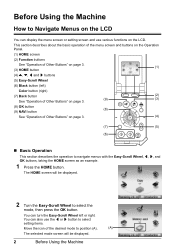
The HOME screen will be displayed. 2 Turn the Easy-Scroll Wheel to select the mode, then press the OK button. You can also use various functions on the LCD. This section describes ... (4) {, }, [ and ] buttons (5) Easy-Scroll Wheel (6) Black button (left or right. Before Using the Machine How to Navigate Menus on the LCD You can turn the Easy-Scroll Wheel left ) Color button (right) (7) Back button (2) See "Operation of Other Buttons" on page 3. (9) (3) (8) OK button (8) (9) NAVI button See "Operation of Other Buttons" on page...
The HOME screen will be displayed. 2 Turn the Easy-Scroll Wheel to select the mode, then press the OK button. You can also use various functions on the LCD. This section describes ... (4) {, }, [ and ] buttons (5) Easy-Scroll Wheel (6) Black button (left or right. Before Using the Machine How to Navigate Menus on the LCD You can turn the Easy-Scroll Wheel left ) Color button (right) (7) Back button (2) See "Operation of Other Buttons" on page 3. (9) (3) (8) OK button (8) (9) NAVI button See "Operation of Other Buttons" on page...
MP520 series Quick Start Guide
Page 8
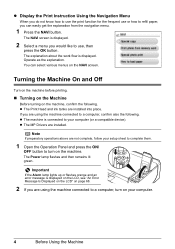
... you do not know how to use the print function for the frequent use , then press the OK button. The NAVI screen is connected to turn on your setup sheet to complete them. 1 Open the Operation Panel and press the ON/ OFF button to your computer (or a compatible device). ...from the navigation menu. 1 Press the NAVI button. Operate as the explanation. Note If preparatory operations above are using the machine connected to a computer, turn on the machine. z The MP Drivers are installed into place. The explanation about the work flow is displayed on the LCD, see "An Error ...
... you do not know how to use the print function for the frequent use , then press the OK button. The NAVI screen is connected to turn on your setup sheet to complete them. 1 Open the Operation Panel and press the ON/ OFF button to your computer (or a compatible device). ...from the navigation menu. 1 Press the NAVI button. Operate as the explanation. Note If preparatory operations above are using the machine connected to a computer, turn on the machine. z The MP Drivers are installed into place. The explanation about the work flow is displayed on the LCD, see "An Error ...
MP520 series Quick Start Guide
Page 9
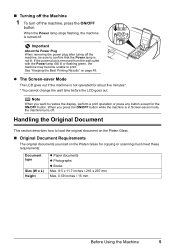
... lit. Important About the Power Plug When removing the power plug after turing off . If the power plug is in Screen-saver mode, the machine turns off the machine, be sure to restore the display, perform a print operation or press any button except for about five minutes*. * You cannot change .../ 216 x 297 mm Max. 0.59 inches / 15 mm Before Using the Machine 5 Handling the Original Document This section describes how to print. „ Turning off the Machine 1 To turn off . When you press the ON/OFF button while the machine is removed from the wall outlet with the Power lamp still lit...
... lit. Important About the Power Plug When removing the power plug after turing off . If the power plug is in Screen-saver mode, the machine turns off the machine, be sure to restore the display, perform a print operation or press any button except for about five minutes*. * You cannot change .../ 216 x 297 mm Max. 0.59 inches / 15 mm Before Using the Machine 5 Handling the Original Document This section describes how to print. „ Turning off the Machine 1 To turn off . When you press the ON/OFF button while the machine is removed from the wall outlet with the Power lamp still lit...
MP520 series Quick Start Guide
Page 25
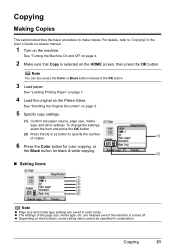
... on page 4. 2 Make sure that Copy is turned off. See "Loading Printing Paper" on page 7. 4 Load the original on the HOME screen, then press the OK button. are saved in each mode. Note You can also press the Color or Black button instead of the page size, media...To change the settings, select the item and press the OK button. (2) Press the [+] or [-] button to specify the number of copies. (1) 6 Press the Color button for color copying, or the Black button for black & white copying. (2) „ Setting Items (1) (2) (3) (4) (5) (6) Note z Page size and media type settings are...
... on page 4. 2 Make sure that Copy is turned off. See "Loading Printing Paper" on page 7. 4 Load the original on the HOME screen, then press the OK button. are saved in each mode. Note You can also press the Color or Black button instead of the page size, media...To change the settings, select the item and press the OK button. (2) Press the [+] or [-] button to specify the number of copies. (1) 6 Press the Color button for color copying, or the Black button for black & white copying. (2) „ Setting Items (1) (2) (3) (4) (5) (6) Note z Page size and media type settings are...
MP520 series Quick Start Guide
Page 28
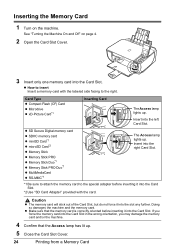
... the Card Slot. Doing so damages the machine and the memory card. Inserting the Memory Card 1 Turn on page 4. 2 Open the Card Slot Cover. 3 Insert only one memory card into the slot any further. See "Turning the Machine On and Off" on the machine. z How to insert Insert a memory card with the...
... the Card Slot. Doing so damages the machine and the memory card. Inserting the Memory Card 1 Turn on page 4. 2 Open the Card Slot Cover. 3 Insert only one memory card into the slot any further. See "Turning the Machine On and Off" on the machine. z How to insert Insert a memory card with the...
MP520 series Quick Start Guide
Page 29
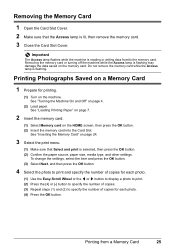
...the Access lamp is lit, then remove the memory card. 3 Close the Card Slot Cover. Printing from /to specify the number of copies for printing. (1) Turn on page 4. (2) Load paper. See "Loading Printing Paper" on page 7. 2 Insert the memory card. (1) Select Memory card on the memory card. ...Removing the memory card or turning off the machine while the Access lamp is flashing may damage the data saved on the HOME screen, then press the OK button. (2) Insert the...
...the Access lamp is lit, then remove the memory card. 3 Close the Card Slot Cover. Printing from /to specify the number of copies for printing. (1) Turn on page 4. (2) Load paper. See "Loading Printing Paper" on page 7. 2 Insert the memory card. (1) Select Memory card on the memory card. ...Removing the memory card or turning off the machine while the Access lamp is flashing may damage the data saved on the HOME screen, then press the OK button. (2) Insert the...
MP520 series Quick Start Guide
Page 30
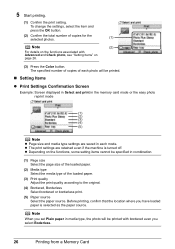
Before printing, confirm that the location where you have loaded paper is turned off. z The print settings are saved in each mode. To change the settings, select the item and press the OK button. (2) Confirm the total number ... size of the loaded paper. (2) Media type Select the media type of copies for the selected photos. (1) Note (2) For details on page 26. (3) Press the Color button. Note When you select Boderless. 26 Printing from a Memory Card The specified number of copies of each photo will be printed with Advanced and...
Before printing, confirm that the location where you have loaded paper is turned off. z The print settings are saved in each mode. To change the settings, select the item and press the OK button. (2) Confirm the total number ... size of the loaded paper. (2) Media type Select the media type of copies for the selected photos. (1) Note (2) For details on page 26. (3) Press the Color button. Note When you select Boderless. 26 Printing from a Memory Card The specified number of copies of each photo will be printed with Advanced and...
MP520 series Quick Start Guide
Page 34
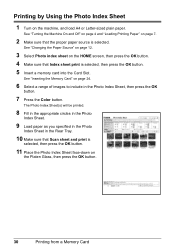
See "Turning the Machine On and Off" on page 4 and "Loading Printing Paper" on page 7. 2 Make sure that the proper... paper as you specified in the Photo Index Sheet in the Photo Index Sheet, then press the OK button. 7 Press the Color button. See "Inserting the Memory Card" on the machine, and load A4 or Letter-sized plain paper. Printing by Using the Photo... Index Sheet 1 Turn on page 24. 6 Select a range of images to include in the Rear Tray. 10 Make sure that Index sheet print is...
See "Turning the Machine On and Off" on page 4 and "Loading Printing Paper" on page 7. 2 Make sure that the proper... paper as you specified in the Photo Index Sheet in the Photo Index Sheet, then press the OK button. 7 Press the Color button. See "Inserting the Memory Card" on the machine, and load A4 or Letter-sized plain paper. Printing by Using the Photo... Index Sheet 1 Turn on page 24. 6 Select a range of images to include in the Rear Tray. 10 Make sure that Index sheet print is...
MP520 series Quick Start Guide
Page 35
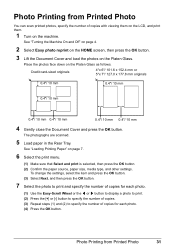
... [-] button to specify the number of copies. (3) Repeat steps (1) and (2) to specify the number of copies with viewing them on the LCD, and print them. 1 Turn on the Platen Glass. Credit card-sized originals 4"x 6"/ 101.6 x 152.4 mm or 5"x 7"/ 127.0 x 177.8 mm originals 0.4"/ 10 mm 0.4"/ 10 mm 0.4"/ 10 mm 0.4"/... 0.4"/ 10 mm 4 Gently close the Document Cover and press the OK button. See "Loading Printing Paper" on the Platen Glass as follows. See "Turning the Machine On and Off" on page 4. 2 Select Easy photo reprint on the HOME screen, then press the OK button. 3 Lift the Document ...
... [-] button to specify the number of copies. (3) Repeat steps (1) and (2) to specify the number of copies with viewing them on the LCD, and print them. 1 Turn on the Platen Glass. Credit card-sized originals 4"x 6"/ 101.6 x 152.4 mm or 5"x 7"/ 127.0 x 177.8 mm originals 0.4"/ 10 mm 0.4"/ 10 mm 0.4"/ 10 mm 0.4"/... 0.4"/ 10 mm 4 Gently close the Document Cover and press the OK button. See "Loading Printing Paper" on the Platen Glass as follows. See "Turning the Machine On and Off" on page 4. 2 Select Easy photo reprint on the HOME screen, then press the OK button. 3 Lift the Document ...

MP520 series Quick Start Guide
Page 37
...B5-sized plain paper in easy steps using an appropriate application software. 3 Select Print on the application software's File menu. 4 Make sure that Canon XXX Printer (where "XXX" is your digital camera, you select Front for Plain Paper, the machine will automatically switch to view the online help... Panel on the machine and load the paper in Select Printer, and click Preferences (or Properties). 5 Specify the required settings and click OK. See "Turning the Machine On and Off" on page 4 and "Loading Printing Paper" on page 7. 2 Create a document or open a file to achieve higher print...
...B5-sized plain paper in easy steps using an appropriate application software. 3 Select Print on the application software's File menu. 4 Make sure that Canon XXX Printer (where "XXX" is your digital camera, you select Front for Plain Paper, the machine will automatically switch to view the online help... Panel on the machine and load the paper in Select Printer, and click Preferences (or Properties). 5 Specify the required settings and click OK. See "Turning the Machine On and Off" on page 4 and "Loading Printing Paper" on page 7. 2 Create a document or open a file to achieve higher print...
MP520 series Quick Start Guide
Page 38
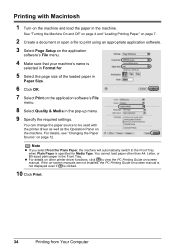
Printing with the printer driver as well as the Operation Panel on -screen manual. See "Turning the Machine On and Off" on page 4 and "Loading Printing Paper" on page 7. 2 Create a document or open a file to the Front Tray when Plain Paper ... that your machine's name is selected in Format for Media Type. You cannot load paper other printer driver functions, click to be used with Macintosh 1 Turn on the machine and load the paper in the pop-up menu. 9 Specify the required settings. If the on-screen manuals are not installed, the...
Printing with the printer driver as well as the Operation Panel on -screen manual. See "Turning the Machine On and Off" on page 4 and "Loading Printing Paper" on page 7. 2 Create a document or open a file to the Front Tray when Plain Paper ... that your machine's name is selected in Format for Media Type. You cannot load paper other printer driver functions, click to be used with Macintosh 1 Turn on the machine and load the paper in the pop-up menu. 9 Specify the required settings. If the on-screen manuals are not installed, the...
MP520 series Quick Start Guide
Page 39
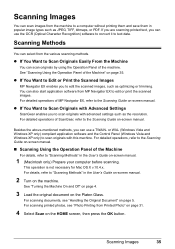
...Vista and Windows XP only) to scan originals with advanced settings such as the resolution. This operation is not necessary for Mac OS X v.10.4.x. See "Turning the Machine On and Off" on page 4. 3 Load the original document on page 35. If you are scanning printed text, you can use the ... from the various scanning methods. For detailed operations of the Machine For details, refer to "Scanning Methods" in the User's Guide on-screen manual. 2 Turn on page 5. z If You Want to Scan Originals Easily From the Machine You can scan originals by using the Operation Panel of MP Navigator EX...
...Vista and Windows XP only) to scan originals with advanced settings such as the resolution. This operation is not necessary for Mac OS X v.10.4.x. See "Turning the Machine On and Off" on page 4. 3 Load the original document on page 35. If you are scanning printed text, you can use the ... from the various scanning methods. For detailed operations of the Machine For details, refer to "Scanning Methods" in the User's Guide on-screen manual. 2 Turn on page 5. z If You Want to Scan Originals Easily From the Machine You can scan originals by using the Operation Panel of MP Navigator EX...

MP520 series Quick Start Guide
Page 41
Note When printing photos with a DCF (Design rule for printing. (1) Turn on the machine. Printing Photographs Directly from a PictBridge Compliant Device You can be connected to this mark is an industry standard enabling a .... Important Never disconnect the USB cable during printing unless when explicitly allowed to this machine, use a USB cable recommended by the PictBridge compliant device. See "Turning the Machine On and Off" on page 7. z Connectable Devices PictBridge is PictBridge compliant. A device can connect a PictBridge compliant device such as "PictBridge compliant ...
Note When printing photos with a DCF (Design rule for printing. (1) Turn on the machine. Printing Photographs Directly from a PictBridge Compliant Device You can be connected to this mark is an industry standard enabling a .... Important Never disconnect the USB cable during printing unless when explicitly allowed to this machine, use a USB cable recommended by the PictBridge compliant device. See "Turning the Machine On and Off" on page 7. z Connectable Devices PictBridge is PictBridge compliant. A device can connect a PictBridge compliant device such as "PictBridge compliant ...

MP520 series Quick Start Guide
Page 42
... your PictBridge compliant device. 38 Printing Photographs Directly from the machine. Do not load paper in the machine. If your device does not turn on automatically, turn on the device or select Play mode manually after connecting the device to the machine using the menu on the LCD of your PictBridge... compliant device. You may also have to turn it to this machine according to the machine. You can only use the Rear Tray as paper type and layout. Note When printing directly ...
... your PictBridge compliant device. 38 Printing Photographs Directly from the machine. Do not load paper in the machine. If your device does not turn on automatically, turn on the device or select Play mode manually after connecting the device to the machine using the menu on the LCD of your PictBridge... compliant device. You may also have to turn it to this machine according to the machine. You can only use the Rear Tray as paper type and layout. Note When printing directly ...

MP520 series Quick Start Guide
Page 45
... Default on the machine. When Auto image fix On is selected, the scene or person's face of a shot photo is recognized and the most suitable color, brightness, or contrasts automatically to the settings on the PictBridge compliant device when you need, select OK and then press the OK button. You can... the OK button. (4) Select PictBridge settings, then press the OK button. (5) Select the item to print. z Displaying the PictBridge Settings Screen and Specifying the Settings (1) Turn on the machine. (2) Select Settings on the machine.
... Default on the machine. When Auto image fix On is selected, the scene or person's face of a shot photo is recognized and the most suitable color, brightness, or contrasts automatically to the settings on the PictBridge compliant device when you need, select OK and then press the OK button. You can... the OK button. (4) Select PictBridge settings, then press the OK button. (5) Select the item to print. z Displaying the PictBridge Settings Screen and Specifying the Settings (1) Turn on the machine. (2) Select Settings on the machine.
MP520 series Quick Start Guide
Page 47
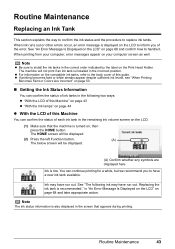
... of this Machine" on page 43 z "With the Ink lamps" on page 44 z With the LCD of this guide. Note The ink status information is turned on the Print Head Holder. z If printing becomes faint or white streaks appear despite sufficient ink levels, see "When Printing Becomes Faint or... Colors Are Incorrect" on page 68 and confirm how to replace ink tanks. You can confirm the status of ink tanks in the following ink may ...
... of this Machine" on page 43 z "With the Ink lamps" on page 44 z With the LCD of this guide. Note The ink status information is turned on the Print Head Holder. z If printing becomes faint or white streaks appear despite sufficient ink levels, see "When Printing Becomes Faint or... Colors Are Incorrect" on page 68 and confirm how to replace ink tanks. You can confirm the status of ink tanks in the following ink may ...
MP520 series Quick Start Guide
Page 49
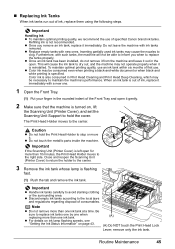
... within six months of first use of ink, replace it gently. 2 Make sure that the machine is turned on page 43. (A) (A) Do NOT touch the Print Head Lock Lever; z Do not touch the ...partially used ink tanks may not operate properly when it . When an ink tank is out of specified Canon brand ink tanks. Important z Handle ink tanks carefully to stop or move it is flashing fast. (1)... an ink tank has been installed, do not remove it from the machine and leave it immediately. z Color ink may be consumed even when printing a black-and-white document or when black-and white printing is ...
... within six months of first use of ink, replace it gently. 2 Make sure that the machine is turned on page 43. (A) (A) Do NOT touch the Print Head Lock Lever; z Do not touch the ...partially used ink tanks may not operate properly when it . When an ink tank is out of specified Canon brand ink tanks. Important z Handle ink tanks carefully to stop or move it is flashing fast. (1)... an ink tank has been installed, do not remove it from the machine and leave it immediately. z Color ink may be consumed even when printing a black-and-white document or when black-and white printing is ...
MP520 series Quick Start Guide
Page 53
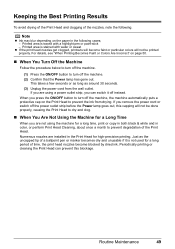
... Just as around 30 seconds. (3) Unplug the power cord from drying. For details, see "When Printing Becomes Faint or Colors Are Incorrect" on the Print Head to turn off the power outlet strip before the Power lamp goes out, this blockage. Periodically printing or cleaning the Print Head can switch... it is not used for a long period of time, the print head nozzles become faint or particular colors will not be done ...
... Just as around 30 seconds. (3) Unplug the power cord from drying. For details, see "When Printing Becomes Faint or Colors Are Incorrect" on the Print Head to turn off the power outlet strip before the Power lamp goes out, this blockage. Periodically printing or cleaning the Print Head can switch... it is not used for a long period of time, the print head nozzles become faint or particular colors will not be done ...
MP520 series Quick Start Guide
Page 55
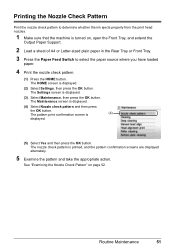
.... (3) Select Maintenance, then press the OK button. The Settings screen is (4) displayed. (5) Select Yes and then press the OK button. The nozzle check pattern is turned on page 52. Routine Maintenance 51 Printing the Nozzle Check Pattern Print the nozzle check pattern to select the paper source where you have loaded...
.... (3) Select Maintenance, then press the OK button. The Settings screen is (4) displayed. (5) Select Yes and then press the OK button. The nozzle check pattern is turned on page 52. Routine Maintenance 51 Printing the Nozzle Check Pattern Print the nozzle check pattern to select the paper source where you have loaded...


