MP520 series Quick Start Guide
Page 5
...2 Turning the Machine On and Off 4 Handling the Original Document 5 Loading Printing Paper 7 Hints for Handling the Paper Sources ..........10 Changing the Paper Source 12 Loading Paper 13 Loading Envelopes 18 Loading Small-Sized Paper 20 Copying 21 Making Copies 21 Using Useful Copy Functions 22 Printing from a Memory Card 23 Memory Cards Supported by This Machine 23 Inserting the Memory Card 24 Removing the Memory Card 25 Printing Photographs Saved on a Memory Card 25 Using Useful Printing Functions 29 Using Useful Display Functions 29 Printing by Using the Photo Index Sheet...
...2 Turning the Machine On and Off 4 Handling the Original Document 5 Loading Printing Paper 7 Hints for Handling the Paper Sources ..........10 Changing the Paper Source 12 Loading Paper 13 Loading Envelopes 18 Loading Small-Sized Paper 20 Copying 21 Making Copies 21 Using Useful Copy Functions 22 Printing from a Memory Card 23 Memory Cards Supported by This Machine 23 Inserting the Memory Card 24 Removing the Memory Card 25 Printing Photographs Saved on a Memory Card 25 Using Useful Printing Functions 29 Using Useful Display Functions 29 Printing by Using the Photo Index Sheet...
MP520 series Quick Start Guide
Page 14
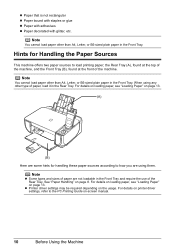
... loading paper, see "Loading Paper" on page 13. (A) (B) Here are some hints for Handling the Paper Sources This machine offers two paper sources to load printing paper; For details on printer driver settings, refer to how you are not loadable in the Rear Tray. See "Paper Handling" on -screen manual. 10 Before Using the Machine For details on loading paper, see "Loading Paper" on the usage. Note z Some types and sizes of paper, load it in the Front Tray...
... loading paper, see "Loading Paper" on page 13. (A) (B) Here are some hints for Handling the Paper Sources This machine offers two paper sources to load printing paper; For details on printer driver settings, refer to how you are not loadable in the Rear Tray. See "Paper Handling" on -screen manual. 10 Before Using the Machine For details on loading paper, see "Loading Paper" on the usage. Note z Some types and sizes of paper, load it in the Front Tray...
MP520 series Quick Start Guide
Page 25
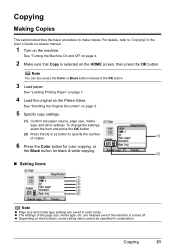
... page size, media type, etc. z The settings of the OK button. 3 Load paper. To change the settings, select the item and press the OK button. (2) Press the [+] or [-] button to specify the number of copies. (1) 6 Press the Color button for color copying, or the Black button for black & white copying. (2) „ Setting Items (1) (2) (3) (4) (5) (6) Note z Page size and media type settings are retained even if the machine is selected on the machine. For details, refer to make copies. are saved in the User's Guide on-screen manual. 1 Turn...
... page size, media type, etc. z The settings of the OK button. 3 Load paper. To change the settings, select the item and press the OK button. (2) Press the [+] or [-] button to specify the number of copies. (1) 6 Press the Color button for color copying, or the Black button for black & white copying. (2) „ Setting Items (1) (2) (3) (4) (5) (6) Note z Page size and media type settings are retained even if the machine is selected on the machine. For details, refer to make copies. are saved in the User's Guide on-screen manual. 1 Turn...
MP520 series Quick Start Guide
Page 29
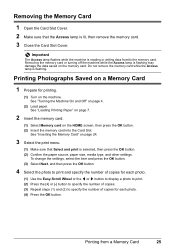
... [ or ] button to display a photo to print. (2) Press the [+] or [-] button to specify the number of copies for printing. (1) Turn on a Memory Card 1 Prepare for each photo. (4) Press the OK button. Removing the Memory Card 1 Open the Card Slot Cover. 2 Make sure that Select and print is selected, then press the OK button. (2) Confirm the paper source, paper size, media type, and other settings. See "Turning the Machine On and Off" on page 24. 3 Select the print menu. (1) Make sure that the Access lamp is...
... [ or ] button to display a photo to print. (2) Press the [+] or [-] button to specify the number of copies for printing. (1) Turn on a Memory Card 1 Prepare for each photo. (4) Press the OK button. Removing the Memory Card 1 Open the Card Slot Cover. 2 Make sure that Select and print is selected, then press the OK button. (2) Confirm the paper source, paper size, media type, and other settings. See "Turning the Machine On and Off" on page 24. 3 Select the print menu. (1) Make sure that the Access lamp is...
MP520 series Quick Start Guide
Page 34
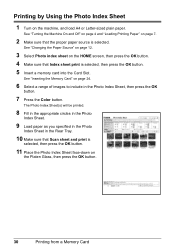
... the OK button. 30 Printing from a Memory Card The Photo Index Sheet(s) will be printed. 8 Fill in the appropriate circles in the Photo Index Sheet. 9 Load paper as you specified in the Photo Index Sheet in the Photo Index Sheet, then press the OK button. 7 Press the Color button. See "Changing the Paper Source" on page 12. 3 Select Photo index sheet on the HOME screen, then press the OK button. 4 Make sure that Scan sheet and print is selected...
... the OK button. 30 Printing from a Memory Card The Photo Index Sheet(s) will be printed. 8 Fill in the appropriate circles in the Photo Index Sheet. 9 Load paper as you specified in the Photo Index Sheet in the Photo Index Sheet, then press the OK button. 7 Press the Color button. See "Changing the Paper Source" on page 12. 3 Select Photo index sheet on the HOME screen, then press the OK button. 4 Make sure that Scan sheet and print is selected...

MP520 series Quick Start Guide
Page 37
... load paper other printer driver functions, click Help or Instructions to view the online help or the PC Printing Guide on the application software's File menu. 4 Make sure that Canon XXX Printer (where "XXX" is provided on -screen manuals are installed. 6 Click Print (or OK). Printing with the printer driver as well as the Operation Panel on the machine. See "Turning the Machine On and Off" on page 4 and "Loading Printing Paper" on page 7. 2 Create a document or open a file to achieve higher print quality. Note z If you can change...
... load paper other printer driver functions, click Help or Instructions to view the online help or the PC Printing Guide on the application software's File menu. 4 Make sure that Canon XXX Printer (where "XXX" is provided on -screen manuals are installed. 6 Click Print (or OK). Printing with the printer driver as well as the Operation Panel on the machine. See "Turning the Machine On and Off" on page 4 and "Loading Printing Paper" on page 7. 2 Create a document or open a file to achieve higher print quality. Note z If you can change...
MP520 series Quick Start Guide
Page 39
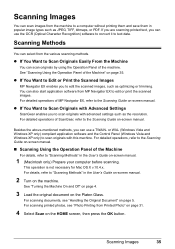
... image types such as optimizing or trimming. See "Turning the Machine On and Off" on page 4. 3 Load the original document on page 35. Scanning Methods You can select from the machine to scan originals with advanced settings such as the resolution. See "Scanning Using the Operation Panel of the Machine For details, refer to Scan Originals with this machine. z If You Want to "Scanning Methods" in the User's Guide on-screen manual. 2 Turn on -screen manual. „ Scanning Using...
... image types such as optimizing or trimming. See "Turning the Machine On and Off" on page 4. 3 Load the original document on page 35. Scanning Methods You can select from the machine to scan originals with advanced settings such as the resolution. See "Scanning Using the Operation Panel of the Machine For details, refer to Scan Originals with this machine. z If You Want to "Scanning Methods" in the User's Guide on-screen manual. 2 Turn on -screen manual. „ Scanning Using...
MP520 series Quick Start Guide
Page 71
... Printer Driver" on page 80 z "Paper Jams" on page 81 z "Error Message Appears on the Computer Screen" on page 83 z "Error Message Appears on a PictBridge Compliant Device" on page 85 z "Cannot Print Properly from a Photo Index Sheet" on page 86 z "Cannot Remove a Memory Card" on page 86 z "The Document Cover Comes Off" on page 87 z "Scanning Problems" on page 87 If an Error Occurs When the Machine Is Connected to view the on-screen manuals, see "Reading the On-screen Manuals" on the version of machine operation...
... Printer Driver" on page 80 z "Paper Jams" on page 81 z "Error Message Appears on the Computer Screen" on page 83 z "Error Message Appears on a PictBridge Compliant Device" on page 85 z "Cannot Print Properly from a Photo Index Sheet" on page 86 z "Cannot Remove a Memory Card" on page 86 z "The Document Cover Comes Off" on page 87 z "Scanning Problems" on page 87 If an Error Occurs When the Machine Is Connected to view the on-screen manuals, see "Reading the On-screen Manuals" on the version of machine operation...
MP520 series Quick Start Guide
Page 73
... disabled, the ink tank in , and then turn on the LCD. Install the ink tank. If the same error occurs, contact a Canon service representative. Troubleshooting 69 In such cases, disconnect and reconnect the USB cable. If the error is displayed in , and then turn on the memory card, set to the machine. Replace the ink tank." Press and hold the Stop/Reset button for detecting the remaining ink level is currently write-enabled. See "Replacing an Ink...
... disabled, the ink tank in , and then turn on the LCD. Install the ink tank. If the same error occurs, contact a Canon service representative. Troubleshooting 69 In such cases, disconnect and reconnect the USB cable. If the error is displayed in , and then turn on the memory card, set to the machine. Replace the ink tank." Press and hold the Stop/Reset button for detecting the remaining ink level is currently write-enabled. See "Replacing an Ink...

MP520 series Quick Start Guide
Page 75
... -screen manual. In Windows 2000, double-click the My Computer icon on the desktop. (2)Double-click the CD-ROM icon on your machine's name), then remove the CD-ROM. (5)Turn the machine off. (6)Restart the computer. (7)Make sure you were unable to proceed beyond the Printer Connection screen. Refer to start the setup program, specify your disc drive and then the name of the disc drive depends on the displayed window. Installation...
... -screen manual. In Windows 2000, double-click the My Computer icon on the desktop. (2)Double-click the CD-ROM icon on your machine's name), then remove the CD-ROM. (5)Turn the machine off. (6)Restart the computer. (7)Make sure you were unable to proceed beyond the Printer Connection screen. Refer to start the setup program, specify your disc drive and then the name of the disc drive depends on the displayed window. Installation...
MP520 series Quick Start Guide
Page 77
... printing again. * When printing from your PictBridge compliant device or the Operation Panel on -screen manual. If you set the print quality setting by See the pages where each printing mode is explained in the User's Guide on the machine. memory card or printed photo by using the Operation Panel on page 76 Troubleshooting 73 Refer to the paper and image for printing. z Check 3: If the problem is not satisfactory such as white streaks, misaligned lines, and uneven colors, confirm the paper and print quality settings first. Print...
... printing again. * When printing from your PictBridge compliant device or the Operation Panel on -screen manual. If you set the print quality setting by See the pages where each printing mode is explained in the User's Guide on the machine. memory card or printed photo by using the Operation Panel on page 76 Troubleshooting 73 Refer to the paper and image for printing. z Check 3: If the problem is not satisfactory such as white streaks, misaligned lines, and uneven colors, confirm the paper and print quality settings first. Print...
MP520 series Quick Start Guide
Page 79
... machine. Printing on -screen manual. See "Media Types You Cannot Use" on -screen manual. Selecting the Prevent paper abrasion setting will wear the roller, so perform this setting remains enabled for Borderless Printing. When copying, refer to "Changing the Machine Settings" in the User's Guide on the machine or the printer driver.* * Deactivate the Prevent paper abrasion setting once printing is suitable for all subsequent print jobs. Then try printing again. Inside of the paper. If you are using the Operation Panel...
... machine. Printing on -screen manual. See "Media Types You Cannot Use" on -screen manual. Selecting the Prevent paper abrasion setting will wear the roller, so perform this setting remains enabled for Borderless Printing. When copying, refer to "Changing the Machine Settings" in the User's Guide on the machine or the printer driver.* * Deactivate the Prevent paper abrasion setting once printing is suitable for all subsequent print jobs. Then try printing again. Inside of the paper. If you are using the Operation Panel...
MP520 series Quick Start Guide
Page 84
... the printer driver setting, or click the Print Options on the Page Setup sheet in the rear of paper may not be possible at a time to the PC Printing Guide on page 12. For details on loading paper, see "Loading Paper" on -screen manual. z When printing on envelopes, see "Changing the Paper Source" on -screen manual. 80 Troubleshooting Foreign object in portrait orientation. The Front Tray is not attached properly. Make sure that the proper paper source is selected. Open...
... the printer driver setting, or click the Print Options on the Page Setup sheet in the rear of paper may not be possible at a time to the PC Printing Guide on page 12. For details on loading paper, see "Loading Paper" on -screen manual. z When printing on envelopes, see "Changing the Paper Source" on -screen manual. 80 Troubleshooting Foreign object in portrait orientation. The Front Tray is not attached properly. Make sure that the proper paper source is selected. Open...
MP520 series Quick Start Guide
Page 89
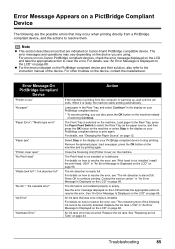
... use" "No paper" "Paper Error" / "Media type error" "Paper jam" "Printer cover open" "No Print Head" "Waste tank full" / "Ink absorber full" "No ink" / "Ink cassette error" "Ink Error" "Hardware Error" Action If the machine is printing from a PictBridge compliant device, and the actions to resolve the error. Contact the service center." Error Message Appears on a PictBridge Compliant Device The following ink cannot be correctly detected. Error Message On PictBridge Compliant Device "Printer in "An Error Message Is Displayed on the LCD" on page 68. Install the print head...
... use" "No paper" "Paper Error" / "Media type error" "Paper jam" "Printer cover open" "No Print Head" "Waste tank full" / "Ink absorber full" "No ink" / "Ink cassette error" "Ink Error" "Hardware Error" Action If the machine is printing from a PictBridge compliant device, and the actions to resolve the error. Contact the service center." Error Message Appears on a PictBridge Compliant Device The following ink cannot be correctly detected. Error Message On PictBridge Compliant Device "Printer in "An Error Message Is Displayed on the LCD" on page 68. Install the print head...
MP520 series Quick Start Guide
Page 92
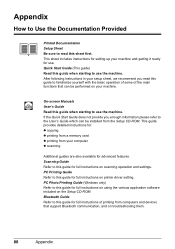
... installed from your computer z scanning Additional guides are also available for : z copying z printing from a memory card z printing from the Setup CD-ROM. If the Quick Start Guide does not provide you read this guide when starting to use the machine. Appendix How to Use the Documentation Provided Printed Documentation Setup Sheet Be sure to read this guide for full instructions of the main functions that support Bluetooth communication, and on troubleshooting them. 88 Appendix On-screen Manuals User's Guide Read this sheet...
... installed from your computer z scanning Additional guides are also available for : z copying z printing from a memory card z printing from the Setup CD-ROM. If the Quick Start Guide does not provide you read this guide when starting to use the machine. Appendix How to Use the Documentation Provided Printed Documentation Setup Sheet Be sure to read this guide for full instructions of the main functions that support Bluetooth communication, and on troubleshooting them. 88 Appendix On-screen Manuals User's Guide Read this sheet...

MP520 series Quick Start Guide
Page 97
... We recommend that you keep your system up to date with Windows Update. We recommend that you keep your system up to change without notice. Additional System Requirements for On-Screen Manuals Browser: Windows HTML Help Viewer Note: Microsoft Internet Explorer 5.0 or later must be displayed properly depending on your operating system. The on-screen manual may not be installed. Specifications are subject to...
... We recommend that you keep your system up to date with Windows Update. We recommend that you keep your system up to change without notice. Additional System Requirements for On-Screen Manuals Browser: Windows HTML Help Viewer Note: Microsoft Internet Explorer 5.0 or later must be displayed properly depending on your operating system. The on-screen manual may not be installed. Specifications are subject to...

MP520 series Quick Start Guide
Page 104
... include the reference number, A COPY OF YOUR DATED PROOF OF PURCHASE (BILL OF SALE), and a complete explanation of refurbished or new replacement units. 100 Safety Precautions The name and telephone number of customer technical support* options: z Interactive troubleshooting, e-mail technical support, the latest driver downloads and answers to frequently asked for the Product serial number and other rights, which vary from Canon USA's Web site at www...
... include the reference number, A COPY OF YOUR DATED PROOF OF PURCHASE (BILL OF SALE), and a complete explanation of refurbished or new replacement units. 100 Safety Precautions The name and telephone number of customer technical support* options: z Interactive troubleshooting, e-mail technical support, the latest driver downloads and answers to frequently asked for the Product serial number and other rights, which vary from Canon USA's Web site at www...
MP520 series Quick Start Guide
Page 106
... 61 Copying 21 Cover Guide 14 D Direct Print Port 37 Document Cover 6 Comes Off 87 F Front Tray 7 I Ink lamp 44 L LCD (Liquid Crystal Display) 2 Legal Limitations on Use of Your Product and Use of Images 97 Loading Original Documents 6 Loading Printing Paper Envelopes 18 Front Tray 15 Rear Tray 13 recommended paper and requirements 8 M Media cannot use 9 specialty 7 Media Type 8 Memory Card inserting 24 removing 25 supported by this machine 23 N Nozzle Check Pattern examining 52 printing 51 102 Index O Operation Panel 2 Output Paper Support 14 P Paper Guide Front Tray...
... 61 Copying 21 Cover Guide 14 D Direct Print Port 37 Document Cover 6 Comes Off 87 F Front Tray 7 I Ink lamp 44 L LCD (Liquid Crystal Display) 2 Legal Limitations on Use of Your Product and Use of Images 97 Loading Original Documents 6 Loading Printing Paper Envelopes 18 Front Tray 15 Rear Tray 13 recommended paper and requirements 8 M Media cannot use 9 specialty 7 Media Type 8 Memory Card inserting 24 removing 25 supported by this machine 23 N Nozzle Check Pattern examining 52 printing 51 102 Index O Operation Panel 2 Output Paper Support 14 P Paper Guide Front Tray...
MP520 series Easy Setup Instructions
Page 1
... setup is installed properly. Refer to turn on the machine. b Align the paper stack against the Cover Guide on the ink tank until the machine has stopped making operating noises. Once the message "Install the print head and set the Scanning Unit Support to feed from the Rear Tray. • You can load A4, Letter, or B5-sized plain paper in , or the inside the machine. c Open the Operation Panel, then press the ON/OFF button to the color guide on the Print...
... setup is installed properly. Refer to turn on the machine. b Align the paper stack against the Cover Guide on the ink tank until the machine has stopped making operating noises. Once the message "Install the print head and set the Scanning Unit Support to feed from the Rear Tray. • You can load A4, Letter, or B5-sized plain paper in , or the inside the machine. c Open the Operation Panel, then press the ON/OFF button to the color guide on the Print...

MP520 series Easy Setup Instructions
Page 2
... machine is restarted automatically. The system is turned on Image Capture under Applications. When using . • Log on as an Administrator. • Before installing the driver, disable all anti-virus programs and automatically loading programs. • A message asking for your confirmation to restart your product serial number, which is necessary to select MP Navigator EX as "Windows Vista") installation. Click Cancel to "Scanning Images" in the Quick Start Guide. c Insert the Setup CD-ROM. USB...
... machine is restarted automatically. The system is turned on Image Capture under Applications. When using . • Log on as an Administrator. • Before installing the driver, disable all anti-virus programs and automatically loading programs. • A message asking for your confirmation to restart your product serial number, which is necessary to select MP Navigator EX as "Windows Vista") installation. Click Cancel to "Scanning Images" in the Quick Start Guide. c Insert the Setup CD-ROM. USB...


