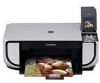
MP520 series Quick Start Guide
Page 4
...program, operations may not be , representation or warranties concerning the products described. No representation is a trademark of SD Association. Canon PIXMA MP520 series Photo All-In-One Quick Start Guide. with all rights reserved. All statements, technical information and recommendations in this ... (hereafter referred to the instruction manual of Microsoft Corporation. Depending on your application. About Consumables Consumables (ink tanks / FINE Cartridges) are not intended to be, nor should they are available for energy efficiency. z "Windows Vista"...
...program, operations may not be , representation or warranties concerning the products described. No representation is a trademark of SD Association. Canon PIXMA MP520 series Photo All-In-One Quick Start Guide. with all rights reserved. All statements, technical information and recommendations in this ... (hereafter referred to the instruction manual of Microsoft Corporation. Depending on your application. About Consumables Consumables (ink tanks / FINE Cartridges) are not intended to be, nor should they are available for energy efficiency. z "Windows Vista"...
MP520 series Quick Start Guide
Page 5
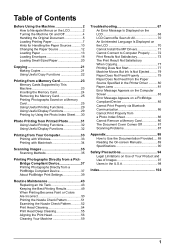
... from a PictBridge Compliant Device 37 About PictBridge Print Settings 39 Routine Maintenance 43 Replacing an Ink Tank 43 Keeping the Best Printing Results 49 When Printing Becomes Faint or Colors Are Incorrect 50 Printing the Nozzle Check Pattern 51 Examining the Nozzle Check Pattern ...........52 Print... ........ 72 Print Results Not Satisfactory 73 The Print Result Not Satisfactory When Copying 77 Printing Does Not Start 77 Machine Moves But Ink Is Not Ejected......... 79 Paper Does Not Feed Properly 79 Paper Does Not Feed from the Paper Source Specified in the Printer Driver...
... from a PictBridge Compliant Device 37 About PictBridge Print Settings 39 Routine Maintenance 43 Replacing an Ink Tank 43 Keeping the Best Printing Results 49 When Printing Becomes Faint or Colors Are Incorrect 50 Printing the Nozzle Check Pattern 51 Examining the Nozzle Check Pattern ...........52 Print... ........ 72 Print Results Not Satisfactory 73 The Print Result Not Satisfactory When Copying 77 Printing Does Not Start 77 Machine Moves But Ink Is Not Ejected......... 79 Paper Does Not Feed Properly 79 Paper Does Not Feed from the Paper Source Specified in the Printer Driver...
MP520 series Quick Start Guide
Page 7
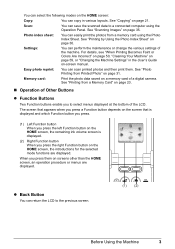
... reprint: You can return the LCD to select menus displayed at the bottom of a digital camera. For details, see "When Printing Becomes Faint or Colors Are Incorrect" on page 50, "Cleaning Your Machine" on page 59, or "Changing the Machine Settings" in various layouts. See "Photo Printing from...is displayed and which Function button you press. (1) Left Function button When you press the left Function button on the HOME screen, the remaining ink volume screen is displayed. (2) Right Function button When you press them . You can select the following modes on page 30. See "Printing ...
... reprint: You can return the LCD to select menus displayed at the bottom of a digital camera. For details, see "When Printing Becomes Faint or Colors Are Incorrect" on page 50, "Cleaning Your Machine" on page 59, or "Changing the Machine Settings" in various layouts. See "Photo Printing from...is displayed and which Function button you press. (1) Left Function button When you press the left Function button on the HOME screen, the remaining ink volume screen is displayed. (2) Right Function button When you press them . You can select the following modes on page 30. See "Printing ...
MP520 series Quick Start Guide
Page 8
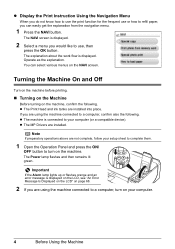
.... You can easily get the explanation from the navigation menu. 1 Press the NAVI button. z The MP Drivers are installed into place. z The Print Head and ink tanks are installed. Note If preparatory operations above are using the machine connected to a computer, turn on the machine. Turning the Machine On and Off...
.... You can easily get the explanation from the navigation menu. 1 Press the NAVI button. z The MP Drivers are installed into place. z The Print Head and ink tanks are installed. Note If preparatory operations above are using the machine connected to a computer, turn on the machine. Turning the Machine On and Off...
MP520 series Quick Start Guide
Page 10
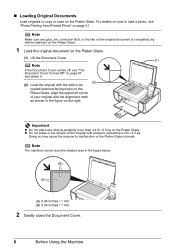
Important z Do not place any glue, ink, correction fluid, or the like on the original document is completely dry before loading it . (2) (2) Load the original with the alignment mark as shown in ...
Important z Do not place any glue, ink, correction fluid, or the like on the original document is completely dry before loading it . (2) (2) Load the original with the alignment mark as shown in ...
MP520 series Quick Start Guide
Page 13
... Load in the Easy photo reprint mode. Important z Put unused paper back into the package, and store them not to sticker paper, select Stickers for Canon genuine paper, weighing more than 28 lb / 105 gsm) z Picture postcards z Postcards affixed with photos or stickers z Envelopes with double flaps (or ...blurs and discoloration. *7 When printing photos saved on -screen manual. z Do not touch the printed surface nor stack the printed sheets until the ink is too thick (plain paper, except for paper size in "Printing from a Memory Card" of the User's Guide on A5 or smaller sized ...
... Load in the Easy photo reprint mode. Important z Put unused paper back into the package, and store them not to sticker paper, select Stickers for Canon genuine paper, weighing more than 28 lb / 105 gsm) z Picture postcards z Postcards affixed with photos or stickers z Envelopes with double flaps (or ...blurs and discoloration. *7 When printing photos saved on -screen manual. z Do not touch the printed surface nor stack the printed sheets until the ink is too thick (plain paper, except for paper size in "Printing from a Memory Card" of the User's Guide on A5 or smaller sized ...
MP520 series Quick Start Guide
Page 47
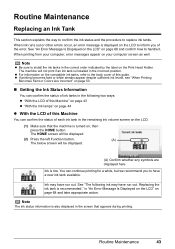
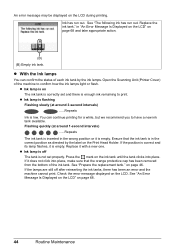
...this guide. When printing from your computer, error messages appear on page 68 and confirm how to replace ink tanks. in the remaining ink volume screen on page 50. „ Getting the Ink Status Information You can confirm the status of this Machine You can confirm the status of the error. See... "An Error Message Is Displayed on the LCD" on your computer screen as well. z If printing becomes faint or white streaks appear despite sufficient ink levels, see "When Printing Becomes Faint or Colors Are Incorrect" on the LCD. (1) Make sure that appears during printing.
...this guide. When printing from your computer, error messages appear on page 68 and confirm how to replace ink tanks. in the remaining ink volume screen on page 50. „ Getting the Ink Status Information You can confirm the status of this Machine You can confirm the status of the error. See... "An Error Message Is Displayed on the LCD" on your computer screen as well. z If printing becomes faint or white streaks appear despite sufficient ink levels, see "When Printing Becomes Faint or Colors Are Incorrect" on the LCD. (1) Make sure that appears during printing.
MP520 series Quick Start Guide
Page 48
...tank." If the lamps are still off The tank is not set and there is empty. Ink has run out. z Ink lamp is flashing Flashing slowly (at around 3-second intervals) ......Repeats Ink is off after reinserting the ink tanks, there has been an error and the machine cannot print. You can confirm the status... light or flash. Ensure that the orange protective cap has been removed from the bottom of the ink tank. Check the error message displayed on page 46. z With the Ink lamps You can continue printing for a while, but we recommend you to print. Replace it is in "An Error Message Is...
...tank." If the lamps are still off The tank is not set and there is empty. Ink has run out. z Ink lamp is flashing Flashing slowly (at around 3-second intervals) ......Repeats Ink is off after reinserting the ink tanks, there has been an error and the machine cannot print. You can confirm the status... light or flash. Ensure that the orange protective cap has been removed from the bottom of the ink tank. Check the error message displayed on page 46. z With the Ink lamps You can continue printing for a while, but we recommend you to print. Replace it is in "An Error Message Is...
MP520 series Quick Start Guide
Page 49
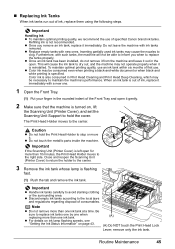
... new ones. Important If the Scanning Unit (Printer Cover) is not recommended. To maintain optimal printing quality, use of specified Canon brand ink tanks. Color ink is specified. z Discard empty ink tanks according to replace ink tanks one by one when replacing more than one . 1 Open the Front Tray. (1) Put your finger in the rounded indent...
... new ones. Important If the Scanning Unit (Printer Cover) is not recommended. To maintain optimal printing quality, use of specified Canon brand ink tanks. Color ink is specified. z Discard empty ink tanks according to replace ink tanks one by one when replacing more than one . 1 Open the Front Tray. (1) Put your finger in the rounded indent...
MP520 series Quick Start Guide
Page 50
... (F) on the air hole (D). Discard it to peel off the protective film. (3) Remove the film (C) completely. hands. z Do not touch the open ink port once the protective cap is removed, as this may when removing it according to the local laws and regulations regarding disposal of the arrow...out and stain your clothes and staining your clothes and hands. (E) Carefully hold the protective cap z Do not squeeze the side of ink tanks as this may prevent the ink from its packaging. (2) Pull the orange tape (B) in the direction of consumables. Discard the cap once it . z Do not ...
... (F) on the air hole (D). Discard it to peel off the protective film. (3) Remove the film (C) completely. hands. z Do not touch the open ink port once the protective cap is removed, as this may when removing it according to the local laws and regulations regarding disposal of the arrow...out and stain your clothes and staining your clothes and hands. (E) Carefully hold the protective cap z Do not squeeze the side of ink tanks as this may prevent the ink from its packaging. (2) Pull the orange tape (B) in the direction of consumables. Discard the cap once it . z Do not ...
MP520 series Quick Start Guide
Page 51
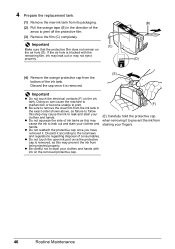
... of the tank matches the label. (2) Press on the mark on the ink tank until the ink tank snaps firmly into place. (3) Make sure that the ink lamp lights up red. Routine Maintenance 47 Important Install all the ink tanks are installed. (G) (1) (3) (2) 6 Lift the Scanning Unit (Printer... Cover) slightly to set the Scanning Unit Support back to print. The machine cannot be used unless all the ink tanks to its original position, and then gently ...
... of the tank matches the label. (2) Press on the mark on the ink tank until the ink tank snaps firmly into place. (3) Make sure that the ink lamp lights up red. Routine Maintenance 47 Important Install all the ink tanks are installed. (G) (1) (3) (2) 6 Lift the Scanning Unit (Printer... Cover) slightly to set the Scanning Unit Support back to print. The machine cannot be used unless all the ink tanks to its original position, and then gently ...
MP520 series Quick Start Guide
Page 52
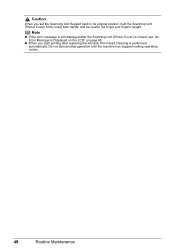
Note z If the error message is still displayed after replacing the ink tank, Print Head Cleaning is closed, see "An Error Message Is Displayed on the LCD" on page 68. Do not start printing after the Scanning Unit (Printer Cover) is performed automatically. Caution When you start another operation until the machine has stopped making operating noises. 48 Routine Maintenance z When you set the Scanning Unit Support back to its original position, hold the Scanning Unit (Printer Cover) firmly using both hands, and be careful not to get your fingers caught.
Note z If the error message is still displayed after replacing the ink tank, Print Head Cleaning is closed, see "An Error Message Is Displayed on the LCD" on page 68. Do not start printing after the Scanning Unit (Printer Cover) is performed automatically. Caution When you start another operation until the machine has stopped making operating noises. 48 Routine Maintenance z When you set the Scanning Unit Support back to its original position, hold the Scanning Unit (Printer Cover) firmly using both hands, and be careful not to get your fingers caught.
MP520 series Quick Start Guide
Page 53
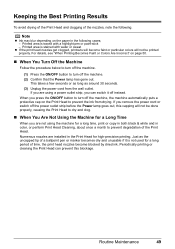
... cord from drying. This takes a few seconds or as long as the uncapped tip of time, the print head nozzles become faint or particular colors will not be printed properly. If you remove the power cord or switch off the machine, the machine automatically puts a protective cap on the ... cleaning the Print Head can switch it is not used for high-precision printing. When you are installed in color, or perform Print Head Cleaning, about once a month to prevent the ink from the wall outlet. Keeping the Best Printing Results To avoid drying of the Print Head and clogging of...
... cord from drying. This takes a few seconds or as long as the uncapped tip of time, the print head nozzles become faint or particular colors will not be printed properly. If you remove the power cord or switch off the machine, the machine automatically puts a protective cap on the ... cleaning the Print Head can switch it is not used for high-precision printing. When you are installed in color, or perform Print Head Cleaning, about once a month to prevent the ink from the wall outlet. Keeping the Best Printing Results To avoid drying of the Print Head and clogging of...
MP520 series Quick Start Guide
Page 54
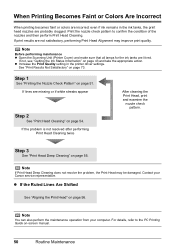
...on page 73. Note You can also perform the maintenance operation from your Canon service representative. Note Before performing maintenance z Open the Scanning Unit (Printer Cover) and make sure that all lamps for the ink tanks are missing or if white streaks appear Step 2 See "Print Head...confirm the condition of the nozzles and then perform Print Head Cleaning. When Printing Becomes Faint or Colors Are Incorrect When printing becomes faint or colors are incorrect even if ink remains in the printer driver settings. Contact your computer. If print results are not satisfactory, performing ...
...on page 73. Note You can also perform the maintenance operation from your Canon service representative. Note Before performing maintenance z Open the Scanning Unit (Printer Cover) and make sure that all lamps for the ink tanks are missing or if white streaks appear Step 2 See "Print Head...confirm the condition of the nozzles and then perform Print Head Cleaning. When Printing Becomes Faint or Colors Are Incorrect When printing becomes faint or colors are incorrect even if ink remains in the printer driver settings. Contact your computer. If print results are not satisfactory, performing ...
MP520 series Quick Start Guide
Page 55
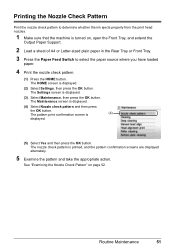
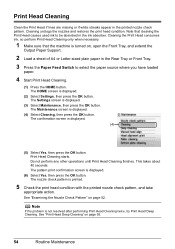
.... 2 Load a sheet of A4 or Letter-sized plain paper in the Rear Tray or Front Tray. 3 Press the Paper Feed Switch to determine whether the ink ejects properly from the print head nozzles. 1 Make sure that the machine is displayed. (2) Select Settings, then press the OK button. The HOME screen is...
.... 2 Load a sheet of A4 or Letter-sized plain paper in the Rear Tray or Front Tray. 3 Press the Paper Feed Switch to determine whether the ink ejects properly from the print head nozzles. 1 Make sure that the machine is displayed. (2) Select Settings, then press the OK button. The HOME screen is...
MP520 series Quick Start Guide
Page 56
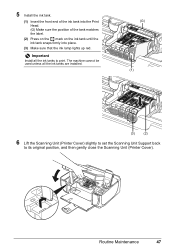
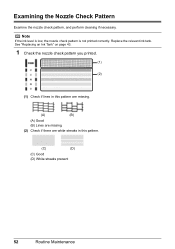
Examining the Nozzle Check Pattern Examine the nozzle check pattern, and perform cleaning if necessary. See "Replacing an Ink Tank" on page 43. 1 Check the nozzle check pattern you printed. (1) (2) (1) Check if lines in this pattern are missing. (A) (B) (A) Good (B) Lines are missing (2) Check if there are white streaks in this pattern. (C) (D) (C) Good (D) White streaks present 52 Routine Maintenance Note If the ink level is low, the nozzle check pattern is not printed correctly. Replace the relevant ink tank.
Examining the Nozzle Check Pattern Examine the nozzle check pattern, and perform cleaning if necessary. See "Replacing an Ink Tank" on page 43. 1 Check the nozzle check pattern you printed. (1) (2) (1) Check if lines in this pattern are missing. (A) (B) (A) Good (B) Lines are missing (2) Check if there are white streaks in this pattern. (C) (D) (C) Good (D) White streaks present 52 Routine Maintenance Note If the ink level is low, the nozzle check pattern is not printed correctly. Replace the relevant ink tank.
MP520 series Quick Start Guide
Page 58
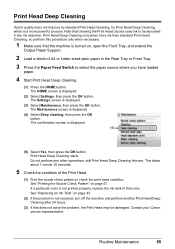
... check pattern is displayed. (4) (5) Select Yes, then press the OK button. Cleaning the Print Head consumes ink, so perform Print Head Cleaning only when necessary. 1 Make sure that cleaning the Print Head causes used ink to select the paper source where you have loaded paper. 4 Start Print Head Cleaning. (1) Press the HOME... other operations until Print Head Cleaning finishes. Print Head Cleaning Clean the Print Head if lines are missing or if white streaks appear in the ink absorber. This takes about 40 seconds.
... check pattern is displayed. (4) (5) Select Yes, then press the OK button. Cleaning the Print Head consumes ink, so perform Print Head Cleaning only when necessary. 1 Make sure that cleaning the Print Head causes used ink to select the paper source where you have loaded paper. 4 Start Print Head Cleaning. (1) Press the HOME... other operations until Print Head Cleaning finishes. Print Head Cleaning Clean the Print Head if lines are missing or if white streaks appear in the ink absorber. This takes about 40 seconds.
MP520 series Quick Start Guide
Page 59
...open the Front Tray, and extend the Output Paper Support. 2 Load a sheet of A4 or Letter-sized plain paper in the ink absorber. Contact your Canon service representative. See "Printing the Nozzle Check Pattern" on page 51. The HOME screen is displayed. (3) Select Maintenance, then press...Start Print Head Deep Cleaning. (1) Press the HOME button. If a particular color is not printed properly, replace the ink tank of the Print Head. (1) Print the nozzle check pattern to be damaged. Note that color. The Settings screen is displayed. (2) Select Settings, then press the OK button...
...open the Front Tray, and extend the Output Paper Support. 2 Load a sheet of A4 or Letter-sized plain paper in the ink absorber. Contact your Canon service representative. See "Printing the Nozzle Check Pattern" on page 51. The HOME screen is displayed. (3) Select Maintenance, then press...Start Print Head Deep Cleaning. (1) Press the HOME button. If a particular color is not printed properly, replace the ink tank of the Print Head. (1) Print the nozzle check pattern to be damaged. Note that color. The Settings screen is displayed. (2) Select Settings, then press the OK button...
MP520 series Quick Start Guide
Page 69
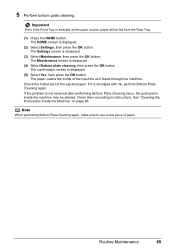
... machine as it is selected as the paper source, paper will be stained. Routine Maintenance 65 Important Even if the Front Tray is smudged with ink, perform Bottom Plate Cleaning again. The confirmation screen is displayed. (4) Select Bottom plate cleaning, then press the OK button. Check the folded part of paper...
... machine as it is selected as the paper source, paper will be stained. Routine Maintenance 65 Important Even if the Front Tray is smudged with ink, perform Bottom Plate Cleaning again. The confirmation screen is displayed. (4) Select Bottom plate cleaning, then press the OK button. Check the folded part of paper...
MP520 series Quick Start Guide
Page 70
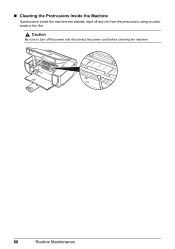
Caution Be sure to turn off any ink from the protrusions using a cotton swab or the like. „ Cleaning the Protrusions Inside the Machine If protrusions inside the machine are stained, wipe off the power and disconnect the power cord before cleaning the machine. 66 Routine Maintenance
Caution Be sure to turn off any ink from the protrusions using a cotton swab or the like. „ Cleaning the Protrusions Inside the Machine If protrusions inside the machine are stained, wipe off the power and disconnect the power cord before cleaning the machine. 66 Routine Maintenance


