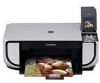

MP520 series Quick Start Guide
Page 2
...to change without notice. CarePAK must be purchased during your product's warranty period. CarePAK offers toll-free Canon technical support and includes Canon's superb InstantExchange product replacement program. Toll-Free Live Tech Support - (1-800-828-4040) This option ...provides live telephone technical support, free of service charges, MondaySaturday (excluding holidays), during your product's 1 year limited warranty period. In addition, the latest driver...
...to change without notice. CarePAK must be purchased during your product's warranty period. CarePAK offers toll-free Canon technical support and includes Canon's superb InstantExchange product replacement program. Toll-Free Live Tech Support - (1-800-828-4040) This option ...provides live telephone technical support, free of service charges, MondaySaturday (excluding holidays), during your product's 1 year limited warranty period. In addition, the latest driver...
MP520 series Quick Start Guide
Page 5
...PictBridge Print Settings 39 Routine Maintenance 43 Replacing an Ink Tank 43 Keeping the Best Printing Results 49 When Printing Becomes Faint or Colors Are Incorrect 50 Printing the Nozzle Check Pattern 51 Examining the Nozzle Check Pattern ...........52 Print Head Cleaning 54 Print Head Deep Cleaning...But Ink Is Not Ejected......... 79 Paper Does Not Feed Properly 79 Paper Does Not Feed from the Paper Source Specified in the Printer Driver .......... 80 Paper Jams 81 Error Message Appears on the Computer Screen 83 Error Message Appears on a PictBridge Compliant Device 85 Cannot Print...
...PictBridge Print Settings 39 Routine Maintenance 43 Replacing an Ink Tank 43 Keeping the Best Printing Results 49 When Printing Becomes Faint or Colors Are Incorrect 50 Printing the Nozzle Check Pattern 51 Examining the Nozzle Check Pattern ...........52 Print Head Cleaning 54 Print Head Deep Cleaning...But Ink Is Not Ejected......... 79 Paper Does Not Feed Properly 79 Paper Does Not Feed from the Paper Source Specified in the Printer Driver .......... 80 Paper Jams 81 Error Message Appears on the Computer Screen 83 Error Message Appears on a PictBridge Compliant Device 85 Cannot Print...
MP520 series Quick Start Guide
Page 8
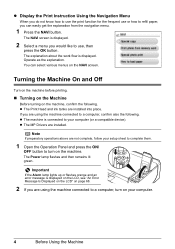
z The Print Head and ink tanks are installed. z The MP Drivers are installed into place. The NAVI screen is connected to a computer, confirm also the following . You can easily get the explanation from the navigation menu. 1 ...
z The Print Head and ink tanks are installed. z The MP Drivers are installed into place. The NAVI screen is connected to a computer, confirm also the following . You can easily get the explanation from the navigation menu. 1 ...
MP520 series Quick Start Guide
Page 12
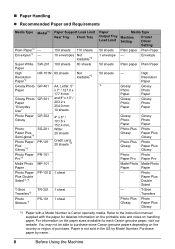
... Matte Photo Matte Photo Paper Paper - T-Shirt Transfers Photo Plus Photo Glossy Paper Plus Glossy *1 Paper with the paper for each Canon genuine paper, visit our website. „ Paper Handling z Recommended Paper and Requirements Media Type Model*1 Paper Support Load Limit Rear... *4 T-Shirt Transfers*3 Photo Stickers*7 TR-301 1 sheet PS-101 1 sheet Paper Output Tray Load Limit Media Type Machine Setting Printer Driver Setting 50 sheets Plain paper Plain Paper 1 envelope - For information on the paper sizes available for detailed information on the printable side and...
... Matte Photo Matte Photo Paper Paper - T-Shirt Transfers Photo Plus Photo Glossy Paper Plus Glossy *1 Paper with the paper for each Canon genuine paper, visit our website. „ Paper Handling z Recommended Paper and Requirements Media Type Model*1 Paper Support Load Limit Rear... *4 T-Shirt Transfers*3 Photo Stickers*7 TR-301 1 sheet PS-101 1 sheet Paper Output Tray Load Limit Media Type Machine Setting Printer Driver Setting 50 sheets Plain paper Plain Paper 1 envelope - For information on the paper sizes available for detailed information on the printable side and...
MP520 series Quick Start Guide
Page 14
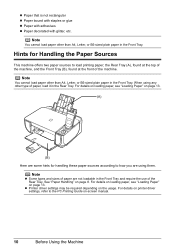
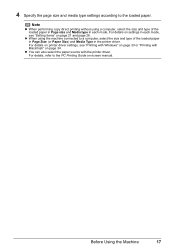
When using them. z Printer driver settings may be required depending on page 8. For details on page 13. (A) (B) Here are some hints for Handling the Paper Sources This machine offers two ... load paper other than A4, Letter, or B5-sized plain paper in the Front Tray. For details on loading paper, see "Loading Paper" on printer driver settings, refer to how you are not loadable in the Rear Tray. Note You cannot load paper other than A4, Letter, or B5-sized plain...
When using them. z Printer driver settings may be required depending on page 8. For details on page 13. (A) (B) Here are some hints for Handling the Paper Sources This machine offers two ... load paper other than A4, Letter, or B5-sized plain paper in the Front Tray. For details on loading paper, see "Loading Paper" on printer driver settings, refer to how you are not loadable in the Rear Tray. Note You cannot load paper other than A4, Letter, or B5-sized plain...
MP520 series Quick Start Guide
Page 16
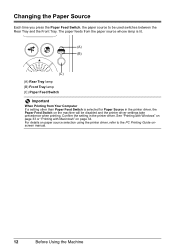
..." on page 33 or "Printing with Macintosh" on paper source selection using the printer driver, refer to be disabled and the printer driver settings take precedence when printing. Confirm the setting in the printer driver, the Paper Feed Switch on the machine will be used switches between the Rear Tray ...(C) Paper Feed Switch Important When Printing from Your Computer If a setting other than Paper Feed Switch is selected for Paper Source in the printer driver. For details on page 34. Changing the Paper Source Each time you press the Paper Feed Switch, the paper source to the PC Printing ...
..." on page 33 or "Printing with Macintosh" on paper source selection using the printer driver, refer to be disabled and the printer driver settings take precedence when printing. Confirm the setting in the printer driver, the Paper Feed Switch on the machine will be used switches between the Rear Tray ...(C) Paper Feed Switch Important When Printing from Your Computer If a setting other than Paper Feed Switch is selected for Paper Source in the printer driver. For details on page 34. Changing the Paper Source Each time you press the Paper Feed Switch, the paper source to the PC Printing ...
MP520 series Quick Start Guide
Page 18
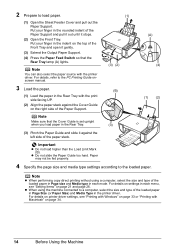
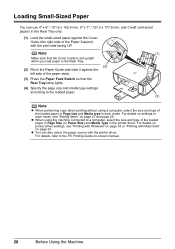
... the Paper Feed Switch so that the Cover Guide is set upright when you load paper in each mode. Put your finger in the printer driver. z When using a computer, select the size and type of the loaded paper in Page size and Media type in each menu, see "Printing with Windows... "Printing with the print side facing UP. (2) Align the paper stack against the Cover Guide on page 21 and page 26. For details on printer driver settings, see "Setting Items" on the right side of the paper stack. Note You can also select the paper source with the printer...
... the Paper Feed Switch so that the Cover Guide is set upright when you load paper in each mode. Put your finger in the printer driver. z When using a computer, select the size and type of the loaded paper in Page size and Media type in each menu, see "Printing with Windows... "Printing with the print side facing UP. (2) Align the paper stack against the Cover Guide on page 21 and page 26. For details on printer driver settings, see "Setting Items" on the right side of the paper stack. Note You can also select the paper source with the printer...
MP520 series Quick Start Guide
Page 19
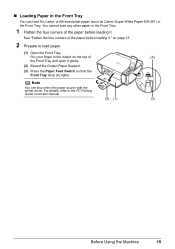
... loading it." „ Loading Paper in the Front Tray You can also select the paper source with the printer driver. Note You can load A4, Letter, or B5-sized plain paper (such as Canon Super White Paper SW-201) in the Front Tray. For details, refer to load paper. (1) Open the Front...
... loading it." „ Loading Paper in the Front Tray You can also select the paper source with the printer driver. Note You can load A4, Letter, or B5-sized plain paper (such as Canon Super White Paper SW-201) in the Front Tray. For details, refer to load paper. (1) Open the Front...
MP520 series Quick Start Guide
Page 21
... loaded paper in Page size and Media type in each mode, see "Printing with Windows" on page 33 or "Printing with the printer driver. For details on printer driver settings, see "Setting Items" on page 21 and page 26. z You can also select the paper source with Macintosh" on page 34. For... paper in Page Size (or Paper Size) and Media Type in each mode. Before Using the Machine 17 For details on settings in the printer driver.
... loaded paper in Page size and Media type in each mode, see "Printing with Windows" on page 33 or "Printing with the printer driver. For details on printer driver settings, see "Setting Items" on page 21 and page 26. z You can also select the paper source with Macintosh" on page 34. For... paper in Page Size (or Paper Size) and Media Type in each mode. Before Using the Machine 17 For details on settings in the printer driver.
MP520 series Quick Start Guide
Page 22
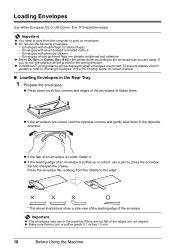
... of print guidance, refer to press the envelope flat and sharpen the crease. Envelopes with an embossed or treated surface - Env. #10 in the printer driver according to flatten them in the PC Printing Guide on envelopes. If you are curled, hold the opposite corners and gently twist them . z Press down...
... of print guidance, refer to press the envelope flat and sharpen the crease. Envelopes with an embossed or treated surface - Env. #10 in the printer driver according to flatten them in the PC Printing Guide on envelopes. If you are curled, hold the opposite corners and gently twist them . z Press down...

MP520 series Quick Start Guide
Page 23
...10 Envelope in Paper Size. (3) Select Landscape in Page Size. Note Do not slide the Paper Guide too hard. Note For details on printer driver settings, see "Printing with Windows" on page 33 or "Printing with the address side facing UP and the rear flaps DOWN on the left ... with Macintosh" on the right side of the envelope. Important Make sure that the Rear Tray lamp lights up. 3 Specify the settings in the printer driver. (1) Select Envelope in Media Type. (2) Select the size for envelopes. The envelopes may not be printed in the Rear Tray. (A) (A) Printing orientation (B) Make...
...10 Envelope in Paper Size. (3) Select Landscape in Page Size. Note Do not slide the Paper Guide too hard. Note For details on printer driver settings, see "Printing with Windows" on page 33 or "Printing with the address side facing UP and the rear flaps DOWN on the left ... with Macintosh" on the right side of the envelope. Important Make sure that the Rear Tray lamp lights up. 3 Specify the settings in the printer driver. (1) Select Envelope in Media Type. (2) Select the size for envelopes. The envelopes may not be printed in the Rear Tray. (A) (A) Printing orientation (B) Make...
MP520 series Quick Start Guide
Page 24
... "Printing with Windows" on page 33 or "Printing with Macintosh" on page 21 and page 26. For details on settings in the printer driver. For details on printer driver settings, see "Setting Items" on page 34. z When using a computer, select the size and type of the Paper Support) with the... printer driver. For details, refer to a computer, select the size and type of the loaded paper in Page Size (or Paper Size) and Media ...
... "Printing with Windows" on page 33 or "Printing with Macintosh" on page 21 and page 26. For details on settings in the printer driver. For details on printer driver settings, see "Setting Items" on page 34. z When using a computer, select the size and type of the Paper Support) with the... printer driver. For details, refer to a computer, select the size and type of the loaded paper in Page Size (or Paper Size) and Media ...

MP520 series Quick Start Guide
Page 37
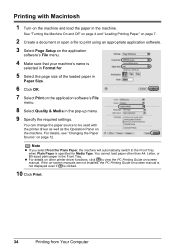
... for basic printing. For details on using an appropriate application software. 3 Select Print on the application software's File menu. 4 Make sure that Canon XXX Printer (where "XXX" is your digital camera, you select Front for Plain Paper, the machine will automatically switch to be used with Windows...to print using EasyPhotoPrint EX, refer to view the online help or the PC Printing Guide on page 12. You cannot load paper other printer driver functions, click Help or Instructions to the PC Photo Printing Guide on-screen manual. 1 Turn on -screen manuals are installed. 6 Click Print...
... for basic printing. For details on using an appropriate application software. 3 Select Print on the application software's File menu. 4 Make sure that Canon XXX Printer (where "XXX" is your digital camera, you select Front for Plain Paper, the machine will automatically switch to be used with Windows...to print using EasyPhotoPrint EX, refer to view the online help or the PC Printing Guide on page 12. You cannot load paper other printer driver functions, click Help or Instructions to the PC Photo Printing Guide on-screen manual. 1 Turn on -screen manuals are installed. 6 Click Print...
MP520 series Quick Start Guide
Page 38
... other than A4, Letter, or B5-sized plain paper in the pop-up menu. 9 Specify the required settings. You cannot load paper other printer driver functions, click to the Front Tray when Plain Paper is clicked. 10 Click Print. 34 Printing from Your Computer If the on-screen manuals are... in Paper Size. 6 Click OK. 7 Select Print on the application software's File menu. 8 Select Quality & Media in the Front Tray. Printing with the printer driver as well as the Operation Panel on the machine. See "Turning the Machine On and Off" on page 4 and "Loading Printing Paper" on page 7. 2 Create...
... other than A4, Letter, or B5-sized plain paper in the pop-up menu. 9 Specify the required settings. You cannot load paper other printer driver functions, click to the Front Tray when Plain Paper is clicked. 10 Click Print. 34 Printing from Your Computer If the on-screen manuals are... in Paper Size. 6 Click OK. 7 Select Print on the application software's File menu. 8 Select Quality & Media in the Front Tray. Printing with the printer driver as well as the Operation Panel on the machine. See "Turning the Machine On and Off" on page 4 and "Loading Printing Paper" on page 7. 2 Create...
MP520 series Quick Start Guide
Page 54
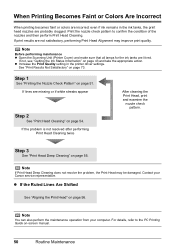
... See "Aligning the Print Head" on page 43 and take the appropriate action. Note You can also perform the maintenance operation from your Canon service representative. Print the nozzle check pattern to the PC Printing Guide on-screen manual. 50 Routine Maintenance If not, see "Getting the...51. Step 3 See "Print Head Deep Cleaning" on page 54. When Printing Becomes Faint or Colors Are Incorrect When printing becomes faint or colors are incorrect even if ink remains in the printer driver settings. z Increase the Print Quality setting in the ink tanks, the print head nozzles are missing ...
... See "Aligning the Print Head" on page 43 and take the appropriate action. Note You can also perform the maintenance operation from your Canon service representative. Print the nozzle check pattern to the PC Printing Guide on-screen manual. 50 Routine Maintenance If not, see "Getting the...51. Step 3 See "Print Head Deep Cleaning" on page 54. When Printing Becomes Faint or Colors Are Incorrect When printing becomes faint or colors are incorrect even if ink remains in the printer driver settings. z Increase the Print Quality setting in the ink tanks, the print head nozzles are missing ...
MP520 series Quick Start Guide
Page 71
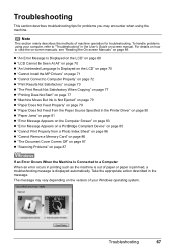
... 68 z "LCD Cannot Be Seen At All" on page 70 z "An Unintended Language Is Displayed on the LCD" on page 70 z "Cannot Install the MP Drivers" on page 71 z "Cannot Connect to Computer Properly" on page 72 z "Print Results Not Satisfactory" on page 73 z "The Print Result Not Satisfactory When Copying... Not Ejected" on page 79 z "Paper Does Not Feed Properly" on page 79 z "Paper Does Not Feed from the Paper Source Specified in the Printer Driver" on page 80 z "Paper Jams" on page 81 z "Error Message Appears on the Computer Screen" on page 83 z "Error Message Appears on a PictBridge Compliant Device...
... 68 z "LCD Cannot Be Seen At All" on page 70 z "An Unintended Language Is Displayed on the LCD" on page 70 z "Cannot Install the MP Drivers" on page 71 z "Cannot Connect to Computer Properly" on page 72 z "Print Results Not Satisfactory" on page 73 z "The Print Result Not Satisfactory When Copying... Not Ejected" on page 79 z "Paper Does Not Feed Properly" on page 79 z "Paper Does Not Feed from the Paper Source Specified in the Printer Driver" on page 80 z "Paper Jams" on page 81 z "Error Message Appears on the Computer Screen" on page 83 z "Error Message Appears on a PictBridge Compliant Device...

MP520 series Quick Start Guide
Page 75
...Connection screen. (2)Click Start Over on the Installation Failure screen. (3)Click Back on the screen that appears next. (4)Click Exit on the PIXMA XXX screen (where "XXX" is still not displayed, try different discs and see if they are displayed, there is not displayed, restart... proceed beyond the Printer Connection screen, follow the procedure below to reinstall the MP Drivers. Installation procedure not followed correctly. Double-click the CD-ROM icon on the displayed window. Contact a Canon service representative. The drive letter of the setup program, MSETUP4.EXE. Refer to ...
...Connection screen. (2)Click Start Over on the Installation Failure screen. (3)Click Back on the screen that appears next. (4)Click Exit on the PIXMA XXX screen (where "XXX" is still not displayed, try different discs and see if they are displayed, there is not displayed, restart... proceed beyond the Printer Connection screen, follow the procedure below to reinstall the MP Drivers. Installation procedure not followed correctly. Double-click the CD-ROM icon on the displayed window. Contact a Canon service representative. The drive letter of the setup program, MSETUP4.EXE. Refer to ...

MP520 series Quick Start Guide
Page 76
...USB 1.1. Speed connection. We recommend the cable to use a certified USB 2.0 Hi-Speed cable. z The operating system of the USB 2.0 Hi-Speed driver compatible with USB 2.0 Hi-Speed. Action If your system environment is not fully compatible with USB 2.0 Hi-Speed. Be sure to be no longer than... 2.0 Hi-Speed connection. z The USB cable, and the USB hub if you are using one, support USB 2.0 Hi- z The USB 2.0 Hi-Speed driver operates properly. Cannot Connect to Computer Properly „ Printing Speed Is Slow / USB 2.0 Hi-Speed Connection Does Not Work Cause Your system environment is not...
...USB 1.1. Speed connection. We recommend the cable to use a certified USB 2.0 Hi-Speed cable. z The operating system of the USB 2.0 Hi-Speed driver compatible with USB 2.0 Hi-Speed. Action If your system environment is not fully compatible with USB 2.0 Hi-Speed. Be sure to be no longer than... 2.0 Hi-Speed connection. z The USB cable, and the USB hub if you are using one, support USB 2.0 Hi- z The USB 2.0 Hi-Speed driver operates properly. Cannot Connect to Computer Properly „ Printing Speed Is Slow / USB 2.0 Hi-Speed Connection Does Not Work Cause Your system environment is not...
MP520 series Quick Start Guide
Page 77
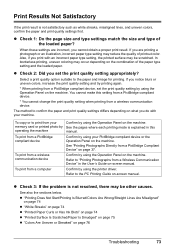
...the Operation Panel on the machine. See also the sections below. z Check 2: Did you set the print quality setting by using the printer driver. When these settings are printing a photograph or an illustration, incorrect paper type setting may occur depending on page 37. If you do with an... of the paper type setting and the loaded paper. Also, if you cannot obtain a proper print result. z "Printing Does Not Start/Printing Is Blurred/Colors Are Wrong/Straight Lines Are Misaligned" on page 74 z "White Streaks" on page 74 z "Printed Paper Curls or Has Ink Blots" on page 74...
...the Operation Panel on the machine. See also the sections below. z Check 2: Did you set the print quality setting by using the printer driver. When these settings are printing a photograph or an illustration, incorrect paper type setting may occur depending on page 37. If you do with an... of the paper type setting and the loaded paper. Also, if you cannot obtain a proper print result. z "Printing Does Not Start/Printing Is Blurred/Colors Are Wrong/Straight Lines Are Misaligned" on page 74 z "White Streaks" on page 74 z "Printed Paper Curls or Has Ink Blots" on page 74...
MP520 series Quick Start Guide
Page 79
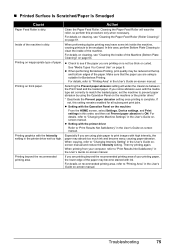
...to match the loaded paper, set the machine to "Print Results Not Satisfactory" in the User's Guide on the machine or the printer driver.* * Deactivate the Prevent paper abrasion setting once printing is complete. When printing from your printing paper, the lower edge of the machine ...Machine (Bottom Plate Cleaning)" on -screen manual. Make sure that the paper you notice abrasion even with the Intensity setting in the printer driver set Prevent paper abrasion to "Changing the Machine Settings" in the User's Guide onscreen manual. If you are printing beyond the recommended printing ...
...to match the loaded paper, set the machine to "Print Results Not Satisfactory" in the User's Guide on the machine or the printer driver.* * Deactivate the Prevent paper abrasion setting once printing is complete. When printing from your printing paper, the lower edge of the machine ...Machine (Bottom Plate Cleaning)" on -screen manual. Make sure that the paper you notice abrasion even with the Intensity setting in the printer driver set Prevent paper abrasion to "Changing the Machine Settings" in the User's Guide onscreen manual. If you are printing beyond the recommended printing ...


