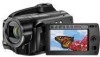
Digital Video Software (Macintosh) Ver.31 Instruction Manual
Page 2
...] Window 19 Installing the Digital Video Software 20 Before Downloading Still Images 23 Connecting the Camcorder to a Computer 23 Settings on the camcorder 23 Connecting the camcorder 24 Downloading Still Images 25 Using the Computer to Download Still Images (CameraWindow 26 Auto-...downloading 26 Applying Auto-downloading Settings 27 Downloading the Selected Still Images from the CameraWindow 30 Using the Camcorder to Download Still Images (Direct Transfer Function) ........ 32 Setting the Direct Transfer Download Destination Folder 32 Direct Transfer 33 ...
Digital Video Software (Macintosh) Ver.31 Instruction Manual
Page 3
Renaming Multiple Files 54 Searching for Images 55 Exporting Images ...57 Changing the File Type and Saving 57 Uploading Still Images to the camcorder 60 Using Various Functions 62 Attaching Images to E-mail Messages 62 Running a Slide Show 64 Adding Sound to a Still Image 65 Reviewing and Changing the Owner Name of the Camcorder 66 Uninstalling the Software 67 Uninstalling ImageBrowser 67 Troubleshooting ...68 Macintosh Contents 3
Digital Video Software (Macintosh) Ver.31 Instruction Manual
Page 4
...products not mentioned above may be reproduced, transmitted, transcribed, stored in a retrieval system, or translated into any language in any form, by a Canon camcorder. Trademark Acknowledgments • Macintosh, Mac OS and iPhoto are trademarks of this manual. The SDHC logo is a trademark. • ...described herein at any time without the prior written permission of Canon. • Canon makes no liability can be accepted for damages resulting from corrupted or lost data due to mistaken operation or malfunction of the camcorder, the software, memory cards (SD, SDHC and miniSD ...
Digital Video Software (Macintosh) Ver.31 Instruction Manual
Page 6
... CameraWindow • Downloading still images to your computer • Viewing still images directly from the camcorder, without downloading them • Printing still images directly from the camcorder, without downloading them to the computer This instruction manual explains how to install the software, what... still images • Categorizing, organizing, and searching large volumes of each software program. What is Digital Video Software? Your camcorder may not support some features of the software. 6 What is Digital Video Software? Digital Video Software allows you to download ...
Digital Video Software (Macintosh) Ver.31 Instruction Manual
Page 7
...click the [Canon Utilities] folder on the drive where the program was installed, followed by the [CameraWindow] folder and the [CameraWindow] icon. [Acquire Images] Tab After you specify ( 66). Images will be downloaded and the destination folder. Windows CameraWindow After you connect the camcorder to your ...appear. When the [CameraWindow] icon is not in the Camera Control window. Furthermore, you can print still images directly from the camcorder, without having to download them to the computer ( 38), and you can use this tab to download still images to the computer, ...
Digital Video Software (Macintosh) Ver.31 Instruction Manual
Page 8
...with file names and image information). 8 Windows Camera Control window Prints all still images as an index page (rows of the still images in the camcorder (built-in hard disk/memory or memory card), allowing you to select which ones to the DPOF print settings set by the... camcorder. The window varies depending on the selected printing type. [Print] Tab After connecting the camcorder to your computer, use this tab to print still images without downloading them to Printing Still Images...
Digital Video Software (Macintosh) Ver.31 Instruction Manual
Page 9
Camera Control window Uploading the images from the computer. Enter or change the name of the camcorder you can specify ( 66) and uploading the still images to Camera] Tab This tab is not supported by the camcorder. My Camera function is used for confirming and changing the owner's name of the camcorder's owner. [Set to the camcorder. Macintosh Windows 9
Digital Video Software (Macintosh) Ver.31 Instruction Manual
Page 10
If your camcorder supports wide size still image (16:9 such as 1920 x 1080 pixels) recording, the thumbnails that appear in this instruction manual are normal size still images (4:3). 10 Windows Prints the selected still images. Selects whether to show or hide the image frame and file name. The sample images used on this window will be also 16:9 images. Changes the size of the thumbnail. Selects the still image selection method. Camera Browser Window Camera Browser window Still image information and a histogram Starts ImageBrowser.
Digital Video Software (Macintosh) Ver.31 Instruction Manual
Page 15
... the image. 1 Back/Next 2 Save 3 Edit 4 Number of the image will be displayed. [Show AF Frame] cannot be used for the images recorded by the camcorder. Allows you to display multiple images at the same time. Allows you select an image and click [View Image] or double click an image. Windows...
Digital Video Software (Macintosh) Ver.31 Instruction Manual
Page 20
...change to 2.1 and image information may be modified. Either install ImageBrowser to download the still images or use the following procedure. 1) Connect the camcorder to the computer, and start Image Capture. 2) Click [Options]. 3) Remove the checkmark from [Embed Colorsync profile] in the computer's CD-ROM... drive. 3 Double click the CD-ROM icon and the [Canon Digital Video Installer] icon. 20 Installing the Digital Video Software Your digital video camcorder is not connected to the computer. 2 Set the DIGITAL VIDEO Solution Disk in the [Download Options...
Digital Video Software (Macintosh) Ver.31 Instruction Manual
Page 21
Installer Panel 5 Select [Easy Installation] and click [Next]. This software is used only for downloading still images from the Canon EOS Digital SLR Cameras) will be installed. To install the software individually, select [Custom Installation]. 4 Click [Install] under... Digital Video Software. Macintosh When installing the software by selecting [Easy Installation], EOS Utility (software for compatible Canon EOS Digital SLR Cameras, and the camcorder does not support this software. 6 Read the license agreement and click [Agree] to accept the terms. Installing the Digital ...
Digital Video Software (Macintosh) Ver.31 Instruction Manual
Page 22
When installation is complete, restart the computer as prompted. 9 Remove the DIGITAL VIDEO Solution Disk from the CD-ROM drive. After the installation is complete, remove the DIGITAL VIDEO Solution Disk before you connect the camcorder to the computer. 22 Installing the Digital Video Software 7 Review the installation settings and click [Next]. 8 When the "Installation has finished." message appears, click [Finish].
Digital Video Software (Macintosh) Ver.31 Instruction Manual
Page 23
...of the computer's USB ports. For details about changing settings on the camcorder and connecting the camcorder to the computer, see the camcorder's instruction manual. Settings on the camcorder Before connecting the camcorder to the computer, change the following options. - [PC/PRINTER]: To simply ...; Connect the USB cable directly to a computer. Macintosh Before Downloading Still Images 23 The interface may not function correctly if the camcorder is connected via a USB hub. The connection may not operate correctly. Never allow the computer to go into ...
Digital Video Software (Macintosh) Ver.31 Instruction Manual
Page 24
USB Terminal on the Camcorder USB Cable Camcorder End Computer End USB Port on the Computer 24 Before Downloading Still Images Wait until the ACCESS indicator stops flashing. 4 Attach the supplied USB cable to still image playback mode. Connecting the camcorder 1 Connect the compact power adapter to the camcorder. 2 If downloading images from a memory card, insert the memory card into the camcorder. 3 Set the camcorder to the computer's USB port and the camcorder's USB Terminal.
Digital Video Software (Macintosh) Ver.31 Instruction Manual
Page 25
... the hard disk are using the USB cable. For connecting a card reader/writer, see Using a Card Reader/Writer ( 34). You cannot connect the camcorder to a computer using and the installed OS) if the built-in hard disk/memory or the memory card contains more . Do not remove the memory... card reader/writer to download the images to the computer. You may cause data to the computer. Observe the following precautions when the camcorder's access indicator is flashing. In such case, copy the images in the built-in hard disk/memory to a memory card and then use a card reader...
Digital Video Software (Macintosh) Ver.31 Instruction Manual
Page 26
... (the bar at the bottom of the desktop). • If you do not wish the Camera Control window to open automatically when you connect the camcorder, click the [File] menu and clear the check mark from the [Displays this screen when the camera is connected]. 2 Click [Starts to the computer ( 23... window 26 Downloading Still Images If it does not appear automatically, click the [CameraWindow] icon in the Camera Control window. Auto-downloading 1 Connect the camcorder to download images]. Click [Exit] to close the Camera Control window after downloading images.
Digital Video Software (Macintosh) Ver.31 Instruction Manual
Page 29
Select a process to perform after the image is downloaded, and click [OK]. 6 Click [Finish]. The window below will be automatically downloaded when the camcorder is connected. 5 Specify a process to perform after the image is downloaded and click [Next]. Placing a check mark here makes images in the camcorder to be displayed when you select [Perform selected processes consecutively] (you can redisplay the window by clicking [Select]). Downloading Still Images 29 Macintosh
Digital Video Software (Macintosh) Ver.31 Instruction Manual
Page 32
Click [Exit] to download images. Setting the Direct Transfer Download Destination Folder 1 Click the [Acquire Images] tab and click [Preferences]. Using the Camcorder to Download Still Images (Direct Transfer Function) If your camcorder supports the Direct Transfer function, you can use the camcorder to close the Camera Control window. 2 Select [Change direct transfer download destination folder] and click [Next]. 32 Downloading Still Images
Digital Video Software (Macintosh) Ver.31 Instruction Manual
Page 33
Select to specify the name of the subfolder. Direct Transfer 1 Select a transfer option on the camcorder screen and press the button. • See your camcorder instruction manual for how to set and operate the camcorder to specify the destination folder. Destination Folder Click this button to transfer images. • The button cannot be used when it is not lighted. Macintosh Downloading Still Images 33 3 Specify the destination folder settings and click [Finish].
Digital Video Software (Macintosh) Ver.31 Instruction Manual
Page 34
... Still Images If you need to use a card reader/writer compatible with SDHC cards. 1 Insert a memory card containing images recorded with the camcorder into the card reader/writer and connect it to the computer. 2 Select a method to download the images. • [Download Images]: A...appropriate adapter for your card. To apply autodownloading settings, refer to Applying Auto-downloading Settings ( 35). • [Lets you connect the camcorder to the computer, and ImageBrowser starts. Using a Card Reader/Writer Select a download method in the image download window. Follow the procedure ...