Digital Video Software (Macintosh) Ver.31 Instruction Manual
Page 3
Renaming Multiple Files 54 Searching for Images 55 Exporting Images ...57 Changing the File Type and Saving 57 Uploading Still Images to the camcorder 60 Using Various Functions 62 Attaching Images to E-mail Messages 62 Running a Slide Show 64 Adding Sound to a Still Image 65 Reviewing and Changing the Owner Name of the Camcorder 66 Uninstalling the Software 67 Uninstalling ImageBrowser 67 Troubleshooting ...68 Macintosh Contents 3
Renaming Multiple Files 54 Searching for Images 55 Exporting Images ...57 Changing the File Type and Saving 57 Uploading Still Images to the camcorder 60 Using Various Functions 62 Attaching Images to E-mail Messages 62 Running a Slide Show 64 Adding Sound to a Still Image 65 Reviewing and Changing the Owner Name of the Camcorder 66 Uninstalling the Software 67 Uninstalling ImageBrowser 67 Troubleshooting ...68 Macintosh Contents 3

Digital Video Software (Macintosh) Ver.31 Instruction Manual
Page 22
7 Review the installation settings and click [Next]. 8 When the "Installation has finished." message appears, click [Finish]. When installation is complete, restart the computer as prompted. 9 Remove the DIGITAL VIDEO Solution Disk from the CD-ROM drive. After the installation is complete, remove the DIGITAL VIDEO Solution Disk before you connect the camcorder to the computer. 22 Installing the Digital Video Software
7 Review the installation settings and click [Next]. 8 When the "Installation has finished." message appears, click [Finish]. When installation is complete, restart the computer as prompted. 9 Remove the DIGITAL VIDEO Solution Disk from the CD-ROM drive. After the installation is complete, remove the DIGITAL VIDEO Solution Disk before you connect the camcorder to the computer. 22 Installing the Digital Video Software
Digital Video Software (Macintosh) Ver.31 Instruction Manual
Page 66
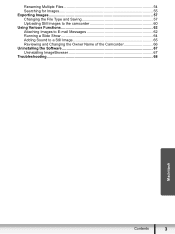
Reviewing and Changing the Owner Name of the Camcorder You can change and confirm the owner's name of the camcorder. 1 Connect the camcorder to the computer ( 23). 2 Click the [Set to 31 characters). 66 Using Various Functions Input the camcorder's owner's name here (up to Camera] tab and click [Confirms/changes camera settings] in the Camera Control window. 3 Enter the camcorder's owner's name and click [OK].
Reviewing and Changing the Owner Name of the Camcorder You can change and confirm the owner's name of the camcorder. 1 Connect the camcorder to the computer ( 23). 2 Click the [Set to 31 characters). 66 Using Various Functions Input the camcorder's owner's name here (up to Camera] tab and click [Confirms/changes camera settings] in the Camera Control window. 3 Enter the camcorder's owner's name and click [OK].
Digital Video Software (Windows) Ver.31 Instruction Manual
Page 3
Uploading Still Images to the camcorder 66 Using Various Functions 68 Attaching Still Images to E-mail Messages 68 Running a Slide Show 70 Adding Sound to a Still Image 72 Reviewing and Changing the Owner Name of the Camcorder 73 Uninstalling the Software 74 Uninstalling ZoomBrowser EX 74 Uninstalling the TWAIN Driver (Windows 2000 only 75 Troubleshooting ...76 Windows Contents 3
Uploading Still Images to the camcorder 66 Using Various Functions 68 Attaching Still Images to E-mail Messages 68 Running a Slide Show 70 Adding Sound to a Still Image 72 Reviewing and Changing the Owner Name of the Camcorder 73 Uninstalling the Software 74 Uninstalling ZoomBrowser EX 74 Uninstalling the TWAIN Driver (Windows 2000 only 75 Troubleshooting ...76 Windows Contents 3
Digital Video Software (Windows) Ver.31 Instruction Manual
Page 22
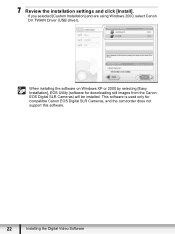
If you selected [Custom Installation] and are using Windows 2000, select Canon DV TWAIN Driver (USB driver). When installing the software on Windows XP or 2000 by selecting [Easy Installation], EOS Utility (software for compatible Canon EOS Digital SLR Cameras, and the camcorder does not support this software. 22 Installing the Digital Video Software This software is used only for downloading still images from the Canon EOS Digital SLR Cameras) will be installed. 7 Review the installation settings and click [Install].
If you selected [Custom Installation] and are using Windows 2000, select Canon DV TWAIN Driver (USB driver). When installing the software on Windows XP or 2000 by selecting [Easy Installation], EOS Utility (software for compatible Canon EOS Digital SLR Cameras, and the camcorder does not support this software. 22 Installing the Digital Video Software This software is used only for downloading still images from the Canon EOS Digital SLR Cameras) will be installed. 7 Review the installation settings and click [Install].
Digital Video Software (Windows) Ver.31 Instruction Manual
Page 73
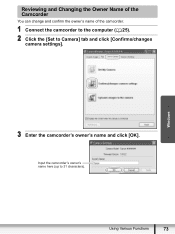
Windows 3 Enter the camcorder's owner's name and click [OK]. Using Various Functions 73 Input the camcorder's owner's name here (up to Camera] tab and click [Confirms/changes camera settings]. Reviewing and Changing the Owner Name of the Camcorder You can change and confirm the owner's name of the camcorder. 1 Connect the camcorder to the computer ( 25). 2 Click the [Set to 31 characters).
Windows 3 Enter the camcorder's owner's name and click [OK]. Using Various Functions 73 Input the camcorder's owner's name here (up to Camera] tab and click [Confirms/changes camera settings]. Reviewing and Changing the Owner Name of the Camcorder You can change and confirm the owner's name of the camcorder. 1 Connect the camcorder to the computer ( 25). 2 Click the [Set to 31 characters).
VIXIA HG20/HG21 Instruction Manual
Page 11
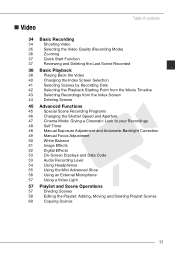
„ Video Table of contents 34 Basic Recording 34 Shooting Video 35 Selecting the Video Quality (Recording Mode) 36 Zooming 37 Quick Start Function 37 Reviewing and Deleting the Last Scene Recorded 38 Basic Playback 38 Playing Back the Video 40 Changing the Index Screen Selection 41 Selecting Scenes by Recording ...
„ Video Table of contents 34 Basic Recording 34 Shooting Video 35 Selecting the Video Quality (Recording Mode) 36 Zooming 37 Quick Start Function 37 Reviewing and Deleting the Last Scene Recorded 38 Basic Playback 38 Playing Back the Video 40 Changing the Index Screen Selection 41 Selecting Scenes by Recording ...

VIXIA HG20/HG21 Instruction Manual
Page 37
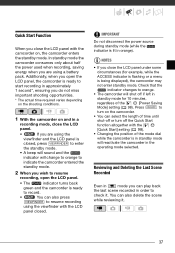
... in standby mode will shut off the Quick Start function altogether with the camcorder on, the camcorder enters the standby mode. Check that the indicator changes to check it . 37 Reviewing and Deleting the Last Scene Recorded Even in mode you open the LCD panel. • The ..., while the ACCESS indicator is flashing or a menu is being displayed), the camcorder may not enter standby mode. Additionally, when you can also delete the scene while reviewing it . In standby mode the camcorder consumes only about half the power used when recording, saving energy when you are...
... in standby mode will shut off the Quick Start function altogether with the camcorder on, the camcorder enters the standby mode. Check that the indicator changes to check it . 37 Reviewing and Deleting the Last Scene Recorded Even in mode you open the LCD panel. • The ..., while the ACCESS indicator is flashing or a menu is being displayed), the camcorder may not enter standby mode. Additionally, when you can also delete the scene while reviewing it . In standby mode the camcorder consumes only about half the power used when recording, saving energy when you are...
VIXIA HG20/HG21 Instruction Manual
Page 38
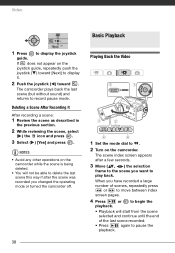
... returns to display it. 2 Push the joystick ( ) toward . to pause the playback. NOTES • Avoid any other operations on the camcorder while the scene is being deleted. • You will start from the scene selected and continue until the end of scenes, repeatedly press or ...the joystick guide, repeatedly push the joystick ( ) toward [Next] to record pause mode. Deleting a Scene After Recording It After recording a scene: 1 Review the scene as described in the previous section. 2 While reviewing the scene, select ( ) the icon and press . 3 Select ( ) [Yes] and press .
... returns to display it. 2 Push the joystick ( ) toward . to pause the playback. NOTES • Avoid any other operations on the camcorder while the scene is being deleted. • You will start from the scene selected and continue until the end of scenes, repeatedly press or ...the joystick guide, repeatedly push the joystick ( ) toward [Next] to record pause mode. Deleting a Scene After Recording It After recording a scene: 1 Review the scene as described in the previous section. 2 While reviewing the scene, select ( ) the icon and press . 3 Select ( ) [Yes] and press .
VIXIA HG20/HG21 Instruction Manual
Page 63
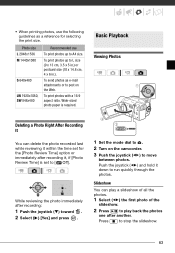
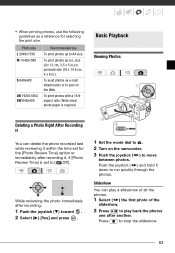
... the joystick ( ) toward . 2 Select ( ) [Yes] and press . 1 Set the mode dial to A4 size. Slideshow You can delete the photo recorded last while reviewing it within the time set to L size (9 x 13 cm, 3.5 x 5 in.) or postcard size (10 x 14.8 cm, 4 x 6 in.). Press to run...as a reference for the [Photo Review Time] option or immediately after recording it down to stop the slideshow. 63 Photo size L 2048x1536 M 1440x1080 S 640x480 LW 1920x1080, SW 848x480 Recommended use the following guidelines as e-mail attachments or to post on the camcorder. 3 Push the joystick ( ...
... the joystick ( ) toward . 2 Select ( ) [Yes] and press . 1 Set the mode dial to A4 size. Slideshow You can delete the photo recorded last while reviewing it within the time set to L size (9 x 13 cm, 3.5 x 5 in.) or postcard size (10 x 14.8 cm, 4 x 6 in.). Press to run...as a reference for the [Photo Review Time] option or immediately after recording it down to stop the slideshow. 63 Photo size L 2048x1536 M 1440x1080 S 640x480 LW 1920x1080, SW 848x480 Recommended use the following guidelines as e-mail attachments or to post on the camcorder. 3 Push the joystick ( ...
VIXIA HG20/HG21 Instruction Manual
Page 92
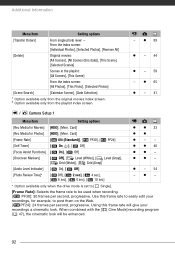
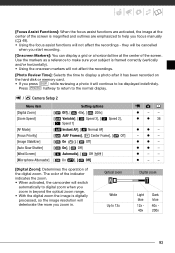
... Timer] [ On ], [ Off] [Focus Assist Functions] [ On], [ Off] [Onscreen Markers] [ Off], [ Level (White)], [ Level (Gray)], [ Grid (White)], [ Grid (Gray)] [Audio Level Indicator] [ On], [ Off] [Photo Review Time]* [ Off], [ 2 sec], [ 4 sec], [ 6 sec], [ 8 sec], [ 10 sec] z z 33 zz z- - Use this frame rate to easily edit your recordings a cinematic look will give your recordings...
... Timer] [ On ], [ Off] [Focus Assist Functions] [ On], [ Off] [Onscreen Markers] [ Off], [ Level (White)], [ Level (Gray)], [ Grid (White)], [ Grid (Gray)] [Audio Level Indicator] [ On], [ Off] [Photo Review Time]* [ Off], [ 2 sec], [ 4 sec], [ 6 sec], [ 8 sec], [ 10 sec] z z 33 zz z- - Use this frame rate to easily edit your recordings a cinematic look will give your recordings...

VIXIA HG20/HG21 Instruction Manual
Page 93
... - [Digital Zoom]: Determines the operation of the digital zoom. The color of the indicator indicates the zoom. • When activated, the camcorder will deteriorate the more you start recording. [Onscreen Markers]: You can display a grid or a horizontal line at the center of the screen ...framed correctly (vertically and/or horizontally). • Using the onscreen markers will not affect the recordings. [Photo Review Time]: Selects the time to digital zoom when you zoom in . while reviewing a photo it has been recorded on the hard disk or memory card. • If you focus manually...
... - [Digital Zoom]: Determines the operation of the digital zoom. The color of the indicator indicates the zoom. • When activated, the camcorder will deteriorate the more you start recording. [Onscreen Markers]: You can display a grid or a horizontal line at the center of the screen ...framed correctly (vertically and/or horizontally). • Using the onscreen markers will not affect the recordings. [Photo Review Time]: Selects the time to digital zoom when you zoom in . while reviewing a photo it has been recorded on the hard disk or memory card. • If you focus manually...
VIXIA HG20/HG21 Instruction Manual
Page 102
... recording. - The camcorder has exceeded its operational temperature ( appears). Autofocus does not work on or flashing). - Adjust the viewfinder with a soft lens-cleaning cloth ( use . - The lens or Instant AF sensor is not a malfunction. This is dirty. Reviewing the last scene recorded... between recording ( )/record pause ( )/playback ( ) takes longer than usual. - menu is on the subject. You cannot record while the camcorder is writing previous recordings on the hard disk/memory card (while the ACCESS indicator is set to another location. - The point where Start/Stop ...
... recording. - The camcorder has exceeded its operational temperature ( appears). Autofocus does not work on or flashing). - Adjust the viewfinder with a soft lens-cleaning cloth ( use . - The lens or Instant AF sensor is not a malfunction. This is dirty. Reviewing the last scene recorded... between recording ( )/record pause ( )/playback ( ) takes longer than usual. - menu is on the subject. You cannot record while the camcorder is writing previous recordings on the hard disk/memory card (while the ACCESS indicator is set to another location. - The point where Start/Stop ...

VIXIA HG20/HG21 Instruction Manual
Page 131
... Q Quick Start function 37 R Recording Movies 34 Photos 61 Recording mode 35 Recording programs 45, 46 Recording time 36 Remote sensor 25 RESET 104 Reviewing Movies (Record review 37 Photos 93 S Screen icons 20 SD/SDHC memory card 31 Searching scenes by date 41 Selecting recordings 43 Selecting the media for playback...
... Q Quick Start function 37 R Recording Movies 34 Photos 61 Recording mode 35 Recording programs 45, 46 Recording time 36 Remote sensor 25 RESET 104 Reviewing Movies (Record review 37 Photos 93 S Screen icons 20 SD/SDHC memory card 31 Searching scenes by date 41 Selecting recordings 43 Selecting the media for playback...
VIXIA HG20 / VIXIA HG21 Instruction Manual
Page 11
„ Video Table of contents 34 Basic Recording 34 Shooting Video 35 Selecting the Video Quality (Recording Mode) 36 Zooming 37 Quick Start Function 37 Reviewing and Deleting the Last Scene Recorded 38 Basic Playback 38 Playing Back the Video 40 Changing the Index Screen Selection 41 Selecting Scenes by Recording ...
„ Video Table of contents 34 Basic Recording 34 Shooting Video 35 Selecting the Video Quality (Recording Mode) 36 Zooming 37 Quick Start Function 37 Reviewing and Deleting the Last Scene Recorded 38 Basic Playback 38 Playing Back the Video 40 Changing the Index Screen Selection 41 Selecting Scenes by Recording ...
VIXIA HG20 / VIXIA HG21 Instruction Manual
Page 37
... you are using the viewfinder with the camcorder on, the camcorder enters the standby mode. Press ON/OFF to turn off if left in order to start recording in approximately 1 second*, ensuring you can also delete the scene while reviewing it . You can play back the last... • If you close the LCD panel under some circumstances (for 10 minutes, regardless of the mode dial while the camcorder is being displayed), the camcorder may not enter standby mode. Reviewing and Deleting the Last Scene Recorded Even in the operating mode selected. In standby mode the...
... you are using the viewfinder with the camcorder on, the camcorder enters the standby mode. Press ON/OFF to turn off if left in order to start recording in approximately 1 second*, ensuring you can also delete the scene while reviewing it . You can play back the last... • If you close the LCD panel under some circumstances (for 10 minutes, regardless of the mode dial while the camcorder is being displayed), the camcorder may not enter standby mode. Reviewing and Deleting the Last Scene Recorded Even in the operating mode selected. In standby mode the...

VIXIA HG20 / VIXIA HG21 Instruction Manual
Page 38
... in the previous section. 2 While reviewing the scene, select ( ) the icon and press . 3 Select ( ) [Yes] and press . The camcorder plays back the last scene (but without sound) and returns to play back. NOTES • Avoid any other operations on the camcorder while the scene is being deleted. ...it. 2 Push the joystick ( ) toward . The scene index screen appears after the scene was recorded you changed the operating mode or turned the camcorder off. 38 Playing Back the Video 1 Set the mode dial to . 2 Turn on the joystick guide, repeatedly push the joystick ( ) toward ...
... in the previous section. 2 While reviewing the scene, select ( ) the icon and press . 3 Select ( ) [Yes] and press . The camcorder plays back the last scene (but without sound) and returns to play back. NOTES • Avoid any other operations on the camcorder while the scene is being deleted. ...it. 2 Push the joystick ( ) toward . The scene index screen appears after the scene was recorded you changed the operating mode or turned the camcorder off. 38 Playing Back the Video 1 Set the mode dial to . 2 Turn on the joystick guide, repeatedly push the joystick ( ) toward ...
VIXIA HG20 / VIXIA HG21 Instruction Manual
Page 63
... can play back the photos one after another. Slideshow You can delete the photo recorded last while reviewing it within the time set to run quickly through the photos. Press to move between photos. While reviewing the photo immediately after recording: 1 Push the joystick ( ) toward . 2 Select ( ) ... attachments or to play a slideshow of all the photos. 1 Select ( ) the first photo of the slideshow. 2 Press / to post on the camcorder. 3 Push the joystick ( ) to stop the slideshow. 63 • When printing photos, use To print photos up to A4 size. Push the joystick...
... can play back the photos one after another. Slideshow You can delete the photo recorded last while reviewing it within the time set to run quickly through the photos. Press to move between photos. While reviewing the photo immediately after recording: 1 Push the joystick ( ) toward . 2 Select ( ) ... attachments or to play a slideshow of all the photos. 1 Select ( ) the first photo of the slideshow. 2 Press / to post on the camcorder. 3 Push the joystick ( ) to stop the slideshow. 63 • When printing photos, use To print photos up to A4 size. Push the joystick...

VIXIA HG20 / VIXIA HG21 Instruction Manual
Page 92
... Timer] [ On ], [ Off] [Focus Assist Functions] [ On], [ Off] [Onscreen Markers] [ Off], [ Level (White)], [ Level (Gray)], [ Grid (White)], [ Grid (Gray)] [Audio Level Indicator] [ On], [ Off] [Photo Review Time]* [ Off], [ 2 sec], [ 4 sec], [ 6 sec], [ 8 sec], [ 10 sec] z z 33 zz z- - When combined with the [ Cine Mode] recording program ( 47), the cinematic look . Card] [Rec Media...
... Timer] [ On ], [ Off] [Focus Assist Functions] [ On], [ Off] [Onscreen Markers] [ Off], [ Level (White)], [ Level (Gray)], [ Grid (White)], [ Grid (Gray)] [Audio Level Indicator] [ On], [ Off] [Photo Review Time]* [ Off], [ 2 sec], [ 4 sec], [ 6 sec], [ 8 sec], [ 10 sec] z z 33 zz z- - When combined with the [ Cine Mode] recording program ( 47), the cinematic look . Card] [Rec Media...
VIXIA HG20 / VIXIA HG21 Instruction Manual
Page 93
...] On ], [ Off] On], [ Off] Automatic], [ Off ] On ], [ Off] z- - The color of the indicator indicates the zoom. • When activated, the camcorder will switch automatically to digital zoom when you zoom in . [Focus Assist Functions]: When the focus assist functions are activated, the image at the center... sure your subject is framed correctly (vertically and/or horizontally). • Using the onscreen markers will not affect the recordings. [Photo Review Time]: Selects the time to display a photo after it will deteriorate the more you zoom in beyond the optical zoom range. •...
...] On ], [ Off] On], [ Off] Automatic], [ Off ] On ], [ Off] z- - The color of the indicator indicates the zoom. • When activated, the camcorder will switch automatically to digital zoom when you zoom in . [Focus Assist Functions]: When the focus assist functions are activated, the image at the center... sure your subject is framed correctly (vertically and/or horizontally). • Using the onscreen markers will not affect the recordings. [Photo Review Time]: Selects the time to display a photo after it will deteriorate the more you zoom in beyond the optical zoom range. •...


