

Users Manual - English
Page 1
EMBROIDERY MACHINE PR-600 OPERATION MANUAL
EMBROIDERY MACHINE PR-600 OPERATION MANUAL
Users Manual - English
Page 5
... the features available, we suggest that you study the manual before using the machine. Be sure to keep your local authorized Brother dealer. Benzene, thinner, and scouring powders can damage the machine, and should never be used. 3. If the problem persists, consult your... the machine • Leaving the machine unattended 3. For additional product information and updates, visit our web site at the back of the most advanced computerized household embroidery machines. THANK YOU FOR CHOOSING OUR MACHINE Your machine is required, first follow the troubleshooting table at www.brother.com ...
... the features available, we suggest that you study the manual before using the machine. Be sure to keep your local authorized Brother dealer. Benzene, thinner, and scouring powders can damage the machine, and should never be used. 3. If the problem persists, consult your... the machine • Leaving the machine unattended 3. For additional product information and updates, visit our web site at the back of the most advanced computerized household embroidery machines. THANK YOU FOR CHOOSING OUR MACHINE Your machine is required, first follow the troubleshooting table at www.brother.com ...

Users Manual - English
Page 6
... ORIGINALLY BEARS CERTAIN COPYRIGHT NOTICE UNDER THE NAME OF ANY THIRD PARTIES OTHER THAN BROTHER (e.g. License Agreement The enclosed machine includes data, software and/or documentation (collectively "CONTENT") that the CONTENT is not used on more than one embroidery machine at any one copy of Japan. BY USING THE CONTENT, THE CUSTOMER ACCEPTS THE...
... ORIGINALLY BEARS CERTAIN COPYRIGHT NOTICE UNDER THE NAME OF ANY THIRD PARTIES OTHER THAN BROTHER (e.g. License Agreement The enclosed machine includes data, software and/or documentation (collectively "CONTENT") that the CONTENT is not used on more than one embroidery machine at any one copy of Japan. BY USING THE CONTENT, THE CUSTOMER ACCEPTS THE...

Users Manual - English
Page 8
...become wet, such as with water, solvents, drinks or any other than our original embroidery cards are used with this embroidery machine. • Only insert or remove embroidery cards while appears in the display or while the embroidery machine is turned off (see page 137). • For additional information, refer to the... instruction manual included with this embroidery machine. • Embroidery cards sold overseas cannot be usable with the USB media that you have purchased. Be sure to use or store ...
...become wet, such as with water, solvents, drinks or any other than our original embroidery cards are used with this embroidery machine. • Only insert or remove embroidery cards while appears in the display or while the embroidery machine is turned off (see page 137). • For additional information, refer to the... instruction manual included with this embroidery machine. • Embroidery cards sold overseas cannot be usable with the USB media that you have purchased. Be sure to use or store ...

Users Manual - English
Page 13
... starting to page 153. Chapter 6: Basic Settings and Help Feature This chapter contains descriptions on the right edge of the embroidery machine and the various preparations required before use a screen feature Touch the help key, refer to sew are described on the LCD... 3: Other Basic Procedures This chapter provides explanations on operations other information that should be provided. Details on changing the basic embroidery machine settings and viewing operations on page 58. xii By condition Various possible conditions and the corresponding operations are described in the ...
... starting to page 153. Chapter 6: Basic Settings and Help Feature This chapter contains descriptions on the right edge of the embroidery machine and the various preparations required before use a screen feature Touch the help key, refer to sew are described on the LCD... 3: Other Basic Procedures This chapter provides explanations on operations other information that should be provided. Details on changing the basic embroidery machine settings and viewing operations on page 58. xii By condition Various possible conditions and the corresponding operations are described in the ...
Users Manual - English
Page 17
... Helpful Tips for the Operation of PR-600II 160 Checking the thread tension of built-in patterns 160 Sewing a pattern aligned with a mark on the fabric 161 Color thread table ...163 Colors of Tajima (.dst) embroidery data ...163 Creating Beautiful Embroidery 164 Threads ...164 Stabilizers (Backing)... ...165 Hooping Techniques...166 Fabric/stabilizer compatibility chart ...167 OPTIONAL ACCESSORIES Attaching an optional embroidery frame for industrial embroidery machines 168 Using the Optional Cap Frame 169 Cap frame and its accessories...169 Types of caps ...170 Fabric...
... Helpful Tips for the Operation of PR-600II 160 Checking the thread tension of built-in patterns 160 Sewing a pattern aligned with a mark on the fabric 161 Color thread table ...163 Colors of Tajima (.dst) embroidery data ...163 Creating Beautiful Embroidery 164 Threads ...164 Stabilizers (Backing)... ...165 Hooping Techniques...166 Fabric/stabilizer compatibility chart ...167 OPTIONAL ACCESSORIES Attaching an optional embroidery frame for industrial embroidery machines 168 Using the Optional Cap Frame 169 Cap frame and its accessories...169 Types of caps ...170 Fabric...
Users Manual - English
Page 18
After checking that all accessories are included, the embroidery machine can be set up the machine / 8 Adjusting the operation panel position / 9 Preparing the thread guide assembly / 10 Positioning the spool stand / 11 Attaching the embroidery frame holder / 11 Names of the PR-600II and the various preparations required before starting to "Included Accessories" on page 4, and check...
After checking that all accessories are included, the embroidery machine can be set up the machine / 8 Adjusting the operation panel position / 9 Preparing the thread guide assembly / 10 Positioning the spool stand / 11 Attaching the embroidery frame holder / 11 Names of the PR-600II and the various preparations required before starting to "Included Accessories" on page 4, and check...
Users Manual - English
Page 22
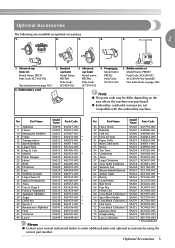
... Parts Code: XC7609-052 (See instructions on the area where the machine was purchased. ● Embroidery cards sold overseas are available as optional accessories. 1. 2. 3. 4. 5. 1 1. Optional Accessories 5 Optional Accessories The following are not compatible with this embroidery machine. Advanced cap frame set Model Name: PRBW1 Parts Code: XC6290-052... ● Contact your nearest authorized dealer to order additional parts and optional accessories by using the correct part number. Embroidery card 2. Standard cap frame Model Name: PRCFH1 Parts Code: XC6958-052 3.
... Parts Code: XC7609-052 (See instructions on the area where the machine was purchased. ● Embroidery cards sold overseas are available as optional accessories. 1. 2. 3. 4. 5. 1 1. Optional Accessories 5 Optional Accessories The following are not compatible with this embroidery machine. Advanced cap frame set Model Name: PRBW1 Parts Code: XC6290-052... ● Contact your nearest authorized dealer to order additional parts and optional accessories by using the correct part number. Embroidery card 2. Standard cap frame Model Name: PRCFH1 Parts Code: XC6958-052 3.
Users Manual - English
Page 23
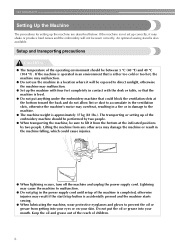
...prevent the oil or grease from getting into your skin. Do not put anything under the embroidery machine that the machine is accidentally pressed and the machine starts sewing. ● When lubricating the machine, wear protective eyeglasses and gloves to malfunction. ● Do not plug in contact with ...level. ● Do not put the oil or grease into your eyes or on your mouth. GETTING READY Setting Up the Machine The procedures for setting up of the embroidery machine should be between 5 °C (40 °F) and 40 °C (104 °F) . An optional sewing stand is...
...prevent the oil or grease from getting into your skin. Do not put anything under the embroidery machine that the machine is accidentally pressed and the machine starts sewing. ● When lubricating the machine, wear protective eyeglasses and gloves to malfunction. ● Do not plug in contact with ...level. ● Do not put the oil or grease into your eyes or on your mouth. GETTING READY Setting Up the Machine The procedures for setting up of the embroidery machine should be between 5 °C (40 °F) and 40 °C (104 °F) . An optional sewing stand is...

Users Manual - English
Page 30
... the Embroidery 11 Checking the Thread Tension 12 Removing the Embroidery Frame and Fabric 13 Turning OFF the Machine 14 2 EMBROIDERING TUTORIAL This chapter describes the basic embroidering operations in the Embroidery Frame 7 Attaching the Embroidery Frame to finishing sewing. Follow the steps of the tutorial to embroider a pattern and master the operation of this embroidery machine.
... the Embroidery 11 Checking the Thread Tension 12 Removing the Embroidery Frame and Fabric 13 Turning OFF the Machine 14 2 EMBROIDERING TUTORIAL This chapter describes the basic embroidering operations in the Embroidery Frame 7 Attaching the Embroidery Frame to finishing sewing. Follow the steps of the tutorial to embroider a pattern and master the operation of this embroidery machine.

Users Manual - English
Page 31
...unplug the power supply cord, otherwise a fire may result. 14 WARNING ● Use only regular household electricity for a long period of this machine in with extension cords or multi-plug adapters with many other appliances plugged into them, otherwise a fire or an electric shock may result. &#... be sure to first turn off the embroidery machine and unplug the power supply cord, otherwise a fire, an electric shock or damage to the machine may result. • When you are away from the machine. • After using the machine, and then take the machine to be cut connection. • During...
...unplug the power supply cord, otherwise a fire may result. 14 WARNING ● Use only regular household electricity for a long period of this machine in with extension cords or multi-plug adapters with many other appliances plugged into them, otherwise a fire or an electric shock may result. &#... be sure to first turn off the embroidery machine and unplug the power supply cord, otherwise a fire, an electric shock or damage to the machine may result. • When you are away from the machine. • After using the machine, and then take the machine to be cut connection. • During...

Users Manual - English
Page 33
... and is not a sign of a malfunction. Note ● It is recommended that rayon or polyester embroidery thread be dark immediately after the embroidery machine is up to observe the following recommendations concerning the upper thread. Note ● Your machine can embroider fabric that the fabric is sewn, the needle may be used (120 den...
... and is not a sign of a malfunction. Note ● It is recommended that rayon or polyester embroidery thread be dark immediately after the embroidery machine is up to observe the following recommendations concerning the upper thread. Note ● Your machine can embroider fabric that the fabric is sewn, the needle may be used (120 den...
Users Manual - English
Page 34
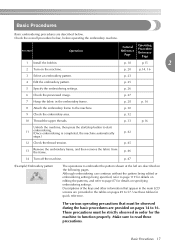
... the basic procedures are provided on the machine. Basic Procedures 17 p. 25 5 Specify the embroidering settings. p. 32 10 Thread the upper threads. p. 47 (Example) Embroidery pattern The operations to 16. p. 45 13 Remove the embroidery frame, and then remove the fabric from...the bobbin. 2 Turn on pages 14 to embroider the pattern shown at the left are described below , before operating the embroidery machine. Basic Procedures Basic embroidering procedures are described on the following pages. Check the overall procedure below . Tutorial Reference Page Operating ...
... the basic procedures are provided on the machine. Basic Procedures 17 p. 25 5 Specify the embroidering settings. p. 32 10 Thread the upper threads. p. 47 (Example) Embroidery pattern The operations to 16. p. 45 13 Remove the embroidery frame, and then remove the fabric from...the bobbin. 2 Turn on pages 14 to embroider the pattern shown at the left are described below , before operating the embroidery machine. Basic Procedures Basic embroidering procedures are described on the following pages. Check the overall procedure below . Tutorial Reference Page Operating ...

Users Manual - English
Page 36
... bobbin into the bobbin case. 1 Installing the bobbin case Insert the bobbin case into place. 2 3 4 5 6 Close the hook cover. 2 7 8 9 10 11 Memo 12 ● This embroidery machine is installed with the thread winding off the bobbin clockwise as shown in the illustration. 1 2 2 Note ● Check that the thread winds off in the...
... bobbin into the bobbin case. 1 Installing the bobbin case Insert the bobbin case into place. 2 3 4 5 6 Close the hook cover. 2 7 8 9 10 11 Memo 12 ● This embroidery machine is installed with the thread winding off the bobbin clockwise as shown in the illustration. 1 2 2 Note ● Check that the thread winds off in the...

Users Manual - English
Page 37
...begin a new operation. (Refer to page 14. EMBROIDERING TUTORIAL 2. For precautions concerning the power supply, refer to "Resume Embroidering After Turning OFF the Machine" on the back 3 of electrical shock, this plug is intended to its initial position. 5 • If the number 1 needle bar is turned... away from the carriage, in any injuries. Plug the power supply cord into the machine. 1 When the screen shown below appears after 4 the initial screen, touch . X The buzzer beeps once and the LCD screen comes on the embroidery machine. If the plug does not fit fully in red.
...begin a new operation. (Refer to page 14. EMBROIDERING TUTORIAL 2. For precautions concerning the power supply, refer to "Resume Embroidering After Turning OFF the Machine" on the back 3 of electrical shock, this plug is intended to its initial position. 5 • If the number 1 needle bar is turned... away from the carriage, in any injuries. Plug the power supply cord into the machine. 1 When the screen shown below appears after 4 the initial screen, touch . X The buzzer beeps once and the LCD screen comes on the embroidery machine. If the plug does not fit fully in red.

Users Manual - English
Page 38
... can be used in this key to page 16. Understanding the screens When the machine is turned on how the machine was previously turned off. (Refer to change the embroidery machine settings. The screen that appears the next time that the embroidery machine is turned on differs depending on and is an operating 4 Help key procedure...
... can be used in this key to page 16. Understanding the screens When the machine is turned on how the machine was previously turned off. (Refer to change the embroidery machine settings. The screen that appears the next time that the embroidery machine is turned on differs depending on and is an operating 4 Help key procedure...

Users Manual - English
Page 39
...bars, and then install the upper threads.Touch the unlock key so that the start/stop button starts flashing in green and the embroidery machine is selected. This key is not available unless a pattern type is ready to begin sewing. EMBROIDERING TUTORIAL Screen overview The basic ...operation flow is a combined pattern , edit the entire pattern, specify the embroidering settings and check the embroidery area. (Refer to page 26, 54) 1 Touch this key to quit the current operation and return to the pattern type selection screen....
...bars, and then install the upper threads.Touch the unlock key so that the start/stop button starts flashing in green and the embroidery machine is selected. This key is not available unless a pattern type is ready to begin sewing. EMBROIDERING TUTORIAL Screen overview The basic ...operation flow is a combined pattern , edit the entire pattern, specify the embroidering settings and check the embroidery area. (Refer to page 26, 54) 1 Touch this key to quit the current operation and return to the pattern type selection screen....
Users Manual - English
Page 46
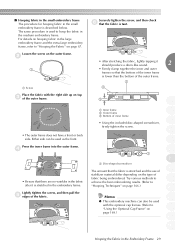
.... (Refer to "Hooping Techniques" on page 166.) 10 Memo 11 ● This embroidery machine can be used as the front. ■ Hooping fabric in the small embroidery frame The procedure for hooping fabric in the embroidery frame. For details on top 3 of the fabric. Securely tighten the screw, and... then check 6 that the fabric is taut. • After stretching the fabric, lightly tapping it is stretched in the small embroidery frame is stretched and the use of stabilizer material differ depending on page 67. Loosen the screw on the outer frame. 2 1 1 Screw ...
.... (Refer to "Hooping Techniques" on page 166.) 10 Memo 11 ● This embroidery machine can be used as the front. ■ Hooping fabric in the small embroidery frame The procedure for hooping fabric in the embroidery frame. For details on top 3 of the fabric. Securely tighten the screw, and... then check 6 that the fabric is taut. • After stretching the fabric, lightly tapping it is stretched in the small embroidery frame is stretched and the use of stabilizer material differ depending on page 67. Loosen the screw on the outer frame. 2 1 1 Screw ...

Users Manual - English
Page 47
... below. Positioning slots Positioning Pin Clip on the embroidery frame holder. 30 Insert the embroidery frame into the clips on embroidery frame holder. EMBROIDERING TUTORIAL 8. Attaching the Embroidery Frame to the Machine After hooping the fabric in green, the embroidery machine may hit the presser foot and damage the machine, or cause injury to adjust it may start...
... below. Positioning slots Positioning Pin Clip on the embroidery frame holder. 30 Insert the embroidery frame into the clips on embroidery frame holder. EMBROIDERING TUTORIAL 8. Attaching the Embroidery Frame to the Machine After hooping the fabric in green, the embroidery machine may hit the presser foot and damage the machine, or cause injury to adjust it may start...

Users Manual - English
Page 48
... on top. 3 Note 4 ● Incorrect frame positioning. 543 2 1 5 6 6 7 1 Mark for extra-large embroidery frame 2 Mark for large embroidery frame 3 Mark for medium embroidery frame 4 Mark for embroidery frame for industrial embroidery machines (When using embroidery frames for small embroidery frame 6 Align the screw with the embroidery frame holder clips. 1 Left arm 2 Thumb screws X The left arm to use the...
... on top. 3 Note 4 ● Incorrect frame positioning. 543 2 1 5 6 6 7 1 Mark for extra-large embroidery frame 2 Mark for large embroidery frame 3 Mark for medium embroidery frame 4 Mark for embroidery frame for industrial embroidery machines (When using embroidery frames for small embroidery frame 6 Align the screw with the embroidery frame holder clips. 1 Left arm 2 Thumb screws X The left arm to use the...


