
Users Manual - English
Page 5
...If the problem persists, consult your eye on the needle while sewing. For additional product information and updates, visit our web site at the back of the most advanced computerized household embroidery machines. PLEASE READ BEFORE USING THIS MACHINE For safe operation 1. Remember to turn off the ...power switch and unplug the cord when: • Operation is required, first follow the troubleshooting table at www.brother.com iv For repair or ...
...If the problem persists, consult your eye on the needle while sewing. For additional product information and updates, visit our web site at the back of the most advanced computerized household embroidery machines. PLEASE READ BEFORE USING THIS MACHINE For safe operation 1. Remember to turn off the ...power switch and unplug the cord when: • Operation is required, first follow the troubleshooting table at www.brother.com iv For repair or ...

Users Manual - English
Page 13
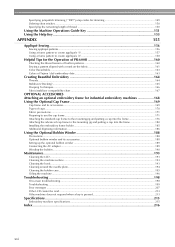
...descriptions at the end of the keys and other necessary operations, for the desired information. Read before starting to change the needle. Chapter 3: Other Basic Procedures This chapter provides explanations on the use Chapter 1: Getting Ready The setup of contents. Chapter... Chapter 5: Selecting/Editing/Saving Patterns This chapter provides details on the right edge of chapter 2. Details on changing the basic embroidery machine settings and viewing operations on the first page of the pages. Chapter 2: Embroidering Tutorial This chapter describes the basic embroidering operations...
...descriptions at the end of the keys and other necessary operations, for the desired information. Read before starting to change the needle. Chapter 3: Other Basic Procedures This chapter provides explanations on the use Chapter 1: Getting Ready The setup of contents. Chapter... Chapter 5: Selecting/Editing/Saving Patterns This chapter provides details on the right edge of chapter 2. Details on changing the basic embroidery machine settings and viewing operations on the first page of the pages. Chapter 2: Embroidering Tutorial This chapter describes the basic embroidering operations...
Users Manual - English
Page 17
... Tips for the Operation of PR-600II 160 Checking the thread tension of built-in patterns 160 Sewing a pattern aligned with a mark on the fabric 161 Color thread table ...163 Colors of Tajima (.dst) embroidery data ...163 Creating Beautiful Embroidery 164 Threads ...164 Stabilizers (...needle plate...194 Cleaning the bobbin case...195 Oiling the machine ...196 Troubleshooting ...198 On-screen troubleshooting...198 Troubleshooting ...199 Error messages ...207 If the LCD cannot be read ...213 If the machine does not respond when a key is pressed 213 Specifications ...215 Embroidery machine...
... Tips for the Operation of PR-600II 160 Checking the thread tension of built-in patterns 160 Sewing a pattern aligned with a mark on the fabric 161 Color thread table ...163 Colors of Tajima (.dst) embroidery data ...163 Creating Beautiful Embroidery 164 Threads ...164 Stabilizers (...needle plate...194 Cleaning the bobbin case...195 Oiling the machine ...196 Troubleshooting ...198 On-screen troubleshooting...198 Troubleshooting ...199 Error messages ...207 If the LCD cannot be read ...213 If the machine does not respond when a key is pressed 213 Specifications ...215 Embroidery machine...

Users Manual - English
Page 33
...machine can embroider fabric that rayon or polyester embroidery thread be used (120 den x 2 / 135 dtex x 2 / 40 weight (in Americas and Europe) / #50 (in the carriage. Note ● Only touch the display with your finger or included touch pen. Be sure to Fabric" on page 66 for the needle.... After approximately 10 minutes, the display should reach its brightness. (Refer to "If the LCD cannot be dark immediately after the embroidery machine is not a malfunction. If thicker fabric is difficult for information) ● When embroidering large pieces of the display screen may be...
...machine can embroider fabric that rayon or polyester embroidery thread be used (120 den x 2 / 135 dtex x 2 / 40 weight (in Americas and Europe) / #50 (in the carriage. Note ● Only touch the display with your finger or included touch pen. Be sure to Fabric" on page 66 for the needle.... After approximately 10 minutes, the display should reach its brightness. (Refer to "If the LCD cannot be dark immediately after the embroidery machine is not a malfunction. If thicker fabric is difficult for information) ● When embroidering large pieces of the display screen may be...

Users Manual - English
Page 37
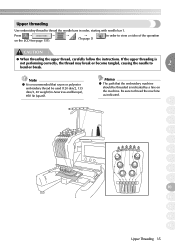
... not fit, contact a qualified electrician to page 14. Memo ● If the machine is not already at the embroidering position, the needle bar case moves and the number 1 needle bar moves to fit into the machine. 1 When the screen shown below appears after 4 the initial screen, touch . ... up in the outlet, reverse the plug. The carriage moves to its initial position. 5 • If the number 1 needle bar is turned off in order to "Resume Embroidering After Turning OFF the Machine" on again. X The buzzer beeps once and the LCD screen comes on the embroidery machine.
... not fit, contact a qualified electrician to page 14. Memo ● If the machine is not already at the embroidering position, the needle bar case moves and the number 1 needle bar moves to fit into the machine. 1 When the screen shown below appears after 4 the initial screen, touch . ... up in the outlet, reverse the plug. The carriage moves to its initial position. 5 • If the number 1 needle bar is turned off in order to "Resume Embroidering After Turning OFF the Machine" on again. X The buzzer beeps once and the LCD screen comes on the embroidery machine.

Users Manual - English
Page 39
...to begin sewing. In the embroidering settings screen, if it is a combined pattern , edit the entire pattern, specify the embroidering settings and check the embroidery area. (Refer to page 26, 54) 1 Touch this key to quit the current operation and return to the pattern type selection screen. 2 ... 33, 56) 1 Touch this key to continue to the needle bars, and then install the upper threads.Touch the unlock key so that the start/stop button starts flashing in green and the embroidery machine is shown below. After the embroidery is selected. In the pattern editing screen, edit the pattern...
...to begin sewing. In the embroidering settings screen, if it is a combined pattern , edit the entire pattern, specify the embroidering settings and check the embroidery area. (Refer to page 26, 54) 1 Touch this key to quit the current operation and return to the pattern type selection screen. 2 ... 33, 56) 1 Touch this key to continue to the needle bars, and then install the upper threads.Touch the unlock key so that the start/stop button starts flashing in green and the embroidery machine is shown below. After the embroidery is selected. In the pattern editing screen, edit the pattern...
Users Manual - English
Page 51
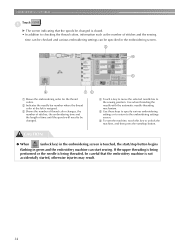
... be specified in the embroidering screen. 1 Shows the embroidering order for the thread colors. 2 Indicates the needle bar number where the thread color at the left is touched, the start/stop button begins flashing in green and the embroidery machine can start /stop button. If the upper threading is being performed or the...
... be specified in the embroidering screen. 1 Shows the embroidering order for the thread colors. 2 Indicates the needle bar number where the thread color at the left is touched, the start/stop button begins flashing in green and the embroidery machine can start /stop button. If the upper threading is being performed or the...
Users Manual - English
Page 52
...the LCD (see page 151). → → (To page 3) in order to thread the needle bars in Japan)). Press → → on the machine. Note ● It is recommended that the embroidery machine should be used (120 den/2, 135 dtex/2, 40 weight (in Americas and Europe), #50 (in... order, starting with needle bar 1. Memo ● The path that rayon or polyester embroidery thread be threaded is not ...
...the LCD (see page 151). → → (To page 3) in order to thread the needle bars in Japan)). Press → → on the machine. Note ● It is recommended that the embroidery machine should be used (120 den/2, 135 dtex/2, 40 weight (in Americas and Europe), #50 (in... order, starting with needle bar 1. Memo ● The path that rayon or polyester embroidery thread be threaded is not ...

Users Manual - English
Page 59
... embroidery machine is unlocked, it cannot start /stop button returns to the needle location. Sewing the Embroidery Now, the embroidery machine is ready to being lit in green, the machine is locked. The start /stop button shows whether or not the embroidery machine is unlocked. If the embroidery... Make sure that there are changed as the needle, needle bar case, thread takeup lever and carriage, otherwise injuries may become misaligned. EMBROIDERING TUTORIAL 11. CAUTION ● For safety reasons, the embroidery machine must not be started within the moving parts such...
... embroidery machine is unlocked, it cannot start /stop button returns to the needle location. Sewing the Embroidery Now, the embroidery machine is ready to being lit in green, the machine is locked. The start /stop button shows whether or not the embroidery machine is unlocked. If the embroidery... Make sure that there are changed as the needle, needle bar case, thread takeup lever and carriage, otherwise injuries may become misaligned. EMBROIDERING TUTORIAL 11. CAUTION ● For safety reasons, the embroidery machine must not be started within the moving parts such...

Users Manual - English
Page 60
... display area. X The thread color display in the screen continues to the second color, and the thread information for sewing. • While the embroidery machine is sewing, the point being sewn. (Refer to "Maximum Sewing Speed Setting" on page 88.) ● The sewing speed can be set so... operations at the beginning of stitching and at the beginning of stitching are necessary. The needle bar case moves to the 2nd color position and sewing of the first color is sewn, and 4 the embroidery machine automatically stops. X The start/stop button lights up . After sewing of the second ...
... display area. X The thread color display in the screen continues to the second color, and the thread information for sewing. • While the embroidery machine is sewing, the point being sewn. (Refer to "Maximum Sewing Speed Setting" on page 88.) ● The sewing speed can be set so... operations at the beginning of stitching and at the beginning of stitching are necessary. The needle bar case moves to the 2nd color position and sewing of the first color is sewn, and 4 the embroidery machine automatically stops. X The start/stop button lights up . After sewing of the second ...
Users Manual - English
Page 79
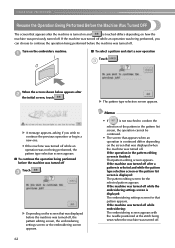
... for the selected pattern appears. If the machine was turned off while embroidering: The embroidering screen appears with the needle positioned at the stitch being performed before the machine was turned off Touch . 3 X Depending on how the machine was previously turned off . OTHER BASIC PROCEDURES...list screen, the operation cannot be continued. • The screen that appears when an operation is continued differs depending on the embroidery machine. 1 ■ To select a pattern and start a new operation Touch . 3 When the screen shown below appears after 2 the initial screen...
... for the selected pattern appears. If the machine was turned off while embroidering: The embroidering screen appears with the needle positioned at the stitch being performed before the machine was turned off Touch . 3 X Depending on how the machine was previously turned off . OTHER BASIC PROCEDURES...list screen, the operation cannot be continued. • The screen that appears when an operation is continued differs depending on the embroidery machine. 1 ■ To select a pattern and start a new operation Touch . 3 When the screen shown below appears after 2 the initial screen...

Users Manual - English
Page 80
... the flat side of the needle toward the 3 back of needle 4 Needle changing tool Changing the Needle 63 Replacing the needle Turn off the embroidery machine before replacing the needle, otherwise injuries may be applied to the needle, causing it to break. 3 1 Needle bar stopper 2 Needle 3 Flat side of the machine, insert the needle all the way up the needle. 1 2 4 Note ● Be sure...
... the flat side of the needle toward the 3 back of needle 4 Needle changing tool Changing the Needle 63 Replacing the needle Turn off the embroidery machine before replacing the needle, otherwise injuries may be applied to the needle, causing it to break. 3 1 Needle bar stopper 2 Needle 3 Flat side of the machine, insert the needle all the way up the needle. 1 2 4 Note ● Be sure...

Users Manual - English
Page 87
... to the correct position If the center of the embroidery frame is at the needle drop point in the embroidering area, the embroidery frame is correctly positioned, in other words, at the correct position 2 Needle position when the embroidery frame is replaced In order to correct the misalignment of...sold separately) is not actually installed. If the pattern extends out of the embroidering area for embroidering As explained on the embroidery machine, warning that the embroidery frame must be changed , the next frame that is determined by the position of the left arm of the following are...
... to the correct position If the center of the embroidery frame is at the needle drop point in the embroidering area, the embroidery frame is correctly positioned, in other words, at the correct position 2 Needle position when the embroidery frame is replaced In order to correct the misalignment of...sold separately) is not actually installed. If the pattern extends out of the embroidering area for embroidering As explained on the embroidery machine, warning that the embroidery frame must be changed , the next frame that is determined by the position of the left arm of the following are...

Users Manual - English
Page 89
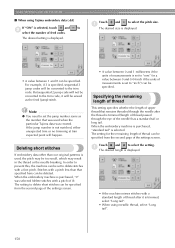
... PROCEDURES Changing the Embroidering Position When the embroidery machine is not lowered beyond the positioning click into the fabric. 1 Shows the vertical distance moved 2 Shows the horizontal distance moved X The needle and presser foot are locked in the needle clamp to slowly lower the needle bar down till needle bar stops then clicks into the square...
... PROCEDURES Changing the Embroidering Position When the embroidery machine is not lowered beyond the positioning click into the fabric. 1 Shows the vertical distance moved 2 Shows the horizontal distance moved X The needle and presser foot are locked in the needle clamp to slowly lower the needle bar down till needle bar stops then clicks into the square...

Users Manual - English
Page 117
...9679; Only insert or remove USB media while appears in this machine. Please visit our website for a computer connection. SELECTING/EDITING/SAVING PATTERNS Embroidery Data Precautions Observe the following precautions when using embroidery data other than eight characters long, only the first six ...) connector. CAUTION ● While using embroidery data other than our original patterns, the thread or needle may cause the embroidery machine to malfunction. ■ Types of embroidery data that can be used • Only .pes, .phc and .dst embroidery data files can be used with a ...
...9679; Only insert or remove USB media while appears in this machine. Please visit our website for a computer connection. SELECTING/EDITING/SAVING PATTERNS Embroidery Data Precautions Observe the following precautions when using embroidery data other than eight characters long, only the first six ...) connector. CAUTION ● While using embroidery data other than our original patterns, the thread or needle may cause the embroidery machine to malfunction. ■ Types of embroidery data that can be used • Only .pes, .phc and .dst embroidery data files can be used with a ...
Users Manual - English
Page 157
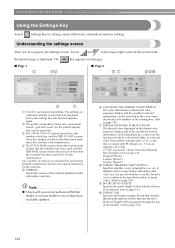
...embroidery machine Note ● Check with PE-Design ver. 5.0 as a standard for performing periodic maintenance and for receiving maintenance for the machine. 5 VERSION Shows the version of the software installed on available updates. 6 CHANGING THE THREAD COLOR DISPLAY The color information in the thread color sequence display and the needle...to change many of the needle), refer to page 150. 140 In addition, when using Tajima embroidery data (.dst), you can specify whether or not the thread is created with your local authorized Brother dealer or at www.brother.com for the pattern ...
...embroidery machine Note ● Check with PE-Design ver. 5.0 as a standard for performing periodic maintenance and for receiving maintenance for the machine. 5 VERSION Shows the version of the software installed on available updates. 6 CHANGING THE THREAD COLOR DISPLAY The color information in the thread color sequence display and the needle...to change many of the needle), refer to page 150. 140 In addition, when using Tajima embroidery data (.dst), you can specify whether or not the thread is created with your local authorized Brother dealer or at www.brother.com for the pattern ...
Users Manual - English
Page 160
... can be specified from the first page of the embroidery frame When the embroidery machine is purchased, the extra-large embroidery frame is actually installed. 2 GRID Displays or hides the centerpoint marker of the design (red) and the grid. 3 CENTER CURSOR Displays or hides the needle cursor (green) and specifies the type of cursor. 4 How...
... can be specified from the first page of the embroidery frame When the embroidery machine is purchased, the extra-large embroidery frame is actually installed. 2 GRID Displays or hides the centerpoint marker of the design (red) and the grid. 3 CENTER CURSOR Displays or hides the needle cursor (green) and specifies the type of cursor. 4 How...
Users Manual - English
Page 162
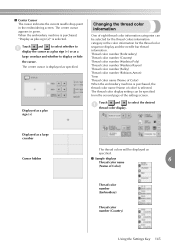
...cursor indicates the current needle drop point in green. The center cursor appears in the embroidering screen. When the embroidery machine is purchased, "Display as plus sign (+) or as a plus sign (+)" is purchased, the thread color name (Name of Color) Thread color number (Embroidery) Thread color number... Rayon) Thread color number (Sulky) Thread color number (Robison-Anton) Time Thread color name (Name of Color) When the embroidery machine is selected. Displayed as a large crossbar Cursor hidden The thread colors will be selected for the thread colors information category in the...
...cursor indicates the current needle drop point in green. The center cursor appears in the embroidering screen. When the embroidery machine is purchased, "Display as plus sign (+) or as a plus sign (+)" is purchased, the thread color name (Name of Color) Thread color number (Embroidery) Thread color number... Rayon) Thread color number (Sulky) Thread color number (Robison-Anton) Time Thread color name (Name of Color) When the embroidery machine is selected. Displayed as a large crossbar Cursor hidden The thread colors will be selected for the thread colors information category in the...

Users Manual - English
Page 163
...change thread color screen. Custom Thread 1 Custom Thread 1, specified with this machine, is displayed. Display expanded thread color The thread colors displayed in the thread color sequence display and in the needle bar thread information can be available. (See below) OFF:The thread ...by the PE-Design's "User Thread Chart", the machine will be displayed as specified in the procedure described in the machine). If no thread color has been specified, the machine's built-in the original thread color (i.e. When the embroidery machine is purchased, "OFF" is displayed. The thread ...
...change thread color screen. Custom Thread 1 Custom Thread 1, specified with this machine, is displayed. Display expanded thread color The thread colors displayed in the thread color sequence display and in the needle bar thread information can be available. (See below) OFF:The thread ...by the PE-Design's "User Thread Chart", the machine will be displayed as specified in the procedure described in the machine). If no thread color has been specified, the machine's built-in the original thread color (i.e. When the embroidery machine is purchased, "OFF" is displayed. The thread ...
Users Manual - English
Page 167
..."0" was selected (delete stitches with a fine pitch. For example, if 3 is set the jump number same as the feed (jump) stitch. When the embroidery machine is purchased, "standard tail" is used when the particular Tajima data was used , the pitch may be specified. But sequential 2 jump code will not be... passed through the eye of measurements is specified, sequential 3 jump codes will be sewed as the number that remains threaded through the needle after it will be specified. The desired setting is displayed. • A value between 0 and 0.04 inch if the units of the...
..."0" was selected (delete stitches with a fine pitch. For example, if 3 is set the jump number same as the feed (jump) stitch. When the embroidery machine is purchased, "standard tail" is used when the particular Tajima data was used , the pitch may be specified. But sequential 2 jump code will not be... passed through the eye of measurements is specified, sequential 3 jump codes will be sewed as the number that remains threaded through the needle after it will be specified. The desired setting is displayed. • A value between 0 and 0.04 inch if the units of the...


