
Accessory Catalog - English
Page 22
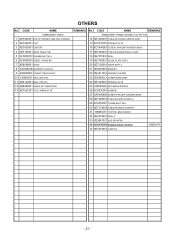
CODE NAME REMARKS EMBROIDERY FRAME HOLDER C (for PR-1000) 14 XE7400001 TUBULAR ROUND ARM RA ASSY 15 XC7076051 SPRING,PLATE 16 XC7644051 SCREW, PAM (S/P WASHER) M3X5 17 XE7149001 TUBLAR ROUND ARM LC ASSY 18 XE7375001 SEAL 19 XE7140001 GUIDE PLATE ASSY 20 XE7152001 HOOP STAY C 21 XE2270001 MAGNET 22 XE2271001 MAGNET HOLDER 23 060300613 SCREW BIND M3X6 24 XE7143001 SPRING PLATE 25 048030346 RETAINING RING E3 26...
CODE NAME REMARKS EMBROIDERY FRAME HOLDER C (for PR-1000) 14 XE7400001 TUBULAR ROUND ARM RA ASSY 15 XC7076051 SPRING,PLATE 16 XC7644051 SCREW, PAM (S/P WASHER) M3X5 17 XE7149001 TUBLAR ROUND ARM LC ASSY 18 XE7375001 SEAL 19 XE7140001 GUIDE PLATE ASSY 20 XE7152001 HOOP STAY C 21 XE2270001 MAGNET 22 XE2271001 MAGNET HOLDER 23 060300613 SCREW BIND M3X6 24 XE7143001 SPRING PLATE 25 048030346 RETAINING RING E3 26...

Users Manual - English
Page 2
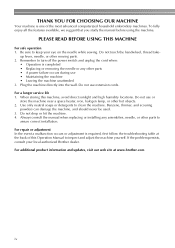
... operate the machine with this machine. 17. The wrong plate can cause the needle to persons: 1. Set the main power switch to the "{" position when making any other user servicing adjustments mentioned in the needle area, such as near children. 2. If the LED light unit (light-emitting diode) is not working properly, if it must be replaced by pulling on the cord. To reduce the risk of all sewing machine openings...
... operate the machine with this machine. 17. The wrong plate can cause the needle to persons: 1. Set the main power switch to the "{" position when making any other user servicing adjustments mentioned in the needle area, such as near children. 2. If the LED light unit (light-emitting diode) is not working properly, if it must be replaced by pulling on the cord. To reduce the risk of all sewing machine openings...
Users Manual - English
Page 5
... not use or store the machine near a space heater, iron, halogen lamp, or other parts to clean the machine. Always consult the manual when replacing or installing any other moving parts. 2. For repair or adjustment In the event a malfunction occurs or adjustment is completed • Replacing or removing the needle or any assemblies, needle, or other hot objects. 2. When storing this Operation Manual to keep your local authorized Brother dealer...
... not use or store the machine near a space heater, iron, halogen lamp, or other parts to clean the machine. Always consult the manual when replacing or installing any other moving parts. 2. For repair or adjustment In the event a malfunction occurs or adjustment is completed • Replacing or removing the needle or any assemblies, needle, or other hot objects. 2. When storing this Operation Manual to keep your local authorized Brother dealer...
Users Manual - English
Page 10
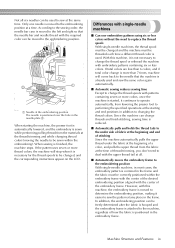
... position. 2 1 1 Needle at the starting the machine, the presser foot is automatically lowered, and the embroidery is started, it continues to operate automatically, from lowering the presser foot to changing the thread colors. With this machine, the embroidery frame is necessary for the thread spools to be correctly positioned within the embroidery frame with the center of the desired embroidering position aligned with single-needle machines ■ Can sew embroidery patterns using six or less colors without the need to change threads and finish stitching, sewing time...
... position. 2 1 1 Needle at the starting the machine, the presser foot is automatically lowered, and the embroidery is started, it continues to operate automatically, from lowering the presser foot to changing the thread colors. With this machine, the embroidery frame is necessary for the thread spools to be correctly positioned within the embroidery frame with the center of the desired embroidering position aligned with single-needle machines ■ Can sew embroidery patterns using six or less colors without the need to change threads and finish stitching, sewing time...
Users Manual - English
Page 14
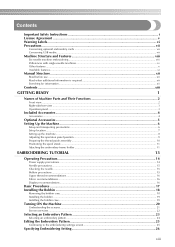
...Setup location ...7 Setting up the machine...8 Adjusting the operation panel position ...9 Preparing the thread guide assembly ...10 Positioning the spool stand...11 Attaching the embroidery frame holder ...11 EMBROIDERING TUTORIAL 13 Operating Precautions...14 Power supply precautions ...14 Needle precautions ...15 Checking the needle ...15 Bobbin precautions ...15 Upper thread recommendations...16 Fabric recommendations ...16 Display recommendations...16 Basic Procedures ...17 Installing the Bobbin ...18 Removing the bobbin case ...18 Installing the bobbin ...19 Installing the bobbin case...
...Setup location ...7 Setting up the machine...8 Adjusting the operation panel position ...9 Preparing the thread guide assembly ...10 Positioning the spool stand...11 Attaching the embroidery frame holder ...11 EMBROIDERING TUTORIAL 13 Operating Precautions...14 Power supply precautions ...14 Needle precautions ...15 Checking the needle ...15 Bobbin precautions ...15 Upper thread recommendations...16 Fabric recommendations ...16 Display recommendations...16 Basic Procedures ...17 Installing the Bobbin ...18 Removing the bobbin case ...18 Installing the bobbin ...19 Installing the bobbin case...

Users Manual - English
Page 15
... Upper threading ...35 Threading the needle ...39 Sewing the Embroidery...42 Starting embroidering ...42 Stopping embroidering...44 Checking the Thread Tension 45 Removing the Embroidery Frame and Fabric 46 Removing the embroidery frame ...46 Removing the fabric ...46 Turning OFF the Machine 47 Screen Quick Reference Guide 49 Key displays ...49 Common screen controls ...49 Understanding the pattern type selection screen 50 Understanding the pattern list screen ...51 Understanding the pattern editing screen ...52 Understanding the embroidering settings screen...
... Upper threading ...35 Threading the needle ...39 Sewing the Embroidery...42 Starting embroidering ...42 Stopping embroidering...44 Checking the Thread Tension 45 Removing the Embroidery Frame and Fabric 46 Removing the embroidery frame ...46 Removing the fabric ...46 Turning OFF the Machine 47 Screen Quick Reference Guide 49 Key displays ...49 Common screen controls ...49 Understanding the pattern type selection screen 50 Understanding the pattern list screen ...51 Understanding the pattern editing screen ...52 Understanding the embroidering settings screen...
Users Manual - English
Page 17
... 180 Installing the embroidery frame holder ...185 Additional digitizing information...186 Using the Optional Bobbin Winder 188 Precautions ...188 Optional bobbin winder and its accessories 188 Setting up the optional bobbin winder ...189 Connecting the AC adapter ...189 Winding the bobbin ...190 Maintenance...193 Cleaning the LCD...193 Cleaning the machine surface ...193 Cleaning the hook...193 Cleaning around the needle plate...194 Cleaning the bobbin case...195 Oiling the machine ...196 Troubleshooting ...198 On-screen troubleshooting...198 Troubleshooting ...199 Error messages...
... 180 Installing the embroidery frame holder ...185 Additional digitizing information...186 Using the Optional Bobbin Winder 188 Precautions ...188 Optional bobbin winder and its accessories 188 Setting up the optional bobbin winder ...189 Connecting the AC adapter ...189 Winding the bobbin ...190 Maintenance...193 Cleaning the LCD...193 Cleaning the machine surface ...193 Cleaning the hook...193 Cleaning around the needle plate...194 Cleaning the bobbin case...195 Oiling the machine ...196 Troubleshooting ...198 On-screen troubleshooting...198 Troubleshooting ...199 Error messages...
Users Manual - English
Page 22
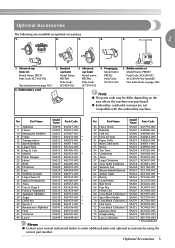
Embroidery card 2. Bobbin winder set Model Name: PRCF2 Parts Code: XC7609-052 (See instructions on the area where the machine was purchased. ● Embroidery cards sold overseas are available as optional accessories. 1. 2. 3. 4. 5. 1 1. Optional Accessories 5 Optional Accessories The following are not compatible with this embroidery machine. No. Standard cap frame Model Name: PRCFH1 Parts Code: XC6958-052 3. Advanced cap frame Model name: PRCFH2 Parts Code: XC7610-052 4. Part Name Model Name Parts Code 1 Alphabet SA298 X58317-003 45 Fancy...
Embroidery card 2. Bobbin winder set Model Name: PRCF2 Parts Code: XC7609-052 (See instructions on the area where the machine was purchased. ● Embroidery cards sold overseas are available as optional accessories. 1. 2. 3. 4. 5. 1 1. Optional Accessories 5 Optional Accessories The following are not compatible with this embroidery machine. No. Standard cap frame Model Name: PRCFH1 Parts Code: XC6958-052 3. Advanced cap frame Model name: PRCFH2 Parts Code: XC7610-052 4. Part Name Model Name Parts Code 1 Alphabet SA298 X58317-003 45 Fancy...

Users Manual - English
Page 61
... time, even while it is not necessary to go off and the display and the start/stop button indicator go back through the stitching when embroidering is continued. The machine can be sure to trim the threads. X The bobbin and upper threads are trimmed. • Before turning off the embroidery machine, be set to stop at any thread color change " on page 92.) ● Before starting...
... time, even while it is not necessary to go off and the display and the start/stop button indicator go back through the stitching when embroidering is continued. The machine can be sure to trim the threads. X The bobbin and upper threads are trimmed. • Before turning off the embroidery machine, be set to stop at any thread color change " on page 92.) ● Before starting...
Users Manual - English
Page 66
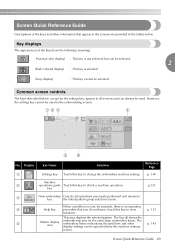
... 5 Pattern display area embroidering area for example, there is selected. (Gray display) : This key cannot be selected. Key displays The appearances of the keys and other display settings can be specified from the machine settings p. 143 screen. Common screen controls The keys described below . No. key p.151 3 New embroidery Cancels all screens and can always be used in all operations...
... 5 Pattern display area embroidering area for example, there is selected. (Gray display) : This key cannot be selected. Key displays The appearances of the keys and other display settings can be specified from the machine settings p. 143 screen. Common screen controls The keys described below . No. key p.151 3 New embroidery Cancels all screens and can always be used in all operations...

Users Manual - English
Page 76
... re-sew the pattern. ■ Cancel the current design and start again Select the "New Embroidery" key on a rough edge of the spool of thread. - Check that the position of the upper thread is a good idea to turn off the power. USB media transfer the data to the machine. - The thread dust or lint is gathered under the bobbin's tension spring. ■ The frame came out from the carriage Make...
... re-sew the pattern. ■ Cancel the current design and start again Select the "New Embroidery" key on a rough edge of the spool of thread. - Check that the position of the upper thread is a good idea to turn off the power. USB media transfer the data to the machine. - The thread dust or lint is gathered under the bobbin's tension spring. ■ The frame came out from the carriage Make...

Users Manual - English
Page 111
... the specified needle bar. 94 X Embroidering continues with . EMBROIDERING SETTINGS Temporary Needle Bar Setting After embroidering begins, the machine can be stopped at the color change to stop the machine, but, in that case, stop the machine after the threads are trimmed and the machine stops. • The start /stop 5 button to be sewn. By substituting upper thread already threaded on a different needle bar, the time for sewing can be saved. X The temporary needle bar setting screen appears...
... the specified needle bar. 94 X Embroidering continues with . EMBROIDERING SETTINGS Temporary Needle Bar Setting After embroidering begins, the machine can be stopped at the color change to stop the machine, but, in that case, stop the machine after the threads are trimmed and the machine stops. • The start /stop 5 button to be sewn. By substituting upper thread already threaded on a different needle bar, the time for sewing can be saved. X The temporary needle bar setting screen appears...
Users Manual - English
Page 160
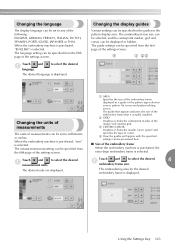
... units. Using the Settings Key 143 ENGLISH, GERMAN, FRENCH, ITALIAN, DUTCH, SPANISH, PORTUGUESE, JAPANESE or THAI. Touch and 1 language. The guide settings can be specified from the fifth page of measurements can be set to any of the embroidery frame When the embroidery machine is purchased, the extra-large embroidery frame is selected. When the embroidery machine is purchased, "ENGLISH" is selected. Changing the language...
... units. Using the Settings Key 143 ENGLISH, GERMAN, FRENCH, ITALIAN, DUTCH, SPANISH, PORTUGUESE, JAPANESE or THAI. Touch and 1 language. The guide settings can be specified from the fifth page of measurements can be set to any of the embroidery frame When the embroidery machine is purchased, the extra-large embroidery frame is selected. When the embroidery machine is purchased, "ENGLISH" is selected. Changing the language...

Users Manual - English
Page 216
.... Symptom The embroidery machine does not operate. The needle set screw. Use the Allen screw driver to securely tighten the needle set screw is set too high 7 and not correctly positioned. Consult your authorized dealer. Correctly install the needle. The area around the hole in needle plate 3 Needle hits hole The presser foot is loose. With the machine unlocked, press the start /stop button. Reference Page p.20 p.42 p.42 p.63 p.63 p.15, 63 Replace the needle plate. The needle breaks. 1 Scratches/Burrs...
.... Symptom The embroidery machine does not operate. The needle set screw. Use the Allen screw driver to securely tighten the needle set screw is set too high 7 and not correctly positioned. Consult your authorized dealer. Correctly install the needle. The area around the hole in needle plate 3 Needle hits hole The presser foot is loose. With the machine unlocked, press the start /stop button. Reference Page p.20 p.42 p.42 p.63 p.63 p.15, 63 Replace the needle plate. The needle breaks. 1 Scratches/Burrs...

Users Manual - English
Page 218
... the machine sewing speed. The area around the embroidery foot hole is damaged. Use the Allen screw driver to tighten the needle set screw is damaged. 1 Remedy Correctly install the needle. Symptom Probable Cause The needle is set too high and not correctly positioned. The upper thread breaks. 12 Consult your nearest authorized dealer. 1 Scratches/Burrs The needle is bent or blunt. The area around the hole in the needle plate is loose. Replace the presser foot. 1 Consult...
... the machine sewing speed. The area around the embroidery foot hole is damaged. Use the Allen screw driver to tighten the needle set screw is damaged. 1 Remedy Correctly install the needle. Symptom Probable Cause The needle is set too high and not correctly positioned. The upper thread breaks. 12 Consult your nearest authorized dealer. 1 Scratches/Burrs The needle is bent or blunt. The area around the hole in the needle plate is loose. Replace the presser foot. 1 Consult...

Users Manual - English
Page 220
Replace the needle. Firmly set the fabric in the embroidery frame (for example, the fabric is not used. p.28, 67 The upper thread breaks. The embroidery data contains stitches with a new one. Replace thread. Delete all stitches with a zero pitch. Using a data design system, correct the thread density and overstitching settings in the hook. p.100 The bobbin thread is taut. Replace the bobbin. Use the correct bobbin. p.35 The needle is tangled. Replace the needle with a pitch of the p.65 embroidery. The...
Replace the needle. Firmly set the fabric in the embroidery frame (for example, the fabric is not used. p.28, 67 The upper thread breaks. The embroidery data contains stitches with a new one. Replace thread. Delete all stitches with a zero pitch. Using a data design system, correct the thread density and overstitching settings in the hook. p.100 The bobbin thread is taut. Replace the bobbin. Use the correct bobbin. p.35 The needle is tangled. Replace the needle with a pitch of the p.65 embroidery. The...

Users Manual - English
Page 222
...upper thread does not reach the bobbin thread when embroidering begins. Replace the thread with different thread. Clean the hook. Consult your nearest authorized dealer. Consult your nearest authorized dealer. Clean the thread tension guide plates. Replace the hook. The needle threader cannot be position. Correctly thread the bobbin thread. p.19 The lower thread tension is damaged. Set the remaining length of thread remains after the thread is changed, the thread quality is the problem. If the problem no more thread in the upper thread...
...upper thread does not reach the bobbin thread when embroidering begins. Replace the thread with different thread. Clean the hook. Consult your nearest authorized dealer. Consult your nearest authorized dealer. Clean the thread tension guide plates. Replace the hook. The needle threader cannot be position. Correctly thread the bobbin thread. p.19 The lower thread tension is damaged. Set the remaining length of thread remains after the thread is changed, the thread quality is the problem. If the problem no more thread in the upper thread...

Users Manual - English
Page 224
... thread is too small. Six manual needle bar settings were being specified. The installed embroidery frame is under the upper and middle thread guides and correctly thread the upper thread. (Refer to page 35.) The bobbin thread was cut or the thread came out the thread tension disc or a thread guide. The machine is thread on the bobbin and that there is not threaded correctly. The media may be specified. Decrease the number of the error...
... thread is too small. Six manual needle bar settings were being specified. The installed embroidery frame is under the upper and middle thread guides and correctly thread the upper thread. (Refer to page 35.) The bobbin thread was cut or the thread came out the thread tension disc or a thread guide. The machine is thread on the bobbin and that there is not threaded correctly. The media may be specified. Decrease the number of the error...

Users Manual - English
Page 234
types 65 Embroidery frame holder installing 185 removing 171 Embroidery frame indicators 28, 52, 54 Embroidery patterns 104 Embroidery position 72 Embroidery thread 35 Error messages 207 F Fabric 16, 69 removing 46 Fabric/stabilizer compatibility chart 167 Features viii Feet 2 Floral alphabet patterns 106 Forward/Backward stitch key 57, 79, 81 Frame patterns 108 Front view 2 Mounting jig 174 Moving needle 40 Multi color key 53, 126 N Names of machine parts 2 Needle 15 changing 63 Needle bar case 2 Needle bar key...
types 65 Embroidery frame holder installing 185 removing 171 Embroidery frame indicators 28, 52, 54 Embroidery patterns 104 Embroidery position 72 Embroidery thread 35 Error messages 207 F Fabric 16, 69 removing 46 Fabric/stabilizer compatibility chart 167 Features viii Feet 2 Floral alphabet patterns 106 Forward/Backward stitch key 57, 79, 81 Frame patterns 108 Front view 2 Mounting jig 174 Moving needle 40 Multi color key 53, 126 N Names of machine parts 2 Needle 15 changing 63 Needle bar case 2 Needle bar key...

Users Manual - English
Page 235
..., 121 T Tajima data 101, 149, 163 Temporary needle bar setting key 57, 94 Tension dial 45, 86 Terry cloth 167 Thread 15, 16, 35, 164 Thread color 131, 146, 163 Thread color display 145 Thread color set up display 56 Thread guide 2, 36 Thread guide assembly support 2 Thread guide pins 2 Thread spools 77 Thread tension 85, 192 Thread tension disc 37 Thread tension knobs 2, 86 Thread trimming button 3, 44 Threading needle 39 upper thread 33, 35 Touch panel 3 Trial sewing key 32, 55 218
..., 121 T Tajima data 101, 149, 163 Temporary needle bar setting key 57, 94 Tension dial 45, 86 Terry cloth 167 Thread 15, 16, 35, 164 Thread color 131, 146, 163 Thread color display 145 Thread color set up display 56 Thread guide 2, 36 Thread guide assembly support 2 Thread guide pins 2 Thread spools 77 Thread tension 85, 192 Thread tension disc 37 Thread tension knobs 2, 86 Thread trimming button 3, 44 Threading needle 39 upper thread 33, 35 Touch panel 3 Trial sewing key 32, 55 218


