

Users Manual - English
Page 1
EMBROIDERY MACHINE PR-600 OPERATION MANUAL
EMBROIDERY MACHINE PR-600 OPERATION MANUAL
Users Manual - English
Page 5
....brother.com iv Do not use or store the machine near a space heater, iron, halogen lamp, or other moving parts. 2. Do not drop or hit the machine. 4. For additional product information and updates, visit our web site at the back of the most advanced computerized household embroidery machines.... To fully enjoy all the features available, we suggest that you study the manual before using the machine. Benzene, thinner, and scouring powders can damage the machine, and should never be used. 3. Remember to turn ...
....brother.com iv Do not use or store the machine near a space heater, iron, halogen lamp, or other moving parts. 2. Do not drop or hit the machine. 4. For additional product information and updates, visit our web site at the back of the most advanced computerized household embroidery machines.... To fully enjoy all the features available, we suggest that you study the manual before using the machine. Benzene, thinner, and scouring powders can damage the machine, and should never be used. 3. Remember to turn ...

Users Manual - English
Page 6
..., commercial or industrial purposes. • Sell or otherwise distribute the EMBROIDERY created by use at any one embroidery machine at a time. Nothing in this agreement constitutes a waiver of the rights of BROTHER under the terms and conditions of this Agreement. Please direct all rights... • Use the CONTENT in writing by the laws of Brother Industries, Ltd. ("BROTHER"). BROTHER retains ownership of all rights to CONTENT and to create embroidery. • Use the CONTENT in combination with an embroidery machine to the copies of the CONTENT included in this Agreement in ...
..., commercial or industrial purposes. • Sell or otherwise distribute the EMBROIDERY created by use at any one embroidery machine at a time. Nothing in this agreement constitutes a waiver of the rights of BROTHER under the terms and conditions of this Agreement. Please direct all rights... • Use the CONTENT in writing by the laws of Brother Industries, Ltd. ("BROTHER"). BROTHER retains ownership of all rights to CONTENT and to create embroidery. • Use the CONTENT in combination with an embroidery machine to the copies of the CONTENT included in this Agreement in ...

Users Manual - English
Page 8
... USB media in a location exposed to strong static electricity or electrical interference. • Do not use only recommended embroidery cards. • Some licensed or copyright embroidery cards cannot be used with this embroidery machine. • Embroidery cards sold overseas cannot be exposed to vibrations or impacts, and do not attempt to remove the USB media...
... USB media in a location exposed to strong static electricity or electrical interference. • Do not use only recommended embroidery cards. • Some licensed or copyright embroidery cards cannot be used with this embroidery machine. • Embroidery cards sold overseas cannot be exposed to vibrations or impacts, and do not attempt to remove the USB media...

Users Manual - English
Page 13
...such as described below. Chapter 6: Basic Settings and Help Feature This chapter contains descriptions on the use of this embroidery machine. Details on changing the basic embroidery machine settings and viewing operations on the right edge of chapter 2. Find the appropriate page by using the help key....setup of this chapter. Searching for information ■ Searching the manual By title Check the descriptions at the end of the embroidery machine and the various preparations required before starting to the page that should be provided. By keyword Search the index at the ...
...such as described below. Chapter 6: Basic Settings and Help Feature This chapter contains descriptions on the use of this embroidery machine. Details on changing the basic embroidery machine settings and viewing operations on the right edge of chapter 2. Find the appropriate page by using the help key....setup of this chapter. Searching for information ■ Searching the manual By title Check the descriptions at the end of the embroidery machine and the various preparations required before starting to the page that should be provided. By keyword Search the index at the ...
Users Manual - English
Page 17
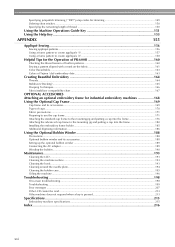
... Helpful Tips for the Operation of PR-600II 160 Checking the thread tension of built-in patterns 160 Sewing a pattern aligned with a mark on the fabric 161 Color thread table ...163 Colors of Tajima (.dst) embroidery data ...163 Creating Beautiful Embroidery 164 Threads ...164 Stabilizers (Backing)... ...165 Hooping Techniques...166 Fabric/stabilizer compatibility chart ...167 OPTIONAL ACCESSORIES Attaching an optional embroidery frame for industrial embroidery machines 168 Using the Optional Cap Frame 169 Cap frame and its accessories...169 Types of caps ...170 Fabric...
... Helpful Tips for the Operation of PR-600II 160 Checking the thread tension of built-in patterns 160 Sewing a pattern aligned with a mark on the fabric 161 Color thread table ...163 Colors of Tajima (.dst) embroidery data ...163 Creating Beautiful Embroidery 164 Threads ...164 Stabilizers (Backing)... ...165 Hooping Techniques...166 Fabric/stabilizer compatibility chart ...167 OPTIONAL ACCESSORIES Attaching an optional embroidery frame for industrial embroidery machines 168 Using the Optional Cap Frame 169 Cap frame and its accessories...169 Types of caps ...170 Fabric...
Users Manual - English
Page 18
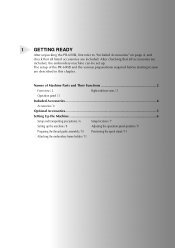
... the spool stand / 11 Attaching the embroidery frame holder / 11 The setup of Machine Parts and Their Functions 2 Front view / 2 Right-side/rear view / 3 Operation panel / 3 Included Accessories 4 Accessories / 4 Optional Accessories 5 Setting Up the Machine 6 Setup and transporting precautions / 6 Setup location / 7 Setting up . Names of the PR-600II and the various preparations required before starting...
... the spool stand / 11 Attaching the embroidery frame holder / 11 The setup of Machine Parts and Their Functions 2 Front view / 2 Right-side/rear view / 3 Operation panel / 3 Included Accessories 4 Accessories / 4 Optional Accessories 5 Setting Up the Machine 6 Setup and transporting precautions / 6 Setup location / 7 Setting up . Names of the PR-600II and the various preparations required before starting...
Users Manual - English
Page 22
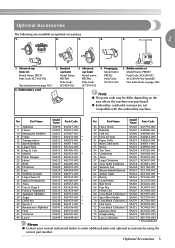
... overseas are available as optional accessories. 1. 2. 3. 4. 5. 1 1. Standard cap frame Model Name: PRCFH1 Parts Code: XC6958-052 3. Optional Accessories The following are not compatible with this embroidery machine. Advanced cap frame set Model Name: PRBW1 Parts Code: XC6290-052 XC6290-061(for Australia) (See instructions on page 188.) Note ● The parts code...
... overseas are available as optional accessories. 1. 2. 3. 4. 5. 1 1. Standard cap frame Model Name: PRCFH1 Parts Code: XC6958-052 3. Optional Accessories The following are not compatible with this embroidery machine. Advanced cap frame set Model Name: PRBW1 Parts Code: XC6290-052 XC6290-061(for Australia) (See instructions on page 188.) Note ● The parts code...
Users Manual - English
Page 23
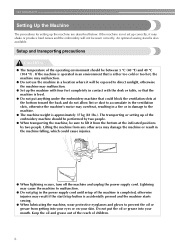
... it may shake or produce loud noises and the embroidery will be sewn correctly. Do not put anything under the embroidery machine that is either too cold or too hot, the machine may malfunction. ● Set up the machine are described below. Setup and transporting precautions CAUTION ●... people. Lightning may cause the machine to malfunction. ● Do not plug in the power supply cord until setup of the embroidery machine should be sure to direct sunlight, otherwise the machine may malfunction. ● Do not use the machine in the machine falling, which could block the ...
... it may shake or produce loud noises and the embroidery will be sewn correctly. Do not put anything under the embroidery machine that is either too cold or too hot, the machine may malfunction. ● Set up the machine are described below. Setup and transporting precautions CAUTION ●... people. Lightning may cause the machine to malfunction. ● Do not plug in the power supply cord until setup of the embroidery machine should be sure to direct sunlight, otherwise the machine may malfunction. ● Do not use the machine in the machine falling, which could block the ...

Users Manual - English
Page 30
... tutorial to embroider a pattern and master the operation of this embroidery machine. 2 EMBROIDERING TUTORIAL This chapter describes the basic embroidering operations in the Embroidery Frame 7 Attaching the Embroidery Frame to the Machine 8 Checking the Embroidery Area 9 Upper Threading 10 Sewing the Embroidery 11 Checking the Thread Tension 12 Removing the Embroidery Frame and Fabric 13 Turning OFF the...
... tutorial to embroider a pattern and master the operation of this embroidery machine. 2 EMBROIDERING TUTORIAL This chapter describes the basic embroidering operations in the Embroidery Frame 7 Attaching the Embroidery Frame to the Machine 8 Checking the Embroidery Area 9 Upper Threading 10 Sewing the Embroidery 11 Checking the Thread Tension 12 Removing the Embroidery Frame and Fabric 13 Turning OFF the...

Users Manual - English
Page 31
... damage it to heat, otherwise damage to observe the following occur, turn off the embroidery machine and unplug the power supply cord, otherwise a fire, an electric shock or damage to the machine may result. • When you are described below. Power supply precautions Be sure ...9679; Use only regular household electricity for repairs before continuing use. ● If the machine is a loose or cut connection. • During electrical storms. CAUTION ● Do not plug this machine in with extension cords or multi-plug adapters with many other appliances plugged into them, otherwise...
... damage it to heat, otherwise damage to observe the following occur, turn off the embroidery machine and unplug the power supply cord, otherwise a fire, an electric shock or damage to the machine may result. • When you are described below. Power supply precautions Be sure ...9679; Use only regular household electricity for repairs before continuing use. ● If the machine is a loose or cut connection. • During electrical storms. CAUTION ● Do not plug this machine in with extension cords or multi-plug adapters with many other appliances plugged into them, otherwise...

Users Manual - English
Page 33
... concerning the upper thread. Be sure to read " on page 213.) • The display may be dark immediately after the embroidery machine is turned on page 66 for the needle to temperature changes. Fabric recommendations Be sure to observe the following recommendations concerning the fabric.... Note ● Your machine can embroider fabric that the fabric is sewn, the needle may sometimes become darker or lighter due to penetrate the fabric, ...
... concerning the upper thread. Be sure to read " on page 213.) • The display may be dark immediately after the embroidery machine is turned on page 66 for the needle to temperature changes. Fabric recommendations Be sure to observe the following recommendations concerning the fabric.... Note ● Your machine can embroider fabric that the fabric is sewn, the needle may sometimes become darker or lighter due to penetrate the fabric, ...
Users Manual - English
Page 34
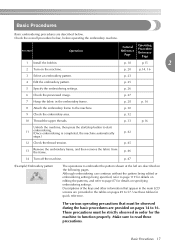
... the main LCD screens are described below , before operating the embroidery machine. These precautions must be strictly observed in the embroidery frame. Basic Procedures 17 Tutorial Reference Page Operating Procedure Reference Page p. 18 p.15 2 p. 20 p.14, 16 3 Select an embroidery pattern. p. 28 p. 16 8 Attach the embroidery frame to start 11 embroidering. (Once embroidering is completed...
... the main LCD screens are described below , before operating the embroidery machine. These precautions must be strictly observed in the embroidery frame. Basic Procedures 17 Tutorial Reference Page Operating Procedure Reference Page p. 18 p.15 2 p. 20 p.14, 16 3 Select an embroidery pattern. p. 28 p. 16 8 Attach the embroidery frame to start 11 embroidering. (Once embroidering is completed...

Users Manual - English
Page 36
... bobbin into the bobbin case. 1 Installing the bobbin case Insert the bobbin case into place. 2 3 4 5 6 Close the hook cover. 2 7 8 9 10 11 Memo 12 ● This embroidery machine is installed with the thread winding off the bobbin clockwise as shown in the opposite direction, the...
... bobbin into the bobbin case. 1 Installing the bobbin case Insert the bobbin case into place. 2 3 4 5 6 Close the hook cover. 2 7 8 9 10 11 Memo 12 ● This embroidery machine is installed with the thread winding off the bobbin clockwise as shown in the opposite direction, the...

Users Manual - English
Page 37
...To reduce the risk of embroidering, the machine will be asked if you wish to continue embroidering or begin a new operation. (Refer to the embroidering position. At that time, you will automatically save the design position when turned on the embroidery machine. If it still does not fit, ...contact a qualified electrician to page 14. Turning ON the Machine Connect the power supply cord, and then turn on again. For precautions concerning the power...
...To reduce the risk of embroidering, the machine will be asked if you wish to continue embroidering or begin a new operation. (Refer to the embroidering position. At that time, you will automatically save the design position when turned on the embroidery machine. If it still does not fit, ...contact a qualified electrician to page 14. Turning ON the Machine Connect the power supply cord, and then turn on again. For precautions concerning the power...

Users Manual - English
Page 38
... 16. The settings key cannot be used in most of the touch panel, refer to check a machine operation. The screen that appears the next time that the embroidery machine is turned on differs depending on and is an operating 4 Help key procedure that you do not know...in the embroidering settings screen. 11 12 13 14 Turning ON the Machine 21 Display Key Name Function 2 Reference Page 3 1 Settings key Touch this key to change the embroidery machine settings. key p.151 5 3 New embroidery Cancels all operations previously performed and returns to key the initial pattern ...
... 16. The settings key cannot be used in most of the touch panel, refer to check a machine operation. The screen that appears the next time that the embroidery machine is turned on differs depending on and is an operating 4 Help key procedure that you do not know...in the embroidering settings screen. 11 12 13 14 Turning ON the Machine 21 Display Key Name Function 2 Reference Page 3 1 Settings key Touch this key to change the embroidery machine settings. key p.151 5 3 New embroidery Cancels all operations previously performed and returns to key the initial pattern ...

Users Manual - English
Page 39
...the needle bars, and then install the upper threads.Touch the unlock key so that the start/stop button starts flashing in green and the embroidery machine is sewn, the embroidering settings screen appears. (Refer to page 33, 56) 1 Touch this key to continue to the pattern editing screen. After... the embroidery is ready to the embroidering settings screen. In the pattern type selection screen, select a pattern type. (Refer to page 23, 50) 1 Touch this ...
...the needle bars, and then install the upper threads.Touch the unlock key so that the start/stop button starts flashing in green and the embroidery machine is sewn, the embroidering settings screen appears. (Refer to page 33, 56) 1 Touch this key to continue to the pattern editing screen. After... the embroidery is ready to the embroidering settings screen. In the pattern type selection screen, select a pattern type. (Refer to page 23, 50) 1 Touch this ...
Users Manual - English
Page 46
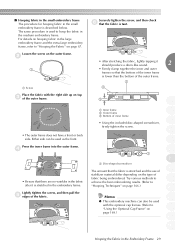
...of the outer frame. • The outer frame does not have a front or back side. For details on hooping fabric in the large embroidery frame and the extra-large embroidery frame, refer to "Hooping the Fabric" on top 3 of the fabric. Securely tighten the screw, and then check 6 that the fabric ...29 Try various methods to 9 achieve the best embroidering results. (Refer to "Hooping Techniques" on page 166.) 10 Memo 11 ● This embroidery machine can be used with the right side up on page 67. Either side can also be used as the front. The same procedure is described ...
...of the outer frame. • The outer frame does not have a front or back side. For details on hooping fabric in the large embroidery frame and the extra-large embroidery frame, refer to "Hooping the Fabric" on top 3 of the fabric. Securely tighten the screw, and then check 6 that the fabric ...29 Try various methods to 9 achieve the best embroidering results. (Refer to "Hooping Techniques" on page 166.) 10 Memo 11 ● This embroidery machine can be used with the right side up on page 67. Either side can also be used as the front. The same procedure is described ...

Users Manual - English
Page 47
... enough thread in green, the embroidery machine may start sewing. Attaching the Embroidery Frame to the embroidery machine. Attaching the embroidery frame Adjust the width of the embroidery frame holder to the size of the embroidery frame, and then attach the embroidery frame to the size of the embroidery frame. Note ● Before attaching the embroidery frame, check that there is...
... enough thread in green, the embroidery machine may start sewing. Attaching the Embroidery Frame to the embroidery machine. Attaching the embroidery frame Adjust the width of the embroidery frame holder to the size of the embroidery frame, and then attach the embroidery frame to the size of the embroidery frame. Note ● Before attaching the embroidery frame, check that there is...

Users Manual - English
Page 48
... to be on top. 3 Note 4 ● Incorrect frame positioning. 543 2 1 5 6 6 7 1 Mark for extra-large embroidery frame 2 Mark for large embroidery frame 3 Mark for medium embroidery frame 4 Mark for embroidery frame for industrial embroidery machines (When using embroidery frames for 1 the embroidery frame to be moved. • Only loosen the thumb screws a maximum of 2 turns counter clockwise. Hold the...
... to be on top. 3 Note 4 ● Incorrect frame positioning. 543 2 1 5 6 6 7 1 Mark for extra-large embroidery frame 2 Mark for large embroidery frame 3 Mark for medium embroidery frame 4 Mark for embroidery frame for industrial embroidery machines (When using embroidery frames for 1 the embroidery frame to be moved. • Only loosen the thumb screws a maximum of 2 turns counter clockwise. Hold the...


