

Accessory Catalog - English
Page 1
Home Sewing Machine PARTS REFERENCE LIST OPTIONAL ACCESSORIES PR-1000 PR-650/PR-650C PR-620/PR620C PR-600II/PR-600IIC PR-600/PR-600C Published: Jul.,2010 Revised: Dec.,2011
Home Sewing Machine PARTS REFERENCE LIST OPTIONAL ACCESSORIES PR-1000 PR-650/PR-650C PR-620/PR620C PR-600II/PR-600IIC PR-600/PR-600C Published: Jul.,2010 Revised: Dec.,2011

Users Manual - English
Page 2
... openings of the machine free from the accumulation of electric shock: 1. Do not unplug by young children or infirm persons without supervision. 16. i Use only accessories recommended by the manufacturer as changing the needle. 14. To unplug, grasp the plug, not the cord. 10. The wrong plate can cause the needle...
... openings of the machine free from the accumulation of electric shock: 1. Do not unplug by young children or infirm persons without supervision. 16. i Use only accessories recommended by the manufacturer as changing the needle. 14. To unplug, grasp the plug, not the cord. 10. The wrong plate can cause the needle...
Users Manual - English
Page 14
... Searching for information...xii Contents ...xiii GETTING READY 1 Names of Machine Parts and Their Functions 2 Front view ...2 Right-side/rear view ...3 Operation panel ...3 Included Accessories ...4 Accessories ...4 Optional Accessories...5 Setting Up the Machine...6 Setup and transporting precautions ...6 Setup location ...7 Setting up the machine...8 Adjusting the operation panel position ...9 Preparing the thread guide assembly ...10...
... Searching for information...xii Contents ...xiii GETTING READY 1 Names of Machine Parts and Their Functions 2 Front view ...2 Right-side/rear view ...3 Operation panel ...3 Included Accessories ...4 Accessories ...4 Optional Accessories...5 Setting Up the Machine...6 Setup and transporting precautions ...6 Setup location ...7 Setting up the machine...8 Adjusting the operation panel position ...9 Preparing the thread guide assembly ...10...
Users Manual - English
Page 17
...PR-600II 160 Checking the thread tension of built-in patterns 160 Sewing a pattern aligned with a mark on the fabric 161 Color thread table ...163 Colors of Tajima (.dst) embroidery data ...163 Creating Beautiful Embroidery 164 Threads ...164 Stabilizers (Backing) ...165 Hooping Techniques...166 Fabric/stabilizer compatibility chart ...167 OPTIONAL ACCESSORIES... digitizing information...186 Using the Optional Bobbin Winder 188 Precautions ...188 Optional bobbin winder and its accessories 188 Setting up the optional bobbin winder ...189 Connecting the AC adapter ...189 Winding the bobbin...
...PR-600II 160 Checking the thread tension of built-in patterns 160 Sewing a pattern aligned with a mark on the fabric 161 Color thread table ...163 Colors of Tajima (.dst) embroidery data ...163 Creating Beautiful Embroidery 164 Threads ...164 Stabilizers (Backing) ...165 Hooping Techniques...166 Fabric/stabilizer compatibility chart ...167 OPTIONAL ACCESSORIES... digitizing information...186 Using the Optional Bobbin Winder 188 Precautions ...188 Optional bobbin winder and its accessories 188 Setting up the optional bobbin winder ...189 Connecting the AC adapter ...189 Winding the bobbin...
Users Manual - English
Page 18
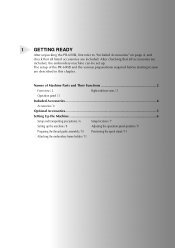
... refer to sew are described in this chapter. Names of the PR-600II and the various preparations required before starting to "Included Accessories" on page 4, and check that all listed accessories are included, the embroidery machine can be set up the machine / 8 Adjusting the operation ...setup of Machine Parts and Their Functions 2 Front view / 2 Right-side/rear view / 3 Operation panel / 3 Included Accessories 4 Accessories / 4 Optional Accessories 5 Setting Up the Machine 6 Setup and transporting precautions / 6 Setup location / 7 Setting up . After checking that all...
... refer to sew are described in this chapter. Names of the PR-600II and the various preparations required before starting to "Included Accessories" on page 4, and check that all listed accessories are included, the embroidery machine can be set up the machine / 8 Adjusting the operation ...setup of Machine Parts and Their Functions 2 Front view / 2 Right-side/rear view / 3 Operation panel / 3 Included Accessories 4 Accessories / 4 Optional Accessories 5 Setting Up the Machine 6 Setup and transporting precautions / 6 Setup location / 7 Setting up . After checking that all...

Users Manual - English
Page 21
If any item is missing or damaged, contact your retailer. Accessories The accessories listed below are included. Part Name Model Name Parts Code 1 Accessory case XC6482-051 2 Needle set (2 pcs.) PRHA1BR11 XC6469-001 3 Prewound bobbin (6 pcs.) XC6368-051 4 Spool net (6 pcs.) S34455-000 ... XD1133-051 30 Quick reference guide XD0754-051 31 Spool mat (6pcs.) XC7134-051 32 Spool cap (6pcs.) 130012-054 4 Make sure to use the accessories supplied with this machine. 1. 2. 3. 4. 5. 6. 7. 8. 9. 10. 11. 12. 13. 14. 15. 16. 17. 18. 19. 20. 21. 22. 23. 24. ...
If any item is missing or damaged, contact your retailer. Accessories The accessories listed below are included. Part Name Model Name Parts Code 1 Accessory case XC6482-051 2 Needle set (2 pcs.) PRHA1BR11 XC6469-001 3 Prewound bobbin (6 pcs.) XC6368-051 4 Spool net (6 pcs.) S34455-000 ... XD1133-051 30 Quick reference guide XD0754-051 31 Spool mat (6pcs.) XC7134-051 32 Spool cap (6pcs.) 130012-054 4 Make sure to use the accessories supplied with this machine. 1. 2. 3. 4. 5. 6. 7. 8. 9. 10. 11. 12. 13. 14. 15. 16. 17. 18. 19. 20. 21. 22. 23. 24. ...
Users Manual - English
Page 22
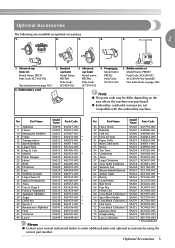
...XA6849-003 75 Lace Collection SA375 XD1193-003 * Discontinued Memo ● Contact your nearest authorized dealer to order additional parts and optional accessories by using the correct part number. Advanced cap frame set Model Name: PRBW1 Parts Code: XC6290-052 XC6290-061(for Australia) ...cap frame Model Name: PRCFH1 Parts Code: XC6958-052 3. No. Advanced cap frame Model name: PRCFH2 Parts Code: XC7610-052 4. Optional Accessories 5 Embroidery card 2. Part Name Model Name Parts Code No. Bobbin winder set Model Name: PRCF2 Parts Code: XC7609-052 (See instructions on...
...XA6849-003 75 Lace Collection SA375 XD1193-003 * Discontinued Memo ● Contact your nearest authorized dealer to order additional parts and optional accessories by using the correct part number. Advanced cap frame set Model Name: PRBW1 Parts Code: XC6290-052 XC6290-061(for Australia) ...cap frame Model Name: PRCFH1 Parts Code: XC6958-052 3. No. Advanced cap frame Model name: PRCFH2 Parts Code: XC7610-052 4. Optional Accessories 5 Embroidery card 2. Part Name Model Name Parts Code No. Bobbin winder set Model Name: PRCF2 Parts Code: XC7609-052 (See instructions on...
Users Manual - English
Page 172
...Threads / 164 Stabilizers (Backing) / 165 Hooping Techniques / 166 Fabric/stabilizer compatibility chart / 167 OPTIONAL ACCESSORIES Attaching an optional embroidery frame for the Operation of PR-600II 160 Checking the thread tension of caps / 170 Fabric precautions / 171 Preparing to use the cap ... frame holder / 185 Additional digitizing information / 186 Using the Optional Bobbin Winder 188 Precautions / 188 Optional bobbin winder and its accessories / 188 Setting up the optional bobbin winder / 189 Connecting the AC adapter / 189 Winding the bobbin / 190 Maintenance ...193...
...Threads / 164 Stabilizers (Backing) / 165 Hooping Techniques / 166 Fabric/stabilizer compatibility chart / 167 OPTIONAL ACCESSORIES Attaching an optional embroidery frame for the Operation of PR-600II 160 Checking the thread tension of caps / 170 Fabric precautions / 171 Preparing to use the cap ... frame holder / 185 Additional digitizing information / 186 Using the Optional Bobbin Winder 188 Precautions / 188 Optional bobbin winder and its accessories / 188 Setting up the optional bobbin winder / 189 Connecting the AC adapter / 189 Winding the bobbin / 190 Maintenance ...193...

Users Manual - English
Page 185
... moved. • Only loosen the thumb screws a maximum of the embroidery frame holder moves. Move the left and right arms of 2 turns counterclockwise. APPENDIX OPTIONAL ACCESSORIES Attaching an optional embroidery frame for industrial embroidery machines Prepare the embroidery frame holder in order to align the screw on the 3 right side with...
... moved. • Only loosen the thumb screws a maximum of the embroidery frame holder moves. Move the left and right arms of 2 turns counterclockwise. APPENDIX OPTIONAL ACCESSORIES Attaching an optional embroidery frame for industrial embroidery machines Prepare the embroidery frame holder in order to align the screw on the 3 right side with...

Users Manual - English
Page 186
... adjustment is only required the first time that is being used , appear as shown below . For details, contact your sales representative. Cap frame and its accessories The cap frame driver and the mounting jig are described below . Using the Optional Cap Frame By using the cap frame are required in the...
... adjustment is only required the first time that is being used , appear as shown below . For details, contact your sales representative. Cap frame and its accessories The cap frame driver and the mounting jig are described below . Using the Optional Cap Frame By using the cap frame are required in the...

Users Manual - English
Page 205
... winder set may differ depending on a level, stable surface. ● Only use the optional bobbin winder. Optional bobbin winder and its accessories Check that the following bobbin winder and accessories are described below. APPENDIX Using the Optional Bobbin Winder When winding the bobbin thread onto a metal bobbin, use the bobbins supplied with...
... winder set may differ depending on a level, stable surface. ● Only use the optional bobbin winder. Optional bobbin winder and its accessories Check that the following bobbin winder and accessories are described below. APPENDIX Using the Optional Bobbin Winder When winding the bobbin thread onto a metal bobbin, use the bobbins supplied with...
Users Manual - English
Page 233
APPENDIX Index Symbols "DST" TRIM SETTING 140, 149 A Accessories 4 Adjusting angle 73 cap frame driver 173 edited patterns 120 legs 8 operation panel 9 screen brightness 142, 213 sewing speed 91 thread tension 85 touch panel ...
APPENDIX Index Symbols "DST" TRIM SETTING 140, 149 A Accessories 4 Adjusting angle 73 cap frame driver 173 edited patterns 120 legs 8 operation panel 9 screen brightness 142, 213 sewing speed 91 thread tension 85 touch panel ...

Users Manual - English
Page 234
..., 56 Needle plate 194 New embroidery key 49 Next page key 51 Number of thread color changes 51, 52, 54 O Oiling 196 Operation panel 2, 3, 9 Optional accessories 5 G Golf shirt 167 Golf Style 170 Grid 144 P Pattern display area 49 Pattern editing screen 25, 52, 119 Pattern list screen 23, 51 Pattern selection...
..., 56 Needle plate 194 New embroidery key 49 Next page key 51 Number of thread color changes 51, 52, 54 O Oiling 196 Operation panel 2, 3, 9 Optional accessories 5 G Golf shirt 167 Golf Style 170 Grid 144 P Pattern display area 49 Pattern editing screen 25, 52, 119 Pattern list screen 23, 51 Pattern selection...


