
Accessory Catalog - English
Page 1
Home Sewing Machine PARTS REFERENCE LIST OPTIONAL ACCESSORIES PR-1000 PR-650/PR-650C PR-620/PR620C PR-600II/PR-600IIC PR-600/PR-600C Published: Jul.,2010 Revised: Dec.,2011
Home Sewing Machine PARTS REFERENCE LIST OPTIONAL ACCESSORIES PR-1000 PR-650/PR-650C PR-620/PR620C PR-600II/PR-600IIC PR-600/PR-600C Published: Jul.,2010 Revised: Dec.,2011

Users Manual - English
Page 2
...from the electrical outlet immediately after using and before using this machine. 17. Always use outdoors. 7. This sewing machine is intended for its intended use bent needles. 13. Never operate the machine with this machine, basic safety precautions should always be left unattended while plugged... care is used as near children. 2. Important Safety Instructions When using . DANGER - The machine should be used by pulling on the cord. Always unplug the machine from all sewing machine openings, such as a toy. To reduce the risk of all moving parts. Close attention ...
...from the electrical outlet immediately after using and before using this machine. 17. Always use outdoors. 7. This sewing machine is intended for its intended use bent needles. 13. Never operate the machine with this machine, basic safety precautions should always be left unattended while plugged... care is used as near children. 2. Important Safety Instructions When using . DANGER - The machine should be used by pulling on the cord. Always unplug the machine from all sewing machine openings, such as a toy. To reduce the risk of all moving parts. Close attention ...
Users Manual - English
Page 4
...any interference received, including interference that the product Product Name: Brother Sewing Machine Model Number: PR-600II complies with the instructions, may cause undesired operation. These limits ...are designed to operate the equipment. could void the user's authority to provide reasonable protection against harmful interference in accordance with Part 15 of the FCC Rules. Federal Communications Commission (FCC) Declaration of Conformity (For USA Only) Responsible Party: Brother International...
...any interference received, including interference that the product Product Name: Brother Sewing Machine Model Number: PR-600II complies with the instructions, may cause undesired operation. These limits ...are designed to operate the equipment. could void the user's authority to provide reasonable protection against harmful interference in accordance with Part 15 of the FCC Rules. Federal Communications Commission (FCC) Declaration of Conformity (For USA Only) Responsible Party: Brother International...
Users Manual - English
Page 5
... In the event a malfunction occurs or adjustment is required, first follow the troubleshooting table at www.brother.com iv Plug the machine directly into the wall. Do not use or store the machine near a space heater, iron, halogen lamp, or other parts • A power failure occurs ...correct installation. If the problem persists, consult your eye on the needle while sewing. Be sure to keep your local authorized Brother dealer. THANK YOU FOR CHOOSING OUR MACHINE Your machine is one of this machine, avoid direct sunlight and high humidity locations. Always consult the manual when ...
... In the event a malfunction occurs or adjustment is required, first follow the troubleshooting table at www.brother.com iv Plug the machine directly into the wall. Do not use or store the machine near a space heater, iron, halogen lamp, or other parts • A power failure occurs ...correct installation. If the problem persists, consult your eye on the needle while sewing. Be sure to keep your local authorized Brother dealer. THANK YOU FOR CHOOSING OUR MACHINE Your machine is one of this machine, avoid direct sunlight and high humidity locations. Always consult the manual when ...

Users Manual - English
Page 9
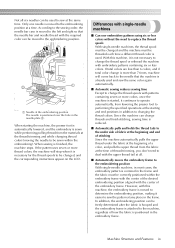
...needle bars are listed on the screen. If a needle is already threaded by automatically selecting the appropriate needle for each color. Memo ● Sewing is called the needle bar, and the needle bars are different according to their corresponding needle bar number. 2 1 Needle bar 1 2 Needle... color that will be used on the currently threaded colors. Machine Structure and Features Six-needle machine embroidering Your machine has six needles, each threaded with a different color of the needle bar numbers. It can sew embroidery patterns that moves the needles up levers and thread paths...
...needle bars are listed on the screen. If a needle is already threaded by automatically selecting the appropriate needle for each color. Memo ● Sewing is called the needle bar, and the needle bars are different according to their corresponding needle bar number. 2 1 Needle bar 1 2 Needle... color that will be used on the currently threaded colors. Machine Structure and Features Six-needle machine embroidering Your machine has six needles, each threaded with a different color of the needle bar numbers. It can sew embroidery patterns that moves the needles up levers and thread paths...
Users Manual - English
Page 10
... to the left and right so that the machine is already used and sew the same color again automatically. ■ Automatic sewing reduces sewing time Except to the embroidering position at a time. When sewing is positioned over the hole in the frame. Machine Structure and Features ix If total colors are...the fabric at the beginning of thread trimming, you don't need to deal with single-needle machines ■ Can sew embroidery patterns using six or less colors without the need to sew at the starting and end positions in the frame and the fabric must be correctly positioned ...
... to the left and right so that the machine is already used and sew the same color again automatically. ■ Automatic sewing reduces sewing time Except to the embroidering position at a time. When sewing is positioned over the hole in the frame. Machine Structure and Features ix If total colors are...the fabric at the beginning of thread trimming, you don't need to deal with single-needle machines ■ Can sew embroidery patterns using six or less colors without the need to sew at the starting and end positions in the frame and the fabric must be correctly positioned ...

Users Manual - English
Page 12
... patterns, embroidery patterns and frame patterns built into the machine, if an optional embroidery card is connected to the machine through the included USB cable, embroidery patterns can be recalled from the computer. The machine can be embroidered. Available features Designs with a maximum size... of 200 mm (H) × 300 mm (W) (7-7/8 inches (H) × 11-3/4 inches (W)) can also be set to repeatedly sew the same pattern. ■ USB Type "B" (...
... patterns, embroidery patterns and frame patterns built into the machine, if an optional embroidery card is connected to the machine through the included USB cable, embroidery patterns can be recalled from the computer. The machine can be embroidered. Available features Designs with a maximum size... of 200 mm (H) × 300 mm (W) (7-7/8 inches (H) × 11-3/4 inches (W)) can also be set to repeatedly sew the same pattern. ■ USB Type "B" (...

Users Manual - English
Page 13
... key. Chapter 3: Other Basic Procedures This chapter provides explanations on the use Chapter 1: Getting Ready The setup of titles on the machine and sewing a pattern to the page that is equipped with seven or more colors, and other than those described in order-from turning on the...the LCD will be taken when a problem occurs. Details on changing the basic embroidery machine settings and viewing operations on using the machine operations guide key, refer to page 153. Look for example, to sew are described on the right edge of contents. Read before use of chapter 2.
... key. Chapter 3: Other Basic Procedures This chapter provides explanations on the use Chapter 1: Getting Ready The setup of titles on the machine and sewing a pattern to the page that is equipped with seven or more colors, and other than those described in order-from turning on the...the LCD will be taken when a problem occurs. Details on changing the basic embroidery machine settings and viewing operations on using the machine operations guide key, refer to page 153. Look for example, to sew are described on the right edge of contents. Read before use of chapter 2.

Users Manual - English
Page 15
...screen ...32 Upper Threading ...33 Checking the needle bars and thread colors ...33 Upper threading ...35 Threading the needle ...39 Sewing the Embroidery...42 Starting embroidering ...42 Stopping embroidering...44 Checking the Thread Tension 45 Removing the Embroidery Frame and Fabric 46 ... You 58 TECHNICAL TERMS: ...58 PATTERNS: ...59 EMBROIDERING: ...59 OTHER BASIC PROCEDURES 61 Resume the Operation Being Performed Before the Machine Was Turned OFF 62 Changing the Needle ...63 Replacing the needle...63 Correctly Using the Embroidery Frames 65 Embroidery frame types and applications...
...screen ...32 Upper Threading ...33 Checking the needle bars and thread colors ...33 Upper threading ...35 Threading the needle ...39 Sewing the Embroidery...42 Starting embroidering ...42 Stopping embroidering...44 Checking the Thread Tension 45 Removing the Embroidery Frame and Fabric 46 ... You 58 TECHNICAL TERMS: ...58 PATTERNS: ...59 EMBROIDERING: ...59 OTHER BASIC PROCEDURES 61 Resume the Operation Being Performed Before the Machine Was Turned OFF 62 Changing the Needle ...63 Replacing the needle...63 Correctly Using the Embroidery Frames 65 Embroidery frame types and applications...

Users Manual - English
Page 16
... Lock Stitch Setting 88 Starting/Ending Position Settings 89 Repeatedly sewing a pattern along a diagonal 90 Maximum Sewing Speed Setting 91 Setting the Machine to Stop at Color Changes 92 Stopping the machine at the next color change 92 Specifying pause locations before embroidering...Patterns ...105 Floral alphabet patterns...106 Appliqué alphabet...107 Frame patterns ...108 Alphabet patterns ...109 Embroidery patterns stored in the machine...111 Embroidery cards (optional) ...112 Computer (USB) ...114 USB media (Commercially Available) ...117 Editing the Embroidery Pattern (Pattern ...
... Lock Stitch Setting 88 Starting/Ending Position Settings 89 Repeatedly sewing a pattern along a diagonal 90 Maximum Sewing Speed Setting 91 Setting the Machine to Stop at Color Changes 92 Stopping the machine at the next color change 92 Specifying pause locations before embroidering...Patterns ...105 Floral alphabet patterns...106 Appliqué alphabet...107 Frame patterns ...108 Alphabet patterns ...109 Embroidery patterns stored in the machine...111 Embroidery cards (optional) ...112 Computer (USB) ...114 USB media (Commercially Available) ...117 Editing the Embroidery Pattern (Pattern ...
Users Manual - English
Page 17
... the Machine Operations Guide Key 151 Using the Help Key...153 APPENDIX 155 Appliqué Sewing...156 Sewing appliqué patterns ...156 Using a frame pattern to create appliqués (1 157 Using a frame pattern to create appliqués (2 158 Helpful Tips for the Operation of PR-600II 160 Checking... the thread tension of built-in patterns 160 Sewing a pattern aligned with a mark on the fabric 161 Color thread table ...163 Colors of Tajima (.dst) embroidery...
... the Machine Operations Guide Key 151 Using the Help Key...153 APPENDIX 155 Appliqué Sewing...156 Sewing appliqué patterns ...156 Using a frame pattern to create appliqués (1 157 Using a frame pattern to create appliqués (2 158 Helpful Tips for the Operation of PR-600II 160 Checking... the thread tension of built-in patterns 160 Sewing a pattern aligned with a mark on the fabric 161 Color thread table ...163 Colors of Tajima (.dst) embroidery...
Users Manual - English
Page 18
... and transporting precautions / 6 Setup location / 7 Setting up . 1 GETTING READY After unpacking the PR-600II, first refer to sew are included. After checking that all accessories are included, the embroidery machine can be set up the machine / 8 Adjusting the operation panel position / 9 Preparing the thread guide assembly / 10 Positioning the spool stand / 11 Attaching the embroidery...
... and transporting precautions / 6 Setup location / 7 Setting up . 1 GETTING READY After unpacking the PR-600II, first refer to sew are included. After checking that all accessories are included, the embroidery machine can be set up the machine / 8 Adjusting the operation panel position / 9 Preparing the thread guide assembly / 10 Positioning the spool stand / 11 Attaching the embroidery...
Users Manual - English
Page 19
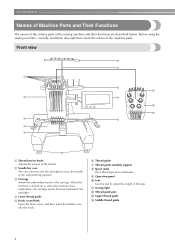
.... 3 Carriage Attach the embroidery frame to the carriage. GETTING READY Names of Machine Parts and Their Functions The names of the various parts of the machine parts. A Sewing light B Thread guide pins C Upper thread guide D Middle thread guide 2 Before using the sewing machine, carefully read these descriptions to adjust the height of the legs. Front.... 6 Thread guide 7 Thread guide assembly support 8 Spool stand Put 6 thread spools to embroider. 9 Operation panel 0 Feet Use the feet to learn the names of the sewing machine and their functions are described below.
.... 3 Carriage Attach the embroidery frame to the carriage. GETTING READY Names of Machine Parts and Their Functions The names of the various parts of the machine parts. A Sewing light B Thread guide pins C Upper thread guide D Middle thread guide 2 Before using the sewing machine, carefully read these descriptions to adjust the height of the legs. Front.... 6 Thread guide 7 Thread guide assembly support 8 Spool stand Put 6 thread spools to embroider. 9 Operation panel 0 Feet Use the feet to learn the names of the sewing machine and their functions are described below.

Users Manual - English
Page 20
... power switch Use the main power switch to turn the machine ON (I) and OFF ({). 7 Ventilation slots 123 1 Start/stop button Press the start/stop button to start sewing Lit in green: When the machine can start or stop machine. The lighting status and color of the button changes depending... on the power supply cord into the USB Type "B" (function) port connector. Names of the machine. Operation panel Bottom 5 Power...
... power switch Use the main power switch to turn the machine ON (I) and OFF ({). 7 Ventilation slots 123 1 Start/stop button Press the start/stop button to start sewing Lit in green: When the machine can start or stop machine. The lighting status and color of the button changes depending... on the power supply cord into the USB Type "B" (function) port connector. Names of the machine. Operation panel Bottom 5 Power...
Users Manual - English
Page 23
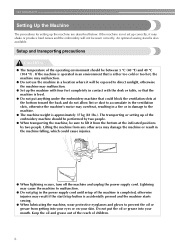
...accidentally pressed and the machine starts sewing. ● When lubricating the machine, wear protective eyeglasses and gloves to malfunction. ● Do not plug in the power supply cord until setup of the operating environment should be performed by two people. Lightning may cause the machine to prevent the oil... or grease from getting into your skin. Setup and transporting precautions CAUTION ● The temperature of the machine is completed, otherwise injuries may result if the start/stop button is also available. The transporting or setting up of children....
...accidentally pressed and the machine starts sewing. ● When lubricating the machine, wear protective eyeglasses and gloves to malfunction. ● Do not plug in the power supply cord until setup of the operating environment should be performed by two people. Lightning may cause the machine to prevent the oil... or grease from getting into your skin. Setup and transporting precautions CAUTION ● The temperature of the machine is completed, otherwise injuries may result if the start/stop button is also available. The transporting or setting up of children....

Users Manual - English
Page 30
...the Embroidery Pattern 4 Specifying Embroidering Setting 5 Previewing the Image 6 Hooping the Fabric in order-from turning on the machine and sewing a pattern to finishing sewing. 2 EMBROIDERING TUTORIAL This chapter describes the basic embroidering operations in the Embroidery Frame 7 Attaching the Embroidery Frame to ...embroider a pattern and master the operation of the tutorial to the Machine 8 Checking the Embroidery Area 9 Upper Threading 10 Sewing the Embroidery 11 Checking the Thread Tension 12 Removing the Embroidery Frame and Fabric 13 Turning ...
...the Embroidery Pattern 4 Specifying Embroidering Setting 5 Previewing the Image 6 Hooping the Fabric in order-from turning on the machine and sewing a pattern to finishing sewing. 2 EMBROIDERING TUTORIAL This chapter describes the basic embroidering operations in the Embroidery Frame 7 Attaching the Embroidery Frame to ...embroider a pattern and master the operation of the tutorial to the Machine 8 Checking the Embroidery Area 9 Upper Threading 10 Sewing the Embroidery 11 Checking the Thread Tension 12 Removing the Embroidery Frame and Fabric 13 Turning ...

Users Manual - English
Page 32
...or damage the needle- Do not use household embroidery needles. Use of any other bobbin may result in injuries or damage to the machine. Operating Precautions 15 CAUTION ● Only use cotton or spun polyester bobbin thread (between the needle and the flat surface is not... If the needle is extremely dangerous since the needle may be sure to use prewound bobbin (COATS "L" type/TRU-SEW POLYESTER "Filaments") or bobbins designed specifically for your machine. COATS L Polyester ● Use a bobbin thread that the distance between the needle and the flat surface is ...
...or damage the needle- Do not use household embroidery needles. Use of any other bobbin may result in injuries or damage to the machine. Operating Precautions 15 CAUTION ● Only use cotton or spun polyester bobbin thread (between the needle and the flat surface is not... If the needle is extremely dangerous since the needle may be sure to use prewound bobbin (COATS "L" type/TRU-SEW POLYESTER "Filaments") or bobbins designed specifically for your machine. COATS L Polyester ● Use a bobbin thread that the distance between the needle and the flat surface is ...

Users Manual - English
Page 117
... CD-ROM, CD-R or CD-RW drive. ● USB devices/media can be used with this machine. Using pattern data other than those saved using our data design systems or sewing machines may cause the embroidery machine to or recalled from USB media. CAUTION ● While using embroidery data other than that created and...
... CD-ROM, CD-R or CD-RW drive. ● USB devices/media can be used with this machine. Using pattern data other than those saved using our data design systems or sewing machines may cause the embroidery machine to or recalled from USB media. CAUTION ● While using embroidery data other than that created and...

Users Manual - English
Page 168
... the four topics that appear to thread the upper thread Touch . 1 Operations Troubleshooting X The sewing machine help screen appears. Using the Machine Operations Guide Key 151 Using the Machine Operations Guide Key This machine contains information based on the contents of Machine Principal Parts and Their Functions Example: To learn how to display the available information...
... the four topics that appear to thread the upper thread Touch . 1 Operations Troubleshooting X The sewing machine help screen appears. Using the Machine Operations Guide Key 151 Using the Machine Operations Guide Key This machine contains information based on the contents of Machine Principal Parts and Their Functions Example: To learn how to display the available information...

Users Manual - English
Page 214
...one drop of oil on the lower needle bar felt washer every 40 - 50 hours of sewing time. ● Apply only sewing machine oil. Use of any excess with a rag. ● If the thread breaks while sewing or the operating noise of the hook becomes loud, apply oil onto the race hook. 7 ... Apply oil here. • Use a pointed object to punch a small hole in damage to the embroidery machine. ● Do not apply too much oil may get contaminated. Fabric or thread may drip onto sewing project. Note ● Put a drop of oil onto the hook once a day before using it can easily...
...one drop of oil on the lower needle bar felt washer every 40 - 50 hours of sewing time. ● Apply only sewing machine oil. Use of any excess with a rag. ● If the thread breaks while sewing or the operating noise of the hook becomes loud, apply oil onto the race hook. 7 ... Apply oil here. • Use a pointed object to punch a small hole in damage to the embroidery machine. ● Do not apply too much oil may get contaminated. Fabric or thread may drip onto sewing project. Note ● Put a drop of oil onto the hook once a day before using it can easily...


