
Users Manual - English
Page 14
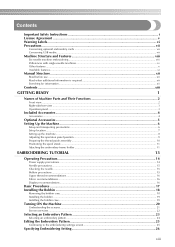
.../rear view ...3 Operation panel ...3 Included Accessories ...4 Accessories ...4 Optional Accessories...5 Setting Up the Machine...6 Setup and transporting precautions ...6 Setup location ...7 Setting up the machine...8 Adjusting the operation panel position ...9 Preparing the thread guide assembly ...10 Positioning the spool stand...11 Attaching the embroidery frame holder ...11 EMBROIDERING TUTORIAL 13 Operating Precautions...14 Power supply precautions...
.../rear view ...3 Operation panel ...3 Included Accessories ...4 Accessories ...4 Optional Accessories...5 Setting Up the Machine...6 Setup and transporting precautions ...6 Setup location ...7 Setting up the machine...8 Adjusting the operation panel position ...9 Preparing the thread guide assembly ...10 Positioning the spool stand...11 Attaching the embroidery frame holder ...11 EMBROIDERING TUTORIAL 13 Operating Precautions...14 Power supply precautions...
Users Manual - English
Page 18
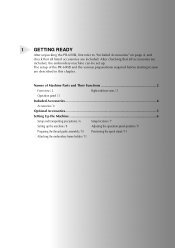
... up . Names of the PR-600II and the various preparations required before starting to "Included Accessories" on page 4, and check that all listed accessories are included, the embroidery machine can be set up the machine / 8 Adjusting the operation panel position / 9 Preparing the thread guide assembly / 10 Positioning the spool stand / 11 Attaching the embroidery frame holder / 11...
... up . Names of the PR-600II and the various preparations required before starting to "Included Accessories" on page 4, and check that all listed accessories are included, the embroidery machine can be set up the machine / 8 Adjusting the operation panel position / 9 Preparing the thread guide assembly / 10 Positioning the spool stand / 11 Attaching the embroidery frame holder / 11...
Users Manual - English
Page 19
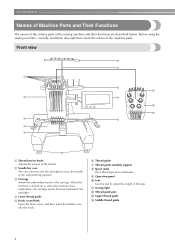
..., backward, left and right to move the needle to the embroidering position. 3 Carriage Attach the embroidery frame to the carriage. GETTING READY Names of Machine Parts and Their Functions The names of the various parts of the machine parts. A Sewing light B Thread guide pins C Upper thread guide D Middle thread guide 2 Front view 1 2 ...5 Hook cover/Hook Open the hook cover, and then insert the bobbin case into the hook. 6 Thread guide 7 Thread guide assembly support 8 Spool stand Put 6 thread spools to embroider. 9 Operation panel 0 Feet Use the feet to learn the names of the sewing...
..., backward, left and right to move the needle to the embroidering position. 3 Carriage Attach the embroidery frame to the carriage. GETTING READY Names of Machine Parts and Their Functions The names of the various parts of the machine parts. A Sewing light B Thread guide pins C Upper thread guide D Middle thread guide 2 Front view 1 2 ...5 Hook cover/Hook Open the hook cover, and then insert the bobbin case into the hook. 6 Thread guide 7 Thread guide assembly support 8 Spool stand Put 6 thread spools to embroider. 9 Operation panel 0 Feet Use the feet to learn the names of the sewing...
Users Manual - English
Page 23
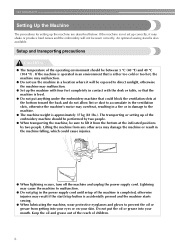
...or produce loud noises and the embroidery will be exposed to prevent the oil or grease from getting into your skin. Setup and transporting precautions CAUTION ● The temperature of the embroidery machine should be performed by two people. An optional sewing stand is approximately 37 kg (81 ...Ibs.). Keep the oil and grease out of the reach of the machine is level. ● Do not put the oil or...
...or produce loud noises and the embroidery will be exposed to prevent the oil or grease from getting into your skin. Setup and transporting precautions CAUTION ● The temperature of the embroidery machine should be performed by two people. An optional sewing stand is approximately 37 kg (81 ...Ibs.). Keep the oil and grease out of the reach of the machine is level. ● Do not put the oil or...

Users Manual - English
Page 28
Positioning the spool stand Attaching the embroidery Secure the spool stand in the embroidery frame holder Setting Up the Machine 11 frame holder Loosen the thumb screw, and then open up 1 the spool stand to the left and right. 1 Attach the embroidery frame holder to the carriage. 1 Remove the two thumb screws of the 1 embroidery frame holder. 2 1 Thumb screw...
Positioning the spool stand Attaching the embroidery Secure the spool stand in the embroidery frame holder Setting Up the Machine 11 frame holder Loosen the thumb screw, and then open up 1 the spool stand to the left and right. 1 Attach the embroidery frame holder to the carriage. 1 Remove the two thumb screws of the 1 embroidery frame holder. 2 1 Thumb screw...

Users Manual - English
Page 36
... 11 Memo 12 ● This embroidery machine is installed with the thread winding off the bobbin clockwise as shown in the opposite direction, the embroidery will not be used. (Refer to page 5, 188.) Installing the Bobbin 19 Use pre-wound (L 13 type) bobbins. ● The optional bobbin winder (stand-alone type) and optional metal...
... 11 Memo 12 ● This embroidery machine is installed with the thread winding off the bobbin clockwise as shown in the opposite direction, the embroidery will not be used. (Refer to page 5, 188.) Installing the Bobbin 19 Use pre-wound (L 13 type) bobbins. ● The optional bobbin winder (stand-alone type) and optional metal...

Users Manual - English
Page 235
... with a mark on the fabric 161 Sewing key 55 Sewing light 2 Sewing order 56 Sewing speed 91 Sewing the embroidery 42 Sewing time 56 Short stitch delete 140, 150 Silk 167 Six-needle machine viii Size (horizontal 51, 52 Size (vertical 51, 52 Size key 51, 53, 103, 121 Spacing key 53..., 124 Specifications 215 Spool 36 Spool change indicator 56, 76 Spool stand 2, 11 Stabilizer 66, 165, 167 Standard Tail 140, 150 ...
... with a mark on the fabric 161 Sewing key 55 Sewing light 2 Sewing order 56 Sewing speed 91 Sewing the embroidery 42 Sewing time 56 Short stitch delete 140, 150 Silk 167 Six-needle machine viii Size (horizontal 51, 52 Size (vertical 51, 52 Size key 51, 53, 103, 121 Spacing key 53..., 124 Specifications 215 Spool 36 Spool change indicator 56, 76 Spool stand 2, 11 Stabilizer 66, 165, 167 Standard Tail 140, 150 ...


