Users Manual - English
Page 2
... Product Name: Model Number: Brother USB Writer PE-DESIGN complies with Part 15 of Communications Radio Interference (Other than USA and Canada) This machine complies with EN55022 (CISPR Publication 22) /Class B. This equipment generates, uses, and can be determined by turning the equipment off and on, the user is no guarantee that interference will not occur in a residential installation. Increase the...
... Product Name: Model Number: Brother USB Writer PE-DESIGN complies with Part 15 of Communications Radio Interference (Other than USA and Canada) This machine complies with EN55022 (CISPR Publication 22) /Class B. This equipment generates, uses, and can be determined by turning the equipment off and on, the user is no guarantee that interference will not occur in a residential installation. Increase the...
Users Manual - English
Page 3
... embroidery patterns and supports a wider range of Microsoft Corp. "For additional product information and updates, visit our web site at: www.brother.com" For repairs or adjustments • In the event malfunction occurs or adjustment is protected by law. However, the final result will depend on the final material. For safe operation • Avoid dropping a needle, a piece of International Business Machine...
... embroidery patterns and supports a wider range of Microsoft Corp. "For additional product information and updates, visit our web site at: www.brother.com" For repairs or adjustments • In the event malfunction occurs or adjustment is protected by law. However, the final result will depend on the final material. For safe operation • Avoid dropping a needle, a piece of International Business Machine...

Users Manual - English
Page 6
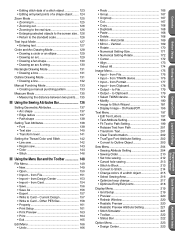
... Mode 76 Fit Design Page to Window 76 Zoom-out Mode 76 I Using the Sewing Attributes Bar 77 Setting the Thread Color and Stitch 77 • Region sew 77 • Line sew 78 • Color 79 • Stitch 80 I Using the Tool Box 116 Selection Mode 117 • Selecting patterns 117 • Selecting patterns 2 117 • Moving patterns 117 • Scaling patterns 118 • Flipping...
... Mode 76 Fit Design Page to Window 76 Zoom-out Mode 76 I Using the Sewing Attributes Bar 77 Setting the Thread Color and Stitch 77 • Region sew 77 • Line sew 78 • Color 79 • Stitch 80 I Using the Tool Box 116 Selection Mode 117 • Selecting patterns 117 • Selecting patterns 2 117 • Moving patterns 117 • Scaling patterns 118 • Flipping...
Users Manual - English
Page 7
... a manual punching pattern 133 Measure Mode 135 • Measuring the distance between two points.... 135 I Using the Sewing Attributes Bar 136 Setting Geometric Attributes 137 • Arc shape 137 • Edge radius 137 • Path shape 138 Setting Text Attributes 138 • Font 138 • Text size 140 • Transform level 141 Setting the Thread Color and Stitch 142 • Line sew...
... a manual punching pattern 133 Measure Mode 135 • Measuring the distance between two points.... 135 I Using the Sewing Attributes Bar 136 Setting Geometric Attributes 137 • Arc shape 137 • Edge radius 137 • Path shape 138 Setting Text Attributes 138 • Font 138 • Text size 140 • Transform level 141 Setting the Thread Color and Stitch 142 • Line sew...

Users Manual - English
Page 15
... 1 Turn on the computer and start up the installed Web browser and open the online registration page on any error messages that appear. 7 Programmable Stitch Creator Quick Reference Alphabetic Index IMPORTANT: Have the following information ready before contacting Technical Support. • The make and model of your area. Technical Support Please contact Technical Support if you are using as well as the Windows...
... 1 Turn on the computer and start up the installed Web browser and open the online registration page on any error messages that appear. 7 Programmable Stitch Creator Quick Reference Alphabetic Index IMPORTANT: Have the following information ready before contacting Technical Support. • The make and model of your area. Technical Support Please contact Technical Support if you are using as well as the Windows...
Users Manual - English
Page 16
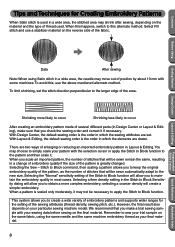
... most cases. Before Using Getting Started Design Center Layout & Editing Programmable Stitch Creator Data After sewing Note: When using the same needle and the same machine embroidery thread as the number of stitches that will create a simpler embroidery. When this happens, switch to maintain the embroidery quality in a change of embroidery quality if the size of the pattern is scaled only moderately, it . There are set the stitch direction perpendicular to sew your...
... most cases. Before Using Getting Started Design Center Layout & Editing Programmable Stitch Creator Data After sewing Note: When using the same needle and the same machine embroidery thread as the number of stitches that will create a simpler embroidery. When this happens, switch to maintain the embroidery quality in a change of embroidery quality if the size of the pattern is scaled only moderately, it . There are set the stitch direction perpendicular to sew your...
Users Manual - English
Page 18
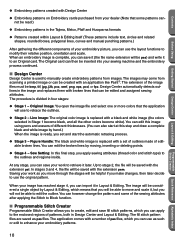
... be edited and assigned sewing attributes. The application comes with a number of pas files, which means that can use as such or edit to enhance your embroidery patterns. 10 Programmable Stitch Creator Quick Reference Alphabetic Index When an embroidery image is complete, you can be inserted into your sewing machine and the embroidery process continued. The procedure is replaced with a black and white...
... be edited and assigned sewing attributes. The application comes with a number of pas files, which means that can use as such or edit to enhance your embroidery patterns. 10 Programmable Stitch Creator Quick Reference Alphabetic Index When an embroidery image is complete, you can be inserted into your sewing machine and the embroidery process continued. The procedure is replaced with a black and white...
Users Manual - English
Page 44
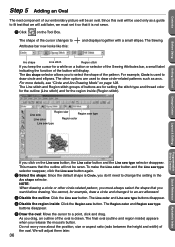
...-related pattern, you want before drawing. Line sew Region sew Region sew type Line color Region color Line sew type Getting Started Design Center Layout & Editing Programmable Stitch Creator Quick Reference Alphabetic Index If you drag, an outline of the oval is used to draw circle and ellipses. You cannot, for the region inside : Click the Region sew button. The Line color and Line sew type buttons...
...-related pattern, you want before drawing. Line sew Region sew Region sew type Line color Region color Line sew type Getting Started Design Center Layout & Editing Programmable Stitch Creator Quick Reference Alphabetic Index If you drag, an outline of the oval is used to draw circle and ellipses. You cannot, for the region inside : Click the Region sew button. The Line color and Line sew type buttons...
Users Manual - English
Page 52
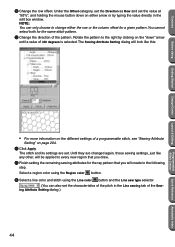
... stitch pattern. 5 Change the direction of the Sewing Attribute Setting dialog.) 44 Programmable Stitch Creator Quick Reference Alphabetic Index You cannot select both for a given pattern. Under the Offset category, set the Direction as Row and set the value at "50%", and holding the mouse button down " arrow until a value of the pitch in the following step. Contents Before Using Getting Started Design Center Layout & Editing 4 Change...
... stitch pattern. 5 Change the direction of the Sewing Attribute Setting dialog.) 44 Programmable Stitch Creator Quick Reference Alphabetic Index You cannot select both for a given pattern. Under the Offset category, set the Direction as Row and set the value at "50%", and holding the mouse button down " arrow until a value of the pitch in the following step. Contents Before Using Getting Started Design Center Layout & Editing 4 Change...
Users Manual - English
Page 68
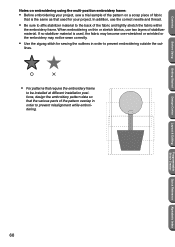
... or stretch fabrics, use the correct needle and thread. • Be sure to affix stabilizer material to prevent misalignment while embroidering. 60 Programmable Stitch Creator Quick Reference Alphabetic Index If no stabilizer material is the same as that used , the fabric may become over-stretched or wrinkled or the embroidery may not be installed at different installation positions, design the embroidery pattern data so that is used for sewing...
... or stretch fabrics, use the correct needle and thread. • Be sure to affix stabilizer material to prevent misalignment while embroidering. 60 Programmable Stitch Creator Quick Reference Alphabetic Index If no stabilizer material is the same as that used , the fabric may become over-stretched or wrinkled or the embroidery may not be installed at different installation positions, design the embroidery pattern data so that is used for sewing...
Users Manual - English
Page 69
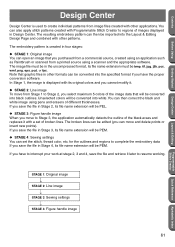
... conversion software. N STAGE 4: Sewing settings You can then be edited (you can open an image that will be converted into the Layout & Editing Design Page and combined with other applications. The image file must be in Stage 4, its file name extension will be PEM. You can also apply stitch patterns created with Programmable Stitch Creator to resume working...
... conversion software. N STAGE 4: Sewing settings You can then be edited (you can open an image that will be converted into the Layout & Editing Design Page and combined with other applications. The image file must be in Stage 4, its file name extension will be PEM. You can also apply stitch patterns created with Programmable Stitch Creator to resume working...
Users Manual - English
Page 83
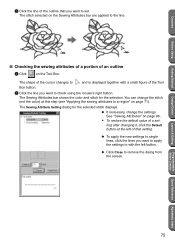
... stitch displays. N If necessary, change the stitch (not the color) at the left of that you want to apply the settings to with a small figure of the Tool Box button. 2 Click the line you want to set - See "Sewing Attributes" on the Tool Box. Design Center Layout & Editing Programmable Stitch Creator Quick Reference Alphabetic Index 75 Contents Before Using Getting Started...
... stitch displays. N If necessary, change the stitch (not the color) at the left of that you want to apply the settings to with a small figure of the Tool Box button. 2 Click the line you want to set - See "Sewing Attributes" on the Tool Box. Design Center Layout & Editing Programmable Stitch Creator Quick Reference Alphabetic Index 75 Contents Before Using Getting Started...
Users Manual - English
Page 87
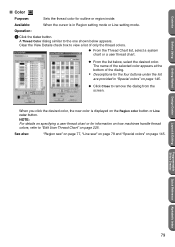
...; Descriptions for the four buttons under the list are provided in Region setting mode or Line setting mode. Contents Before Using Getting Started I Color Purpose: Sets the thread color for information on how machines handle thread colors, refer to "Edit User Thread Chart" on page 225. Design Center Layout & Editing Programmable Stitch Creator Quick Reference Alphabetic Index 79 Operation: 1 Click the Color button. Clear the View Details...
...; Descriptions for the four buttons under the list are provided in Region setting mode or Line setting mode. Contents Before Using Getting Started I Color Purpose: Sets the thread color for information on how machines handle thread colors, refer to "Edit User Thread Chart" on page 225. Design Center Layout & Editing Programmable Stitch Creator Quick Reference Alphabetic Index 79 Operation: 1 Click the Color button. Clear the View Details...
Users Manual - English
Page 102
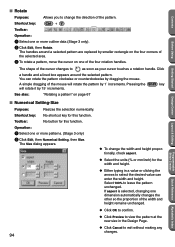
... cursor on page 67 Getting Started Design Center Layout & Editing Programmable Stitch Creator I Rotate Purpose: Allows you to change the width and height proportionally, check aspect. Toolbar: No button for the width and height. The Size dialog appears. 94 N To change the direction of the four rotation handles. Select 100% to exit without making any changes. The shape of the...
... cursor on page 67 Getting Started Design Center Layout & Editing Programmable Stitch Creator I Rotate Purpose: Allows you to change the width and height proportionally, check aspect. Toolbar: No button for the width and height. The Size dialog appears. 94 N To change the direction of the four rotation handles. Select 100% to exit without making any changes. The shape of the...
Users Manual - English
Page 106
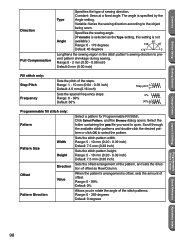
...;ll stitch only: Pattern Pattern Size Offset Width Height Direction Value Pattern Direction Select a pattern for Programmable Fill Stitch. When the pattern's arrangement is specified by the Angle setting. Click Select Pattern, and the Browse dialog opens. Select the folder containing the pas file you to open. Variable: Varies the sewing direction according to select the pattern. Contents Before Using Getting Started Design Center Direction Pull Compensation Type Speci...
...;ll stitch only: Pattern Pattern Size Offset Width Height Direction Value Pattern Direction Select a pattern for Programmable Fill Stitch. When the pattern's arrangement is specified by the Angle setting. Click Select Pattern, and the Browse dialog opens. Select the folder containing the pas file you to open. Variable: Varies the sewing direction according to select the pattern. Contents Before Using Getting Started Design Center Direction Pull Compensation Type Speci...

Users Manual - English
Page 108
... stitch: Example 1: Stitch direction: Default: 45˚ Example 2: Stitch direction: 90˚ Example 3: Stitch direction: 0˚ See also: "Preview" on page 104, "Programmable Stitch Creator" on the Programmable Fill Stitch: When setting the stitch and pattern directions of different settings. Use the preview function of each color individually. The embroidery pattern is grayed. The Sewing Order dialog opens and displays the Color tab. Shortcut key: F10 Toolbar: Operation: 1 Click Sew, then Sewing...
... stitch: Example 1: Stitch direction: Default: 45˚ Example 2: Stitch direction: 90˚ Example 3: Stitch direction: 0˚ See also: "Preview" on page 104, "Programmable Stitch Creator" on the Programmable Fill Stitch: When setting the stitch and pattern directions of different settings. Use the preview function of each color individually. The embroidery pattern is grayed. The Sewing Order dialog opens and displays the Color tab. Shortcut key: F10 Toolbar: Operation: 1 Click Sew, then Sewing...
Users Manual - English
Page 141
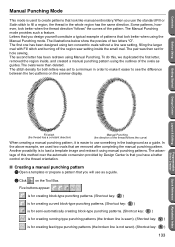
... outlines of the thread follows the curve) When creating a manual punching pattern, it is easier to see the difference between the two patterns on the Tool Box. Getting Started Design Center Layout & Editing Programmable Stitch Creator Quick Reference Alphabetic Index Fill stitch (the thread has a constant direction) Manual Punching (the direction of the ovals as a guide. The pair was set for creating feed-type punching patterns (the broken...
... outlines of the thread follows the curve) When creating a manual punching pattern, it is easier to see the difference between the two patterns on the Tool Box. Getting Started Design Center Layout & Editing Programmable Stitch Creator Quick Reference Alphabetic Index Fill stitch (the thread has a constant direction) Manual Punching (the direction of the ovals as a guide. The pair was set for creating feed-type punching patterns (the broken...
Users Manual - English
Page 152
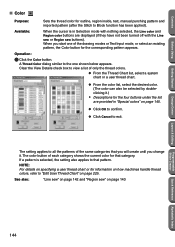
... sew buttons). Operation: 1 Click the Color button. N Click OK to exit. The setting applies to all the patterns of the drawing modes or Text Input mode, or select an existing pattern, the Color button for that pattern. See also: "Line sew" on page 142 and "Region sew" on specifying a user thread chart or for outline, region inside, text, manual punching pattern and imported pattern (after the Stitch...
... sew buttons). Operation: 1 Click the Color button. N Click OK to exit. The setting applies to all the patterns of the drawing modes or Text Input mode, or select an existing pattern, the Color button for that pattern. See also: "Line sew" on page 142 and "Region sew" on specifying a user thread chart or for outline, region inside, text, manual punching pattern and imported pattern (after the Stitch...
Users Manual - English
Page 170
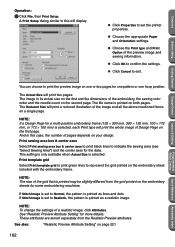
... size on the first and the dimensions of Design Page on your design. Print sewing area box & center axes Select Print sewing area box & center axes to print black lines to this case, the number of pages depends on the first page. If Stitch Image is set to print the preview image on the embroidery sheets for some embroidering machines...
... size on the first and the dimensions of Design Page on your design. Print sewing area box & center axes Select Print sewing area box & center axes to print black lines to this case, the number of pages depends on the first page. If Stitch Image is set to print the preview image on the embroidery sheets for some embroidering machines...
Users Manual - English
Page 270
..., 235 Moving stitch points 124 Moving the Embroidery Pattern 35 multi-position embroidery frame 224 multi-position frame 55 N New 149, 238 New Figure Data 82 New Line Image 82 Noise Reduction 109 Numerical Setting 94, 95, 171, 172 O Offset-Direction 98, 208 Offset-Value 98, 208 Online Registration 231 Open 85, 150, 238 Operating system 2 Optimize Entry/Exit points 218 Optimize hoop change 56, 217...
..., 235 Moving stitch points 124 Moving the Embroidery Pattern 35 multi-position embroidery frame 224 multi-position frame 55 N New 149, 238 New Figure Data 82 New Line Image 82 Noise Reduction 109 Numerical Setting 94, 95, 171, 172 O Offset-Direction 98, 208 Offset-Value 98, 208 Online Registration 231 Open 85, 150, 238 Operating system 2 Optimize Entry/Exit points 218 Optimize hoop change 56, 217...


