

Users Manual - English
Page 2
... fabric while stitching. Always unplug before cleaning. 2. WARNING - Do not use as threading needle, changing needle, threading bobbin, or changing presser foot, and the like. 15. The embroidery machine should always be used as contained in the instruction manual. Do not allow this manual. 3. Never drop or insert any object into water. To reduce the risk of lint, dust, and loose cloth. 5. Use only accessories recommended by pulling on cord. Keep ventilation openings of the embroidery machine and foot control free...
... fabric while stitching. Always unplug before cleaning. 2. WARNING - Do not use as threading needle, changing needle, threading bobbin, or changing presser foot, and the like. 15. The embroidery machine should always be used as contained in the instruction manual. Do not allow this manual. 3. Never drop or insert any object into water. To reduce the risk of lint, dust, and loose cloth. 5. Use only accessories recommended by pulling on cord. Keep ventilation openings of the embroidery machine and foot control free...
Users Manual - English
Page 4
... installation. For a longer service life 1. If the problem persists, please consult your machine turns on the needle while sewing. Do not touch the balance wheel, thread take-up, needle, or other parts to change for improvement without notice. 1 needle, or other moving parts. 2. Do not store your eye on . Always consult the operation manual or use extension cords. 4. To fully enjoy all of the operation manual to keep your embroidery machine...
... installation. For a longer service life 1. If the problem persists, please consult your machine turns on the needle while sewing. Do not touch the balance wheel, thread take-up, needle, or other parts to change for improvement without notice. 1 needle, or other moving parts. 2. Do not store your eye on . Always consult the operation manual or use extension cords. 4. To fully enjoy all of the operation manual to keep your embroidery machine...

Users Manual - English
Page 5
... 5 "START/STOP" BUTTON 5 ACCESSORIES 6 OPTIONS 7 OPERATION (SELECTION KEYS) ........ 8 HOW TO USE THE LANGUAGE SELECTION KEY 11 How to clear the language selection 12 BOBBIN WINDING AND INSTALLATION 13 Setting the bobbin 15 UPPER THREADING 16 Auto needle threading device 17 PREPARATION BEFORE EMBROIDERING 18 Attaching stabilizer material 18 Embroidering different types of fabric 18 Setting the fabric in the embroidery frame 20 Fitting the embroidery frame to the machine 22 Removing the embroidery frame ...... 22 THREAD TENSION ADJUSTMENT....... 23 ADJUSTING...
... 5 "START/STOP" BUTTON 5 ACCESSORIES 6 OPTIONS 7 OPERATION (SELECTION KEYS) ........ 8 HOW TO USE THE LANGUAGE SELECTION KEY 11 How to clear the language selection 12 BOBBIN WINDING AND INSTALLATION 13 Setting the bobbin 15 UPPER THREADING 16 Auto needle threading device 17 PREPARATION BEFORE EMBROIDERING 18 Attaching stabilizer material 18 Embroidering different types of fabric 18 Setting the fabric in the embroidery frame 20 Fitting the embroidery frame to the machine 22 Removing the embroidery frame ...... 22 THREAD TENSION ADJUSTMENT....... 23 ADJUSTING...
Users Manual - English
Page 6
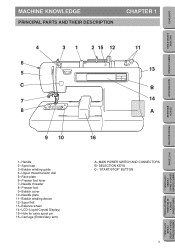
... CONTENTS MACHINE KNOWLEDGE EMBROIDERING MAINTENANCE MACHINE KNOWLEDGE PRINCIPAL PARTS AND THEIR DESCRIPTION CHAPTER 1 4 6 5 C 7 8 31 2 15 12 11 13 B 14 A ERROR MESSAGE TROUBLESHOOTING PATTERNS EMBROIDERING USING A SMALL FRAME (OPTIONAL) 9 10 1- Bobbin winding device 12- "START/STOP" BUTTON EMBROIDERING USING A EXTRA-SMALL FRAME (OPTIONAL) EMBROIDERING USING A LARGE FRAME (OPTIONAL) 3 Presser foot lever 7- Presser foot 9- Spool felt 13- Carriage (Embroidery arm) 16 A- Upper thread tension dial 5- Needle threader 8- Spool cap 3- Face plate 6- Bobbin winding guide...
... CONTENTS MACHINE KNOWLEDGE EMBROIDERING MAINTENANCE MACHINE KNOWLEDGE PRINCIPAL PARTS AND THEIR DESCRIPTION CHAPTER 1 4 6 5 C 7 8 31 2 15 12 11 13 B 14 A ERROR MESSAGE TROUBLESHOOTING PATTERNS EMBROIDERING USING A SMALL FRAME (OPTIONAL) 9 10 1- Bobbin winding device 12- "START/STOP" BUTTON EMBROIDERING USING A EXTRA-SMALL FRAME (OPTIONAL) EMBROIDERING USING A LARGE FRAME (OPTIONAL) 3 Presser foot lever 7- Presser foot 9- Spool felt 13- Carriage (Embroidery arm) 16 A- Upper thread tension dial 5- Needle threader 8- Spool cap 3- Face plate 6- Bobbin winding guide...
Users Manual - English
Page 8
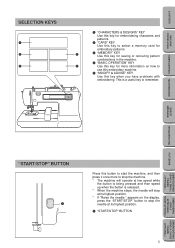
...) "START/STOP" BUTTON 1 Press this key when you have problems with embroidering. CONTENTS MACHINE KNOWLEDGE SELECTION KEYS 1 2 4 1 "CHARACTERS & DESIGNS" KEY Use this key for embroidering characters and patterns. 2 "CARD" KEY Use this key to select a memory card for embroidery patterns. 3 3 "MEMORY" KEY Use this key for saving or retrieving pattern combinations in the machine. 4 "BASIC OPERATION" KEY 5 Use this key for more to stop the machine. * The machine will operate at low speed...
...) "START/STOP" BUTTON 1 Press this key when you have problems with embroidering. CONTENTS MACHINE KNOWLEDGE SELECTION KEYS 1 2 4 1 "CHARACTERS & DESIGNS" KEY Use this key for embroidering characters and patterns. 2 "CARD" KEY Use this key to select a memory card for embroidery patterns. 3 3 "MEMORY" KEY Use this key for saving or retrieving pattern combinations in the machine. 4 "BASIC OPERATION" KEY 5 Use this key for more to stop the machine. * The machine will operate at low speed...

Users Manual - English
Page 16
... using a fine thread such as cross wound thread, remove the spool felt and slightly separate the spool cap from the bottom front of the spool. The spool cap closest to the thread spool size should be used to hold the spool securely on the spool post. * The spool cap should come from the thread on the main power. 1 ON 2 OFF 2. Connect the machine to wind a bobbin and set the lower thread. 1 1 "BASIC OPERATION" key 3 2 6 7 4 5 1 ERROR MESSAGE TROUBLESHOOTING PATTERNS EMBROIDERING USING...
... using a fine thread such as cross wound thread, remove the spool felt and slightly separate the spool cap from the bottom front of the spool. The spool cap closest to the thread spool size should be used to hold the spool securely on the spool post. * The spool cap should come from the thread on the main power. 1 ON 2 OFF 2. Connect the machine to wind a bobbin and set the lower thread. 1 1 "BASIC OPERATION" key 3 2 6 7 4 5 1 ERROR MESSAGE TROUBLESHOOTING PATTERNS EMBROIDERING USING...

Users Manual - English
Page 17
..., push the bobbin winder shaft to the left. TROUBLESHOOTING PATTERNS EMBROIDERING USING A SMALL FRAME (OPTIONAL) EMBROIDERING USING A EXTRA-SMALL FRAME (OPTIONAL) EMBROIDERING USING A LARGE FRAME (OPTIONAL) 14 Guide the thread through the machine and the bobbin winding guide as shown on hand before start your project. Remove the bobbin and continue sewing. 8. Wind the thread a few times around the bobbin and press the "START/STOP" button again. CONTENTS MACHINE KNOWLEDGE EMBROIDERING MAINTENANCE ERROR MESSAGE 2 3 3. Guide the thread through the small hole in the...
..., push the bobbin winder shaft to the left. TROUBLESHOOTING PATTERNS EMBROIDERING USING A SMALL FRAME (OPTIONAL) EMBROIDERING USING A EXTRA-SMALL FRAME (OPTIONAL) EMBROIDERING USING A LARGE FRAME (OPTIONAL) 14 Guide the thread through the machine and the bobbin winding guide as shown on hand before start your project. Remove the bobbin and continue sewing. 8. Wind the thread a few times around the bobbin and press the "START/STOP" button again. CONTENTS MACHINE KNOWLEDGE EMBROIDERING MAINTENANCE ERROR MESSAGE 2 3 3. Guide the thread through the small hole in the...
Users Manual - English
Page 19
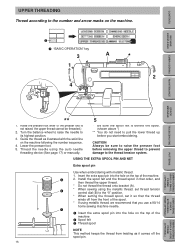
... the needle to the thread tension system. CONTENTS MACHINE KNOWLEDGE UPPER THREADING Thread according to the "0" position. * When setting the thread spool, set it comes off the spool pin. 16 EMBROIDERING USING A EXTRA-SMALL FRAME (OPTIONAL) EMBROIDERING USING A LARGE FRAME (OPTIONAL) Guide the thread as it so that the thread winds off from twisting as illustrated with metallic thread. 1. Raise the presser foot lever (If the presser foot is behind the spool. (shown above *) ** You do not need to pull the lower thread...
... the needle to the thread tension system. CONTENTS MACHINE KNOWLEDGE UPPER THREADING Thread according to the "0" position. * When setting the thread spool, set it comes off the spool pin. 16 EMBROIDERING USING A EXTRA-SMALL FRAME (OPTIONAL) EMBROIDERING USING A LARGE FRAME (OPTIONAL) Guide the thread as it so that the thread winds off from twisting as illustrated with metallic thread. 1. Raise the presser foot lever (If the presser foot is behind the spool. (shown above *) ** You do not need to pull the lower thread...

Users Manual - English
Page 26
...Upper thread tension dial 1 Upper thread tension setting 2 Weak (Decrease thread tension) 3 Strong (Increase thread tension) A- Thread tension may need to check for the proper thread tension. Correct tension is important because too much or too little tension will cause poor quality embroidery or your fabric to pucker. 1 Top surface of fabric 2 Reverse side of fabric If upper thread tension is too weak The upper thread will be done to be loose. To loosen the upper thread tension, adjust the dial to the A right. B ERROR MESSAGE TROUBLESHOOTING PATTERNS EMBROIDERING USING...
...Upper thread tension dial 1 Upper thread tension setting 2 Weak (Decrease thread tension) 3 Strong (Increase thread tension) A- Thread tension may need to check for the proper thread tension. Correct tension is important because too much or too little tension will cause poor quality embroidery or your fabric to pucker. 1 Top surface of fabric 2 Reverse side of fabric If upper thread tension is too weak The upper thread will be done to be loose. To loosen the upper thread tension, adjust the dial to the A right. B ERROR MESSAGE TROUBLESHOOTING PATTERNS EMBROIDERING USING...
Users Manual - English
Page 28
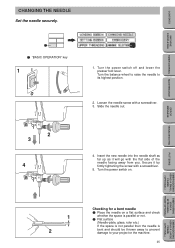
... will go with a screwdriver. 3. ERROR MESSAGE TROUBLESHOOTING PATTERNS EMBROIDERING USING A SMALL FRAME (OPTIONAL) EMBROIDERING USING A EXTRA-SMALL FRAME (OPTIONAL) EMBROIDERING USING A LARGE FRAME (OPTIONAL) 1 2 Checking for a bent needle 1 Place the needle on . Slide the needle out. 2 3 4 4. Turn the power switch off and lower the presser foot lever. Turn the balance wheel to raise the needle to your project or the machine. 25 Turn the power switch on a flat surface and...
... will go with a screwdriver. 3. ERROR MESSAGE TROUBLESHOOTING PATTERNS EMBROIDERING USING A SMALL FRAME (OPTIONAL) EMBROIDERING USING A EXTRA-SMALL FRAME (OPTIONAL) EMBROIDERING USING A LARGE FRAME (OPTIONAL) 1 2 Checking for a bent needle 1 Place the needle on . Slide the needle out. 2 3 4 4. Turn the power switch off and lower the presser foot lever. Turn the balance wheel to raise the needle to your project or the machine. 25 Turn the power switch on a flat surface and...

Users Manual - English
Page 29
Thread the upper thread following the solidline and numerical sequence marked on your machine. Be sure to attach the spool felt as shown in the illustration. 1 Spool felt (See page 16 - 17) 2. Thread the lower (bobbin) thread. (See page 15) 26 EMBROIDERING USING A LARGE FRAME (OPTIONAL) CONTENTS MACHINE KNOWLEDGE EMBROIDERING MAINTENANCE EMBROIDERING EMBROIDERY CHAPTER 2 1 1 "BASIC OPERATION" key 6 1 5 3 4 2 ERROR MESSAGE TROUBLESHOOTING PATTERNS EMBROIDERING USING A SMALL FRAME (OPTIONAL) EMBROIDERING USING A EXTRA-SMALL FRAME (OPTIONAL) 1.
Thread the upper thread following the solidline and numerical sequence marked on your machine. Be sure to attach the spool felt as shown in the illustration. 1 Spool felt (See page 16 - 17) 2. Thread the lower (bobbin) thread. (See page 15) 26 EMBROIDERING USING A LARGE FRAME (OPTIONAL) CONTENTS MACHINE KNOWLEDGE EMBROIDERING MAINTENANCE EMBROIDERING EMBROIDERY CHAPTER 2 1 1 "BASIC OPERATION" key 6 1 5 3 4 2 ERROR MESSAGE TROUBLESHOOTING PATTERNS EMBROIDERING USING A SMALL FRAME (OPTIONAL) EMBROIDERING USING A EXTRA-SMALL FRAME (OPTIONAL) 1.
Users Manual - English
Page 35
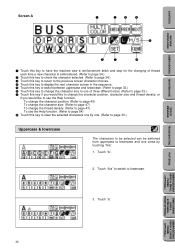
... change the character position, character size and thread density, or if you would like to use the Help function: (Refer to page 54) 8 Touch this key to clear the selected characters one by touching "A/a". 1. TROUBLESHOOTING PATTERNS EMBROIDERING USING A SMALL FRAME (OPTIONAL) EMBROIDERING USING A EXTRA-SMALL FRAME (OPTIONAL) EMBROIDERING USING A LARGE FRAME (OPTIONAL) 32 CONTENTS MACHINE KNOWLEDGE EMBROIDERING MAINTENANCE ERROR MESSAGE Screen A 1 2 3 4 6 5 7 8 1 Touch this key to have the machine sew a reinforcement stitch...
... change the character position, character size and thread density, or if you would like to use the Help function: (Refer to page 54) 8 Touch this key to clear the selected characters one by touching "A/a". 1. TROUBLESHOOTING PATTERNS EMBROIDERING USING A SMALL FRAME (OPTIONAL) EMBROIDERING USING A EXTRA-SMALL FRAME (OPTIONAL) EMBROIDERING USING A LARGE FRAME (OPTIONAL) 32 CONTENTS MACHINE KNOWLEDGE EMBROIDERING MAINTENANCE ERROR MESSAGE Screen A 1 2 3 4 6 5 7 8 1 Touch this key to have the machine sew a reinforcement stitch...
Users Manual - English
Page 46
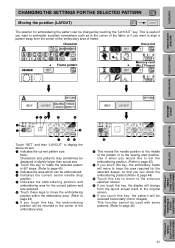
...) EMBROIDERING MAINTENANCE ERROR MESSAGE TROUBLESHOOTING PATTERNS EMBROIDERING USING A SMALL FRAME (OPTIONAL) 34 5 6 8 1 2 9 7 0A Touch "SET" and then "LAYOUT" to the sewing start position. A If you touch this key, the embroidering position will be changed by touching the "LAYOUT" key. CONTENTS MACHINE KNOWLEDGE CHANGING THE SETTINGS FOR THE SELECTED PATTERN Moving the position (LAYOUT) The position for the selected design, so that you can be returned to the center of the embroidery area. Use...
...) EMBROIDERING MAINTENANCE ERROR MESSAGE TROUBLESHOOTING PATTERNS EMBROIDERING USING A SMALL FRAME (OPTIONAL) 34 5 6 8 1 2 9 7 0A Touch "SET" and then "LAYOUT" to the sewing start position. A If you touch this key, the embroidering position will be changed by touching the "LAYOUT" key. CONTENTS MACHINE KNOWLEDGE CHANGING THE SETTINGS FOR THE SELECTED PATTERN Moving the position (LAYOUT) The position for the selected design, so that you can be returned to the center of the embroidery area. Use...

Users Manual - English
Page 51
... on the left one position. 2. Raise the presser foot. 6. The diagram on the screen. ERROR MESSAGE TROUBLESHOOTING PATTERNS EMBROIDERING USING A SMALL FRAME (OPTIONAL) EMBROIDERING USING A EXTRA-SMALL FRAME (OPTIONAL) Embroidering single color patterns 1. CONTENTS MACHINE KNOWLEDGE EMBROIDERING MAINTENANCE SEWING A BASIC EMBROIDERY PATTERN Embroidering multi-color patterns (1) (2) (3) (2) (3) When a pattern is selected it is finished. 5. Replace the upper thread with the next color and press the "START/STOP" button. Replace the upper thread with the next color...
... on the left one position. 2. Raise the presser foot. 6. The diagram on the screen. ERROR MESSAGE TROUBLESHOOTING PATTERNS EMBROIDERING USING A SMALL FRAME (OPTIONAL) EMBROIDERING USING A EXTRA-SMALL FRAME (OPTIONAL) Embroidering single color patterns 1. CONTENTS MACHINE KNOWLEDGE EMBROIDERING MAINTENANCE SEWING A BASIC EMBROIDERY PATTERN Embroidering multi-color patterns (1) (2) (3) (2) (3) When a pattern is selected it is finished. 5. Replace the upper thread with the next color and press the "START/STOP" button. Replace the upper thread with the next color...

Users Manual - English
Page 57
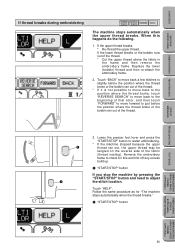
... this key to move back stitch by stitch without embroidering. (If touched continuously, the stitch will change to begin. CONTENTS IF THREAD BREAKS DURING EMBROIDERING OR WHEN PARTLY COMPLETING A PATTERN Before embroidering MACHINE KNOWLEDGE EMBROIDERING MAINTENANCE ERROR MESSAGE TROUBLESHOOTING PATTERNS EMBROIDERING USING A SMALL FRAME (OPTIONAL) While embroidering * When embroidering starts, "SET" will be advanced in 9-stitch jumps starting from the 6th single stitch) 54 5 Touch this key to return to the previous screen and allow embroidery to "HELP".
... this key to move back stitch by stitch without embroidering. (If touched continuously, the stitch will change to begin. CONTENTS IF THREAD BREAKS DURING EMBROIDERING OR WHEN PARTLY COMPLETING A PATTERN Before embroidering MACHINE KNOWLEDGE EMBROIDERING MAINTENANCE ERROR MESSAGE TROUBLESHOOTING PATTERNS EMBROIDERING USING A SMALL FRAME (OPTIONAL) While embroidering * When embroidering starts, "SET" will be advanced in 9-stitch jumps starting from the 6th single stitch) 54 5 Touch this key to return to the previous screen and allow embroidery to "HELP".
Users Manual - English
Page 58
..., the upper thread may be tangled on the reverse side of the thread. * Cut the upper thread above the fabric in the frame and then remove the embroidery frame. CONTENTS MACHINE KNOWLEDGE EMBROIDERING MAINTENANCE ERROR MESSAGE If thread breaks during embroidering The machine stops automatically when the upper thread breaks. Touch "HELP". If the lower thread breaks or the bobbin runs out of the fabric (thread nesting). Remove the embroidery frame to check for "The machine stops automatically when the thread breaks." 1 "START/STOP" button TROUBLESHOOTING PATTERNS EMBROIDERING USING...
..., the upper thread may be tangled on the reverse side of the thread. * Cut the upper thread above the fabric in the frame and then remove the embroidery frame. CONTENTS MACHINE KNOWLEDGE EMBROIDERING MAINTENANCE ERROR MESSAGE If thread breaks during embroidering The machine stops automatically when the upper thread breaks. Touch "HELP". If the lower thread breaks or the bobbin runs out of the fabric (thread nesting). Remove the embroidery frame to check for "The machine stops automatically when the thread breaks." 1 "START/STOP" button TROUBLESHOOTING PATTERNS EMBROIDERING USING...
Users Manual - English
Page 60
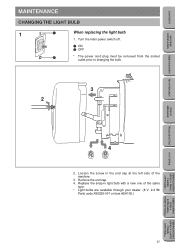
...W/ Parts code X50228-001 or item #SA105.) ERROR MESSAGE TROUBLESHOOTING PATTERNS EMBROIDERING USING A SMALL FRAME (OPTIONAL) EMBROIDERING USING A EXTRA-SMALL FRAME (OPTIONAL) EMBROIDERING USING A LARGE FRAME (OPTIONAL) 57 Remove the end cap. 4. Turn the main power switch off. 1 ON 2 OFF * The power cord plug must be removed from the socket outlet prior to changing the bulb. 3 2 4 2. CONTENTS MACHINE KNOWLEDGE EMBROIDERING MAINTENANCE MAINTENANCE CHANGING THE LIGHT BULB 1 When replacing the light bulb 1. Loosen the screw in light bulb with a new one of the machine. 3.
...W/ Parts code X50228-001 or item #SA105.) ERROR MESSAGE TROUBLESHOOTING PATTERNS EMBROIDERING USING A SMALL FRAME (OPTIONAL) EMBROIDERING USING A EXTRA-SMALL FRAME (OPTIONAL) EMBROIDERING USING A LARGE FRAME (OPTIONAL) 57 Remove the end cap. 4. Turn the main power switch off. 1 ON 2 OFF * The power cord plug must be removed from the socket outlet prior to changing the bulb. 3 2 4 2. CONTENTS MACHINE KNOWLEDGE EMBROIDERING MAINTENANCE MAINTENANCE CHANGING THE LIGHT BULB 1 When replacing the light bulb 1. Loosen the screw in light bulb with a new one of the machine. 3.
Users Manual - English
Page 62
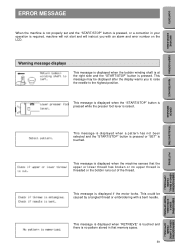
... by a tangled thread or embroidering with an alarm and error number on the LCD. This message is displayed when the "START/STOP" button is pressed while the presser foot lever is displayed if the motor locks. CONTENTS MACHINE KNOWLEDGE EMBROIDERING MAINTENANCE ERROR MESSAGE TROUBLESHOOTING ERROR MESSAGE When the machine is not properly set and the "START/STOP" button is pressed, or a correction in that memory space. 59 PATTERNS EMBROIDERING USING A SMALL FRAME (OPTIONAL) EMBROIDERING USING A EXTRA...
... by a tangled thread or embroidering with an alarm and error number on the LCD. This message is displayed when the "START/STOP" button is pressed while the presser foot lever is displayed if the motor locks. CONTENTS MACHINE KNOWLEDGE EMBROIDERING MAINTENANCE ERROR MESSAGE TROUBLESHOOTING ERROR MESSAGE When the machine is not properly set and the "START/STOP" button is pressed, or a correction in that memory space. 59 PATTERNS EMBROIDERING USING A SMALL FRAME (OPTIONAL) EMBROIDERING USING A EXTRA...

Users Manual - English
Page 65
... used . 2. Lower thread breaks 3. embroidery thread. 1. The upper thread is being used . Replace with 3. Change to the machine correctly. 5. Change to the machine incorrectly. 4. The embroidery frame has been attached to the proper needle. 5. no stabilizer fabric attached. 4. The upper thread tension is being used with the designated lower lower embroidery thread is tangled. 1. Thin or stretch fabric is too strong. 1. Change to make sure that you are using the upper thread tension dial. 2. Upper thread breaks 2. Set the spool of the problem...
... used . 2. Lower thread breaks 3. embroidery thread. 1. The upper thread is being used . Replace with 3. Change to the machine correctly. 5. Change to the machine incorrectly. 4. The embroidery frame has been attached to the proper needle. 5. no stabilizer fabric attached. 4. The upper thread tension is being used with the designated lower lower embroidery thread is tangled. 1. Thin or stretch fabric is too strong. 1. Change to make sure that you are using the upper thread tension dial. 2. Upper thread breaks 2. Set the spool of the problem...

Users Manual - English
Page 67
... inserted. 2. Accordingly, if the upper thread is not threaded, the machine will not operate even if the "START/STOP" button is not pressed. 2. Refer to page 54, using the "HELP" function to get back to the proper needle. The "START/STOP" button is pressed. Remedy 1. Press the "START/STOP" button. 2. Turn the power on page 59. 1. Remove the needle and reset a new needle properly. 2. The needle breaks Probable cause 1. ERROR MESSAGE TROUBLESHOOTING PATTERNS EMBROIDERING USING A SMALL FRAME (OPTIONAL) EMBROIDERING USING...
... inserted. 2. Accordingly, if the upper thread is not threaded, the machine will not operate even if the "START/STOP" button is not pressed. 2. Refer to page 54, using the "HELP" function to get back to the proper needle. The "START/STOP" button is pressed. Remedy 1. Press the "START/STOP" button. 2. Turn the power on page 59. 1. Remove the needle and reset a new needle properly. 2. The needle breaks Probable cause 1. ERROR MESSAGE TROUBLESHOOTING PATTERNS EMBROIDERING USING A SMALL FRAME (OPTIONAL) EMBROIDERING USING...


