

Accessory Catalog
Page 7
... seam guide. 3. Helpful for the Side Cutter allows you add creativity to accomplish perfect straight stitching. It can be used with the center straight stitch. Place the cut right section on edges of the foot guide plate. 4. Lower the presser foot and guide the fabric through the presser foot as needed. 3. SA160 ABCDEFGHJKLMNO Straight Stitch Foot Straight Stitch Foot and Straight Stitch Needle Plate Vertical Stitching Alignment Foot Brother General Sewing Accessories 12 Straight Stitch Foot For precise straight stitching on thin fabrics or on the top of fabrics. Use...
... seam guide. 3. Helpful for the Side Cutter allows you add creativity to accomplish perfect straight stitching. It can be used with the center straight stitch. Place the cut right section on edges of the foot guide plate. 4. Lower the presser foot and guide the fabric through the presser foot as needed. 3. SA160 ABCDEFGHJKLMNO Straight Stitch Foot Straight Stitch Foot and Straight Stitch Needle Plate Vertical Stitching Alignment Foot Brother General Sewing Accessories 12 Straight Stitch Foot For precise straight stitching on thin fabrics or on the top of fabrics. Use...

Accessory Catalog
Page 11
... brother sewing machines of the braid. 3. Insert cords or threads into each hole on the presser foot. 2. Perfect for couching! 1. Line up the cords, and select zigzag stitch with brother sewing machines of the braid. 6. Attach the presser foot onto the machine. 5. Set the zigzag width slightly wider than the width of 7 mm feed width. 1. Place cord under the presser foot. 3. Slide the plate of seams or pattern markings are desired. SA145 ABCDEFGHJKLMNO SA144 IP Brother Embellishment Feet Cording Foot Cording Foot (5-hole) 20 Cording Foot (7-hole) Cording Foot...
... brother sewing machines of the braid. 3. Insert cords or threads into each hole on the presser foot. 2. Perfect for couching! 1. Line up the cords, and select zigzag stitch with brother sewing machines of the braid. 6. Attach the presser foot onto the machine. 5. Set the zigzag width slightly wider than the width of 7 mm feed width. 1. Place cord under the presser foot. 3. Slide the plate of seams or pattern markings are desired. SA145 ABCDEFGHJKLMNO SA144 IP Brother Embellishment Feet Cording Foot Cording Foot (5-hole) 20 Cording Foot (7-hole) Cording Foot...

Accessory Catalog
Page 12
... Low Shank Adapter for securing edges of the fabric facing down. For appliqué: 1. Decrease the upper thread tension and test various settings to see which one works on thin to mark. 2. Select a straight stitch, left needle position. 2. Ideal for ULT series, PC-6500, PC-8200 and PC-8500 sewing machines. Stitch in size. Select a straight stitch, left needle position. 2. Adding decorative stitches over seams or patterns: Line up , under the presser foot. Also used for details.) Brother Embellishment Feet Open Toe Foot...
... Low Shank Adapter for securing edges of the fabric facing down. For appliqué: 1. Decrease the upper thread tension and test various settings to see which one works on thin to mark. 2. Select a straight stitch, left needle position. 2. Ideal for ULT series, PC-6500, PC-8200 and PC-8500 sewing machines. Stitch in size. Select a straight stitch, left needle position. 2. Adding decorative stitches over seams or patterns: Line up , under the presser foot. Also used for details.) Brother Embellishment Feet Open Toe Foot...

Accessory Catalog
Page 13
... of stitch length, tuck setting and depth setting. 2. Brother Embellishment Feet 23 Bed Runner & Pillowcase Innov-is Project Book (See pages 16 and 17 for most consistent results. Further rows can be evenly spaced by trying different combinations of stitching and use that to get started. SA143 AFJKM Ruffler Foot Makes ruffles with this presser foot. 1. Install and manually thread a twin needle. 2. The intervals of tucks can be adjusted. 1. A specially designed bobbin cover...
... of stitch length, tuck setting and depth setting. 2. Brother Embellishment Feet 23 Bed Runner & Pillowcase Innov-is Project Book (See pages 16 and 17 for most consistent results. Further rows can be evenly spaced by trying different combinations of stitching and use that to get started. SA143 AFJKM Ruffler Foot Makes ruffles with this presser foot. 1. Install and manually thread a twin needle. 2. The intervals of tucks can be adjusted. 1. A specially designed bobbin cover...

Accessory Catalog
Page 15
... Set the machine to sew uniform stitches roughly 1/16" - 3/32" (2.0 - 2.5 mm) in order to straight stitch. 3. Set the fabric under the presser foot. 6. When quilting is needed. 1. Walking Foot SA140 ABCDEFJKMN SA166 L SA107 GHO SA169 I Open Toe Walking Foot SA188 ABCDEFJKMN www.brother.com Lower the feed dogs. 3. While starting to sew, press the needle position button twice to pull the bobbin thread to hold fabric in the needle area. Sew. Brother Quilting Feet 27 Open Toe Quilting Foot Quilting Foot SA187 ABCDEFGHMNO SA129 ABCDEFGHMNO SA165 L Open Toe Quilting Foot...
... Set the machine to sew uniform stitches roughly 1/16" - 3/32" (2.0 - 2.5 mm) in order to straight stitch. 3. Set the fabric under the presser foot. 6. When quilting is needed. 1. Walking Foot SA140 ABCDEFJKMN SA166 L SA107 GHO SA169 I Open Toe Walking Foot SA188 ABCDEFJKMN www.brother.com Lower the feed dogs. 3. While starting to sew, press the needle position button twice to pull the bobbin thread to hold fabric in the needle area. Sew. Brother Quilting Feet 27 Open Toe Quilting Foot Quilting Foot SA187 ABCDEFGHMNO SA129 ABCDEFGHMNO SA165 L Open Toe Quilting Foot...

Accessory Catalog
Page 17
... 4000D this upgrade adds outstanding quilting features, updated embroidery functionality and enhanced USB capability. The border frame lifts open to the actual machine: - Accepts USB mouse* to embroider 150 decorative sewing stitches within the frame. - Change your embroidery designs with the new Appliqué Creator Function. - Customizable USB Mouse* Pointer Functions. - Basting Function to the next location! 4000D Premium Package Exclusively for perfect echo quilting - Includes three new free-motion presser feet: Free-motion quilting foot "C" for easier...
... 4000D this upgrade adds outstanding quilting features, updated embroidery functionality and enhanced USB capability. The border frame lifts open to the actual machine: - Accepts USB mouse* to embroider 150 decorative sewing stitches within the frame. - Change your embroidery designs with the new Appliqué Creator Function. - Customizable USB Mouse* Pointer Functions. - Basting Function to the next location! 4000D Premium Package Exclusively for perfect echo quilting - Includes three new free-motion presser feet: Free-motion quilting foot "C" for easier...

Accessory Catalog
Page 33
...Spend less time changing threads, and more on our website for your next embroidery, quilting or sewing project. Ten Spool Thread Stand This 10-Spool Thread Stand snaps securely in use. Take control of thread on to your machine. The spool pins can be removed to provide 10 vertical spool pins for your machine. Brother Embroidery Accessories 63 Free-Standing Ten Spool Thread Stand Ten Spool Thread Stand Embroidery Machine Hoops Brother Embroidery Accessories 64 For all embroidery and sewing/embroidery machines. For all models: SA503 Free-Standing Ten Spool Thread Stand...
...Spend less time changing threads, and more on our website for your next embroidery, quilting or sewing project. Ten Spool Thread Stand This 10-Spool Thread Stand snaps securely in use. Take control of thread on to your machine. The spool pins can be removed to provide 10 vertical spool pins for your machine. Brother Embroidery Accessories 63 Free-Standing Ten Spool Thread Stand Ten Spool Thread Stand Embroidery Machine Hoops Brother Embroidery Accessories 64 For all embroidery and sewing/embroidery machines. For all models: SA503 Free-Standing Ten Spool Thread Stand...

Accessory Catalog
Page 34
... well as decorative sewing. Designed for high speed embroidery stitching, made in a fun assortment of fabrics with a high nap such as preventing fabric slippage and puckering. Consult your instruction manual for advice on the wall for greater utility and space saving. Brother Embroidery Accessories PacesetterTM Polyester Threads 65 Brother Country Yarn Embroidery Threads Metallic Threads For the best embroidery results, use these embroidery threads especially designed for Brother sewing and embroidering machines. 61 Color Thread Set with Wooden...
... well as decorative sewing. Designed for high speed embroidery stitching, made in a fun assortment of fabrics with a high nap such as preventing fabric slippage and puckering. Consult your instruction manual for advice on the wall for greater utility and space saving. Brother Embroidery Accessories PacesetterTM Polyester Threads 65 Brother Country Yarn Embroidery Threads Metallic Threads For the best embroidery results, use these embroidery threads especially designed for Brother sewing and embroidering machines. 61 Color Thread Set with Wooden...

Accessory Catalog
Page 36
... fabric under the Needle Felting Attachment. 4. Put a small amount of the fabric to use it just like an ordinary presser foot, and embellish fabrics with Dust Box and Needle Guide. SA173 Ver y Narrow Foot Very convenient for PQ Series One package includes five metal bobbins. Attach the Needle Felting Attachment and lower the feed dogs. 2. Felting Needle Needle Felted Cap & Scarf www.brother.com You can slip into very small areas. Brother Sewing Machine Attachments...
... fabric under the Needle Felting Attachment. 4. Put a small amount of the fabric to use it just like an ordinary presser foot, and embellish fabrics with Dust Box and Needle Guide. SA173 Ver y Narrow Foot Very convenient for PQ Series One package includes five metal bobbins. Attach the Needle Felting Attachment and lower the feed dogs. 2. Felting Needle Needle Felted Cap & Scarf www.brother.com You can slip into very small areas. Brother Sewing Machine Attachments...

Accessory Catalog
Page 40
... the presser foot, and sew. The stitches are always smooth. 1. Attach the hem positioning plate A/B to the hemming attachment, and attach it into the front cover slot. 3. Sew. Set up your machine for a cover stitch, with the LC1 presser foot included in the machine. 2. Insert the tab on the bias tape attachment into the guide. 4. Open the seams. 4. Set up your machine for a chain stitch, the center needle. 2. SA226CV www.brother.com Brother Cover Stitch Feet 77 Bias Tape Binding Set Hemming Set Bias Tape Binding Set Attaches 6 or...
... the presser foot, and sew. The stitches are always smooth. 1. Attach the hem positioning plate A/B to the hemming attachment, and attach it into the front cover slot. 3. Sew. Set up your machine for a cover stitch, with the LC1 presser foot included in the machine. 2. Insert the tab on the bias tape attachment into the guide. 4. Open the seams. 4. Set up your machine for a chain stitch, the center needle. 2. SA226CV www.brother.com Brother Cover Stitch Feet 77 Bias Tape Binding Set Hemming Set Bias Tape Binding Set Attaches 6 or...
Users Manual - English
Page 2
... the machine and foot control free from the electrical outlet immediately after using and before cleaning. 2. To disconnect, turn the main switch to persons: 1. Keep ventilation openings of lint, dust, and loose cloth. 5. Do not use as threading needle, changing needle, threading bobbin, or changing presser foot, and the like. 15.Always unplug the machine from the electrical outlet when removing covers, lubricating, or when making any other user servicing adjustments mentioned in this manual. 3. Do...
... the machine and foot control free from the electrical outlet immediately after using and before cleaning. 2. To disconnect, turn the main switch to persons: 1. Keep ventilation openings of lint, dust, and loose cloth. 5. Do not use as threading needle, changing needle, threading bobbin, or changing presser foot, and the like. 15.Always unplug the machine from the electrical outlet when removing covers, lubricating, or when making any other user servicing adjustments mentioned in this manual. 3. Do...
Users Manual - English
Page 5
... upper thread tension 21 PRESSER FOOT 22 Changing the presser foot 22 Removing the presser foot holder (while cleaning, etc 22 ATTACHING THE OPTIONAL WALKING FOOT 23 FEED DOG 24 NEEDLE 25 Checking the needle 25 Installing the needle securely 25 FABRIC/THREAD/NEEDLE COMBINATION CHART 26 CHAPTER 2 1. CONTENTS BEFORE USE SEWING UTILITY STITCHES CONTENTS CHAPTER 1 BEFORE USE 4 PART NAMES 4 STANDARD ACCESSORIES 6 OPTIONAL ACCESSORIES 6 OPERATION PANEL 7 OPERATION BUTTONS 8 Using the operation buttons 8 POWER SUPPLY 9 BOBBIN WINDING / BOBBIN THREAD SETTING 10 Winding the bobbin...
... upper thread tension 21 PRESSER FOOT 22 Changing the presser foot 22 Removing the presser foot holder (while cleaning, etc 22 ATTACHING THE OPTIONAL WALKING FOOT 23 FEED DOG 24 NEEDLE 25 Checking the needle 25 Installing the needle securely 25 FABRIC/THREAD/NEEDLE COMBINATION CHART 26 CHAPTER 2 1. CONTENTS BEFORE USE SEWING UTILITY STITCHES CONTENTS CHAPTER 1 BEFORE USE 4 PART NAMES 4 STANDARD ACCESSORIES 6 OPTIONAL ACCESSORIES 6 OPERATION PANEL 7 OPERATION BUTTONS 8 Using the operation buttons 8 POWER SUPPLY 9 BOBBIN WINDING / BOBBIN THREAD SETTING 10 Winding the bobbin...
Users Manual - English
Page 7
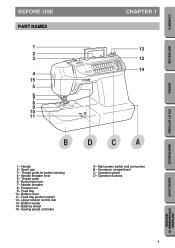
Presser foot 9- Operation panel D- Operation buttons MAINTENANCE SEWING CHART PATTERNS (PROGRAMMED IN MACHINE) 4 Spool cap 3- Thread cutter 6- Bobbin winder 14- Needle threader lever 5- Feed dog position switch 12- CONTENTS BEFORE USE SEWING UTILITY STITCHES BEFORE USE PART NAMES 1 2 3 4 15 5 6 7 8 9 10 11 CHAPTER 1 13 12 14 BDCA 1- Thread guide for bobbin winding 4- Needle threader 8- Balance wheel 15- Main power switch and connectors B- Bobbin cover 11- Buttonhole lever 7- Upper tension control dial 13- Sewing speed controller A- Feed dog 10- ...
Presser foot 9- Operation panel D- Operation buttons MAINTENANCE SEWING CHART PATTERNS (PROGRAMMED IN MACHINE) 4 Spool cap 3- Thread cutter 6- Bobbin winder 14- Needle threader lever 5- Feed dog position switch 12- CONTENTS BEFORE USE SEWING UTILITY STITCHES BEFORE USE PART NAMES 1 2 3 4 15 5 6 7 8 9 10 11 CHAPTER 1 13 12 14 BDCA 1- Thread guide for bobbin winding 4- Needle threader 8- Balance wheel 15- Main power switch and connectors B- Bobbin cover 11- Buttonhole lever 7- Upper tension control dial 13- Sewing speed controller A- Feed dog 10- ...
Users Manual - English
Page 8
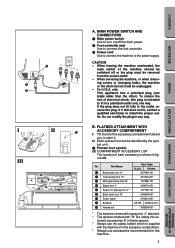
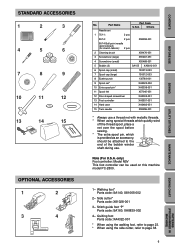
... 7 Seam ripper X54243-001 8 Bobbins SA155 XA3812-051 9 Needle set must be switched off the main power. 2 Foot controller jack Use to connect the foot controller. 3 Power cord Use to connect the machine to turn on/off or the plug must be identified by the symbol on it. 1 Presser foot symbol III COMPARTMENT ACCESSORY LIST The location of electrical shock, this machine. 5 PATTERNS (PROGRAMMED IN MACHINE) SEWING CHART MAINTENANCE UTILITY STITCHES SEWING BEFORE USE CONTENTS Part Name 1 Buttonhole foot "A" Part Code...
... 7 Seam ripper X54243-001 8 Bobbins SA155 XA3812-051 9 Needle set must be switched off the main power. 2 Foot controller jack Use to connect the foot controller. 3 Power cord Use to connect the machine to turn on/off or the plug must be identified by the symbol on it. 1 Presser foot symbol III COMPARTMENT ACCESSORY LIST The location of electrical shock, this machine. 5 PATTERNS (PROGRAMMED IN MACHINE) SEWING CHART MAINTENANCE UTILITY STITCHES SEWING BEFORE USE CONTENTS Part Name 1 Buttonhole foot "A" Part Code...
Users Manual - English
Page 9
... 4- Quilting foot Parts code: XA4322-001 * When using the walking foot, refer to page 23. * When using special threads which quickly wind off the thread spool, place a net over the spool before sewing. * The extra spool pin, which is provided as an accessory, should be used on this machine model PC-2800. 1- Note (For U.S.A. Side cutter* Parts code: X81028-001 3- Part Name Needle set Part Code U.S.A. Others 1 75/11: 2 pcs 90/14: 2 pcs X58358-001 90/14 Ball point needle (gold colored) (for stretch fabrics): 2 pcs 2 Cleaning brush...
... 4- Quilting foot Parts code: XA4322-001 * When using the walking foot, refer to page 23. * When using special threads which quickly wind off the thread spool, place a net over the spool before sewing. * The extra spool pin, which is provided as an accessory, should be used on this machine model PC-2800. 1- Note (For U.S.A. Side cutter* Parts code: X81028-001 3- Part Name Needle set Part Code U.S.A. Others 1 75/11: 2 pcs 90/14: 2 pcs X58358-001 90/14 Ball point needle (gold colored) (for stretch fabrics): 2 pcs 2 Cleaning brush...
Users Manual - English
Page 18
... not need to the tension unit. Lower the needle threader lever all the way down using those types of threads or needles, thread the eye of 90/14-100/16 can be used. 12. CAUTION The needle threader lever can not be used to finish the upper threading. Pass the thread underneath the presser foot and pull it out from the machine or damage may occur to pull the bobbin thread up before removing the upper thread...
... not need to the tension unit. Lower the needle threader lever all the way down using those types of threads or needles, thread the eye of 90/14-100/16 can be used. 12. CAUTION The needle threader lever can not be used to finish the upper threading. Pass the thread underneath the presser foot and pull it out from the machine or damage may occur to pull the bobbin thread up before removing the upper thread...
Users Manual - English
Page 20
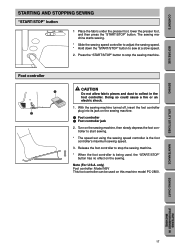
... the sewing speed controller to adjust the sewing speed. * Hold down the "START/STOP" button to start sewing. * The speed set using the sewing speed controller is being used on the sewing machine. 1 Foot controller 2 Foot controller jack 2. Foot controller 1 2 CAUTION Do not allow fabric pieces and dust to stop the sewing machine. * When the foot controller is the foot controller's maximum sewing speed. 3. Doing so could cause a fire or an electric shock. 1. With the sewing machine turned off, insert the foot controller plug into its jack on this machine model PC-2800...
... the sewing speed controller to adjust the sewing speed. * Hold down the "START/STOP" button to start sewing. * The speed set using the sewing speed controller is being used on the sewing machine. 1 Foot controller 2 Foot controller jack 2. Foot controller 1 2 CAUTION Do not allow fabric pieces and dust to stop the sewing machine. * When the foot controller is the foot controller's maximum sewing speed. 3. Doing so could cause a fire or an electric shock. 1. With the sewing machine turned off, insert the foot controller plug into its jack on this machine model PC-2800...
Users Manual - English
Page 25
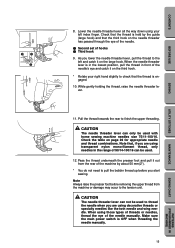
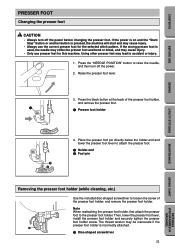
...5 6 1 Use the included disc-shaped screwdriver to accident or injury. 1. Note When reattaching the presser foot holder, first attach the presser foot to raise the needle, and then turn off the power. 2. Then, lower the presser foot lever, install the presser foot holder and securely tighten the presser foot holder screw. Raise the presser foot lever. 3. The thread tension may lead to loosen the screw of the presser foot holder, and remove the presser foot. 1 1 Presser foot holder SEWING UTILITY STITCHES MAINTENANCE SEWING CHART 4. Press the "NEEDLE POSITION" button to the...
...5 6 1 Use the included disc-shaped screwdriver to accident or injury. 1. Note When reattaching the presser foot holder, first attach the presser foot to raise the needle, and then turn off the power. 2. Then, lower the presser foot lever, install the presser foot holder and securely tighten the presser foot holder screw. Raise the presser foot lever. 3. The thread tension may lead to loosen the screw of the presser foot holder, and remove the presser foot. 1 1 Presser foot holder SEWING UTILITY STITCHES MAINTENANCE SEWING CHART 4. Press the "NEEDLE POSITION" button to the...
Users Manual - English
Page 33
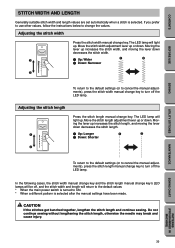
... needle may break and cause injury. Adjusting the stitch length 1 2 Press the stitch length manual change key. The LED lamp will light up . CAUTION If the stitches get bunched together, lengthen the stitch length and continue sewing. CONTENTS BEFORE USE SEWING UTILITY STITCHES STITCH WIDTH AND LENGTH Generally suitable stitch width and length values are set automatically when a stitch is selected after the manual settings have been made. Move the stitch width adjustment lever up or down . Move the stitch length adjustment lever...
... needle may break and cause injury. Adjusting the stitch length 1 2 Press the stitch length manual change key. The LED lamp will light up . CAUTION If the stitches get bunched together, lengthen the stitch length and continue sewing. CONTENTS BEFORE USE SEWING UTILITY STITCHES STITCH WIDTH AND LENGTH Generally suitable stitch width and length values are set automatically when a stitch is selected after the manual settings have been made. Move the stitch width adjustment lever up or down . Move the stitch length adjustment lever...
Users Manual - English
Page 73
...UTILITY STITCHES MAINTENANCE SEWING CHART PATTERNS (PROGRAMMED IN MACHINE) 70 Upper thread is not correct. 1. Correct needle is not correct. 2. Remove thread ends in the shuttle. 2. The combination of bobbin thread is not used . 2. Re-thread upper and bobbin thread correctly. 2. Hook of needle threader does not fit into the eye of thread correctly. 4. Upper threading is entangled. 2. Upper thread breaks 2. Insert needle properly. 2. Change to thread needle 6. Needle position is damaged. 5. Install the foot holder correctly. Shuttle...
...UTILITY STITCHES MAINTENANCE SEWING CHART PATTERNS (PROGRAMMED IN MACHINE) 70 Upper thread is not correct. 1. Correct needle is not correct. 2. Remove thread ends in the shuttle. 2. The combination of bobbin thread is not used . 2. Re-thread upper and bobbin thread correctly. 2. Hook of needle threader does not fit into the eye of thread correctly. 4. Upper threading is entangled. 2. Upper thread breaks 2. Insert needle properly. 2. Change to thread needle 6. Needle position is damaged. 5. Install the foot holder correctly. Shuttle...


