

Accessory Catalog
Page 4
Its position can be adjusted exactly on either left ). 2. Sew. SA161 All Brother home-use sewing machines www.brother.com Requires Low Shank Adapter for ULT series, PC-6500, PC-8200 and PC-8500 sewing machines. Loosen the clamp screw at the back of zipper/piping, and ...presses the fabric with a screwdriver. 5. Position the presser foot over the long feed dogs on the edge of zipper/piping, avoiding the non-flat parts...
Its position can be adjusted exactly on either left ). 2. Sew. SA161 All Brother home-use sewing machines www.brother.com Requires Low Shank Adapter for ULT series, PC-6500, PC-8200 and PC-8500 sewing machines. Loosen the clamp screw at the back of zipper/piping, and ...presses the fabric with a screwdriver. 5. Position the presser foot over the long feed dogs on the edge of zipper/piping, avoiding the non-flat parts...

Accessory Catalog
Page 6
...the fabric from the back and front and roll it into the fabric approximately 1/8" from fraying. 1. Non Stick Foot Designed for details.) www.brother.com Sew along the guide. Increase upper thread tension. 2. Raise the needle and the presser foot. 5. Raise the needle and the presser ... Foot Picot Foot Brother General Sewing Accessories 10 SA126 ABCDEFJKMN SA127 GHILOP Skirt Innov-is Project Book (See page 50 for details.) Narrow Hemmer Foot Designed to create a flat narrow hem on sheer and very lightweight fabrics. 1. Lower the needle into the curled part of the foot....
...the fabric from the back and front and roll it into the fabric approximately 1/8" from fraying. 1. Non Stick Foot Designed for details.) www.brother.com Sew along the guide. Increase upper thread tension. 2. Raise the needle and the presser foot. 5. Raise the needle and the presser ... Foot Picot Foot Brother General Sewing Accessories 10 SA126 ABCDEFJKMN SA127 GHILOP Skirt Innov-is Project Book (See page 50 for details.) Narrow Hemmer Foot Designed to create a flat narrow hem on sheer and very lightweight fabrics. 1. Lower the needle into the curled part of the foot....
Users Manual - English
Page 2
... main switch to break. 12.Do not use as contained in this machine, basic safety precautions should be taken, including the following: Read all moving parts. It may deflect the needle causing it has been dropped or damaged, or dropped into any object into water. To reduce the risk of burns...
... main switch to break. 12.Do not use as contained in this machine, basic safety precautions should be taken, including the following: Read all moving parts. It may deflect the needle causing it has been dropped or damaged, or dropped into any object into water. To reduce the risk of burns...
Users Manual - English
Page 4
... 1 Be sure to keep your local authorized Brother dealer. For a longer service life 1. When storing this machine, avoid direct sunlight and high humidity locations. Do not touch the balance wheel, thread take-up, needle, or other parts to assure correct installation. Do not store anything on the needle while sewing. If the...
... 1 Be sure to keep your local authorized Brother dealer. For a longer service life 1. When storing this machine, avoid direct sunlight and high humidity locations. Do not touch the balance wheel, thread take-up, needle, or other parts to assure correct installation. Do not store anything on the needle while sewing. If the...
Users Manual - English
Page 5
... the needle 25 Installing the needle securely 25 FABRIC/THREAD/NEEDLE COMBINATION CHART 26 CHAPTER 2 1. CONTENTS BEFORE USE SEWING UTILITY STITCHES CONTENTS CHAPTER 1 BEFORE USE 4 PART NAMES 4 STANDARD ACCESSORIES 6 OPTIONAL ACCESSORIES 6 OPERATION PANEL 7 OPERATION BUTTONS 8 Using the operation buttons 8 POWER SUPPLY 9 BOBBIN WINDING / BOBBIN THREAD SETTING 10 Winding the bobbin and...
... the needle 25 Installing the needle securely 25 FABRIC/THREAD/NEEDLE COMBINATION CHART 26 CHAPTER 2 1. CONTENTS BEFORE USE SEWING UTILITY STITCHES CONTENTS CHAPTER 1 BEFORE USE 4 PART NAMES 4 STANDARD ACCESSORIES 6 OPTIONAL ACCESSORIES 6 OPERATION PANEL 7 OPERATION BUTTONS 8 Using the operation buttons 8 POWER SUPPLY 9 BOBBIN WINDING / BOBBIN THREAD SETTING 10 Winding the bobbin and...
Users Manual - English
Page 7
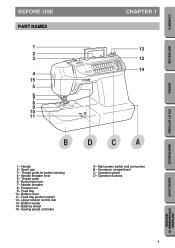
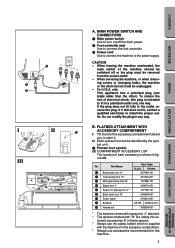
... 14- Accessory compartment C- Feed dog 10- Main power switch and connectors B- Spool cap 3- Needle threader 8- Presser foot 9- CONTENTS BEFORE USE SEWING UTILITY STITCHES BEFORE USE PART NAMES 1 2 3 4 15 5 6 7 8 9 10 11 CHAPTER 1 13 12 14 BDCA 1- Bobbin cover 11- Operation buttons MAINTENANCE SEWING CHART PATTERNS (PROGRAMMED IN MACHINE) 4 Needle threader lever 5- Feed...
... 14- Accessory compartment C- Feed dog 10- Main power switch and connectors B- Spool cap 3- Needle threader 8- Presser foot 9- CONTENTS BEFORE USE SEWING UTILITY STITCHES BEFORE USE PART NAMES 1 2 3 4 15 5 6 7 8 9 10 11 CHAPTER 1 13 12 14 BDCA 1- Bobbin cover 11- Operation buttons MAINTENANCE SEWING CHART PATTERNS (PROGRAMMED IN MACHINE) 4 Needle threader lever 5- Feed...
Users Manual - English
Page 8
... SA155 XA3812-051 9 Needle set must be identified by the symbol on /off or the plug must be removed from the socket-outlet. - Part Name 1 Buttonhole foot "A" Part Code U.S.A. When leaving the machine unattended, the main switch of the accessory compartment toward you to open it. If the plug does not fit...
... SA155 XA3812-051 9 Needle set must be identified by the symbol on /off or the plug must be removed from the socket-outlet. - Part Name 1 Buttonhole foot "A" Part Code U.S.A. When leaving the machine unattended, the main switch of the accessory compartment toward you to open it. If the plug does not fit...
Users Manual - English
Page 9
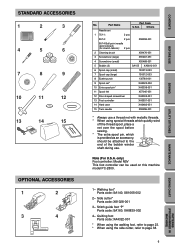
Stitch guide foot "P" Parts code: SA160, XA8839-002 4- Part Name Needle set Part Code U.S.A. Others 1 75/11: 2 pcs 90/14: 2 pcs X58358-001 90/14 Ball point needle (gold colored) (for stretch fabrics): 2 pcs 2 Cleaning brush X59476-051 3 Screwdriver (large) X55467-051 4 Screwdriver (small) ... before sewing. * The extra spool pin, which is provided as an accessory, should be used on this machine model PC-2800. 1- Side cutter* Parts code: X81028-001 3- Walking foot* Parts code: SA140, X81065-002 2- STANDARD ACCESSORIES 1 2 3 4 5 6 7 8 9 10 11 12 13 14 15...
Stitch guide foot "P" Parts code: SA160, XA8839-002 4- Part Name Needle set Part Code U.S.A. Others 1 75/11: 2 pcs 90/14: 2 pcs X58358-001 90/14 Ball point needle (gold colored) (for stretch fabrics): 2 pcs 2 Cleaning brush X59476-051 3 Screwdriver (large) X55467-051 4 Screwdriver (small) ... before sewing. * The extra spool pin, which is provided as an accessory, should be used on this machine model PC-2800. 1- Side cutter* Parts code: X81028-001 3- Walking foot* Parts code: SA140, X81065-002 2- STANDARD ACCESSORIES 1 2 3 4 5 6 7 8 9 10 11 12 13 14 15...
Users Manual - English
Page 19
... made for decorative and metallic threads. Transparent nylon thread can be available as it so that the thread winds off from twisting as an optional part. Needle 65/9 75/11 90/14 Thread (cotton) #30, 50, 60 #30 #30 Note The auto-threading device cannot be used is 90/14 to...
... made for decorative and metallic threads. Transparent nylon thread can be available as it so that the thread winds off from twisting as an optional part. Needle 65/9 75/11 90/14 Thread (cotton) #30, 50, 60 #30 #30 Note The auto-threading device cannot be used is 90/14 to...

Users Manual - English
Page 29
..., and thicker needles with heavyweight fabrics. • To avoid skipped stitches, use needle 90/14 - 100/16. * The same thread is probably the most important part of the sewing machine. Choosing the proper needle for knits Cotton Synthetic mercerized Silk Synthetic mercerized Silk Size 60 - 80 60 - 80 50 - 80 60...
..., and thicker needles with heavyweight fabrics. • To avoid skipped stitches, use needle 90/14 - 100/16. * The same thread is probably the most important part of the sewing machine. Choosing the proper needle for knits Cotton Synthetic mercerized Silk Synthetic mercerized Silk Size 60 - 80 60 - 80 50 - 80 60...
Users Manual - English
Page 30
... the presser foot toward the rear of the machine. 1 Upper thread 2 5 cm (2") CAUTION Always use bent or broken needles. Keep your hands away from moving parts while the machine is used, the needle may lead to the needle while the machine is selected. 2. Doing so may break and cause injury. •...
... the presser foot toward the rear of the machine. 1 Upper thread 2 5 cm (2") CAUTION Always use bent or broken needles. Keep your hands away from moving parts while the machine is used, the needle may lead to the needle while the machine is selected. 2. Doing so may break and cause injury. •...
Users Manual - English
Page 45
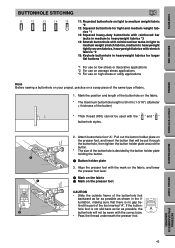
... lower the presser foot lever. 1 Mark on the fabric 2 Mark on the presser foot, and insert the button that there is no gap behind the part of the foot marked "A". Pull out the button holder plate on the presser foot 5 6 CAUTION • Slide the outside frame of the buttonhole foot backward...
... lower the presser foot lever. 1 Mark on the fabric 2 Mark on the presser foot, and insert the button that there is no gap behind the part of the foot marked "A". Pull out the button holder plate on the presser foot 5 6 CAUTION • Slide the outside frame of the buttonhole foot backward...
Users Manual - English
Page 57
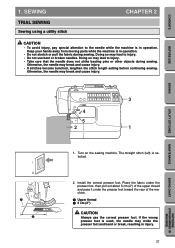
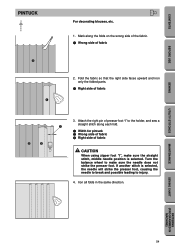
... the same direction. CONTENTS BEFORE USE SEWING PINTUCK 2 I " to injury. 4. Fold the fabric so that the right side faces upward and iron only the folded parts. 1 Right side of fabric I CAUTION When using zipper foot "I", make sure the needle does not strike the presser foot. Attach the right pin of presser...
... the same direction. CONTENTS BEFORE USE SEWING PINTUCK 2 I " to injury. 4. Fold the fabric so that the right side faces upward and iron only the folded parts. 1 Right side of fabric I CAUTION When using zipper foot "I", make sure the needle does not strike the presser foot. Attach the right pin of presser...
Users Manual - English
Page 65
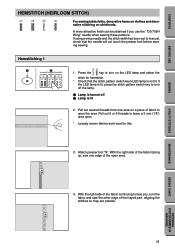
... been set to face you use the "130/705H Wing" needle when sewing these patterns. Pull out several threads from one edge of the frayed part, aligning the stitches so they are parallel. Pull out 5 or 6 threads to open area. 4. UTILITY STITCHES MAINTENANCE SEWING CHART PATTERNS (PROGRAMMED IN MACHINE) 62 Hemstitching...
... been set to face you use the "130/705H Wing" needle when sewing these patterns. Pull out several threads from one edge of the frayed part, aligning the stitches so they are parallel. Pull out 5 or 6 threads to open area. 4. UTILITY STITCHES MAINTENANCE SEWING CHART PATTERNS (PROGRAMMED IN MACHINE) 62 Hemstitching...
Users Manual - English
Page 67
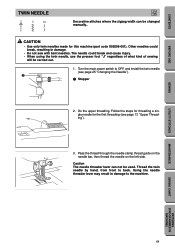
..., resulting in damage to back. UTILITY STITCHES MAINTENANCE SEWING CHART PATTERNS (PROGRAMMED IN MACHINE) 64 Follow the steps for threading a single needle for this machine (part code X59296-001). CAUTION • Use only twin needles made for the first threading (see page 25 "Changing the Needle"). 1 1 Stopper 2. Pass the thread through...
..., resulting in damage to back. UTILITY STITCHES MAINTENANCE SEWING CHART PATTERNS (PROGRAMMED IN MACHINE) 64 Follow the steps for threading a single needle for this machine (part code X59296-001). CAUTION • Use only twin needles made for the first threading (see page 25 "Changing the Needle"). 1 1 Stopper 2. Pass the thread through...
Users Manual - English
Page 71
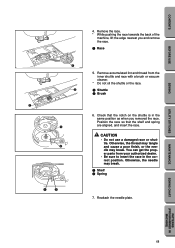
... • Do not use a damaged race or shuttle. Reattach the needle plate. MAINTENANCE SEWING CHART PATTERNS (PROGRAMMED IN MACHINE) 68 You can get the proper parts from the inner shuttle and race with a brush or vacuum cleaner. * Do not oil the shuttle or the race. 1 Shuttle 2 Brush 6. CONTENTS BEFORE USE SEWING...
... • Do not use a damaged race or shuttle. Reattach the needle plate. MAINTENANCE SEWING CHART PATTERNS (PROGRAMMED IN MACHINE) 68 You can get the proper parts from the inner shuttle and race with a brush or vacuum cleaner. * Do not oil the shuttle or the race. 1 Shuttle 2 Brush 6. CONTENTS BEFORE USE SEWING...
Users Manual - English
Page 72
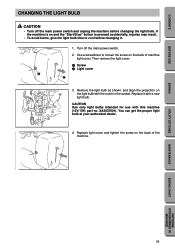
... (PROGRAMMED IN MACHINE) Use a screwdriver to cool before changing the light bulb. CAUTION Use only light bulbs intended for use with this machine (12V/ 5W: part no. CONTENTS BEFORE USE SEWING UTILITY STITCHES CHANGING THE LIGHT BULB CAUTION • Turn off the main power switch. 2.
... (PROGRAMMED IN MACHINE) Use a screwdriver to cool before changing the light bulb. CAUTION Use only light bulbs intended for use with this machine (12V/ 5W: part no. CONTENTS BEFORE USE SEWING UTILITY STITCHES CHANGING THE LIGHT BULB CAUTION • Turn off the main power switch. 2.

