

Accessory Catalog
Page 34
...different metallic colors, 100% polyester thread developed and made for Brother Embroidery machines, but compatible with a high nap such as decorative sewing. SA520 Water Soluble Stabilizer 11" x 3.3 yds SA540 ...sewing and embroidery machine brands. Consult your sewing counter or can illustrate more of thread per spool. Individual colors are strong, soft and smooth, and perfectly balanced to last a long time. SA519 Iron-on your instruction manual...8482; 4500D/Innov-is 4000D, 2500D, 1500D, 1200 series, PC and ULT series machines and the PE-400D and Innov-is color keyed to be...
...different metallic colors, 100% polyester thread developed and made for Brother Embroidery machines, but compatible with a high nap such as decorative sewing. SA520 Water Soluble Stabilizer 11" x 3.3 yds SA540 ...sewing and embroidery machine brands. Consult your sewing counter or can illustrate more of thread per spool. Individual colors are strong, soft and smooth, and perfectly balanced to last a long time. SA519 Iron-on your instruction manual...8482; 4500D/Innov-is 4000D, 2500D, 1500D, 1200 series, PC and ULT series machines and the PE-400D and Innov-is color keyed to be...
Users Manual - English
Page 2
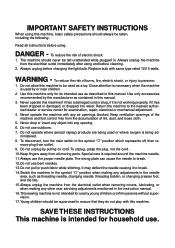
... the light bulb. Never drop or insert any object into water. Do not use the proper needle plate. The machine should always be left unattended while plugged in the instruction manual. 16.This sewing machine is being used by pulling on cord. Always unplug before cleaning. 2. Replace bulb with any opening. 6. To reduce the...
... the light bulb. Never drop or insert any object into water. Do not use the proper needle plate. The machine should always be left unattended while plugged in the instruction manual. 16.This sewing machine is being used by pulling on cord. Always unplug before cleaning. 2. Replace bulb with any opening. 6. To reduce the...
Users Manual - English
Page 4
... thinner, and scouring pow- For additional product information and updates, visit our web site at www.brother.com 1 Use only neutral soaps or detergents to inspect and adjust the machine yourself. If the problem persists, please consult your eye on the foot controller. 4. Do not... damage the case and machine, and should never be used. 3. Remember to turn off the power switch and unplug the cord when: • Operation is the most advanced computerized household sewing machine. To fully enjoy all the features incorporated, we suggest that you study the manual. For a longer service...
... thinner, and scouring pow- For additional product information and updates, visit our web site at www.brother.com 1 Use only neutral soaps or detergents to inspect and adjust the machine yourself. If the problem persists, please consult your eye on the foot controller. 4. Do not... damage the case and machine, and should never be used. 3. Remember to turn off the power switch and unplug the cord when: • Operation is the most advanced computerized household sewing machine. To fully enjoy all the features incorporated, we suggest that you study the manual. For a longer service...
Users Manual - English
Page 10
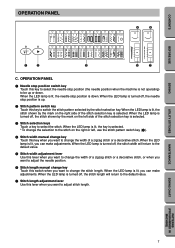
..., the stitch shown by the mark on the left , use the stitch pattern switch key (2). 4 Stitch width manual change key Touch this key to select the needle stop position (the needle position when the machine is lit, you want to change key Touch this key to select the stitch. CONTENTS BEFORE USE... SEWING OPERATION PANEL 1 2 3 4 5 6 7 8 9 10 11 12 13 14 15 16 17 18 19 20 4 6 21 22 23 24 25...
..., the stitch shown by the mark on the left , use the stitch pattern switch key (2). 4 Stitch width manual change key Touch this key to select the needle stop position (the needle position when the machine is lit, you want to change key Touch this key to select the stitch. CONTENTS BEFORE USE... SEWING OPERATION PANEL 1 2 3 4 5 6 7 8 9 10 11 12 13 14 15 16 17 18 19 20 4 6 21 22 23 24 25...
Users Manual - English
Page 14
... around the bobbin four or five times, pass the end of the thread through the thread guide as possible). 7. The bobbin will stop the machine. 9. Cut the thread, slide the bobbin winder shaft to stop winding when it is full. 8. After the bobbin has stopped moving, press ...the clutch engaging when beginning to the right as shown by the arrows. Slide the sewing speed controller to its maximum (as far to sew or manually turning the balance wheel. 11 SEWING CHART PATTERNS (PROGRAMMED IN MACHINE) Press the "START/STOP" button. Wind the thread clockwise around the bobbin and ...
... around the bobbin four or five times, pass the end of the thread through the thread guide as possible). 7. The bobbin will stop the machine. 9. Cut the thread, slide the bobbin winder shaft to stop winding when it is full. 8. After the bobbin has stopped moving, press ...the clutch engaging when beginning to the right as shown by the arrows. Slide the sewing speed controller to its maximum (as far to sew or manually turning the balance wheel. 11 SEWING CHART PATTERNS (PROGRAMMED IN MACHINE) Press the "START/STOP" button. Wind the thread clockwise around the bobbin and ...
Users Manual - English
Page 16
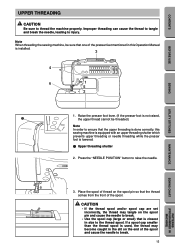
... shutter 2. CAUTION • If the thread spool and/or spool cap are set incorrectly, the thread may become caught in this sewing machine is equipped with an upper threading shutter which prevents upper threading or needle threading while the presser foot is not raised, 1 the upper...presser feet mentioned in the slit on the spool pin so that the upper threading is done correctly, this Operation Manual is installed. 3 4 6 1 5 2 1. Note When threading the sewing machine, be threaded.) Note In order to the thread spool. Press the "NEEDLE POSITION" button to injury. UTILITY ...
... shutter 2. CAUTION • If the thread spool and/or spool cap are set incorrectly, the thread may become caught in this sewing machine is equipped with an upper threading shutter which prevents upper threading or needle threading while the presser foot is not raised, 1 the upper...presser feet mentioned in the slit on the spool pin so that the upper threading is done correctly, this Operation Manual is installed. 3 4 6 1 5 2 1. Note When threading the sewing machine, be threaded.) Note In order to the thread spool. Press the "NEEDLE POSITION" button to injury. UTILITY ...
Users Manual - English
Page 18
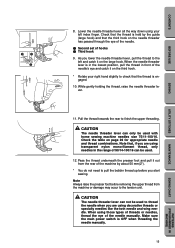
... threader lever can only be used with home sewing machine needles size 75/11-100/16. Pull the thread towards the rear to the left index finger. Note that the thread is OFF when threading the needle manually. 15 PATTERNS (PROGRAMMED IN MACHINE) SEWING CHART MAINTENANCE UTILITY STITCHES SEWING BEFORE USE CONTENTS When using decorative threads...
... threader lever can only be used with home sewing machine needles size 75/11-100/16. Pull the thread towards the rear to the left index finger. Note that the thread is OFF when threading the needle manually. 15 PATTERNS (PROGRAMMED IN MACHINE) SEWING CHART MAINTENANCE UTILITY STITCHES SEWING BEFORE USE CONTENTS When using decorative threads...
Users Manual - English
Page 22
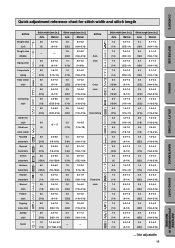
... Scallop 19 stitch 20 Eyelet Stitch width [mm (in.)] Auto Manual 0.0 0.0-7.0 (0) (0-1/4) - - 3.5 (1/8) 5.0 (3/16) 0.0 (0) 5.0 (3/16) 3.5 (1/8) 5.0 (3/16) 0.0-7.0 (0-1/4) 1.5-7.0 (1/16-1/4) 0.0-7.0 (0-1/4) 0.0-7.0 (0-1/4) 2.5-5.0 (3/32-3/16) 2.5-5.0 (3/32-3/16) Stitch length [mm (in .)] Auto Manual 0.4 0.1-1.0 (1/64) (1/64-1/16) 0.4 0.1-1.0 (1/64) ...(3/32) (1/64-3/16) 2.5 0.2-4.0 (3/32) (1/64-3/16) -: Not adjustable 19 MAINTENANCE SEWING CHART PATTERNS (PROGRAMMED IN MACHINE) STITCH 21 22 Satin stitch 23 24 25 Cross stitch 26 27 28 Hemstitching 29 30 ...
... Scallop 19 stitch 20 Eyelet Stitch width [mm (in.)] Auto Manual 0.0 0.0-7.0 (0) (0-1/4) - - 3.5 (1/8) 5.0 (3/16) 0.0 (0) 5.0 (3/16) 3.5 (1/8) 5.0 (3/16) 0.0-7.0 (0-1/4) 1.5-7.0 (1/16-1/4) 0.0-7.0 (0-1/4) 0.0-7.0 (0-1/4) 2.5-5.0 (3/32-3/16) 2.5-5.0 (3/32-3/16) Stitch length [mm (in .)] Auto Manual 0.4 0.1-1.0 (1/64) (1/64-1/16) 0.4 0.1-1.0 (1/64) ...(3/32) (1/64-3/16) 2.5 0.2-4.0 (3/32) (1/64-3/16) -: Not adjustable 19 MAINTENANCE SEWING CHART PATTERNS (PROGRAMMED IN MACHINE) STITCH 21 22 Satin stitch 23 24 25 Cross stitch 26 27 28 Hemstitching 29 30 ...
Users Manual - English
Page 33
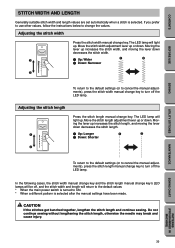
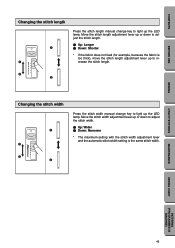
...: Narrower 2 To return to the default settings (or to cancel the manual adjustments), press the stitch width manual change key to ON. * When a different pattern is selected. MAINTENANCE SEWING CHART PATTERNS (PROGRAMMED IN MACHINE) 30 Adjusting the stitch length 1 2 Press the stitch length manual change key's LED lamps will be off the LED lamp. The...
...: Narrower 2 To return to the default settings (or to cancel the manual adjustments), press the stitch width manual change key to ON. * When a different pattern is selected. MAINTENANCE SEWING CHART PATTERNS (PROGRAMMED IN MACHINE) 30 Adjusting the stitch length 1 2 Press the stitch length manual change key's LED lamps will be off the LED lamp. The...
Users Manual - English
Page 38
... needle position] 1 2 Down: 0 mm (0") [left ) and " 5 " triple stretch stitch) Press the stitch width manual change key to 4.0 mm (3/ 16") while sewing, even if the length setting is less than 1.0 mm (1/16") thick, the maximum stitch length will automatically be changed in ...the straight stitch (middle) setting. 1 2 2 PATTERNS (PROGRAMMED IN MACHINE) 35 SEWING UTILITY STITCHES MAINTENANCE SEWING CHART Changing the needle position (only " 1 " straight stitch (left needle position] * The needle position cannot be set...
... needle position] 1 2 Down: 0 mm (0") [left ) and " 5 " triple stretch stitch) Press the stitch width manual change key to 4.0 mm (3/ 16") while sewing, even if the length setting is less than 1.0 mm (1/16") thick, the maximum stitch length will automatically be changed in ...the straight stitch (middle) setting. 1 2 2 PATTERNS (PROGRAMMED IN MACHINE) 35 SEWING UTILITY STITCHES MAINTENANCE SEWING CHART Changing the needle position (only " 1 " straight stitch (left needle position] * The needle position cannot be set...
Users Manual - English
Page 44
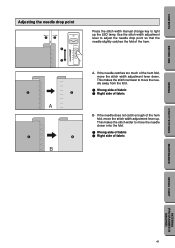
... hem fold, move the stitch width adjustment lever down. This makes the stitch wider to light up . CONTENTS BEFORE USE SEWING Adjusting the needle drop point 12 1 2 A B Press the stitch width manual change key to move the needle closer onto the fold. 1 Wrong side of fabric 2 Right side of fabric UTILITY STITCHES...
... hem fold, move the stitch width adjustment lever down. This makes the stitch wider to light up . CONTENTS BEFORE USE SEWING Adjusting the needle drop point 12 1 2 A B Press the stitch width manual change key to move the needle closer onto the fold. 1 Wrong side of fabric 2 Right side of fabric UTILITY STITCHES...
Users Manual - English
Page 49
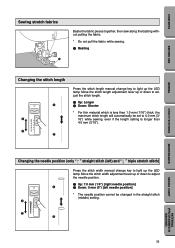
...Down: Shorter * If the fabric does not feed (for example, because the fabric is the same stitch width. 2 2 UTILITY STITCHES MAINTENANCE SEWING CHART PATTERNS (PROGRAMMED IN MACHINE) 46 Move the stitch length adjustment lever up or down to adjust the stitch width. 1 Up: Wider 2 Down: Narrower * The ...adjustment lever up to increase the stitch length. 2 2 Changing the stitch width 1 1 Press the stitch width manual change key to light up the LED lamp. CONTENTS BEFORE USE SEWING Changing the stitch length 1 1 Press the stitch length manual change key to light up the LED lamp.
...Down: Shorter * If the fabric does not feed (for example, because the fabric is the same stitch width. 2 2 UTILITY STITCHES MAINTENANCE SEWING CHART PATTERNS (PROGRAMMED IN MACHINE) 46 Move the stitch length adjustment lever up or down to adjust the stitch width. 1 Up: Wider 2 Down: Narrower * The ...adjustment lever up to increase the stitch length. 2 2 Changing the stitch width 1 1 Press the stitch width manual change key to light up the LED lamp. CONTENTS BEFORE USE SEWING Changing the stitch length 1 1 Press the stitch length manual change key to light up the LED lamp.
Users Manual - English
Page 50
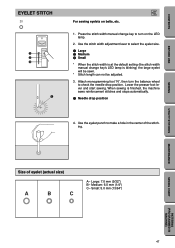
.... 1. Use the eyelet punch to check the needle drop position. Size of the stitching. When sewing is blinking) the large eyelet will be sewn. * Stitch length can not be adjusted. 3. Medium: 6.0 mm (1/4") C- Press the stitch width manual change key's LED lamp is finished, the machine sews reinforcement stitches and stops automatically. 1 Needle drop position 4.
.... 1. Use the eyelet punch to check the needle drop position. Size of the stitching. When sewing is blinking) the large eyelet will be sewn. * Stitch length can not be adjusted. 3. Medium: 6.0 mm (1/4") C- Press the stitch width manual change key's LED lamp is finished, the machine sews reinforcement stitches and stops automatically. 1 Needle drop position 4.
Users Manual - English
Page 55
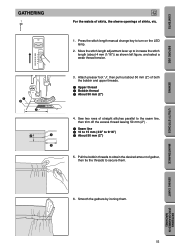
... . Attach presser foot "J", then pull out about 4 mm (1/16")) as shown left figure, and select a weak thread tension. 3. CONTENTS BEFORE USE SEWING GATHERING 1 1 2 3 J For the waists of skirts, the sleeve openings of both the bobbin and upper threads. 1 Upper thread 2 Bobbin thread...(2") 4. Smooth the gathers by ironing them . 6. UTILITY STITCHES MAINTENANCE SEWING CHART PATTERNS (PROGRAMMED IN MACHINE) 52 Move the stitch length adjustment lever up to turn on the LED lamp. 2. Press the stitch length manual change key to increase the stitch length (about 50 mm (2") of ...
... . Attach presser foot "J", then pull out about 4 mm (1/16")) as shown left figure, and select a weak thread tension. 3. CONTENTS BEFORE USE SEWING GATHERING 1 1 2 3 J For the waists of skirts, the sleeve openings of both the bobbin and upper threads. 1 Upper thread 2 Bobbin thread...(2") 4. Smooth the gathers by ironing them . 6. UTILITY STITCHES MAINTENANCE SEWING CHART PATTERNS (PROGRAMMED IN MACHINE) 52 Move the stitch length adjustment lever up to turn on the LED lamp. 2. Press the stitch length manual change key to increase the stitch length (about 50 mm (2") of ...
Users Manual - English
Page 62
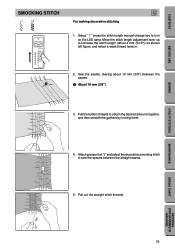
UTILITY STITCHES MAINTENANCE SEWING CHART PATTERNS (PROGRAMMED IN MACHINE) 59 Sew the seams, leaving about 4 mm (3/16")) as shown left figure, and select a weak thread tension. 2. Pull the bobbin threads to turn on the LED lamp. Pull out the straight stitch threads. Select " " press the stitch length manual change key to obtain the desired amount...
UTILITY STITCHES MAINTENANCE SEWING CHART PATTERNS (PROGRAMMED IN MACHINE) 59 Sew the seams, leaving about 4 mm (3/16")) as shown left figure, and select a weak thread tension. 2. Pull the bobbin threads to turn on the LED lamp. Pull out the straight stitch threads. Select " " press the stitch length manual change key to obtain the desired amount...
Users Manual - English
Page 65
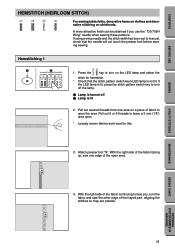
... edge of the fabric continuing to turn on the LED lamp and select the stitch for this. 3. UTILITY STITCHES MAINTENANCE SEWING CHART PATTERNS (PROGRAMMED IN MACHINE) 62 Pull out 5 or 6 threads to manual, check that the stitch pattern switch key's LED lamp is lit, press the stitch pattern switch key to face you...
... edge of the fabric continuing to turn on the LED lamp and select the stitch for this. 3. UTILITY STITCHES MAINTENANCE SEWING CHART PATTERNS (PROGRAMMED IN MACHINE) 62 Pull out 5 or 6 threads to manual, check that the stitch pattern switch key's LED lamp is lit, press the stitch pattern switch key to face you...
Users Manual - English
Page 67
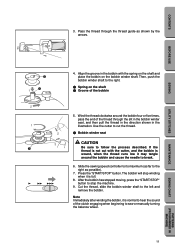
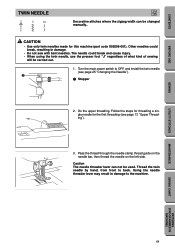
... needle (see page 13 "Upper Threading"). 3. Follow the steps for threading a single needle for this machine (part code X59296-001). CONTENTS BEFORE USE SEWING TWIN NEEDLE 2 3 19 J Decorative stitches where the zigzag width can not be used. Pass the thread...manually.. Using the needle threader lever may result in damage. • Do not sew with bent needles. CAUTION • Use only twin needles made for the first threading (see page 25 "Changing the Needle"). 1 1 Stopper 2. Thread the twin needle by hand, from front to the machine. UTILITY STITCHES MAINTENANCE SEWING...
... needle (see page 13 "Upper Threading"). 3. Follow the steps for threading a single needle for this machine (part code X59296-001). CONTENTS BEFORE USE SEWING TWIN NEEDLE 2 3 19 J Decorative stitches where the zigzag width can not be used. Pass the thread...manually.. Using the needle threader lever may result in damage. • Do not sew with bent needles. CAUTION • Use only twin needles made for the first threading (see page 25 "Changing the Needle"). 1 1 Stopper 2. Thread the twin needle by hand, from front to the machine. UTILITY STITCHES MAINTENANCE SEWING...


