Quick Setup Guide - English
Page 1
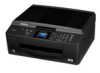
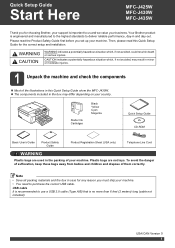
...machine. Quick Setup Guide Start Here MFC-J425W MFC-J430W MFC-J435W Thank you for choosing Brother, your support is important to us and we value your machine. • You need to purchase the correct USB cable. Please read this Quick Setup Guide show the MFC-J430W. The components ...Plastic bags are used in case for the correct setup and installation. USA/CAN Version 0 1 Your Brother product is engineered and manufactured to the highest standards to use a USB 2.0 cable (Type A/B) that is recommended to deliver reliable performance, day-in this Quick Setup Guide for any...
...machine. Quick Setup Guide Start Here MFC-J425W MFC-J430W MFC-J435W Thank you for choosing Brother, your support is important to us and we value your machine. • You need to purchase the correct USB cable. Please read this Quick Setup Guide show the MFC-J430W. The components ...Plastic bags are used in case for the correct setup and installation. USA/CAN Version 0 1 Your Brother product is engineered and manufactured to the highest standards to use a USB 2.0 cable (Type A/B) that is recommended to deliver reliable performance, day-in this Quick Setup Guide for any...
Quick Setup Guide - English
Page 4
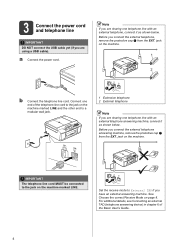
.... IMPORTANT The telephone line cord MUST be connected to a modular wall jack. 1 1 Extension telephone 2 External telephone Note If you are using a USB cable). jack on the machine. Note If you are sharing one telephone line with an external telephone, connect it as shown below . Before you connect the... LINE and the other end to the jack on page 8. 3 Connect the power cord and telephone line IMPORTANT DO NOT connect the USB cable yet (if you are sharing one telephone line with an external telephone answering machine, connect it as shown below . a Connect the power cord...
.... IMPORTANT The telephone line cord MUST be connected to a modular wall jack. 1 1 Extension telephone 2 External telephone Note If you are using a USB cable). jack on the machine. Note If you are sharing one telephone line with an external telephone, connect it as shown below . Before you connect the... LINE and the other end to the jack on page 8. 3 Connect the power cord and telephone line IMPORTANT DO NOT connect the USB cable yet (if you are sharing one telephone line with an external telephone answering machine, connect it as shown below . a Connect the power cord...
Quick Setup Guide - English
Page 14
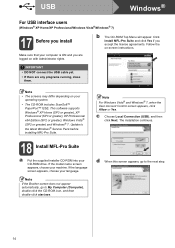
... double-click the CD-ROM icon, and then double-click start.exe. Note If the Brother screen does not appear automatically, go to the next step. 14 IMPORTANT • DO NOT connect the USB cable yet. • If there are logged on with Administrator rights. Follow the on your...appear. Click Install MFL-Pro Suite and click Yes if you are any programs running, close them. The installation continues. c Choose Local Connection (USB), and then click Next. This software supports Windows® XP Home (SP3 or greater), XP Professional (SP3 or greater), XP Professional x64 Edition...
... double-click the CD-ROM icon, and then double-click start.exe. Note If the Brother screen does not appear automatically, go to the next step. 14 IMPORTANT • DO NOT connect the USB cable yet. • If there are logged on with Administrator rights. Follow the on your...appear. Click Install MFL-Pro Suite and click Yes if you are any programs running, close them. The installation continues. c Choose Local Connection (USB), and then click Next. This software supports Windows® XP Home (SP3 or greater), XP Professional (SP3 or greater), XP Professional x64 Edition...
Quick Setup Guide - English
Page 15
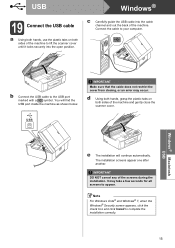
...may take a few seconds for all screens to complete the installation correctly. 15 IMPORTANT DO NOT cancel any of the machine. USB Windows® 19 Connect the USB cable a Using both hands, use the plastic tabs on both sides of the machine to lift the scanner cover until it locks ...® 7, when the Windows® Security screen appears, click the check box and click Install to appear. Connect the cable to the USB port marked with a symbol. b Connect the USB cable to your computer. d Using both hands, grasp the plastic tabs on both sides of the machine and gently close the ...
...may take a few seconds for all screens to complete the installation correctly. 15 IMPORTANT DO NOT cancel any of the machine. USB Windows® 19 Connect the USB cable a Using both hands, use the plastic tabs on both sides of the machine to lift the scanner cover until it locks ...® 7, when the Windows® Security screen appears, click the check box and click Install to appear. Connect the cable to the USB port marked with a symbol. b Connect the USB cable to your computer. d Using both hands, grasp the plastic tabs on both sides of the machine and gently close the ...
Quick Setup Guide - English
Page 17
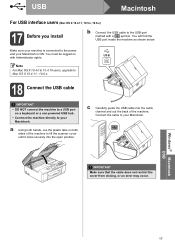
... below. Note For Mac OS X 10.4.0 to 10.4.10 users, upgrade to Mac OS X 10.4.11 - 10.6.x. c Carefully guide the USB cable into the cable channel and out the back of the machine to lift the scanner cover until it locks securely into the open position. a Using both hands..., or an error may occur. USB 18 Connect the USB cable IMPORTANT • DO NOT connect the machine to a USB port on both sides of the machine. USB Macintosh For USB interface users (Mac OS X 10.4.11, 10.5.x, 10.6.x) 17 Before you install b Connect the USB cable to the USB port marked with Administrator rights.
... below. Note For Mac OS X 10.4.0 to 10.4.10 users, upgrade to Mac OS X 10.4.11 - 10.6.x. c Carefully guide the USB cable into the cable channel and out the back of the machine to lift the scanner cover until it locks securely into the open position. a Using both hands..., or an error may occur. USB 18 Connect the USB cable IMPORTANT • DO NOT connect the machine to a USB port on both sides of the machine. USB Macintosh For USB interface users (Mac OS X 10.4.11, 10.5.x, 10.6.x) 17 Before you install b Connect the USB cable to the USB port marked with Administrator rights.

Quick Setup Guide - English
Page 20
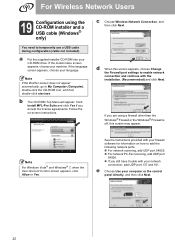
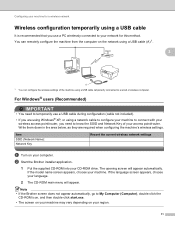
...or currently using the CD-ROM installer and a USB cable (Windows® only) • You need to page 22 20 It is recommended that you use a USB cable during configuration (cable not included). We cannot assist you need to ...temporarily use a PC wirelessly connected to an access point/router by network cable, you in a wireless network environment. For Wireless Network Users 18 Choose your wireless install method The following instructions will offer three methods for installing your Brother...
...or currently using the CD-ROM installer and a USB cable (Windows® only) • You need to page 22 20 It is recommended that you use a USB cable during configuration (cable not included). We cannot assist you need to ...temporarily use a PC wirelessly connected to an access point/router by network cable, you in a wireless network environment. For Wireless Network Users 18 Choose your wireless install method The following instructions will offer three methods for installing your Brother...
Quick Setup Guide - English
Page 22
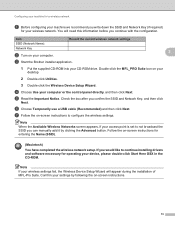
... the language screen appears, choose your computer or the control panel directly. If you are using the CD-ROM installer and a USB cable (Windows® only) You need to My Computer (Computer), double-click the CD-ROM icon, and then double-click start.... PC-Fax receiving, add UDP port 54926. If you accept the license agreements. Note If the Brother screen does not appear automatically, go to temporarily use a USB cable during configuration (cable not included). See the instructions provided with the installation. (Recommended) and click Next. a Put the supplied installer...
... the language screen appears, choose your computer or the control panel directly. If you are using the CD-ROM installer and a USB cable (Windows® only) You need to My Computer (Computer), double-click the CD-ROM icon, and then double-click start.... PC-Fax receiving, add UDP port 54926. If you accept the license agreements. Note If the Brother screen does not appear automatically, go to temporarily use a USB cable during configuration (cable not included). See the instructions provided with the installation. (Recommended) and click Next. a Put the supplied installer...
Quick Setup Guide - English
Page 23
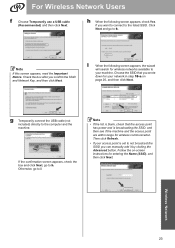
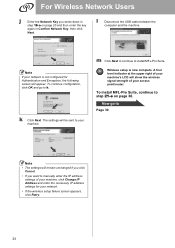
.... Note If this screen appears, read the Important Notice. Note • If the list is set to the computer and the machine. g Temporarily connect the USB cable (not included) directly to not broadcast the SSID you confirm the SSID and Network Key, and then click Next. h When the following screen appears, the... click Next. Otherwise, go to your network in step 18-a on -screen instructions for wireless networks available to i. For Wireless Network Users f Choose Temporarily use a USB cable (Recommended) and then click Next.
.... Note If this screen appears, read the Important Notice. Note • If the list is set to the computer and the machine. g Temporarily connect the USB cable (not included) directly to not broadcast the SSID you confirm the SSID and Network Key, and then click Next. h When the following screen appears, the... click Next. Otherwise, go to your network in step 18-a on -screen instructions for wireless networks available to i. For Wireless Network Users f Choose Temporarily use a USB cable (Recommended) and then click Next.
Quick Setup Guide - English
Page 24
... to continue to manually enter the IP address settings of your network. • If the wireless setup failure screen appears, click Retry. 24 l Disconnect the USB cable between the computer and the machine. k Click Next. Wireless setup is not configured for your access point/router.
... to continue to manually enter the IP address settings of your network. • If the wireless setup failure screen appears, click Retry. 24 l Disconnect the USB cable between the computer and the machine. k Click Next. Wireless setup is not configured for your access point/router.
Network Users Manual - English
Page 3
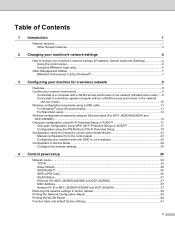
...point/router in the network (Ad-hoc mode)...10 Wireless configuration temporarily using a USB cable 11 For Windows® users (Recommended 11 For Macintosh users ...12 Wireless configuration temporarily using an Ethernet cable (For MFC-J825DW/J835DW and DCP-J925DW) ...14 One push configuration using Wi-Fi Protected ... ...36 WPS/AOSS™ ...36 WPS w/PIN Code ...36 WLAN Status ...37 Ethernet (For MFC-J825DW/J835DW and DCP-J925DW 37 MAC Address ...37 Network I/F (For MFC-J825DW/J835DW and DCP-J925DW 37 Restoring the network settings to factory default 38 Printing the Network Configuration...
...point/router in the network (Ad-hoc mode)...10 Wireless configuration temporarily using a USB cable 11 For Windows® users (Recommended 11 For Macintosh users ...12 Wireless configuration temporarily using an Ethernet cable (For MFC-J825DW/J835DW and DCP-J925DW) ...14 One push configuration using Wi-Fi Protected ... ...36 WPS/AOSS™ ...36 WPS w/PIN Code ...36 WLAN Status ...37 Ethernet (For MFC-J825DW/J835DW and DCP-J925DW 37 MAC Address ...37 Network I/F (For MFC-J825DW/J835DW and DCP-J925DW 37 Restoring the network settings to factory default 38 Printing the Network Configuration...
Network Users Manual - English
Page 12
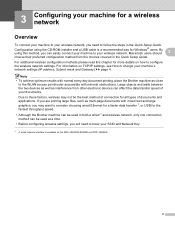
...your machine to your wireless network, you need to the WLAN access point/router as possible with normal every day document printing, place the Brother machine as close to know your SSID and Network Key. 1 A wired network interface is a recommended way for Windows® users. For...Ethernet for a faster data transfer 1, or USB for the fastest throughput speed. • Although the Brother machine can be the best method of connection for all types of your documents. By using the CD-ROM installer and a USB cable is available on the MFC-J825DW/J835DW and DCP-J925DW. 8 Configuration...
...your machine to your wireless network, you need to the WLAN access point/router as possible with normal every day document printing, place the Brother machine as close to know your SSID and Network Key. 1 A wired network interface is a recommended way for Windows® users. For...Ethernet for a faster data transfer 1, or USB for the fastest throughput speed. • Although the Brother machine can be the best method of connection for all types of your documents. By using the CD-ROM installer and a USB cable is available on the MFC-J825DW/J835DW and DCP-J925DW. 8 Configuration...
Network Users Manual - English
Page 13
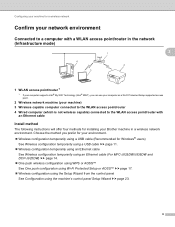
... following instructions will offer four methods for Windows® users) See Wireless configuration temporarily using a USB cable uu page 11. Wireless configuration temporarily using an Ethernet cable See Wireless configuration temporarily using an Ethernet cable (For MFC-J825DW/J835DW and DCP-J925DW) uu page 14. One push wireless configuration using WPS ... (Infrastructure mode) 3 1 3 4 2 3 1 WLAN access point/router 1 1 If your computer supports Intel® My WiFi Technology (Intel® MWT), you prefer for your Brother machine in a wireless network environment.
... following instructions will offer four methods for Windows® users) See Wireless configuration temporarily using a USB cable uu page 11. Wireless configuration temporarily using an Ethernet cable See Wireless configuration temporarily using an Ethernet cable (For MFC-J825DW/J835DW and DCP-J925DW) uu page 14. One push wireless configuration using WPS ... (Infrastructure mode) 3 1 3 4 2 3 1 WLAN access point/router 1 1 If your computer supports Intel® My WiFi Technology (Intel® MWT), you prefer for your Brother machine in a wireless network environment.
Network Users Manual - English
Page 15
...; The screen on your machine may vary depending on the network using a USB cable (A) 1. 3 3 A 1 You can remotely configure the machine from the computer on your language. 2 The CD-ROM main menu will appear automatically. The opening screen will appear. b Start the Brother installer application. 1 Put the supplied CD-ROM into your CD-ROM...
...; The screen on your machine may vary depending on the network using a USB cable (A) 1. 3 3 A 1 You can remotely configure the machine from the computer on your language. 2 The CD-ROM main menu will appear automatically. The opening screen will appear. b Start the Brother installer application. 1 Put the supplied CD-ROM into your CD-ROM...

Network Users Manual - English
Page 16
...your access point is set to enable network connection and continue with this installation. and click Next. 3 f Choose Temporarily use a USB cable (not included) during configuration. • You must reset the LAN settings before you have completed the wireless network setup. g Follow ...firewall function of anti-spyware or antivirus applications, temporarily disable them. Your Brother machine supports the use of the machine, you must know your firewall. • You need to temporarily use a USB cable (Recommended) and click Next. If you can print please re-enable your...
...your access point is set to enable network connection and continue with this installation. and click Next. 3 f Choose Temporarily use a USB cable (not included) during configuration. • You must reset the LAN settings before you have completed the wireless network setup. g Follow ...firewall function of anti-spyware or antivirus applications, temporarily disable them. Your Brother machine supports the use of the machine, you must know your firewall. • You need to temporarily use a USB cable (Recommended) and click Next. If you can print please re-enable your...
Network Users Manual - English
Page 17
... Next. Follow the on-screen instructions for operating your device, please double-click Start Here OSX in the CD-ROM. c Start the Brother installer application. 1 Put the supplied CD-ROM into your computer or the control panel directly. d Choose Use your CD-ROM drive. ...installing drivers and software necessary for entering the Name (SSID). (Macintosh) You have completed the wireless network setup. f Choose Temporarily use a USB cable (Recommended) and then click Next. Configuring your machine for a wireless network a Before configuring your machine we recommend you write down the SSID ...
... Next. Follow the on-screen instructions for operating your device, please double-click Start Here OSX in the CD-ROM. c Start the Brother installer application. 1 Put the supplied CD-ROM into your computer or the control panel directly. d Choose Use your CD-ROM drive. ...installing drivers and software necessary for entering the Name (SSID). (Macintosh) You have completed the wireless network setup. f Choose Temporarily use a USB cable (Recommended) and then click Next. Configuring your machine for a wireless network a Before configuring your machine we recommend you write down the SSID ...
Software Users Manual - English
Page 8
... Level ...183 11 Remote Setup & PhotoCapture Center™ (For MFC-J625DW/J825DW/J835DW) 184 Remote Setup...184 PhotoCapture Center™ ...186 For USB cable users ...186 For network users...187 Section III Using the Scan key 12 USB cable scanning 189 Using the Scan key over a USB cable connection 189 Scan to E-mail ...189 Scan to Image... on your network from a computer (Windows Vista® SP2 or later and Windows® 7 214 Using Web Services for scanning on your network from the Brother machine (Windows Vista® SP2 or later and Windows® 7 216 vii
... Level ...183 11 Remote Setup & PhotoCapture Center™ (For MFC-J625DW/J825DW/J835DW) 184 Remote Setup...184 PhotoCapture Center™ ...186 For USB cable users ...186 For network users...187 Section III Using the Scan key 12 USB cable scanning 189 Using the Scan key over a USB cable connection 189 Scan to E-mail ...189 Scan to Image... on your network from a computer (Windows Vista® SP2 or later and Windows® 7 214 Using Web Services for scanning on your network from the Brother machine (Windows Vista® SP2 or later and Windows® 7 216 vii
Software Users Manual - English
Page 136
... to read Loading paper and 8 Loading documents in the Basic User's Guide before buying paper, and to purchase a USB cable (type A/B) that is copying or receiving a fax on a keyboard or a non-powered USB hub. Fax sending will be printed at your machine as black & white. You can print from the memory 8 If... the right type of their life. However, when the machine is no longer than 6 feet (2 meters). If the sending machine has the ability to a USB port on paper, it , the color fax will not be sent as a black & white fax. IMPORTANT DO NOT connect the machine to convert it pauses...
... to read Loading paper and 8 Loading documents in the Basic User's Guide before buying paper, and to purchase a USB cable (type A/B) that is copying or receiving a fax on a keyboard or a non-powered USB hub. Fax sending will be printed at your machine as black & white. You can print from the memory 8 If... the right type of their life. However, when the machine is no longer than 6 feet (2 meters). If the sending machine has the ability to a USB port on paper, it , the color fax will not be sent as a black & white fax. IMPORTANT DO NOT connect the machine to convert it pauses...
Software Users Manual - English
Page 164
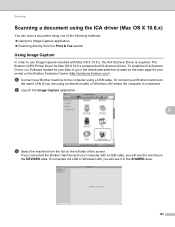
...OS X 10.6.x contains the ICA Scanner Driver. Or connect your Brother machine to use Image Capture included with a USB cable, you are using a network model) or Wireless LAN where the computer is required. If you connected the Brother machine and your model on the left side of the following methods... & Fax section Using Image Capture 9 In order to the computer using a USB cable. Scanning Scanning a document using the ICA driver (Mac OS X 10.6.x) 9 You can scan a document using one of the screen. The Brother CUPS Printer Driver for your computer with Mac OS X 10.6.x, the ICA Scanner...
...OS X 10.6.x contains the ICA Scanner Driver. Or connect your Brother machine to use Image Capture included with a USB cable, you are using a network model) or Wireless LAN where the computer is required. If you connected the Brother machine and your model on the left side of the following methods... & Fax section Using Image Capture 9 In order to the computer using a USB cable. Scanning Scanning a document using the ICA driver (Mac OS X 10.6.x) 9 You can scan a document using one of the screen. The Brother CUPS Printer Driver for your computer with Mac OS X 10.6.x, the ICA Scanner...

Software Users Manual - English
Page 167
Or connect your Brother machine to the computer using a network model) or Wireless LAN where the computer is connected. d Select the machine from the list on the left side .... c Click on the Scanner icon. 158 Please follow the steps below: a Connect your Brother machine to the same LAN (if you can scan directly from the Apple Menu. Scanning Scanning directly from the Print & Fax section 9 If you have already added your Brother machine in the Print & Fax section, you are using a USB cable.
Or connect your Brother machine to the computer using a network model) or Wireless LAN where the computer is connected. d Select the machine from the list on the left side .... c Click on the Scanner icon. 158 Please follow the steps below: a Connect your Brother machine to the same LAN (if you can scan directly from the Apple Menu. Scanning Scanning directly from the Print & Fax section 9 If you have already added your Brother machine in the Print & Fax section, you are using a USB cable.

Software Users Manual - English
Page 195
...installed in the media drive of Removable Disk. Remote Setup & PhotoCapture Center™ (For MFC-J625DW/J825DW/J835DW) PhotoCapture Center™ 11 You can edit a file and save it to avoid damaging the card, USB Flash memory drive or data stored on the card. Note If you remove the memory card... media may be destroyed. 186 If you do not restart your computer, the data on your data or damage the media. For USB cable users 11 a Put a memory card or USB Flash memory drive into the machine. b Double-click the Removable Disk icon. CAUTION DO NOT start your machine. d Quit all ...
...installed in the media drive of Removable Disk. Remote Setup & PhotoCapture Center™ (For MFC-J625DW/J825DW/J835DW) PhotoCapture Center™ 11 You can edit a file and save it to avoid damaging the card, USB Flash memory drive or data stored on the card. Note If you remove the memory card... media may be destroyed. 186 If you do not restart your computer, the data on your data or damage the media. For USB cable users 11 a Put a memory card or USB Flash memory drive into the machine. b Double-click the Removable Disk icon. CAUTION DO NOT start your machine. d Quit all ...


