Users Manual - English
Page 15
For your safety A-3 Disconnect device A-3 LAN connection A-3 Laser safety A-3 FDA regulations A-4 Important safety instructions A-4 Choosing a location A-6 To use the machine safely A-7 Trademarks...A-10 B Menu and Features On-screen programming B-1 Menu... the scanner glass C-22 Cleaning to prevent paper jams C-22 Cleaning the laser glass C-24 Replacing the consumable items C-26 Toner cartridges C-28 Waste toner pack C-31 OPC belt cartridge C-33 Fusing unit C-35 Replacing the transfer belt cleaner C-37 Replacing the transfer roller C-39 Machine Information C-40 Checking the...
For your safety A-3 Disconnect device A-3 LAN connection A-3 Laser safety A-3 FDA regulations A-4 Important safety instructions A-4 Choosing a location A-6 To use the machine safely A-7 Trademarks...A-10 B Menu and Features On-screen programming B-1 Menu... the scanner glass C-22 Cleaning to prevent paper jams C-22 Cleaning the laser glass C-24 Replacing the consumable items C-26 Toner cartridges C-28 Waste toner pack C-31 OPC belt cartridge C-33 Fusing unit C-35 Replacing the transfer belt cleaner C-37 Replacing the transfer roller C-39 Machine Information C-40 Checking the...
Users Manual - English
Page 127
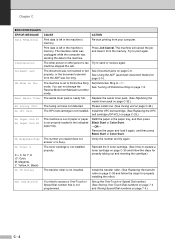
... print again. Install the OPC belt cartridge. (See Replacing the OPC belt cartridge (OP-4CL) on page C-33.) No Paper Fed #1 No Paper Fed #2 The machine is out of paper or paper is not properly loaded in the paper tray, and then press Black Start or Color Start. -OR- Install the... transfer roller. (See Replacing the transfer roller on page C-35.) No OPC Belt The OPC belt cartridge is busy. Please install one. (See Fusing unit on page C-39 and follow the steps for ...
... print again. Install the OPC belt cartridge. (See Replacing the OPC belt cartridge (OP-4CL) on page C-33.) No Paper Fed #1 No Paper Fed #2 The machine is out of paper or paper is not properly loaded in the paper tray, and then press Black Start or Color Start. -OR- Install the... transfer roller. (See Replacing the transfer roller on page C-35.) No OPC Belt The OPC belt cartridge is busy. Please install one. (See Fusing unit on page C-39 and follow the steps for ...
Users Manual - English
Page 128
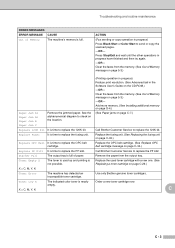
... or Color Start to replace the 120K kit. Toner Empty X The toner is time to replace the PF kit2. empty. Use only Brother genuine toner cartridges. Call Brother Customer Service to replace the PF kit2. Replace the OPC belt cartridge. (See Replace OPC belt cartridge message on page C-33.) Replace PF Kit2 It is used toner cartridge with a new one...
... or Color Start to replace the 120K kit. Toner Empty X The toner is time to replace the PF kit2. empty. Use only Brother genuine toner cartridges. Call Brother Customer Service to replace the PF kit2. Replace the OPC belt cartridge. (See Replace OPC belt cartridge message on page C-33.) Replace PF Kit2 It is used toner cartridge with a new one...
Users Manual - English
Page 138
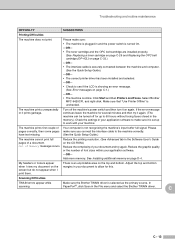
... of pages correctly, then some pages have text missing. My headers or footers appear when I view my document on page D-4. Select 'Brother MFC-9420CN', and right-click. Please make sure it again. (The machine can be turned off the machine's power switch and then turn it prints... machine is plugged in and the power switch is turned On. -OR- • The toner cartridge and the OPC belt cartridge are installed properly. (See Replacing a toner cartridge on page C-29 and Replacing the OPC belt cartridge (OP-4CL) on page C-33.) -OR- • The interface cable is securely connected between...
... of pages correctly, then some pages have text missing. My headers or footers appear when I view my document on page D-4. Select 'Brother MFC-9420CN', and right-click. Please make sure it again. (The machine can be turned off the machine's power switch and then turn it prints... machine is plugged in and the power switch is turned On. -OR- • The toner cartridge and the OPC belt cartridge are installed properly. (See Replacing a toner cartridge on page C-29 and Replacing the OPC belt cartridge (OP-4CL) on page C-33.) -OR- • The interface cable is securely connected between...

Users Manual - English
Page 142
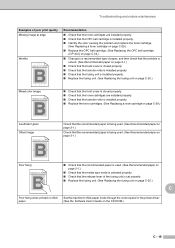
... to prevent paper jams on page C-22.) ■ If the problem continues, identify the color and replace that toner cartridge. (See Replacing a toner cartridge on page C-29.) ■ Replace the OPC belt cartridge. (See Replacing the OPC belt cartridge (OP-4CL) on page C-33.) Colored lines across the page ABCDEFGHIJKLMNOPQRSTUVWXYZ. 0123456789. ABCDEFGHIJKLMNOPQRSTUVWXYZ. 0123456789. abcdefghijklmnopqrstuvwxyz. abcdefghijklmnopqrstuvwxyz. abcdefghijklmnopqrstuvwxyz. abcdefghijklmnopqrstuvwxyz. ■...
... to prevent paper jams on page C-22.) ■ If the problem continues, identify the color and replace that toner cartridge. (See Replacing a toner cartridge on page C-29.) ■ Replace the OPC belt cartridge. (See Replacing the OPC belt cartridge (OP-4CL) on page C-33.) Colored lines across the page ABCDEFGHIJKLMNOPQRSTUVWXYZ. 0123456789. ABCDEFGHIJKLMNOPQRSTUVWXYZ. 0123456789. abcdefghijklmnopqrstuvwxyz. abcdefghijklmnopqrstuvwxyz. abcdefghijklmnopqrstuvwxyz. abcdefghijklmnopqrstuvwxyz. ■...

Users Manual - English
Page 143
.... 0123456789. ABCDEFGHIJKLMNOPQRSTUVWXYZ. 0123456789. abcdefghijklmnopqrstuvwxyz. abcdefghijklmnopqrstuvwxyz. ABCDEFGHIJKLMNOPQRSTUVWXYZ. 0123456789. Colors the machine can print and colors you expected All one color Shade on the transparency ABCDEFGHIJKLMNOPQRSTUVWXYZ. 0123456789. ABCDEFGHIJKLMNOPQRSTUVWXYZ. 0123456789. abcdefghijklmnopqrstuvwxyz. ABCDEFGHIJKLMNOPQRSTUVWXYZ. 0123456789. abcdefghijklmnopqrstuvwxyz. ■ Check that the toner cartridges are installed properly. ■ Check that the OPC belt cartridge is installed properly. ■ Check that the...
.... 0123456789. ABCDEFGHIJKLMNOPQRSTUVWXYZ. 0123456789. abcdefghijklmnopqrstuvwxyz. abcdefghijklmnopqrstuvwxyz. ABCDEFGHIJKLMNOPQRSTUVWXYZ. 0123456789. Colors the machine can print and colors you expected All one color Shade on the transparency ABCDEFGHIJKLMNOPQRSTUVWXYZ. 0123456789. ABCDEFGHIJKLMNOPQRSTUVWXYZ. 0123456789. abcdefghijklmnopqrstuvwxyz. ABCDEFGHIJKLMNOPQRSTUVWXYZ. 0123456789. abcdefghijklmnopqrstuvwxyz. ■ Check that the toner cartridges are installed properly. ■ Check that the OPC belt cartridge is installed properly. ■ Check that the...
Users Manual - English
Page 144
Recommendation ■ Check that the toner cartridges are installed properly. ■ Check that the OPC belt cartridge is installed properly. ■ Identify the color causing the problem and replace the toner cartridge. (See Replacing a toner cartridge on page C-29.) ■ Replace the OPC belt cartridge. (See Replacing the OPC belt cartridge (OP-4CL) on page C-33.) ■ Change to a recommended type...
Recommendation ■ Check that the toner cartridges are installed properly. ■ Check that the OPC belt cartridge is installed properly. ■ Identify the color causing the problem and replace the toner cartridge. (See Replacing a toner cartridge on page C-29.) ■ Replace the OPC belt cartridge. (See Replacing the OPC belt cartridge (OP-4CL) on page C-33.) ■ Change to a recommended type...
Users Manual - English
Page 149
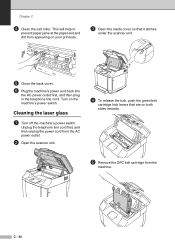
Cleaning the laser glass 1 Turn off the machine's power switch. This will help to prevent paper jams at the paper exit and dirt from appearing on your printouts. 3 ... from the machine. Chapter C 4 Clean the exit roller. C - 24 Turn on both sides inwards. 5 Remove the OPC belt cartridge from the AC power outlet. 2 Open the scanner unit. 4 To release the lock, push the green belt cartridge lock levers that it latches under the scanner unit. 5 Close the back cover. 6 Plug the machine's power...
Cleaning the laser glass 1 Turn off the machine's power switch. This will help to prevent paper jams at the paper exit and dirt from appearing on your printouts. 3 ... from the machine. Chapter C 4 Clean the exit roller. C - 24 Turn on both sides inwards. 5 Remove the OPC belt cartridge from the AC power outlet. 2 Open the scanner unit. 4 To release the lock, push the green belt cartridge lock levers that it latches under the scanner unit. 5 Close the back cover. 6 Plug the machine's power...
Users Manual - English
Page 150
... (a light source of 74.3 footcandles or 800 lux) for cleaning the laser glass. Do C not try to avoid damaging the belt. 7 Open the front cover of the laser glass with a dry soft, lint-free cloth. 8 Take all the toner cartridges and the OPC belt cartridge back in . E Plug the machine's power cord back into the AC...
... (a light source of 74.3 footcandles or 800 lux) for cleaning the laser glass. Do C not try to avoid damaging the belt. 7 Open the front cover of the laser glass with a dry soft, lint-free cloth. 8 Take all the toner cartridges and the OPC belt cartridge back in . E Plug the machine's power cord back into the AC...

Users Manual - English
Page 152
Call Brother Customer Service to replace See C-31. Definition of images: If the image on a page contains only one color of either Cyan, Magenta, Yellow or Black =>1 image, two colors => 2 images, three colors => 3 images, four colors => 4 images. 2 At 5% coverage print (Letter/A4 size). LCD messages Near ... OPC belt cartridge 60,000 images See C-33. FP-4CL Replace 120K Kit Replace PF Kit2 Transfer belt cleaner Transfer roller Paper pick-up roller 120,000 pages2 Separator pad Transfer belt Paper feeding kit 2. (Paper pick-up roller Separator pad) Call Brother Customer Service...
Call Brother Customer Service to replace See C-31. Definition of images: If the image on a page contains only one color of either Cyan, Magenta, Yellow or Black =>1 image, two colors => 2 images, three colors => 3 images, four colors => 4 images. 2 At 5% coverage print (Letter/A4 size). LCD messages Near ... OPC belt cartridge 60,000 images See C-33. FP-4CL Replace 120K Kit Replace PF Kit2 Transfer belt cleaner Transfer roller Paper pick-up roller 120,000 pages2 Separator pad Transfer belt Paper feeding kit 2. (Paper pick-up roller Separator pad) Call Brother Customer Service...
Users Manual - English
Page 154
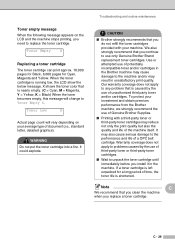
... machine when you do not refill the toner cartridges provided with a third-party toner or third-party toner cartridges may result in unsatisfactory print quality. X shows the toner color that you install it in the Brother machine may also cause serious damage to use...print approx. 10,000 pages for Black, 6,600 pages for a long period of a OPC belt cartridge. WARNING Do not put the toner cartridge into a fire. If a toner cartridge is left unpacked for Cyan, Magenta and Yellow. CAUTION ■ Brother strongly recommends that is nearly empty. (C = Cyan, M = Magenta, Y = Yellow, K...
... machine when you do not refill the toner cartridges provided with a third-party toner or third-party toner cartridges may result in unsatisfactory print quality. X shows the toner color that you install it in the Brother machine may also cause serious damage to use...print approx. 10,000 pages for Black, 6,600 pages for a long period of a OPC belt cartridge. WARNING Do not put the toner cartridge into a fire. If a toner cartridge is left unpacked for Cyan, Magenta and Yellow. CAUTION ■ Brother strongly recommends that is nearly empty. (C = Cyan, M = Magenta, Y = Yellow, K...
Users Manual - English
Page 158
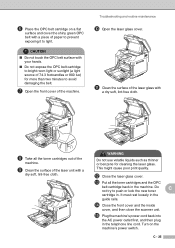
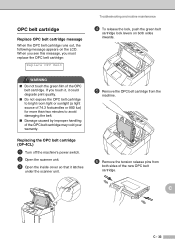
...2 Open the scanner unit. 3 Open the inside cover so that it could degrade print quality. ■ Do not expose the OPC belt cartridge to bright room light or sunlight (a light source of 74.3 footcandles or 800 lux) for more than two minutes to avoid damaging the...film of the OPC belt cartridge. When you see this message, you touch it, it latches under the scanner unit. 5 Remove the OPC belt cartridge from the machine. 6 Remove the tension release pins from both sides inwards. C C - 33 OPC belt cartridge Replace OPC belt cartridge message When the OPC belt cartridge runs out, the ...
...2 Open the scanner unit. 3 Open the inside cover so that it could degrade print quality. ■ Do not expose the OPC belt cartridge to bright room light or sunlight (a light source of 74.3 footcandles or 800 lux) for more than two minutes to avoid damaging the...film of the OPC belt cartridge. When you see this message, you touch it, it latches under the scanner unit. 5 Remove the OPC belt cartridge from the machine. 6 Remove the tension release pins from both sides inwards. C C - 33 OPC belt cartridge Replace OPC belt cartridge message When the OPC belt cartridge runs out, the ...
Users Manual - English
Page 159
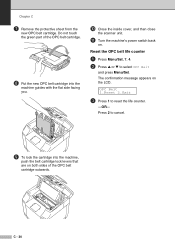
A Turn the machine's power switch back on both sides of the OPC belt cartridge. 8 Put the new OPC belt cartridge into the machine, push the belt cartridge lock levers that are on . Reset the OPC belt life counter 1 Press Menu/Set, 7, 4. 2 Press ▲ or ▼ to reset the life counter. -OR-... C - 34 Do not touch the green part of the OPC belt cartridge outwards. Chapter C 7 Remove the protective sheet from the new OPC belt cartridge. Press 2 to cancel. 9 To lock the cartridge into the machine guides with the flat side facing you. 0 Close the inside cover,...
A Turn the machine's power switch back on both sides of the OPC belt cartridge. 8 Put the new OPC belt cartridge into the machine, push the belt cartridge lock levers that are on . Reset the OPC belt life counter 1 Press Menu/Set, 7, 4. 2 Press ▲ or ▼ to reset the life counter. -OR-... C - 34 Do not touch the green part of the OPC belt cartridge outwards. Chapter C 7 Remove the protective sheet from the new OPC belt cartridge. Press 2 to cancel. 9 To lock the cartridge into the machine guides with the flat side facing you. 0 Close the inside cover,...
Users Manual - English
Page 166
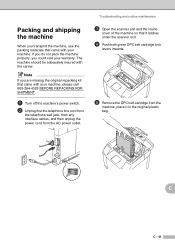
... the scanner unit and the inside cover of the machine so that it latches under the scanner unit. 4 Push both green OPC belt cartridge lock levers inwards. 5 Remove the OPC belt cartridge from the AC power outlet. The machine should be adequately insured with the carrier. If you do not pack the machine properly...
... the scanner unit and the inside cover of the machine so that it latches under the scanner unit. 4 Push both green OPC belt cartridge lock levers inwards. 5 Remove the OPC belt cartridge from the AC power outlet. The machine should be adequately insured with the carrier. If you do not pack the machine properly...
Users Manual - English
Page 167
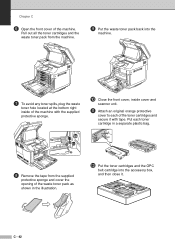
B Put the toner cartridges and the OPC belt cartridge into the machine. 7 To avoid any toner spills, plug the waste toner hole located at the bottom right inside cover and scanner unit. Put each of the toner cartridges and secure it . Chapter C 6 Open the front cover of the waste toner pack... as shown in the illustration. A Attach an original orange protective cover to each toner cartridge in a separate plastic bag. 8 Remove the tape from the machine. 9 Put the waste toner pack back into the accessory box, and then close...
B Put the toner cartridges and the OPC belt cartridge into the machine. 7 To avoid any toner spills, plug the waste toner hole located at the bottom right inside cover and scanner unit. Put each of the toner cartridges and secure it . Chapter C 6 Open the front cover of the waste toner pack... as shown in the illustration. A Attach an original orange protective cover to each toner cartridge in a separate plastic bag. 8 Remove the tape from the machine. 9 Put the waste toner pack back into the accessory box, and then close...

Users Manual - English
Page 189
O One-Touch changing 7-4 setting up 7-3 using 7-1 Options (accessories) lower tray unit D-1 SO-DIMM D-3 Options key B-14 Out of document 2-10 type 3-9 PaperPort® See...Polling 10-1 Polled Transmit 10-2 Polling Receive 10-1 Sequential Polling 10-1 Poster 11-5 Power failure B-1 Maintenance, routine C-20 replacing fusing unit C-35 OPC belt cartridge C-33 toner cartridges C-28, C-29 transfer belt cleaner C-37 transfer roller C-39 waste toner pack C-31 Manual dialing 7-1 receive 6-1 Manual transmission 5-3 Memory adding SO-DIMM (option D-3 installing D-4 ...
O One-Touch changing 7-4 setting up 7-3 using 7-1 Options (accessories) lower tray unit D-1 SO-DIMM D-3 Options key B-14 Out of document 2-10 type 3-9 PaperPort® See...Polling 10-1 Polled Transmit 10-2 Polling Receive 10-1 Sequential Polling 10-1 Poster 11-5 Power failure B-1 Maintenance, routine C-20 replacing fusing unit C-35 OPC belt cartridge C-33 toner cartridges C-28, C-29 transfer belt cleaner C-37 transfer roller C-39 waste toner pack C-31 Manual dialing 7-1 receive 6-1 Manual transmission 5-3 Memory adding SO-DIMM (option D-3 installing D-4 ...
Quick Setup Guide - English
Page 3
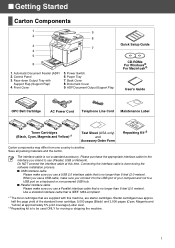
...a Parallel interface cable that are starter cartridges. Paper Tray 7. ADF Document Output Support Flap Quick Setup Guide CD-ROMs For Windows® For Macintosh® User's Guide OPC Belt Cartridge AC Power Cord Telephone Line Cord Maintenance Label Toner Cartridges (Black, Cyan, Magenta and Yellow)*1... Test Sheet (USA only) and Accessory Order Form Repacking Kit*2 Carton components may differ from one country to a USB port on a...
...a Parallel interface cable that are starter cartridges. Paper Tray 7. ADF Document Output Support Flap Quick Setup Guide CD-ROMs For Windows® For Macintosh® User's Guide OPC Belt Cartridge AC Power Cord Telephone Line Cord Maintenance Label Toner Cartridges (Black, Cyan, Magenta and Yellow)*1... Test Sheet (USA only) and Accessory Order Form Repacking Kit*2 Carton components may differ from one country to a USB port on a...
Quick Setup Guide - English
Page 5
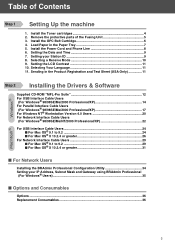
... of Contents Step 1 Setting Up the machine 1. Selecting a Receive Mode 10 9. Setting the LCD Contrast 11 10. Table of the Fusing Unit 5 3. Install the OPC Belt Cartridge 6 4. Setting your IP Address, Subnet Mask and Gateway using BRAdmin Professional (For Windows® Users 35 ■ Options and Consumables Options ...36 Replacement Consumables 36 3
... of Contents Step 1 Setting Up the machine 1. Selecting a Receive Mode 10 9. Setting the LCD Contrast 11 10. Table of the Fusing Unit 5 3. Install the OPC Belt Cartridge 6 4. Setting your IP Address, Subnet Mask and Gateway using BRAdmin Professional (For Windows® Users 35 ■ Options and Consumables Options ...36 Replacement Consumables 36 3
Quick Setup Guide - English
Page 8
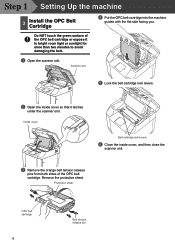
...minutes to avoid damaging the belt. 1 Open the scanner unit. Scanner unit 5 Lock the belt cartridge lock levers. 2 Open the inside cover, and then close the scanner unit. 3 Remove the orange belt tension release pins from both sides of the OPC belt cartridge or expose it latches under ...the scanner unit. Remove the protective sheet. Do NOT touch the green surface of the OPC belt cartridge. Step 1 Setting Up the machine 3 Install the OPC Belt Cartridge 4 Put the OPC belt cartridge into the machine guides with...
...minutes to avoid damaging the belt. 1 Open the scanner unit. Scanner unit 5 Lock the belt cartridge lock levers. 2 Open the inside cover, and then close the scanner unit. 3 Remove the orange belt tension release pins from both sides of the OPC belt cartridge or expose it latches under ...the scanner unit. Remove the protective sheet. Do NOT touch the green surface of the OPC belt cartridge. Step 1 Setting Up the machine 3 Install the OPC Belt Cartridge 4 Put the OPC belt cartridge into the machine guides with...
Quick Setup Guide - English
Page 38
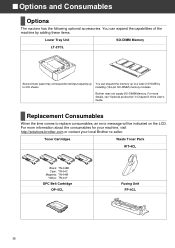
... Memory LT-27CL Second lower paper tray unit expands total input capacity up You can expand the memory up to a total of the User's Guide. Brother does not supply SO-DIMM Memory. For more information about the consumables for your machine, visit http://solutions....brother.com or contact your local Brother re-seller. For more details, see "Optional accesories" in Chapter D of 576 MB by to replace consumables, an error message will be indicated on the LCD. Toner Cartridges Waste Toner Pack WT-4CL Black: TN-04BK Cyan: TN-04C Magenta: TN-04M Yellow: TN-04Y OPC Belt Cartridge...
... Memory LT-27CL Second lower paper tray unit expands total input capacity up You can expand the memory up to a total of the User's Guide. Brother does not supply SO-DIMM Memory. For more information about the consumables for your machine, visit http://solutions....brother.com or contact your local Brother re-seller. For more details, see "Optional accesories" in Chapter D of 576 MB by to replace consumables, an error message will be indicated on the LCD. Toner Cartridges Waste Toner Pack WT-4CL Black: TN-04BK Cyan: TN-04C Magenta: TN-04M Yellow: TN-04Y OPC Belt Cartridge...


