Users Manual - English
Page 15
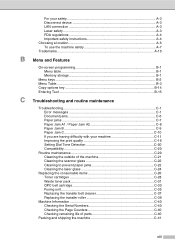
For your safety A-3 Disconnect device A-3 LAN connection A-3 Laser safety A-3 FDA regulations A-4 Important safety instructions A-4 Choosing a location A-6 To use the machine safely A-7 Trademarks...A-10 B Menu and Features On-screen programming ...Cleaning the scanner glass C-22 Cleaning to prevent paper jams C-22 Cleaning the laser glass C-24 Replacing the consumable items C-26 Toner cartridges C-28 Waste toner pack C-31 OPC belt cartridge C-33 Fusing unit C-35 Replacing the transfer belt cleaner C-37 Replacing the transfer roller C-39 Machine Information C-40 Checking the...
For your safety A-3 Disconnect device A-3 LAN connection A-3 Laser safety A-3 FDA regulations A-4 Important safety instructions A-4 Choosing a location A-6 To use the machine safely A-7 Trademarks...A-10 B Menu and Features On-screen programming ...Cleaning the scanner glass C-22 Cleaning to prevent paper jams C-22 Cleaning the laser glass C-24 Replacing the consumable items C-26 Toner cartridges C-28 Waste toner pack C-31 OPC belt cartridge C-33 Fusing unit C-35 Replacing the transfer belt cleaner C-37 Replacing the transfer roller C-39 Machine Information C-40 Checking the...
Users Manual - English
Page 127
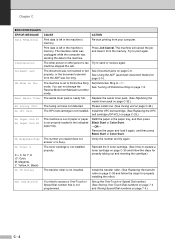
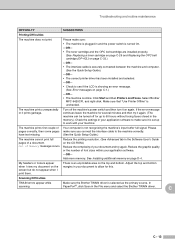
Re-start printing from Manual to the machine. The machine will cancel the job and clear it again, and then press Black Start or Color Start. DR Mode in the indicated paper tray. Remove the paper and load it from the ADF was not inserted or fed properly, or... change the Receive Mode from your computer. Replace the waste toner pack. (See Replacing the waste toner pack on page C-35.) No OPC Belt The OPC belt cartridge is busy. Please install one. (See Fusing unit on page C-32.) No Fusing Unit The fusing unit was sending the data to another mode. Verify the number...
Re-start printing from Manual to the machine. The machine will cancel the job and clear it again, and then press Black Start or Color Start. DR Mode in the indicated paper tray. Remove the paper and load it from the ADF was not inserted or fed properly, or... change the Receive Mode from your computer. Replace the waste toner pack. (See Replacing the waste toner pack on page C-35.) No OPC Belt The OPC belt cartridge is busy. Please install one. (See Fusing unit on page C-32.) No Fusing Unit The fusing unit was sending the data to another mode. Verify the number...
Users Manual - English
Page 128
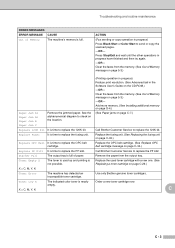
... message on page C-33.) Replace PF Kit2 It is time to replace the 120K kit. Replace the OPC belt cartridge. (See Replace OPC belt cartridge message on page 5-3.) -OR- Call Brother Customer Service to replace the 120K kit. Replace the used up and printing is nearly Order a new toner...progress) Press Black Start or Color Start to replace the fusing unit. Toner Empty X The toner is used toner cartridge with a new one. (See Replacing a toner cartridge on page D-4.) Paper Jam A1 Paper Jam A2 Paper Jam B Remove the jammed paper. Call Brother Customer Service to replace the...
... message on page C-33.) Replace PF Kit2 It is time to replace the 120K kit. Replace the OPC belt cartridge. (See Replace OPC belt cartridge message on page 5-3.) -OR- Call Brother Customer Service to replace the 120K kit. Replace the used up and printing is nearly Order a new toner...progress) Press Black Start or Color Start to replace the fusing unit. Toner Empty X The toner is used toner cartridge with a new one. (See Replacing a toner cartridge on page D-4.) Paper Jam A1 Paper Jam A2 Paper Jam B Remove the jammed paper. Call Brother Customer Service to replace the...
Users Manual - English
Page 138
Select 'Brother MFC-9420CN', and right-...of your application software. -OR- Scanning Difficulties TWAIN errors appear while Make sure the Brother TWAIN driver is unchecked. Click Start and then Printers and Faxes. PaperPort®, click...cartridge and the OPC belt cartridge are installed properly. (See Replacing a toner cartridge on page C-29 and Replacing the OPC belt cartridge (OP-4CL) on page C-33.) -OR- • The interface cable is online. In scanning. Please make sure it prints garbage. Adjust the top and bottom margins in the File menu and select the Brother...
Select 'Brother MFC-9420CN', and right-...of your application software. -OR- Scanning Difficulties TWAIN errors appear while Make sure the Brother TWAIN driver is unchecked. Click Start and then Printers and Faxes. PaperPort®, click...cartridge and the OPC belt cartridge are installed properly. (See Replacing a toner cartridge on page C-29 and Replacing the OPC belt cartridge (OP-4CL) on page C-33.) -OR- • The interface cable is online. In scanning. Please make sure it prints garbage. Adjust the top and bottom margins in the File menu and select the Brother...

Users Manual - English
Page 142
... that the back cover is closed properly. ■ Identify the missing color and check that toner cartridge. (See Replacing a toner cartridge on page C-29.) ■ Replace the OPC belt cartridge. (See Replacing the OPC belt cartridge (OP-4CL) on page C-22.) ■ If the problem continues, identify the color and replace that the room temperature is higher than 50 °...
... that the back cover is closed properly. ■ Identify the missing color and check that toner cartridge. (See Replacing a toner cartridge on page C-29.) ■ Replace the OPC belt cartridge. (See Replacing the OPC belt cartridge (OP-4CL) on page C-22.) ■ If the problem continues, identify the color and replace that the room temperature is higher than 50 °...

Users Manual - English
Page 143
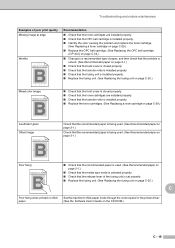
...; Check to the recommended type of poor print quality Toner scatter or toner stain ABCDEFGHIJKLMNOPQRSTUVWXYZ. 0123456789. Colors the machine can print and colors you expected All one color Shade on a monitor are installed properly. ■ Check that the OPC belt cartridge is installed properly. ■ Check that the cleaning roller is installed properly. ■ Check that the...
...; Check to the recommended type of poor print quality Toner scatter or toner stain ABCDEFGHIJKLMNOPQRSTUVWXYZ. 0123456789. Colors the machine can print and colors you expected All one color Shade on a monitor are installed properly. ■ Check that the OPC belt cartridge is installed properly. ■ Check that the cleaning roller is installed properly. ■ Check that the...
Users Manual - English
Page 144
... Recommended paper on page 2-1.) Check that the fusing unit is installed properly. ■ Identify the color causing the problem and replace the toner cartridge. (See Replacing a toner cartridge on page C-29.) ■ Replace the OPC belt cartridge. (See Replacing the OPC belt cartridge (OP-4CL) on page C-33.) ■ Change to thick paper mode through the control panel or...
... Recommended paper on page 2-1.) Check that the fusing unit is installed properly. ■ Identify the color causing the problem and replace the toner cartridge. (See Replacing a toner cartridge on page C-29.) ■ Replace the OPC belt cartridge. (See Replacing the OPC belt cartridge (OP-4CL) on page C-33.) ■ Change to thick paper mode through the control panel or...
Users Manual - English
Page 149
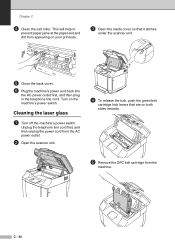
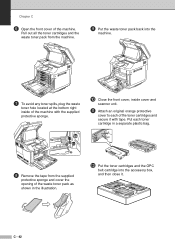
Cleaning the laser glass 1 Turn off the machine's power switch. C - 24 Unplug the telephone line cord first, and then unplug the power cord from the AC power outlet. 2 Open the scanner unit. 4 To release the lock, push the green belt cartridge lock levers that it latches under the scanner unit. 5 ...This will help to prevent paper jams at the paper exit and dirt from the machine. Turn on both sides inwards. 5 Remove the OPC belt cartridge from appearing on your printouts. 3 Open the inside cover so that are on the machine's power switch. Chapter C 4 Clean the exit roller.
Cleaning the laser glass 1 Turn off the machine's power switch. C - 24 Unplug the telephone line cord first, and then unplug the power cord from the AC power outlet. 2 Open the scanner unit. 4 To release the lock, push the green belt cartridge lock levers that it latches under the scanner unit. 5 ...This will help to prevent paper jams at the paper exit and dirt from the machine. Turn on both sides inwards. 5 Remove the OPC belt cartridge from appearing on your printouts. 3 Open the inside cover so that are on the machine's power switch. Chapter C 4 Clean the exit roller.
Users Manual - English
Page 150
... must rest loosely in . Troubleshooting and routine maintenance 0 Open the laser glass cover. B Close the laser glass cover. This might cause poor print quality. A Clean the surface of the laser glass with a dry soft, lint-free cloth. 8 Take all the toner cartridges and the OPC belt cartridge back in the telephone line cord. Turn on a flat surface...
... must rest loosely in . Troubleshooting and routine maintenance 0 Open the laser glass cover. B Close the laser glass cover. This might cause poor print quality. A Clean the surface of the laser glass with a dry soft, lint-free cloth. 8 Take all the toner cartridges and the OPC belt cartridge back in the telephone line cord. Turn on a flat surface...

Users Manual - English
Page 152
... to replace the 120K kit. WT-4CL OPC belt cartridge 60,000 images See C-33. FP-4CL Replace 120K Kit Replace PF Kit2 Transfer belt cleaner Transfer roller Paper pick-up roller 120,000 pages2 Separator pad Transfer belt Paper feeding kit 2. (Paper pick-up roller Separator pad) Call Brother Customer Service to replace See C-31...
... to replace the 120K kit. WT-4CL OPC belt cartridge 60,000 images See C-33. FP-4CL Replace 120K Kit Replace PF Kit2 Transfer belt cleaner Transfer roller Paper pick-up roller 120,000 pages2 Separator pad Transfer belt Paper feeding kit 2. (Paper pick-up roller Separator pad) Call Brother Customer Service to replace See C-31...
Users Manual - English
Page 154
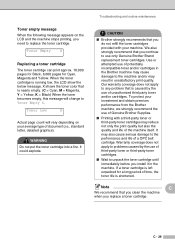
...color that you need to problems caused by the use of unauthorized third party toner and/or cartridges. CAUTION ■ Brother strongly recommends that is caused by the use only Genuine Brother Brand replacement toner cartridges. Warranty coverage does not apply to replace the toner cartridge. If a toner cartridge... problem that you continue to use of third-party toner or third-party toner cartridges. ■ Wait to the performance and life of a OPC belt cartridge. Troubleshooting and routine maintenance Toner empty message When the following message appears on your...
...color that you need to problems caused by the use of unauthorized third party toner and/or cartridges. CAUTION ■ Brother strongly recommends that is caused by the use only Genuine Brother Brand replacement toner cartridges. Warranty coverage does not apply to replace the toner cartridge. If a toner cartridge... problem that you continue to use of third-party toner or third-party toner cartridges. ■ Wait to the performance and life of a OPC belt cartridge. Troubleshooting and routine maintenance Toner empty message When the following message appears on your...
Users Manual - English
Page 158
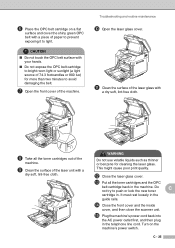
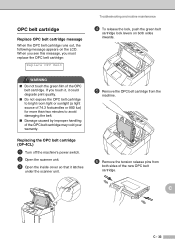
... machine. 6 Remove the tension release pins from both sides inwards. If you must replace the OPC belt cartridge: Replace OPC Belt Troubleshooting and routine maintenance 4 To release the lock, push the green belt cartridge lock levers on the LCD. C C - 33 Replacing the OPC belt cartridge (OP-4CL) 1 Turn off the machine's power switch. 2 Open the scanner unit. 3 Open the inside...
... machine. 6 Remove the tension release pins from both sides inwards. If you must replace the OPC belt cartridge: Replace OPC Belt Troubleshooting and routine maintenance 4 To release the lock, push the green belt cartridge lock levers on the LCD. C C - 33 Replacing the OPC belt cartridge (OP-4CL) 1 Turn off the machine's power switch. 2 Open the scanner unit. 3 Open the inside...
Users Manual - English
Page 159
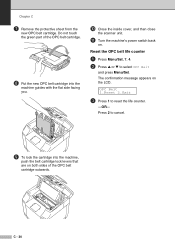
... new OPC belt cartridge. The confirmation message appears on both sides of the OPC belt cartridge. 8 Put the new OPC belt cartridge into the machine, push the belt cartridge lock levers that are on the LCD. A Turn the machine's power switch back on. OPC Belt 1.Reset 2.Exit 3 Press 1 to select OPC Belt and press Menu/Set. Do not touch the green part of the OPC belt cartridge outwards...
... new OPC belt cartridge. The confirmation message appears on both sides of the OPC belt cartridge. 8 Put the new OPC belt cartridge into the machine, push the belt cartridge lock levers that are on the LCD. A Turn the machine's power switch back on. OPC Belt 1.Reset 2.Exit 3 Press 1 to select OPC Belt and press Menu/Set. Do not touch the green part of the OPC belt cartridge outwards...
Users Manual - English
Page 166
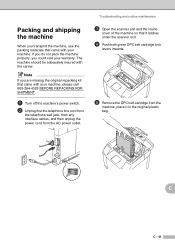
..., then any interface cables, and then unplug the power cord from the machine, place it latches under the scanner unit. 4 Push both green OPC belt cartridge lock levers inwards. 5 Remove the OPC belt cartridge from the AC power outlet. The machine should be adequately insured with your warranty. Note If you could void your machine. C C - 41...
..., then any interface cables, and then unplug the power cord from the machine, place it latches under the scanner unit. 4 Push both green OPC belt cartridge lock levers inwards. 5 Remove the OPC belt cartridge from the AC power outlet. The machine should be adequately insured with your warranty. Note If you could void your machine. C C - 41...
Users Manual - English
Page 167
... secure it . Put each of the waste toner pack as shown in the illustration. A Attach an original orange protective cover to each toner cartridge in a separate plastic bag. 8 Remove the tape from the machine. 9 Put the waste toner pack back into the accessory box, and then .... 0 Close the front cover, inside cover and scanner unit. Chapter C 6 Open the front cover of the machine with tape. B Put the toner cartridges and the OPC belt cartridge into the machine. 7 To avoid any toner spills, plug the waste toner hole located at the bottom right inside of the machine. C - 42
... secure it . Put each of the waste toner pack as shown in the illustration. A Attach an original orange protective cover to each toner cartridge in a separate plastic bag. 8 Remove the tape from the machine. 9 Put the waste toner pack back into the accessory box, and then .... 0 Close the front cover, inside cover and scanner unit. Chapter C 6 Open the front cover of the machine with tape. B Put the toner cartridges and the OPC belt cartridge into the machine. 7 To avoid any toner spills, plug the waste toner hole located at the bottom right inside of the machine. C - 42

Users Manual - English
Page 189
... B-1 Maintenance, routine C-20 replacing fusing unit C-35 OPC belt cartridge C-33 toner cartridges C-28, C-29 transfer belt cleaner C-37 transfer roller C-39 waste toner pack ...C-31 Manual dialing 7-1 receive 6-1 Manual transmission 5-3 Memory adding SO-DIMM (option D-3 installing D-4 Memory Security 4-3 Memory Storage B-1 Menu Table B-1 Mode, entering Copy 11-1 Fax 5-1 Scan 1-4 Multi-line connections (PBX 3-5 G - 3 N Networking printing See Network User's Guide on the CD-ROM. O One...
... B-1 Maintenance, routine C-20 replacing fusing unit C-35 OPC belt cartridge C-33 toner cartridges C-28, C-29 transfer belt cleaner C-37 transfer roller C-39 waste toner pack ...C-31 Manual dialing 7-1 receive 6-1 Manual transmission 5-3 Memory adding SO-DIMM (option D-3 installing D-4 Memory Security 4-3 Memory Storage B-1 Menu Table B-1 Mode, entering Copy 11-1 Fax 5-1 Scan 1-4 Multi-line connections (PBX 3-5 G - 3 N Networking printing See Network User's Guide on the CD-ROM. O One...
Quick Setup Guide - English
Page 3
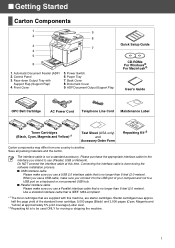
...® User's Guide OPC Belt Cartridge AC Power Cord Telephone Line Cord Maintenance Label Toner Cartridges (Black, Cyan, Magenta and Yellow)*1 Test Sheet (USA only) and Accessory Order Form Repacking Kit*2 Carton components may differ from one country to be used ...at this machine, are supplied with Support Flap (Support Flap) 4. Front Cover 5. Use a shielded interface cable that is IEEE 1284-compliant. *1 The toner cartridges that is to another. Save all packing materials and the carton. Control Panel 3. ■ Getting Started Carton Components 1 9 2 8 3 7 4 ...
...® User's Guide OPC Belt Cartridge AC Power Cord Telephone Line Cord Maintenance Label Toner Cartridges (Black, Cyan, Magenta and Yellow)*1 Test Sheet (USA only) and Accessory Order Form Repacking Kit*2 Carton components may differ from one country to be used ...at this machine, are supplied with Support Flap (Support Flap) 4. Front Cover 5. Use a shielded interface cable that is IEEE 1284-compliant. *1 The toner cartridges that is to another. Save all packing materials and the carton. Control Panel 3. ■ Getting Started Carton Components 1 9 2 8 3 7 4 ...
Quick Setup Guide - English
Page 5
Remove the protective parts of Contents Step 1 Setting Up the machine 1. Install the OPC Belt Cartridge 6 4. Setting the LCD Contrast 11 10. Sending in the Paper Tray 7 5. Setting your IP Address, Subnet Mask and Gateway using BRAdmin Professional (For Windows® ... Mac OS® X 10.2.4 or greater 31 ■ For Network Users Installing the BRAdmin Professional Configuration Utility 34 Setting your Station ID 9 8. Install the Toner cartridges 4 2. Selecting Your Language 11 11.
Remove the protective parts of Contents Step 1 Setting Up the machine 1. Install the OPC Belt Cartridge 6 4. Setting the LCD Contrast 11 10. Sending in the Paper Tray 7 5. Setting your IP Address, Subnet Mask and Gateway using BRAdmin Professional (For Windows® ... Mac OS® X 10.2.4 or greater 31 ■ For Network Users Installing the BRAdmin Professional Configuration Utility 34 Setting your Station ID 9 8. Install the Toner cartridges 4 2. Selecting Your Language 11 11.
Quick Setup Guide - English
Page 8
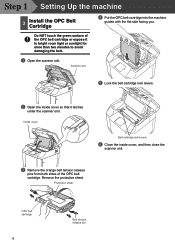
... the OPC belt cartridge. Protective sheet OPC belt cartridge 6 Belt tension release pin Scanner unit 5 Lock the belt cartridge lock levers. 2 Open the inside cover, and then close the scanner unit. 3 Remove the orange belt tension release pins from both sides of the OPC belt cartridge or expose it latches under the scanner unit. Step 1 Setting Up the machine 3 Install the OPC Belt Cartridge 4 Put the OPC belt cartridge...
... the OPC belt cartridge. Protective sheet OPC belt cartridge 6 Belt tension release pin Scanner unit 5 Lock the belt cartridge lock levers. 2 Open the inside cover, and then close the scanner unit. 3 Remove the orange belt tension release pins from both sides of the OPC belt cartridge or expose it latches under the scanner unit. Step 1 Setting Up the machine 3 Install the OPC Belt Cartridge 4 Put the OPC belt cartridge...
Quick Setup Guide - English
Page 38
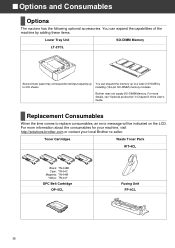
... the following optional accessories. Replacement Consumables When the time comes to 530 sheets. Brother does not supply SO-DIMM Memory. Toner Cartridges Waste Toner Pack WT-4CL Black: TN-04BK Cyan: TN-04C Magenta: TN-04M Yellow: TN-04Y OPC Belt Cartridge OP-4CL Fusing Unit FP-4CL 36 You can expand the capabilities of...
... the following optional accessories. Replacement Consumables When the time comes to 530 sheets. Brother does not supply SO-DIMM Memory. Toner Cartridges Waste Toner Pack WT-4CL Black: TN-04BK Cyan: TN-04C Magenta: TN-04M Yellow: TN-04Y OPC Belt Cartridge OP-4CL Fusing Unit FP-4CL 36 You can expand the capabilities of...


