Users Manual - English
Page 103
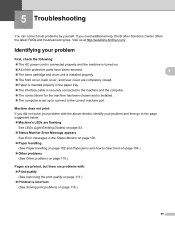
.../. 5 Troubleshooting 5 You can correct most problems by yourself. Identifying your problem First, check the following: The AC power cord is connected properly and the machine is turned on. All of the protective parts have been removed. The toner cartridge and drum unit... computer is set up to connect to the page suggested below. Machine's LEDs are flashing See LEDs (Light Emitting Diodes) on page 118.) 5 5 5 5 5 99 Machine does not print: If you need additional help, the Brother Solutions Center offers the latest FAQs and troubleshooting tips.
.../. 5 Troubleshooting 5 You can correct most problems by yourself. Identifying your problem First, check the following: The AC power cord is connected properly and the machine is turned on. All of the protective parts have been removed. The toner cartridge and drum unit... computer is set up to connect to the page suggested below. Machine's LEDs are flashing See LEDs (Light Emitting Diodes) on page 118.) 5 5 5 5 5 99 Machine does not print: If you need additional help, the Brother Solutions Center offers the latest FAQs and troubleshooting tips.
Users Manual - English
Page 114
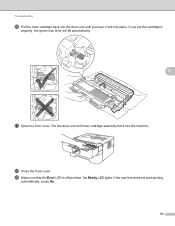
s Make sure that the Error LED is off and then, the Ready LED lights. Troubleshooting p Put the toner cartridge back into the drum unit until you put the cartridge in properly, the green lock lever will lift automatically. 5 q Open the front cover. r Close the front cover. If you hear it lock into the machine. Put the drum unit and toner cartridge assembly back into place. If the machine does not start printing automatically, press Go. 110
s Make sure that the Error LED is off and then, the Ready LED lights. Troubleshooting p Put the toner cartridge back into the drum unit until you put the cartridge in properly, the green lock lever will lift automatically. 5 q Open the front cover. r Close the front cover. If you hear it lock into the machine. Put the drum unit and toner cartridge assembly back into place. If the machine does not start printing automatically, press Go. 110
Users Manual - English
Page 115
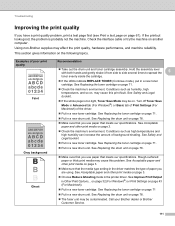
... looks good, the problem is too light, Toner Save Mode may be on page 78. The fuser unit may be contaminated. Check the interface cable or try the machine on page 71. Check the machine's environment. Turn off Toner Save Mode in Advanced tab (For ... Take out the drum unit and toner cartridge assembly. Conditions such as humidity, high temperatures, and so on page 61). See Acceptable paper and other print media on the following topics. Call your Brother dealer or Brother Customer Service. 111 Troubleshooting Improving the print quality 5 If you have...
... looks good, the problem is too light, Toner Save Mode may be on page 78. The fuser unit may be contaminated. Check the interface cable or try the machine on page 71. Check the machine's environment. Turn off Toner Save Mode in Advanced tab (For ... Take out the drum unit and toner cartridge assembly. Conditions such as humidity, high temperatures, and so on page 61). See Acceptable paper and other print media on the following topics. Call your Brother dealer or Brother Customer Service. 111 Troubleshooting Improving the print quality 5 If you have...
Users Manual - English
Page 117
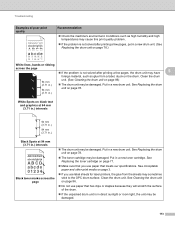
...will scratch the surface of poor print quality Recommendation Check the machine's environment. Put in a new toner cartridge. Put in a new drum unit. Conditions such as glue from the sheets may be damaged. 113 ... page 86) The drum unit may sometimes stick to the OPC drum surface. Clean the drum unit. Troubleshooting Examples of the drum. If the unpacked drum unit is not solved after printing a few pages, the...printing a few pages, put in direct sunlight or room light, the unit may be damaged. Clean the drum 94 mm (3.71 in a new drum unit.
...will scratch the surface of poor print quality Recommendation Check the machine's environment. Put in a new toner cartridge. Put in a new drum unit. Conditions such as glue from the sheets may be damaged. 113 ... page 86) The drum unit may sometimes stick to the OPC drum surface. Clean the drum unit. Troubleshooting Examples of the drum. If the unpacked drum unit is not solved after printing a few pages, the...printing a few pages, put in direct sunlight or room light, the unit may be damaged. Clean the drum 94 mm (3.71 in a new drum unit.


