Users Manual - English
Page 3
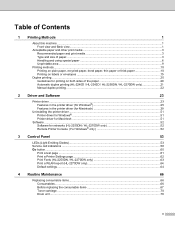
...Guidelines for printing on both sides of the paper 20 Automatic duplex printing (HL-2240D / HL-2242D / HL-2250DN / HL-2270DW only 21 Manual duplex printing ...22 2 Driver and Software 23 Printer... Windows® ...51 Printer driver for Macintosh ...51 Software ...52 Software for networks (HL-2250DN / HL-2270DW only 52 Remote Printer Console (For Windows® only 52 3 Control Panel 53...test page ...61 Print a Printer Settings page...62 Print Fonts (HL-2250DN / HL-2270DW only 63 Print a WLAN report (HL-2270DW only 64 Default settings...64 4 Routine Maintenance 66 Replacing consumable...
...Guidelines for printing on both sides of the paper 20 Automatic duplex printing (HL-2240D / HL-2242D / HL-2250DN / HL-2270DW only 21 Manual duplex printing ...22 2 Driver and Software 23 Printer... Windows® ...51 Printer driver for Macintosh ...51 Software ...52 Software for networks (HL-2250DN / HL-2270DW only 52 Remote Printer Console (For Windows® only 52 3 Control Panel 53...test page ...61 Print a Printer Settings page...62 Print Fonts (HL-2250DN / HL-2270DW only 63 Print a WLAN report (HL-2270DW only 64 Default settings...64 4 Routine Maintenance 66 Replacing consumable...
Users Manual - English
Page 4
Cleaning ...82 Cleaning the outside of the machine 83 Cleaning the corona wire...84 Cleaning the drum unit ...86 Cleaning the paper pick-up roller...93 Packing and shipping the machine ...95 5 Troubleshooting 99 Identifying your problem ...99 Error messages in ...only 129 How to use Web Based Management (Web browser 129 Symbol and character sets list...130 Quick reference for bar code control commands (HL-2250DN / HL-2270DW only) ...132 Print bar codes or expanded characters 132 B Appendix (for Europe and Other Countries) 139 Brother numbers ...139 C Appendix (for USA and Canada) 140...
Cleaning ...82 Cleaning the outside of the machine 83 Cleaning the corona wire...84 Cleaning the drum unit ...86 Cleaning the paper pick-up roller...93 Packing and shipping the machine ...95 5 Troubleshooting 99 Identifying your problem ...99 Error messages in ...only 129 How to use Web Based Management (Web browser 129 Symbol and character sets list...130 Quick reference for bar code control commands (HL-2250DN / HL-2270DW only) ...132 Print bar codes or expanded characters 132 B Appendix (for Europe and Other Countries) 139 Brother numbers ...139 C Appendix (for USA and Canada) 140...
Users Manual - English
Page 12
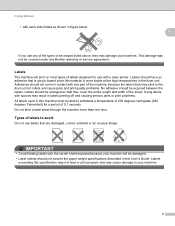
... as shown in figure below 1 If you use labels that is acrylic-based since this User's Guide. Adhesives should be able to the drum unit or rollers and cause jams and print quality problems. No adhesive should not come in this material is more than one time. Labels... should not exceed the paper weight specifications described in contact with spaces may cause damage to avoid 1 Do not use any Brother warranty or service agreement. IMPORTANT • Avoid feeding labels with the carrier sheet exposed because your machine. 8 Do not feed a label sheet ...
... as shown in figure below 1 If you use labels that is acrylic-based since this User's Guide. Adhesives should be able to the drum unit or rollers and cause jams and print quality problems. No adhesive should not come in this material is more than one time. Labels... should not exceed the paper weight specifications described in contact with spaces may cause damage to avoid 1 Do not use any Brother warranty or service agreement. IMPORTANT • Avoid feeding labels with the carrier sheet exposed because your machine. 8 Do not feed a label sheet ...

Users Manual - English
Page 57
... will flash depending on . or or or or LED is flashing. 53 3 Control Panel 3 LEDs (Light Emitting Diodes) 3 This section refers to four LEDs Toner, Drum, Error, Ready and Go button on the control panel. 1 Toner LED 3 1 The Toner LED indicates that the Toner is low...
... will flash depending on . or or or or LED is flashing. 53 3 Control Panel 3 LEDs (Light Emitting Diodes) 3 This section refers to four LEDs Toner, Drum, Error, Ready and Go button on the control panel. 1 Toner LED 3 1 The Toner LED indicates that the Toner is low...

Users Manual - English
Page 59
... out of the machine and put it ready for 3 seconds. 3 REPLACE TONER (Stop mode) Replace the toner cartridge with a new one . CARTRIDGE ERROR The drum unit assembly is indicated. See Toner cartridge on page 71. REPLACE TONER (Continue mode) The machine continues printing until the LED indicates TONER ENDED. The ...
... out of the machine and put it ready for 3 seconds. 3 REPLACE TONER (Stop mode) Replace the toner cartridge with a new one . CARTRIDGE ERROR The drum unit assembly is indicated. See Toner cartridge on page 71. REPLACE TONER (Continue mode) The machine continues printing until the LED indicates TONER ENDED. The ...
Users Manual - English
Page 60
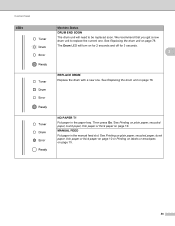
.... See Printing on plain paper, recycled paper, bond paper, thin paper or thick paper on page 78. See Replacing the drum unit on page 10. We recommend that you get a new drum unit to be replaced soon. Then press Go. See Printing on plain paper, recycled paper, bond paper, thin paper or... thick paper on page 10 or Printing on labels or envelopes on page 78. MANUAL FEED Put paper in the paper tray. See Replacing the drum unit on page 15. 56 Control Panel LEDs Machine Status DRUM END SOON The drum unit will turn on for 2 seconds and off for 3 seconds. 3 REPLACE...
.... See Printing on plain paper, recycled paper, bond paper, thin paper or thick paper on page 78. See Replacing the drum unit on page 10. We recommend that you get a new drum unit to be replaced soon. Then press Go. See Printing on plain paper, recycled paper, bond paper, thin paper or... thick paper on page 10 or Printing on labels or envelopes on page 78. MANUAL FEED Put paper in the paper tray. See Replacing the drum unit on page 15. 56 Control Panel LEDs Machine Status DRUM END SOON The drum unit will turn on for 2 seconds and off for 3 seconds. 3 REPLACE...

Users Manual - English
Page 61
... the drum unit with a new one. FUSER COVER OPEN Close the fuser cover located behind the back cover of the machine. See Paper jams and how to be cleaned. JAM TRAY 1 / JAM INSIDE / JAM REAR / JAM DUPLEX 3 Clear the paper jam. SIZE ERROR DX (HL-2240D / HL-2242D / HL-2250DN / HL-2270DW .... The paper size you selected in the machine and close the back cover. See Cleaning the corona wire on page 118. DUPLEX DISABLED (HL-2240D / HL-2242D / HL-2250DN / HL-2270DW only) Put the duplex tray in the current driver setting. MEMORY FULL The machine memory is A4, Letter, Legal or Folio.
... the drum unit with a new one. FUSER COVER OPEN Close the fuser cover located behind the back cover of the machine. See Paper jams and how to be cleaned. JAM TRAY 1 / JAM INSIDE / JAM REAR / JAM DUPLEX 3 Clear the paper jam. SIZE ERROR DX (HL-2240D / HL-2242D / HL-2250DN / HL-2270DW .... The paper size you selected in the machine and close the back cover. See Cleaning the corona wire on page 118. DUPLEX DISABLED (HL-2240D / HL-2242D / HL-2250DN / HL-2270DW only) Put the duplex tray in the current driver setting. MEMORY FULL The machine memory is A4, Letter, Legal or Folio.
Users Manual - English
Page 62
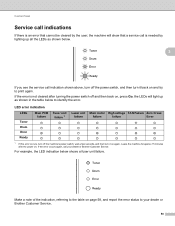
... the error is needed by lighting up as shown below. 3 If you see the service call your dealer or Brother Customer Service. 58 LED error indication LEDs Main PCB failure Toner Drum Error Ready Fuser unit failure 1 Laser unit Main motor High voltage FAN Failure Zero Cross failure failure failure Error 1 If... off and then back on, press Go, the LEDs will light up all the LEDs as shown in the table below to your dealer or Brother Customer Service.
... the error is needed by lighting up as shown below. 3 If you see the service call your dealer or Brother Customer Service. 58 LED error indication LEDs Main PCB failure Toner Drum Error Ready Fuser unit failure 1 Laser unit Main motor High voltage FAN Failure Zero Cross failure failure failure Error 1 If... off and then back on, press Go, the LEDs will light up all the LEDs as shown in the table below to your dealer or Brother Customer Service.
Users Manual - English
Page 65
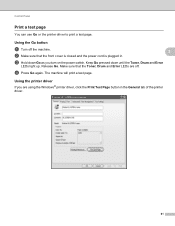
...the printer driver to print a test page. Release Go. Using the printer driver 3 If you turn on the power switch. c Hold down until the Toner, Drum and Error LEDs light up. The machine will print a test page. Using the Go button 3 a Turn off the machine. 3 b Make sure that the Toner..., Drum and Error LEDs are using the Windows® printer driver, click the Print Test Page button in . Keep Go pressed down Go as you are ...
...the printer driver to print a test page. Release Go. Using the printer driver 3 If you turn on the power switch. c Hold down until the Toner, Drum and Error LEDs light up. The machine will print a test page. Using the Go button 3 a Turn off the machine. 3 b Make sure that the Toner..., Drum and Error LEDs are using the Windows® printer driver, click the Print Test Page button in . Keep Go pressed down Go as you are ...
Users Manual - English
Page 67
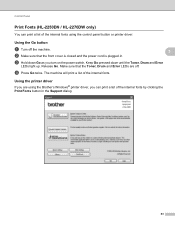
... the machine. 3 b Make sure that the Toner, Drum and Error LEDs are using the control panel button or printer driver. Using the Go button 3 a Turn off . The machine will print a list of the internal fonts using the Brother's Windows® printer driver, you turn on the power... switch. Release Go. Control Panel Print Fonts (HL-2250DN / HL-2270DW only) 3 You can print a list of the internal fonts by clicking the Print Fonts button in . c ...
... the machine. 3 b Make sure that the Toner, Drum and Error LEDs are using the control panel button or printer driver. Using the Go button 3 a Turn off . The machine will print a list of the internal fonts using the Brother's Windows® printer driver, you turn on the power... switch. Release Go. Control Panel Print Fonts (HL-2250DN / HL-2270DW only) 3 You can print a list of the internal fonts by clicking the Print Fonts button in . c ...

Users Manual - English
Page 70
Order No.DR-420 66 4 Routine Maintenance 4 You will need to clean the machine regularly and replace the consumable items. Replacing consumable items 4 The machine will indicate when it is time to replace the consumable items. (See LEDs (Light Emitting Diodes) on page 53) 4 Consumables 4 Toner cartridge See Toner cartridge on page 70 Order No.TN-420, TN-450 Drum unit See Drum unit on page 76.
Order No.DR-420 66 4 Routine Maintenance 4 You will need to clean the machine regularly and replace the consumable items. Replacing consumable items 4 The machine will indicate when it is time to replace the consumable items. (See LEDs (Light Emitting Diodes) on page 53) 4 Consumables 4 Toner cartridge See Toner cartridge on page 70 Order No.TN-420, TN-450 Drum unit See Drum unit on page 76.

Users Manual - English
Page 72
Our warranty coverage does not apply to any problem that you place the drum unit and toner cartridge assembly on a clean, flat surface with a 4 piece of disposable paper underneath it off with your investment and obtain premium performance from ...; We recommend that is caused by the use of unauthorized third party toner and/or cartridges. Routine Maintenance IMPORTANT • Brother strongly recommends that you continue to use only genuine Brother brand replacement toner cartridges. If toner scatters on page 82. 68 See Cleaning on your hands or clothes, wipe or wash...
Our warranty coverage does not apply to any problem that you place the drum unit and toner cartridge assembly on a clean, flat surface with a 4 piece of disposable paper underneath it off with your investment and obtain premium performance from ...; We recommend that is caused by the use of unauthorized third party toner and/or cartridges. Routine Maintenance IMPORTANT • Brother strongly recommends that you continue to use only genuine Brother brand replacement toner cartridges. If toner scatters on page 82. 68 See Cleaning on your hands or clothes, wipe or wash...

Users Manual - English
Page 73
... used toner cartridge tightly in a suitable bag so that you want to http://www.brother.com/original/index.html for a long time the toner life may be damaged. • While removing the drum unit, handle it carefully because it into the machine. If you have questions, call... toner cartridges, call your used toner cartridge, please discard the used toner cartridge according to the brother collection program. If you put it may be shortened. • DO NOT unpack a spare drum unit until immediately before you put it separate from domestic waste. Routine Maintenance • DO NOT...
... used toner cartridge tightly in a suitable bag so that you want to http://www.brother.com/original/index.html for a long time the toner life may be damaged. • While removing the drum unit, handle it carefully because it into the machine. If you have questions, call... toner cartridges, call your used toner cartridge, please discard the used toner cartridge according to the brother collection program. If you put it may be shortened. • DO NOT unpack a spare drum unit until immediately before you put it separate from domestic waste. Routine Maintenance • DO NOT...
Users Manual - English
Page 74
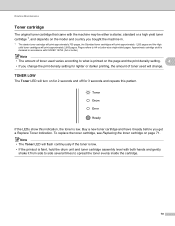
... print approximately 2,600 pages. Note • The Toner LED will flash continuously if the toner is low. • If the printout is faint, hold the drum unit and toner cartridge assembly level with ISO/IEC 19752. (A4 or Letter) Note • The amount of toner used varies according to what is...
... print approximately 2,600 pages. Note • The Toner LED will flash continuously if the toner is low. • If the printout is faint, hold the drum unit and toner cartridge assembly level with ISO/IEC 19752. (A4 or Letter) Note • The amount of toner used varies according to what is...
Users Manual - English
Page 75
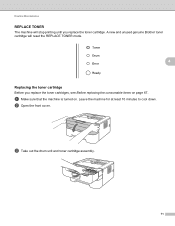
c Take out the drum unit and toner cartridge assembly. 71 Routine Maintenance REPLACE TONER 4 The machine will reset the REPLACE TONER mode. 4 Replacing the toner cartridge 4 Before you replace the toner cartridge. b Open the front cover. a Make sure that the machine is turned on page 67. Leave the machine for at least 10 minutes to cool down. A new and unused genuine Brother toner cartridge will stop printing until you replace the toner cartridges, see Before replacing the consumable items on .
c Take out the drum unit and toner cartridge assembly. 71 Routine Maintenance REPLACE TONER 4 The machine will reset the REPLACE TONER mode. 4 Replacing the toner cartridge 4 Before you replace the toner cartridge. b Open the front cover. a Make sure that the machine is turned on page 67. Leave the machine for at least 10 minutes to cool down. A new and unused genuine Brother toner cartridge will stop printing until you replace the toner cartridges, see Before replacing the consumable items on .

Users Manual - English
Page 76
Routine Maintenance d Push down the green lock lever and take the toner cartridge out of the drum unit. 4 e Unpack the new toner cartridge. Hold the cartridge level with both hands and gently shake it from side to side several times to spread the toner evenly inside the cartridge. 72
Routine Maintenance d Push down the green lock lever and take the toner cartridge out of the drum unit. 4 e Unpack the new toner cartridge. Hold the cartridge level with both hands and gently shake it from side to side several times to spread the toner evenly inside the cartridge. 72

Users Manual - English
Page 77
Routine Maintenance f Pull off the protective cover. 4 g Put the new toner cartridge firmly into the drum unit until you put it lock into place. If you hear it in properly, the green lock lever will lift automatically. 73
Routine Maintenance f Pull off the protective cover. 4 g Put the new toner cartridge firmly into the drum unit until you put it lock into place. If you hear it in properly, the green lock lever will lift automatically. 73

Users Manual - English
Page 78
Close the front cover. Note DO NOT turn off the machine's power switch or open the front cover until the Ready LED lights up. 74 i Put the drum unit and toner cartridge assembly back into the machine. Routine Maintenance h Clean the primary corona wire inside the drum unit by gently sliding the green tab from right to left and left to right several times. 4 1 Note Be sure to return the tab to the home position (a) (1). If you do not, printed pages may have a vertical stripe.
Close the front cover. Note DO NOT turn off the machine's power switch or open the front cover until the Ready LED lights up. 74 i Put the drum unit and toner cartridge assembly back into the machine. Routine Maintenance h Clean the primary corona wire inside the drum unit by gently sliding the green tab from right to left and left to right several times. 4 1 Note Be sure to return the tab to the home position (a) (1). If you do not, printed pages may have a vertical stripe.
Users Manual - English
Page 80
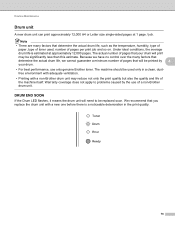
... dust- Because we have no control over the many factors that you replace the drum unit with a non-Brother drum unit may be printed by 4 your drum will need to problems caused by the use only genuine Brother toner. Warranty coverage does not apply to be used , number of toner used only... performance, use of the machine itself. DRUM END SOON 4 If the Drum LED flashes, it means the drum unit will print may reduce not only the print quality but also the quality and life of a non-Brother drum unit. Routine Maintenance Drum unit 4 A new drum unit can print approximately 12,000 A4 ...
... dust- Because we have no control over the many factors that you replace the drum unit with a non-Brother drum unit may be printed by 4 your drum will need to problems caused by the use only genuine Brother toner. Warranty coverage does not apply to be used , number of toner used only... performance, use of the machine itself. DRUM END SOON 4 If the Drum LED flashes, it means the drum unit will print may reduce not only the print quality but also the quality and life of a non-Brother drum unit. Routine Maintenance Drum unit 4 A new drum unit can print approximately 12,000 A4 ...
Users Manual - English
Page 81
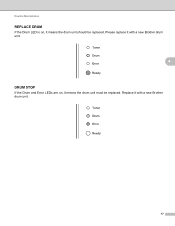
Routine Maintenance REPLACE DRUM 4 If the Drum LED is on , it means the drum unit must be replaced. Replace it with a new Brother drum unit. 4 DRUM STOP 4 If the Drum and Error LEDs are on , it with a new Brother drum unit. 77 Please replace it means the drum unit should be replaced.
Routine Maintenance REPLACE DRUM 4 If the Drum LED is on , it means the drum unit must be replaced. Replace it with a new Brother drum unit. 4 DRUM STOP 4 If the Drum and Error LEDs are on , it with a new Brother drum unit. 77 Please replace it means the drum unit should be replaced.


