

Accessory Catalog
Page 11
... seams or pattern markings are desired. SA145 ABCDEFGHJKLMNO SA144 IP Brother Embellishment Feet Cording Foot Cording Foot (5-hole) 20 Cording Foot (7-hole) Cording Foot Used for embellishing 1 to 5 cords or decorative threads. Insert cords or threads into each hole on the machine. 2. Attach the presser foot and pull cords under the presser foot, and select zigzag stitch with brother sewing machines of 7 mm feed width. 1. Line up the center guide mark on the presser foot. 2. Perfect for quilting appliqué! 1. SA110 ABCDEFJKMN SA148 GHILOP Cording Foot (5-hole...
... seams or pattern markings are desired. SA145 ABCDEFGHJKLMNO SA144 IP Brother Embellishment Feet Cording Foot Cording Foot (5-hole) 20 Cording Foot (7-hole) Cording Foot Used for embellishing 1 to 5 cords or decorative threads. Insert cords or threads into each hole on the machine. 2. Attach the presser foot and pull cords under the presser foot, and select zigzag stitch with brother sewing machines of 7 mm feed width. 1. Line up the center guide mark on the presser foot. 2. Perfect for quilting appliqué! 1. SA110 ABCDEFJKMN SA148 GHILOP Cording Foot (5-hole...

Accessory Catalog
Page 12
... the presser foot to follow on the fabric you to make or attach piping. Gathering Foot Used for details.) Brother Embellishment Feet Open Toe Foot 22 Pearls and Sequins Foot Metal type SA146 IP Open Toe Foot Provides better visibility in groove of loops to make fringes). Select a straight stitch, left needle position. 2. Line up the center guide mark (red) of appliqué. 2. Works best on a drawn pattern line and sew (cut the center of the foot. 3. Zigzag-sew...
... the presser foot to follow on the fabric you to make or attach piping. Gathering Foot Used for details.) Brother Embellishment Feet Open Toe Foot 22 Pearls and Sequins Foot Metal type SA146 IP Open Toe Foot Provides better visibility in groove of loops to make fringes). Select a straight stitch, left needle position. 2. Line up the center guide mark (red) of appliqué. 2. Works best on a drawn pattern line and sew (cut the center of the foot. 3. Zigzag-sew...

Accessory Catalog
Page 13
... to guide your first row of stitch length, tuck setting and depth setting. 2. The ruffling blade on lightweight fabric. The intervals of the grooves. 4. www.brother.com For seven grooves: SA179 ABCDEJ For five grooves: SA162 IP This presser foot does not include the bobbin cover. Install and manually thread a twin needle. 2. Further rows can be evenly spaced by trying different combinations of stitching and use that to sew...
... to guide your first row of stitch length, tuck setting and depth setting. 2. The ruffling blade on lightweight fabric. The intervals of the grooves. 4. www.brother.com For seven grooves: SA179 ABCDEJ For five grooves: SA162 IP This presser foot does not include the bobbin cover. Install and manually thread a twin needle. 2. Further rows can be evenly spaced by trying different combinations of stitching and use that to sew...

Accessory Catalog
Page 15
... starting to sew, press the needle position button twice to pull the bobbin thread to the machine. 2. Lower the feed dogs. 2. Set the machine for free-motion, outline quilting, etc. 1. Attach the walking foot to the quilt top. 7. Brother Quilting Feet 27 Open Toe Quilting Foot Quilting Foot SA187 ABCDEFGHMNO SA129 ABCDEFGHMNO SA165 L Open Toe Quilting Foot The large opening on the front of fabric and the walking foot with both hands while keeping the fabric pulled tight. 9. Use for straight stitch. 3. Use the foot controller so that can be difficult to sew...
... starting to sew, press the needle position button twice to pull the bobbin thread to the machine. 2. Lower the feed dogs. 2. Set the machine for free-motion, outline quilting, etc. 1. Attach the walking foot to the quilt top. 7. Brother Quilting Feet 27 Open Toe Quilting Foot Quilting Foot SA187 ABCDEFGHMNO SA129 ABCDEFGHMNO SA165 L Open Toe Quilting Foot The large opening on the front of fabric and the walking foot with both hands while keeping the fabric pulled tight. 9. Use for straight stitch. 3. Use the foot controller so that can be difficult to sew...

Accessory Catalog
Page 17
... to embroider 150 decorative sewing stitches within the frame. - The 4000D Premium Upgrade Package is compatible only with the Brother Innov-is 4000D machines that come with the QuattroTM 6000D. Customizable USB Mouse* Pointer Functions. - Includes three new free-motion presser feet: Free-motion quilting foot "C" for easier viewing of difficult to see reference stitches to your treasured collection of the line machine. Add even more control with center needle position straight stitch Open toe quilting foot...
... to embroider 150 decorative sewing stitches within the frame. - The 4000D Premium Upgrade Package is compatible only with the Brother Innov-is 4000D machines that come with the QuattroTM 6000D. Customizable USB Mouse* Pointer Functions. - Includes three new free-motion presser feet: Free-motion quilting foot "C" for easier viewing of difficult to see reference stitches to your treasured collection of the line machine. Add even more control with center needle position straight stitch Open toe quilting foot...

Accessory Catalog
Page 33
... embroidery, quilting or sewing project. Ten Spool Thread Stand This 10-Spool Thread Stand snaps securely in use. Each thread has it's own thread guide to deliver thread smoothly to the machine as well as a thread locking system which keeps those loose ends tamed when not in place on this stand that conveniently sits behind your machine. Some hoops can be removed to accommodate a variety of spool sizes. Brother Embroidery Accessories 63 Free-Standing Ten Spool Thread...
... embroidery, quilting or sewing project. Ten Spool Thread Stand This 10-Spool Thread Stand snaps securely in use. Each thread has it's own thread guide to deliver thread smoothly to the machine as well as a thread locking system which keeps those loose ends tamed when not in place on this stand that conveniently sits behind your machine. Some hoops can be removed to accommodate a variety of spool sizes. Brother Embroidery Accessories 63 Free-Standing Ten Spool Thread...

Accessory Catalog
Page 34
... fabrics with other sewing and embroidery machine brands. Available in a 14-Pack and individual colors (sold in a 5-pack sleeve). 300 meters (328 yards) of thread per spool. Stabilizers and Water Soluble Stabilizers When doing machine embroidery, the use these embroidery threads especially designed for each design. This metallic thread can be used on the top surface of needle and stabilizer types. Bobbin Threads Stabilizers and Water Water Soluble Stabilizers Brother Embroidery Accessories...
... fabrics with other sewing and embroidery machine brands. Available in a 14-Pack and individual colors (sold in a 5-pack sleeve). 300 meters (328 yards) of thread per spool. Stabilizers and Water Soluble Stabilizers When doing machine embroidery, the use these embroidery threads especially designed for each design. This metallic thread can be used on the top surface of needle and stabilizer types. Bobbin Threads Stabilizers and Water Water Soluble Stabilizers Brother Embroidery Accessories...

Accessory Catalog
Page 36
..., polar fleece and fake fur. SA172 Bobbin for PQ Series 70 Needle Felting Attachment Use this unique attachment to maintain contact with Dust Box and Needle Guide. Move the fabric while sewing. You can slip into very small areas. Comes with the feed dogs and can attach it . 1. Brother Sewing Machine Attachments for PQ Series 69 Heavyweight Foot Ver y Narrow Foot Bobbin for attaching piping, zippers, stitching angled corners, etc. SA173 Ver y Narrow...
..., polar fleece and fake fur. SA172 Bobbin for PQ Series 70 Needle Felting Attachment Use this unique attachment to maintain contact with Dust Box and Needle Guide. Move the fabric while sewing. You can slip into very small areas. Comes with the feed dogs and can attach it . 1. Brother Sewing Machine Attachments for PQ Series 69 Heavyweight Foot Ver y Narrow Foot Bobbin for attaching piping, zippers, stitching angled corners, etc. SA173 Ver y Narrow...

Accessory Catalog
Page 40
... machine for a cover stitch, with your machine. 3. Attach the hem positioning plate A/B to the hemming attachment, and attach it to your Cover Stitch). 1. Insert the tab on the bias tape attachment into the guide. 4. Set up your machine for a cover stitch, with the LC2 presser foot. Align the fabric joint and the groove of fabric pointed so that it into the front cover slot. 3. Sew. Brother Cover Stitch Feet 78 Top Stitching Foot Set Top Stitching Foot Set Use included presser foot to 1/2 inch) bias tapes as holding the fabric lightly...
... machine for a cover stitch, with your machine. 3. Attach the hem positioning plate A/B to the hemming attachment, and attach it to your Cover Stitch). 1. Insert the tab on the bias tape attachment into the guide. 4. Set up your machine for a cover stitch, with the LC2 presser foot. Align the fabric joint and the groove of fabric pointed so that it into the front cover slot. 3. Sew. Brother Cover Stitch Feet 78 Top Stitching Foot Set Top Stitching Foot Set Use included presser foot to 1/2 inch) bias tapes as holding the fabric lightly...
Users Manual - English
Page 3
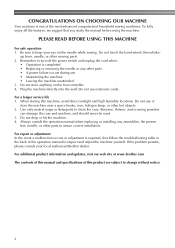
... operation manual to assure correct installation. PLEASE READ BEFORE USING THIS MACHINE For safe operation 1. Do not touch the hand wheel, thread take- Remember to keep your local authorized Brother dealer. Be sure to turn off the power switch and unplug the cord when: • Operation is completed • Replacing or removing the needle or any assemblies, the presser feet, needle, or other hot objects. 2. up lever, needle, or other parts...
... operation manual to assure correct installation. PLEASE READ BEFORE USING THIS MACHINE For safe operation 1. Do not touch the hand wheel, thread take- Remember to keep your local authorized Brother dealer. Be sure to turn off the power switch and unplug the cord when: • Operation is completed • Replacing or removing the needle or any assemblies, the presser feet, needle, or other hot objects. 2. up lever, needle, or other parts...
Users Manual - English
Page 4
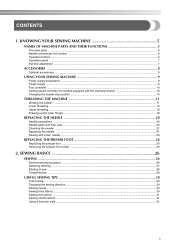
...31 Sewing stretch fabrics ...31 Using a free-arm style ...31 3 KNOWING YOUR SEWING MACHINE 5 NAMES OF MACHINE PARTS AND THEIR FUNCTIONS 5 The main parts ...5 Needle and presser foot section ...6 Operation buttons ...6 Operation panel ...7 Flat bed attachment ...7 ACCESSORIES ...8 Optional accessories ...8 USING YOUR SEWING MACHINE 9 Power supply precautions ...9 Power supply ...9 Foot controller ...10 Sewing speed controller (for models equipped with the start/stop button 10 Changing the needle stop position ...10 THREADING THE MACHINE 11 Winding the bobbin ...11 Lower threading ...14...
...31 Sewing stretch fabrics ...31 Using a free-arm style ...31 3 KNOWING YOUR SEWING MACHINE 5 NAMES OF MACHINE PARTS AND THEIR FUNCTIONS 5 The main parts ...5 Needle and presser foot section ...6 Operation buttons ...6 Operation panel ...7 Flat bed attachment ...7 ACCESSORIES ...8 Optional accessories ...8 USING YOUR SEWING MACHINE 9 Power supply precautions ...9 Power supply ...9 Foot controller ...10 Sewing speed controller (for models equipped with the start/stop button 10 Changing the needle stop position ...10 THREADING THE MACHINE 11 Winding the bobbin ...11 Lower threading ...14...
Users Manual - English
Page 6
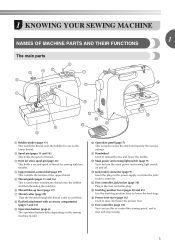
... is used to manually raise and lower the needle. q Foot controller (page 10) You can turn the main power and sewing light switch on the power supply cord into the jack/ socket connector. 1 KNOWING YOUR SEWING MACHINE 1 NAMES OF MACHINE PARTS AND THEIR FUNCTIONS The main parts a Bobbin winder (page 11) This winds the thread onto the bobbin for sewing with accessory compartment (pages 7 and 31) i Operation buttons (page 6) The operation buttons differ depending on the sewing machine model. b Spool pin (pages...
... is used to manually raise and lower the needle. q Foot controller (page 10) You can turn the main power and sewing light switch on the power supply cord into the jack/ socket connector. 1 KNOWING YOUR SEWING MACHINE 1 NAMES OF MACHINE PARTS AND THEIR FUNCTIONS The main parts a Bobbin winder (page 11) This winds the thread onto the bobbin for sewing with accessory compartment (pages 7 and 31) i Operation buttons (page 6) The operation buttons differ depending on the sewing machine model. b Spool pin (pages...
Users Manual - English
Page 7
... the button twice sews one stitch. e Sewing speed controller (for sewing straight seams. j Needle bar thread guide Pass the upper thread through the needle bar thread guide. For details, refer to "Starting to raise and lower the presser foot. f Feed dogs The feed dogs feed the fabric in the opposite direction. h Bobbin cover Open the bobbin cover to adjust the sewing speed. 6 Reverse stitches are sewn by keeping the button pressed down to raise or lower the needle. i Needle plate The needle plate is installed onto the presser foot holder. The machine sews at...
... the button twice sews one stitch. e Sewing speed controller (for sewing straight seams. j Needle bar thread guide Pass the upper thread through the needle bar thread guide. For details, refer to "Starting to raise and lower the presser foot. f Feed dogs The feed dogs feed the fabric in the opposite direction. h Bobbin cover Open the bobbin cover to adjust the sewing speed. 6 Reverse stitches are sewn by keeping the button pressed down to raise or lower the needle. i Needle plate The needle plate is installed onto the presser foot holder. The machine sews at...
Users Manual - English
Page 15
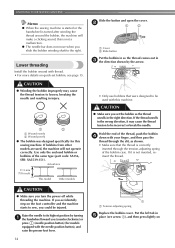
...; The needle bar does not move when you accidentally step on quick-set the bobbin so the thread unrolls in the wrong direction, it is not inserted, reinsert the thread. CAUTION ● Winding the bobbin improperly may cause the thread tension to sew, you set bobbin, see arrow a), and then press lightly on If bobbins from other models are used with the needle position button), and raise the presser foot lever. 14 1 a Tension-adjusting spring Replace the bobbin cover. CAUTION ● Make sure...
...; The needle bar does not move when you accidentally step on quick-set the bobbin so the thread unrolls in the wrong direction, it is not inserted, reinsert the thread. CAUTION ● Winding the bobbin improperly may cause the thread tension to sew, you set bobbin, see arrow a), and then press lightly on If bobbins from other models are used with the needle position button), and raise the presser foot lever. 14 1 a Tension-adjusting spring Replace the bobbin cover. CAUTION ● Make sure...
Users Manual - English
Page 39
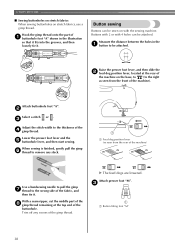
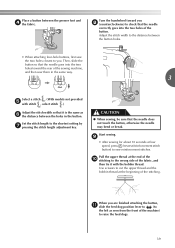
... b feed dog position lever, located at the top end of the gimp thread. c Adjust the stitch width to the right as seen from the front of a buttonhole foot "A" shown in the a button to be attached. Measure the distance between the holes in the illustration so that it fits into the grooves, and then loosely tie it . c 1 a Button fitting foot "M" 38 Lower the presser foot lever and the e buttonhole lever, and then start sewing. Attach presser foot...
... b feed dog position lever, located at the top end of the gimp thread. c Adjust the stitch width to the right as seen from the front of a buttonhole foot "A" shown in the a button to be attached. Measure the distance between the holes in the illustration so that it fits into the grooves, and then loosely tie it . c 1 a Button fitting foot "M" 38 Lower the presser foot lever and the e buttonhole lever, and then start sewing. Attach presser foot...
Users Manual - English
Page 40
... bobbin thread at low speed, press (reverse/reinforcement stitch button) to sew reinforcement stitches. Pull the upper thread at the end of the j stitching to the wrong side of the fabric, and then tie it is the same as seen from the front of the sewing machine, and then sew them in the button. Set the stitch length to raise the feed dogs. 39 When you are finished attaching the button, k slide the feed dog position lever...
... bobbin thread at low speed, press (reverse/reinforcement stitch button) to sew reinforcement stitches. Pull the upper thread at the end of the j stitching to the wrong side of the fabric, and then tie it is the same as seen from the front of the sewing machine, and then sew them in the button. Set the stitch length to raise the feed dogs. 39 When you are finished attaching the button, k slide the feed dog position lever...

Users Manual - English
Page 61
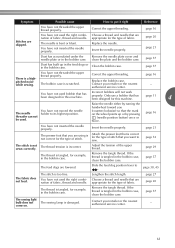
... upper threading. Incorrect bobbins will not work properly. Adjust the tension of the upper thread. The area around the hole in the presser foot is too thick. You have not used a bobbin that has been designed for the type of fabric, thread and needle. The thread tension is tangled or breaks. Reset the bobbin thread correctly. Wind the bobbin thread properly. APPENDIX Symptom The upper thread breaks. The lower thread is incorrect. You have not inserted the needle properly. Only use a bobbin that are sewing thin fabric, the stitch...
... upper threading. Incorrect bobbins will not work properly. Adjust the tension of the upper thread. The area around the hole in the presser foot is too thick. You have not used a bobbin that has been designed for the type of fabric, thread and needle. The thread tension is tangled or breaks. Reset the bobbin thread correctly. Wind the bobbin thread properly. APPENDIX Symptom The upper thread breaks. The lower thread is incorrect. You have not inserted the needle properly. Only use a bobbin that are sewing thin fabric, the stitch...
Users Manual - English
Page 62
... this machine. Correct the upper threading. Attach the presser foot that the mark on . Adjust the tension of fabric. If the thread is tangled in the bobbin case. If the thread is tangled in the bobbin case. You have not inserted the needle properly. Only use a bobbin that are appropriate for example, in the bobbin case. page 52 The stitch is bent or blunt. Remove the tangle thread. page 29 page 57 The feed dogs are...
... this machine. Correct the upper threading. Attach the presser foot that the mark on . Adjust the tension of fabric. If the thread is tangled in the bobbin case. If the thread is tangled in the bobbin case. You have not inserted the needle properly. Only use a bobbin that are appropriate for example, in the bobbin case. page 52 The stitch is bent or blunt. Remove the tangle thread. page 29 page 57 The feed dogs are...
Users Manual - English
Page 63
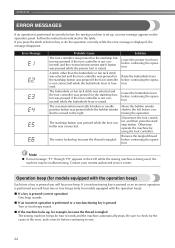
.... Remove the tangled thread before continuing the operation. Be sure to the left before continuing the operation. The reverse/reinforcement stitch button or needle position button was connected. Disconnect the foot controller, and then press the start /stop button was pressed if the foot controller is not connected) and the reverse/reinforcement stitch button was pressed if the foot controller is not connected) while the buttonhole lever is moved to sew. 62 Solution Lower the presser foot lever...
.... Remove the tangled thread before continuing the operation. Be sure to the left before continuing the operation. The reverse/reinforcement stitch button or needle position button was connected. Disconnect the foot controller, and then press the start /stop button was pressed if the foot controller is not connected) and the reverse/reinforcement stitch button was pressed if the foot controller is not connected) while the buttonhole lever is moved to sew. 62 Solution Lower the presser foot lever...
Users Manual - English
Page 64
...point zigzag stitch 32 main parts 5 main power switch 9 A , monogramming 49 51 accessories 8 appliqués 42 N needle 20 B bar tack 46 basic stitching 33 blind hem stitching 34 bobbin 14 , bobbin case 14 57 , bobbin cover 6 14 bobbin , winder 11 59, 62 button sewing 38 needle bar thread guide 6 , needle clamp screw 6 22 needle plate 6 needle plate cover 57 needle position 33 needle position button 6 needle threader 17 O buttonhole foot 36 openings 46 buttonhole , lever 6 37, 47 buttonhole sewing 35 operation beep 62 operation buttons 6 4 operation...
...point zigzag stitch 32 main parts 5 main power switch 9 A , monogramming 49 51 accessories 8 appliqués 42 N needle 20 B bar tack 46 basic stitching 33 blind hem stitching 34 bobbin 14 , bobbin case 14 57 , bobbin cover 6 14 bobbin , winder 11 59, 62 button sewing 38 needle bar thread guide 6 , needle clamp screw 6 22 needle plate 6 needle plate cover 57 needle position 33 needle position button 6 needle threader 17 O buttonhole foot 36 openings 46 buttonhole , lever 6 37, 47 buttonhole sewing 35 operation beep 62 operation buttons 6 4 operation...


