

Accessory Catalog
Page 40
... bias tape: Use the small bias tape sliding plate with 3 or 6 mm (approx. 1/8 or 1/4 inch) wide cover stitch. 1. Open the seams. 4. Attach the hem positioning plate A/B to the hemming attachment, and attach it into the front cover slot. 3. Brother Cover Stitch Feet 78 Top Stitching Foot Set Top Stitching... tape: Use the large bias tape sliding plate with the LC1 presser foot (included with your machine for a chain stitch, the center needle. 2. The stitches are always smooth. 1. SA226CV www.brother.com Set up your machine for a cover stitch, with the LC1 presser foot included in...
... bias tape: Use the small bias tape sliding plate with 3 or 6 mm (approx. 1/8 or 1/4 inch) wide cover stitch. 1. Open the seams. 4. Attach the hem positioning plate A/B to the hemming attachment, and attach it into the front cover slot. 3. Brother Cover Stitch Feet 78 Top Stitching Foot Set Top Stitching... tape: Use the large bias tape sliding plate with the LC1 presser foot (included with your machine for a chain stitch, the center needle. 2. The stitches are always smooth. 1. SA226CV www.brother.com Set up your machine for a cover stitch, with the LC1 presser foot included in...
Users Manual - English
Page 7
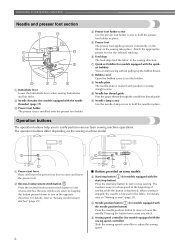
... controller (for sewing straight seams. j Needle bar thread guide Pass the upper thread through the needle bar thread guide. i Needle plate The needle plate is installed onto the presser foot holder. The machine sews at a slow speed at the beginning of sewing while the button is ...YOUR SEWING MACHINE Needle and presser foot section a Buttonhole lever Lower the buttonhole lever when sewing buttonholes and bar tacks. h Bobbin cover Open the bobbin cover to hold the needle in place. For details, refer to "Sewing reinforcement stitches" (page 29). ■ Buttons provided on some...
... controller (for sewing straight seams. j Needle bar thread guide Pass the upper thread through the needle bar thread guide. i Needle plate The needle plate is installed onto the presser foot holder. The machine sews at a slow speed at the beginning of sewing while the button is ...YOUR SEWING MACHINE Needle and presser foot section a Buttonhole lever Lower the buttonhole lever when sewing buttonholes and bar tacks. h Bobbin cover Open the bobbin cover to hold the needle in place. For details, refer to "Sewing reinforcement stitches" (page 29). ■ Buttons provided on some...
Users Manual - English
Page 58
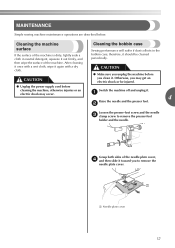
... Sewing performance will suffer if dust collects in neutral detergent, squeeze it out firmly, and then wipe the surface of the needle plate cover, d and then slide it toward you clean it should be injured. ● Unplug the power supply cord before you to ...remove the presser-foot holder and the needle. a Needle plate cover 57 therefore, it . MAINTENANCE Simple sewing machine maintenance operations are described below. CAUTION ● Make sure you unplug the machine before cleaning...
... Sewing performance will suffer if dust collects in neutral detergent, squeeze it out firmly, and then wipe the surface of the needle plate cover, d and then slide it toward you clean it should be injured. ● Unplug the power supply cord before you to ...remove the presser-foot holder and the needle. a Needle plate cover 57 therefore, it . MAINTENANCE Simple sewing machine maintenance operations are described below. CAUTION ● Make sure you unplug the machine before cleaning...
Users Manual - English
Page 59
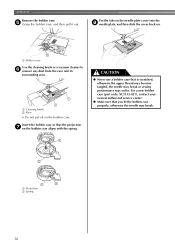
Put the tabs on the needle plate cover into the h needle plate, and then slide the cover back on the bobbin case aligns with the spring. 1 CAUTION ● Never use a bobbin case that is scratched, otherwise the upper thread may become tangled, ...
Put the tabs on the needle plate cover into the h needle plate, and then slide the cover back on the bobbin case aligns with the spring. 1 CAUTION ● Never use a bobbin case that is scratched, otherwise the upper thread may become tangled, ...
Users Manual - English
Page 62
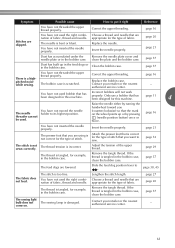
Symptom Possible cause How to . The needle is a highpitched noise while sewing. clean the plate and the bobbin case. page 57 There is bent or blunt. You have not threaded the upper thread properly. Raise the needle either by pressing (... sewing light bulb does not The sewing lamp is not sewn correctly. page 20 page 21 Dust has accumulated under the Remove the needle plate cover and needle plate or in the bobbin case, clean the bobbin case. page 52 The stitch is damaged. The thread is tangled, for this machine. Slide the...
Symptom Possible cause How to . The needle is a highpitched noise while sewing. clean the plate and the bobbin case. page 57 There is bent or blunt. You have not threaded the upper thread properly. Raise the needle either by pressing (... sewing light bulb does not The sewing lamp is not sewn correctly. page 20 page 21 Dust has accumulated under the Remove the needle plate cover and needle plate or in the bobbin case, clean the bobbin case. page 52 The stitch is damaged. The thread is tangled, for this machine. Slide the...
Users Manual - English
Page 64
... tack 46 basic stitching 33 blind hem stitching 34 bobbin 14 , bobbin case 14 57 , bobbin cover 6 14 bobbin , winder 11 59, 62 button sewing 38 needle bar thread guide 6 , needle clamp screw 6 22 needle plate 6 needle plate cover 57 needle position 33 needle position button 6 needle threader 17 O buttonhole foot 36 openings 46...
... tack 46 basic stitching 33 blind hem stitching 34 bobbin 14 , bobbin case 14 57 , bobbin cover 6 14 bobbin , winder 11 59, 62 button sewing 38 needle bar thread guide 6 , needle clamp screw 6 22 needle plate 6 needle plate cover 57 needle position 33 needle position button 6 needle threader 17 O buttonhole foot 36 openings 46...


