
Users Manual - English
Page 3
...only neutral soaps or detergents to keep your local authorized Brother dealer. Always consult the operation manual when replacing or installing any other hot objects. 2. up lever, needle, or other parts to change without notice. 2 Plug the machine directly into the wall. Benzene, thinner, and scouring powders...updates, visit our web site at www.brother.com The contents of this manual and specifications of this machine, avoid direct sunlight and high humidity locations. Be sure to clean the case. Do not store anything on the needle while sewing. To fully enjoy all the features, ...
...only neutral soaps or detergents to keep your local authorized Brother dealer. Always consult the operation manual when replacing or installing any other hot objects. 2. up lever, needle, or other parts to change without notice. 2 Plug the machine directly into the wall. Benzene, thinner, and scouring powders...updates, visit our web site at www.brother.com The contents of this manual and specifications of this machine, avoid direct sunlight and high humidity locations. Be sure to clean the case. Do not store anything on the needle while sewing. To fully enjoy all the features, ...
Users Manual - English
Page 4
... ...26 Selecting stitching ...27 Starting to sew ...28 Thread tension ...29 USEFUL SEWING TIPS ...30 Trial sewing ...30 Changing the sewing direction ...30 Sewing curves ...30 Sewing thick fabrics ...30 Sewing thin fabrics ...31 Sewing stretch fabrics ...31 Using a free-arm style ...31 3 CONTENTS 1. KNOWING YOUR SEWING MACHINE 5 NAMES OF MACHINE PARTS AND THEIR FUNCTIONS 5 The main parts ...5 Needle and presser foot...
... ...26 Selecting stitching ...27 Starting to sew ...28 Thread tension ...29 USEFUL SEWING TIPS ...30 Trial sewing ...30 Changing the sewing direction ...30 Sewing curves ...30 Sewing thick fabrics ...30 Sewing thin fabrics ...31 Sewing stretch fabrics ...31 Using a free-arm style ...31 3 CONTENTS 1. KNOWING YOUR SEWING MACHINE 5 NAMES OF MACHINE PARTS AND THEIR FUNCTIONS 5 The main parts ...5 Needle and presser foot...
Users Manual - English
Page 7
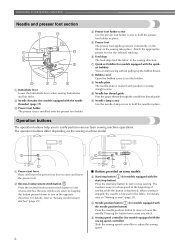
...fabric in the fabric. Operation buttons The operation buttons help you to sew in the opposite direction. Reverse stitches are sewn by keeping the button pressed down to easily perform various basic sewing machine operations. d Needle position button (for models equipped with the needle ...and lower the presser foot. The machine sews at a slow speed at the beginning of sewing while the button is lowered in the sewing direction. Pressing the button twice sews one stitch. e Presser foot The presser foot applies pressure consistently on the sewing machine model. i Needle plate The ...
...fabric in the fabric. Operation buttons The operation buttons help you to sew in the opposite direction. Reverse stitches are sewn by keeping the button pressed down to easily perform various basic sewing machine operations. d Needle position button (for models equipped with the needle ...and lower the presser foot. The machine sews at a slow speed at the beginning of sewing while the button is lowered in the sewing direction. Pressing the button twice sews one stitch. e Presser foot The presser foot applies pressure consistently on the sewing machine model. i Needle plate The ...
Users Manual - English
Page 15
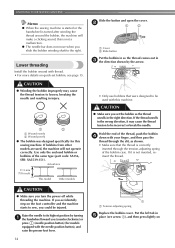
... 1 2 a Cover b Slide button Put the bobbin in so the thread comes out in c the direction shown by turning a the handwheel toward you slide the bobbin winding shaft to sew, you could be incorrect or break the needle. CAUTION ● Winding the bobbin improperly may cause the... was designed specifically for models equipped with this machine. Raise the needle to be injured. Put the left tab in the right direction. this sewing machine. CAUTION ● Make sure you turn the power off while threading the machine. If bobbins from other models are used with...
... 1 2 a Cover b Slide button Put the bobbin in so the thread comes out in c the direction shown by turning a the handwheel toward you slide the bobbin winding shaft to sew, you could be incorrect or break the needle. CAUTION ● Winding the bobbin improperly may cause the... was designed specifically for models equipped with this machine. Raise the needle to be injured. Put the left tab in the right direction. this sewing machine. CAUTION ● Make sure you turn the power off while threading the machine. If bobbins from other models are used with...
Users Manual - English
Page 16
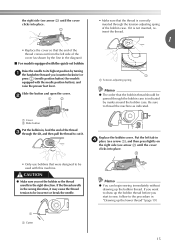
...order that the bobbin thread should be incorrect or break the needle. 1 a Cutter Memo ● You can begin sewing immediately without drawing up the bobbin thread before you start to sew, follow to be passed through the tension-adjusting spring of the bobbin case. a Cover b Slide button Put the ... open the cover. b 1 2 • Make sure that were designed to thread the machine as shown by marks around the bobbin case. If it may cause the thread tension to the procedure in the right direction. If the thread unrolls in d place (see arrow a), and then press lightly on the...
...order that the bobbin thread should be incorrect or break the needle. 1 a Cutter Memo ● You can begin sewing immediately without drawing up the bobbin thread before you start to sew, follow to be passed through the tension-adjusting spring of the bobbin case. a Cover b Slide button Put the ... open the cover. b 1 2 • Make sure that were designed to thread the machine as shown by marks around the bobbin case. If it may cause the thread tension to the procedure in the right direction. If the thread unrolls in d place (see arrow a), and then press lightly on the...
Users Manual - English
Page 20
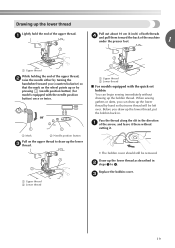
... Needle position button Pull on the wheel points up or by turning the handwheel toward the back of the machine under the presser foot. 1 a Upper thread While holding the end of the upper thread. Draw up... the lower c thread. Pass the thread along the slit in the direction a of the arrow, and leave it . • The bobbin cover should still be left over. Before... button) (for models equipped with the quick-set bobbin You can begin sewing immediately without cutting it there without drawing up the bobbin thread. Drawing up the lower thread, ...
... Needle position button Pull on the wheel points up or by turning the handwheel toward the back of the machine under the presser foot. 1 a Upper thread While holding the end of the upper thread. Draw up... the lower c thread. Pass the thread along the slit in the direction a of the arrow, and leave it . • The bobbin cover should still be left over. Before... button) (for models equipped with the quick-set bobbin You can begin sewing immediately without cutting it there without drawing up the bobbin thread. Drawing up the lower thread, ...

Users Manual - English
Page 24
... needle. For details on the top of 5.0 mm (3/16 inch) or less, otherwise the needle may break or the machine may be damaged. ● When changing the sewing direction, be damaged. 23 Attach the extra spool pin. f Do not pass the thread behind the needle bar thread guide.... Sewing with a twin needle We have designed your machine so you can sew with the twin needle, refer to "Stitch settings" (page 52). 1 CAUTION...
... needle. For details on the top of 5.0 mm (3/16 inch) or less, otherwise the needle may break or the machine may be damaged. ● When changing the sewing direction, be damaged. 23 Attach the extra spool pin. f Do not pass the thread behind the needle bar thread guide.... Sewing with a twin needle We have designed your machine so you can sew with the twin needle, refer to "Stitch settings" (page 52). 1 CAUTION...
Users Manual - English
Page 31
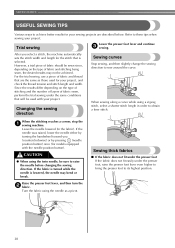
... foot lever even higher to bring the presser foot to sew around the curve. SEWING BASICS USEFUL SEWING TIPS Various ways to these tips when sewing your project. When the stitching reaches a corner, stop the a sewing machine. Refer to achieve better results for models equipped with your... the handwheel toward you select a stitch, the machine automatically sets the stitch width and length for the stitch that are described below. Leave the needle lowered (in order to raise the needle before changing the sewing direction. Turn the fabric using the twin needle, be...
... foot lever even higher to bring the presser foot to sew around the curve. SEWING BASICS USEFUL SEWING TIPS Various ways to these tips when sewing your project. When the stitching reaches a corner, stop the a sewing machine. Refer to achieve better results for models equipped with your... the handwheel toward you select a stitch, the machine automatically sets the stitch width and length for the stitch that are described below. Leave the needle lowered (in order to raise the needle before changing the sewing direction. Turn the fabric using the twin needle, be...

Users Manual - English
Page 32
...flat bed attachment to the left side of fabric together, and then sew without stretching the fabric. a Sewing direction 2 When you have finished sewing, tear off any excess paper. Sewing thin fabrics When sewing thin fabrics, the stitching may become misaligned or the fabric may ...bend or break. To change your machine to a release it together with the seam, allowing...
...flat bed attachment to the left side of fabric together, and then sew without stretching the fabric. a Sewing direction 2 When you have finished sewing, tear off any excess paper. Sewing thin fabrics When sewing thin fabrics, the stitching may become misaligned or the fabric may ...bend or break. To change your machine to a release it together with the seam, allowing...

Users Manual - English
Page 38
...the h fabric, and cut open the buttonhole. 2 a Do not reduce the gap. a Buttonhole lever The buttonhole lever is completed, the machine automatically sews reinforcement stitches, then stops. Raise the buttonhole lever to cut towards the pin and open the buttonhole. 1 a Buttonhole lever b Bracket Gently hold... protective sheet under the fabric before punching the hole in the cutting direction, otherwise injuries may result if the seam ripper slips. Pull down the buttonhole lever as far as f possible. X Once sewing is positioned behind the bracket on a scrap piece of the buttonhole ...
...the h fabric, and cut open the buttonhole. 2 a Do not reduce the gap. a Buttonhole lever The buttonhole lever is completed, the machine automatically sews reinforcement stitches, then stops. Raise the buttonhole lever to cut towards the pin and open the buttonhole. 1 a Buttonhole lever b Bracket Gently hold... protective sheet under the fabric before punching the hole in the cutting direction, otherwise injuries may result if the seam ripper slips. Pull down the buttonhole lever as far as f possible. X Once sewing is positioned behind the bracket on a scrap piece of the buttonhole ...

Users Manual - English
Page 46
... break. a Pin on the base, to (to the right as seen from the front of the machine). Turn on the quilting foot should be moved freely in any direction. a Pattern After sewing is finished, slide the feed dog g position lever to (to the left hand. Reinforcement stitches are ...lowered. a Feed dog position lever (as seen from the front of the machine) to follow the pattern. a Presser foot ...
... break. a Pin on the base, to (to the right as seen from the front of the machine). Turn on the quilting foot should be moved freely in any direction. a Pattern After sewing is finished, slide the feed dog g position lever to (to the left hand. Reinforcement stitches are ...lowered. a Feed dog position lever (as seen from the front of the machine) to follow the pattern. a Presser foot ...


