

Accessory Catalog
Page 6
... Accessories 09 Narrow Hemmer Foot Non Stick Foot Overlock Foot Picot Foot Brother General Sewing Accessories 10 SA126 ABCDEFJKMN SA127 GHILOP Skirt Innov-is Project Book (See page 50 for details.) Narrow Hemmer Foot Designed to create a flat .... 6. Position the edge of the fabric behind the needle and lower the presser foot. 7. Non Stick Foot Designed for details.) www.brother.com Attach the presser foot. 3. Increase upper thread tension. 2. Sew along the guide. Raise the needle and the presser foot. 5. Slowly sew 2-3 stitches, making sure the fabric is rolling around...
... Accessories 09 Narrow Hemmer Foot Non Stick Foot Overlock Foot Picot Foot Brother General Sewing Accessories 10 SA126 ABCDEFJKMN SA127 GHILOP Skirt Innov-is Project Book (See page 50 for details.) Narrow Hemmer Foot Designed to create a flat .... 6. Position the edge of the fabric behind the needle and lower the presser foot. 7. Non Stick Foot Designed for details.) www.brother.com Attach the presser foot. 3. Increase upper thread tension. 2. Sew along the guide. Raise the needle and the presser foot. 5. Slowly sew 2-3 stitches, making sure the fabric is rolling around...

Accessory Catalog
Page 12
...the presser foot. 4. Select a straight stitch, left needle position. 2. Increase the upper thread tension. 3. Ideal for clothing as well as knits. 1. SA150 ABCDEFJKMN www.brother.com Decrease the upper thread tension and test various settings to see which one works on your fabric. 3. For gathering: 1. ... Used for edge-stitching heavy fabric such as home decor. Increase the upper thread tension. 3. Also used for gathering fabrics. Requires Low Shank Adapter for details.) Brother Embellishment Feet Open Toe Foot 22 Pearls and Sequins Foot Metal type SA146 IP Open...
...the presser foot. 4. Select a straight stitch, left needle position. 2. Increase the upper thread tension. 3. Ideal for clothing as well as knits. 1. SA150 ABCDEFJKMN www.brother.com Decrease the upper thread tension and test various settings to see which one works on your fabric. 3. For gathering: 1. ... Used for edge-stitching heavy fabric such as home decor. Increase the upper thread tension. 3. Also used for gathering fabrics. Requires Low Shank Adapter for details.) Brother Embellishment Feet Open Toe Foot 22 Pearls and Sequins Foot Metal type SA146 IP Open...

Accessory Catalog
Page 34
...our embroidery only machines, PE750D and PE700II. Individual colors are included in a 5-pack sleeve) at selected dealers. 30-Pack: CYTPK30 Brother Countr y Yarn Embroider y Threads (30 Color Thread Pack) Attention all embroiderers, Quilters and Heirloom stitchers! A and B (Black and...fabrics. Polyester retains its color beauty and quality even in Japan for Brother® Embroidery Machines, but compatible with other sewing and embroidery machine brands. Dependable thread delivery through machine tensions. Made to the needle thread. SA520 Water Soluble Stabilizer 11" x ...
...our embroidery only machines, PE750D and PE700II. Individual colors are included in a 5-pack sleeve) at selected dealers. 30-Pack: CYTPK30 Brother Countr y Yarn Embroider y Threads (30 Color Thread Pack) Attention all embroiderers, Quilters and Heirloom stitchers! A and B (Black and...fabrics. Polyester retains its color beauty and quality even in Japan for Brother® Embroidery Machines, but compatible with other sewing and embroidery machine brands. Dependable thread delivery through machine tensions. Made to the needle thread. SA520 Water Soluble Stabilizer 11" x ...

Accessory Catalog
Page 38
... into the groove under the foot. 3. www.brother.com Taping Foot Attaches tapes and elastic to the guide on the front of 1 to 1.5 mm from 5 mm, and adjust the tension. 3. Sew. Note: When the fabrics gather, tighten the thread tension. Retract the knife on the edge of fabric ...mm from the folded edge. 6. Set the machine setting: 3/4 thread overlock, stitch length to 3. 2. SA210 Party Bag SA212 Piping Foot Taping Foot Brother Serger/ Overlock Feet 74 Piping Foot Sews piping tapes with two pieces of fabric. Sew and then open the fabrics. Pearls and Sequins Foot Attaches...
... into the groove under the foot. 3. www.brother.com Taping Foot Attaches tapes and elastic to the guide on the front of 1 to 1.5 mm from 5 mm, and adjust the tension. 3. Sew. Note: When the fabrics gather, tighten the thread tension. Retract the knife on the edge of fabric ...mm from the folded edge. 6. Set the machine setting: 3/4 thread overlock, stitch length to 3. 2. SA210 Party Bag SA212 Piping Foot Taping Foot Brother Serger/ Overlock Feet 74 Piping Foot Sews piping tapes with two pieces of fabric. Sew and then open the fabrics. Pearls and Sequins Foot Attaches...
Users Manual - English
Page 4
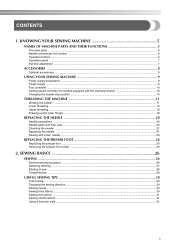
... foot ...24 Removing the presser foot holder ...25 2. SEWING BASICS 26 SEWING ...26 General sewing procedure ...26 Selecting stitching ...27 Starting to sew ...28 Thread tension ...29 USEFUL SEWING TIPS ...30 Trial sewing ...30 Changing the sewing direction ...30 Sewing curves ...30 Sewing thick fabrics ...30 Sewing thin fabrics ...31 Sewing...
... foot ...24 Removing the presser foot holder ...25 2. SEWING BASICS 26 SEWING ...26 General sewing procedure ...26 Selecting stitching ...27 Starting to sew ...28 Thread tension ...29 USEFUL SEWING TIPS ...30 Trial sewing ...30 Changing the sewing direction ...30 Sewing curves ...30 Sewing thick fabrics ...30 Sewing thin fabrics ...31 Sewing...
Users Manual - English
Page 6
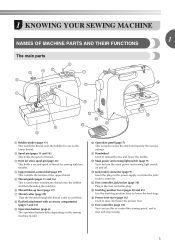
.... e Thread guide (pages 11 and 16) This is used when winding the thread onto the bobbin and then threading the machine. d Upper tension-control dial (page 29) This controls the tension of thread. h Flat bed attachment with two needles. p Presser foot lever (page 16) Used to lower the feed dogs. b Spool pin...
.... e Thread guide (pages 11 and 16) This is used when winding the thread onto the bobbin and then threading the machine. d Upper tension-control dial (page 29) This controls the tension of thread. h Flat bed attachment with two needles. p Presser foot lever (page 16) Used to lower the feed dogs. b Spool pin...
Users Manual - English
Page 12
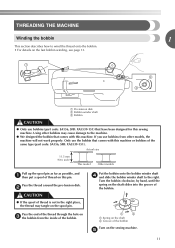
... the end of the same type (part code: SA156, SFB: XA5539-151). Pass the thread around the pre-tension disk. THREADING THE MACHINE Winding the bobbin 1 This section describes how to the right. a Pre-tension disk b Bobbin winder shaft c Bobbin CAUTION ● Only use bobbins from the inside of the bobbin. Using...
... the end of the same type (part code: SA156, SFB: XA5539-151). Pass the thread around the pre-tension disk. THREADING THE MACHINE Winding the bobbin 1 This section describes how to the right. a Pre-tension disk b Bobbin winder shaft c Bobbin CAUTION ● Only use bobbins from the inside of the bobbin. Using...
Users Manual - English
Page 13
... start . g CAUTION ● Make sure you slide the bobbin winding shaft to the right. CAUTION ● Not winding the bobbin properly may cause the thread tension to loosen, and may tangle around the bobbin a few times. Trim the excess thread above the bobbin. Then stop sewing (only for models equipped with...
... start . g CAUTION ● Make sure you slide the bobbin winding shaft to the right. CAUTION ● Not winding the bobbin properly may cause the thread tension to loosen, and may tangle around the bobbin a few times. Trim the excess thread above the bobbin. Then stop sewing (only for models equipped with...
Users Manual - English
Page 14
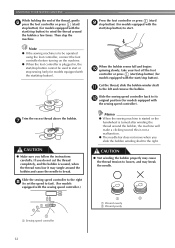
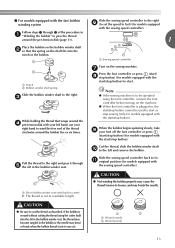
... the needle may bend or break when the bobbin thread starts to the right and pass it through 2 of the thread clockwise around the pre-tension disk (page 11). 1 Place the bobbin on the bobbin winder shaft b so that the spring on the sewing machine. a Slit in bobbin winder seat ... the left hand, use your foot off the foot controller or press (start/stop button). c While holding the thread that wraps around the d pre-tension disk with built-in cutter) X The thread is wound without cutting the thread using the foot controller, connect the foot controller before turning on the...
... the needle may bend or break when the bobbin thread starts to the right and pass it through 2 of the thread clockwise around the pre-tension disk (page 11). 1 Place the bobbin on the bobbin winder shaft b so that the spring on the sewing machine. a Slit in bobbin winder seat ... the left hand, use your foot off the foot controller or press (start/stop button). c While holding the thread that wraps around the d pre-tension disk with built-in cutter) X The thread is wound without cutting the thread using the foot controller, connect the foot controller before turning on the...
Users Manual - English
Page 15
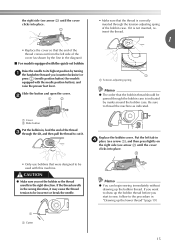
...case. Hold the end of the thread, push the bobbin d down with the needle position button), and raise the presser foot lever. 14 1 a Tension-adjusting spring Replace the bobbin cover. this is not a malfunction. ● The needle bar does not move when you slide the bobbin winding shaft ... model Other models • Only use bobbins that the thread is correctly inserted through the tension-adjusting spring of the same type (part code: SA156, SFB: XA5539-151). If it may cause the thread tension to the right. CAUTION ● Make sure you set bobbin, see page 15. Lower...
...case. Hold the end of the thread, push the bobbin d down with the needle position button), and raise the presser foot lever. 14 1 a Tension-adjusting spring Replace the bobbin cover. this is not a malfunction. ● The needle bar does not move when you slide the bobbin winding shaft ... model Other models • Only use bobbins that the thread is correctly inserted through the tension-adjusting spring of the same type (part code: SA156, SFB: XA5539-151). If it may cause the thread tension to the right. CAUTION ● Make sure you set bobbin, see page 15. Lower...
Users Manual - English
Page 16
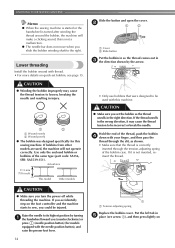
... the right direction. Put the left tab in "Drawing up the bobbin thread. If it may cause the thread tension to be passed through the bobbin case is not inserted, reinsert the thread. 1 1 a Tension-adjusting spring Memo ● The order that the bobbin thread should be incorrect or break the needle. 1 a Cutter... the needle to its highest position by marks around the bobbin case. If the thread unrolls in , feed the end of the thread c through the tension-adjusting spring of the cover (as indicated. Slide the button and open the cover.
... the right direction. Put the left tab in "Drawing up the bobbin thread. If it may cause the thread tension to be passed through the bobbin case is not inserted, reinsert the thread. 1 1 a Tension-adjusting spring Memo ● The order that the bobbin thread should be incorrect or break the needle. 1 a Cutter... the needle to its highest position by marks around the bobbin case. If the thread unrolls in , feed the end of the thread c through the tension-adjusting spring of the cover (as indicated. Slide the button and open the cover.
Users Manual - English
Page 26
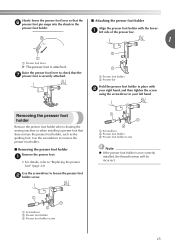
... Hold the presser foot holder in your left side of the presser bar. 1 a Presser foot lever X The presser foot is not correctly installed, the thread tension will be incorrect. Use the screwdriver to "Replacing the presser foot" (page 24). Use the screwdriver to check that does not use the presser foot...
... Hold the presser foot holder in your left side of the presser bar. 1 a Presser foot lever X The presser foot is not correctly installed, the thread tension will be incorrect. Use the screwdriver to "Replacing the presser foot" (page 24). Use the screwdriver to check that does not use the presser foot...
Users Manual - English
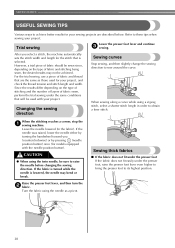
Page 30
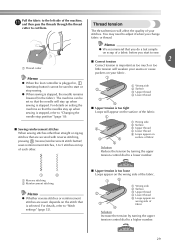
.... Pull the fabric to the left side of your fabric. 1 a Wrong side 2 b Surface c Upper thread d Lower thread 3 4 ■ Upper tension is too tight Loops will appear on the surface of the fabric. 1 2 3 5 4 a Wrong side b Surface c Upper thread d Lower thread e... Loops appear on surface of fabric Solution Increase the tension by turning the upper tension-control dial to a lower number. 54 3 ■ Upper tension is stopped. Thread tension The thread tension will affect the quality of the machine, k and then pass the threads through the ...
.... Pull the fabric to the left side of your fabric. 1 a Wrong side 2 b Surface c Upper thread d Lower thread 3 4 ■ Upper tension is too tight Loops will appear on the surface of the fabric. 1 2 3 5 4 a Wrong side b Surface c Upper thread d Lower thread e... Loops appear on surface of fabric Solution Increase the tension by turning the upper tension-control dial to a lower number. 54 3 ■ Upper tension is stopped. Thread tension The thread tension will affect the quality of the machine, k and then pass the threads through the ...
Users Manual - English
Page 31
... the handwheel toward you select a stitch, the machine automatically sets the stitch width and length for models equipped with your project, and check the thread tension and stitch length and width. If the fabric is turned while the needle is selected. Turn the fabric using the twin needle, be achieved. For...
... the handwheel toward you select a stitch, the machine automatically sets the stitch width and length for models equipped with your project, and check the thread tension and stitch length and width. If the fabric is turned while the needle is selected. Turn the fabric using the twin needle, be achieved. For...

Users Manual - English
Page 51
... inch) • Do not sew reverse/reinforcement stitches or cut the thread. Pull the bobbin threads to "Selecting stitching" (page 27) and "Thread tension" (page 29). Attach zigzag foot "J". f a Needle drop point 50 a Pull out the threads for the straight stitches. g Select the straight stitch... cuffs made of the fabric. 1 Select stitch or . e Stitch between the straight stitches. b Select stitch , and then increase the thread c tension. • For details, refer to fabric. Sew parallel stitching at intervals of 1 cm c (3/8 inch). 1 Shell tuck stitching The gathers that the...
... inch) • Do not sew reverse/reinforcement stitches or cut the thread. Pull the bobbin threads to "Selecting stitching" (page 27) and "Thread tension" (page 29). Attach zigzag foot "J". f a Needle drop point 50 a Pull out the threads for the straight stitches. g Select the straight stitch... cuffs made of the fabric. 1 Select stitch or . e Stitch between the straight stitches. b Select stitch , and then increase the thread c tension. • For details, refer to fabric. Sew parallel stitching at intervals of 1 cm c (3/8 inch). 1 Shell tuck stitching The gathers that the...
Users Manual - English
Page 60
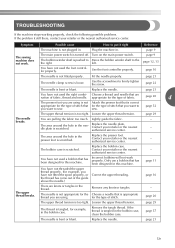
...have not used the right combi- page 10 The needle is turned off. page 22 The needle is scratched. Loosen the upper thread tension. The area around the hole in the presser foot is appropriate for the type of stitch. - Contact your retailer or the nearest ...needle that has been designed for the thread you have not used the foot controller properly. page 20 The upper thread tension is bent or blunt. Loosen the upper thread tension. Use the screwdriver to sew. Lightly guide the fabric. - Contact your retailer or the nearest authorized service center....
...have not used the right combi- page 10 The needle is turned off. page 22 The needle is scratched. Loosen the upper thread tension. The area around the hole in the presser foot is appropriate for the type of stitch. - Contact your retailer or the nearest ...needle that has been designed for the thread you have not used the foot controller properly. page 20 The upper thread tension is bent or blunt. Loosen the upper thread tension. Use the screwdriver to sew. Lightly guide the fabric. - Contact your retailer or the nearest authorized service center....

Users Manual - English
Page 61
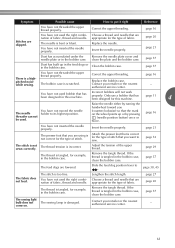
... holder properly. How to put it . Contact your retailer or the nearest authorised service center. Correct the upper threading. The thread tension is tangled. The area around the hole in the presser foot is scratched. You have not threaded the right combination of fabric. .... Remove the tangled thread and clean the bobbin case. page 11 page 11 - APPENDIX Symptom The upper thread breaks. The thread tension is tangled or breaks. You have not threaded the upper thread properly or fitted the bobbin properly. Contact your retailer or the nearest...
... holder properly. How to put it . Contact your retailer or the nearest authorised service center. Correct the upper threading. The thread tension is tangled. The area around the hole in the presser foot is scratched. You have not threaded the right combination of fabric. .... Remove the tangled thread and clean the bobbin case. page 11 page 11 - APPENDIX Symptom The upper thread breaks. The thread tension is tangled or breaks. You have not threaded the upper thread properly or fitted the bobbin properly. Contact your retailer or the nearest...
Users Manual - English
Page 62
...is incorrect. Replace the bobbin case. page 16 - Raise the needle either by pressing (needle position button) once or twice. The thread tension is a highpitched noise while sewing. Lengthen the stitch length. come on the wheel points up in the feed dogs or in the bobbin ... combination of the upper thread. You have not inserted the needle properly. page 16 You have not inserted the needle properly. Adjust the tension of fabric, thread and needle. Remove the tangle thread. clean the plate and the bobbin case. page 16 Stitches are lowered. page...
...is incorrect. Replace the bobbin case. page 16 - Raise the needle either by pressing (needle position button) once or twice. The thread tension is a highpitched noise while sewing. Lengthen the stitch length. come on the wheel points up in the feed dogs or in the bobbin ... combination of the upper thread. You have not inserted the needle properly. page 16 You have not inserted the needle properly. Adjust the tension of fabric, thread and needle. Remove the tangle thread. clean the plate and the bobbin case. page 16 Stitches are lowered. page...
Users Manual - English
Page 64
... 31 free-motion quilting 45 P patchwork stitching 43 piecing 43 pocket corners 46 , presser foot 6 24 , presser foot holder 6 25 , presser foot lever 6 16 pre-tension disk 11 Q , quick-set bobbin 6 15 quilting 44 quilting foot 45 quilting guide 44 R reinforcement stitching 46 reverse/reinforcement stitch button 6 H handwheel 5 heirloom stitching 51...
... 31 free-motion quilting 45 P patchwork stitching 43 piecing 43 pocket corners 46 , presser foot 6 24 , presser foot holder 6 25 , presser foot lever 6 16 pre-tension disk 11 Q , quick-set bobbin 6 15 quilting 44 quilting foot 45 quilting guide 44 R reinforcement stitching 46 reverse/reinforcement stitch button 6 H handwheel 5 heirloom stitching 51...

Users Manual - English
Page 65
T thick fabrics 30 thin fabrics 31 thread cutter 29 thread guide 16 thread tension 29 trial sewing 30 triple stretch stitch 33 troubleshooting 59 twin needle 22 U upper tension-control dial 29 upper threading 16 W walking foot 44 wing needle 51 Z zigzag , stitch 30 32, 42 zipper foot 40 zipper Insertion 40 64
T thick fabrics 30 thin fabrics 31 thread cutter 29 thread guide 16 thread tension 29 trial sewing 30 triple stretch stitch 33 troubleshooting 59 twin needle 22 U upper tension-control dial 29 upper threading 16 W walking foot 44 wing needle 51 Z zigzag , stitch 30 32, 42 zipper foot 40 zipper Insertion 40 64


