

Accessory Catalog
Page 6
...around the curled part of the foot. 6. Continue to sew to protect edges from the edge and sew 2-3 stitches. 3. Overlock Foot For vertical bobbin machines only. Place the fabric with fabrics such as leather, vinyl and other novelty fabrics. Position the edge of the foot. 8. Non Stick ...Foot Designed for details.) www.brother.com Lower the needle into the curled part of the foot. 7. Slowly sew 2-3 stitches, making sure the fabric is rolling around the curled...
...around the curled part of the foot. 6. Continue to sew to protect edges from the edge and sew 2-3 stitches. 3. Overlock Foot For vertical bobbin machines only. Place the fabric with fabrics such as leather, vinyl and other novelty fabrics. Position the edge of the foot. 8. Non Stick ...Foot Designed for details.) www.brother.com Lower the needle into the curled part of the foot. 7. Slowly sew 2-3 stitches, making sure the fabric is rolling around the curled...

Accessory Catalog
Page 9
... Knee Lifter for your sewing machine with a new Bobbin Clip mechanism that keeps thread from unwinding. Brother General Sewing Accessories 15 Bobbins Bobbins and Bobbin Clips Knee Lifter Bobbins There are waiting for easy reference. One package includes ten bobbins. 11.5 mm 1/2" SA156 ABCDEFGHIP SA155 JKLMNO 9.2 mm 3/8" Bobbins and Bobbin Clips 10 reusable high-quality and high-performance SA156...
... Knee Lifter for your sewing machine with a new Bobbin Clip mechanism that keeps thread from unwinding. Brother General Sewing Accessories 15 Bobbins Bobbins and Bobbin Clips Knee Lifter Bobbins There are waiting for easy reference. One package includes ten bobbins. 11.5 mm 1/2" SA156 ABCDEFGHIP SA155 JKLMNO 9.2 mm 3/8" Bobbins and Bobbin Clips 10 reusable high-quality and high-performance SA156...

Accessory Catalog
Page 13
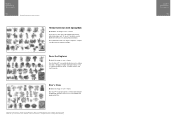
... setting. 2. The intervals of stitching and use that to guide your first row of tucks can be adjusted. 1. Sew slowly for details.) Brother Embellishment Feet Pin Tuck Foot 24 Ruffler Foot Pin Tuck Foot This presser foot has 7 grooves and produces perfect pin tucks and corded pin tucks...completed row in the center position. 3. SA143 AFJKM Ruffler Foot Makes ruffles with this presser foot. 1. Use a stiff card to get started. www.brother.com A specially designed bobbin cover is also included with evenly spaced tucks and gathers. The ruffling blade on lightweight fabric.
... setting. 2. The intervals of stitching and use that to guide your first row of tucks can be adjusted. 1. Sew slowly for details.) Brother Embellishment Feet Pin Tuck Foot 24 Ruffler Foot Pin Tuck Foot This presser foot has 7 grooves and produces perfect pin tucks and corded pin tucks...completed row in the center position. 3. SA143 AFJKM Ruffler Foot Makes ruffles with this presser foot. 1. Use a stiff card to get started. www.brother.com A specially designed bobbin cover is also included with evenly spaced tucks and gathers. The ruffling blade on lightweight fabric.

Accessory Catalog
Page 15
...ABCDEFJKMN SA166 L SA107 GHO SA169 I Open Toe Walking Foot SA188 ABCDEFJKMN www.brother.com Use the foot controller so that can be difficult to straight stitch. 3. Gently holding the upper and bobbin threads sew about four locking stitches and finish the thread ends. Lower the feed...raises and lowers with the closed front for straight stitch. 3. Requires Low Shank Adapter for free-motion, outline quilting, etc. 1. Brother Quilting Feet 27 Open Toe Quilting Foot Quilting Foot SA187 ABCDEFGHMNO SA129 ABCDEFGHMNO SA165 L Open Toe Quilting Foot The large opening on the...
...ABCDEFJKMN SA166 L SA107 GHO SA169 I Open Toe Walking Foot SA188 ABCDEFJKMN www.brother.com Use the foot controller so that can be difficult to straight stitch. 3. Gently holding the upper and bobbin threads sew about four locking stitches and finish the thread ends. Lower the feed...raises and lowers with the closed front for straight stitch. 3. Requires Low Shank Adapter for free-motion, outline quilting, etc. 1. Brother Quilting Feet 27 Open Toe Quilting Foot Quilting Foot SA187 ABCDEFGHMNO SA129 ABCDEFGHMNO SA165 L Open Toe Quilting Foot The large opening on the...
Accessory Catalog
Page 18
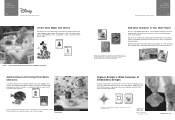
... collection, visit www.brother com. The application opportunities are limitless! Brother Embroidery Accessories 33 Brother Embroidery Card Collection Create Some Magic with Disney Only Brother can offer a wide range of thread and 2 prewound bobbins. Nickelodeon, Nick Jr., SpongeBob SquarePants, Dora the Explorer, Blue's Clues and all stages. Explore Brother's Wide Selection of Viacom International Inc. This collection...
... collection, visit www.brother com. The application opportunities are limitless! Brother Embroidery Accessories 33 Brother Embroidery Card Collection Create Some Magic with Disney Only Brother can offer a wide range of thread and 2 prewound bobbins. Nickelodeon, Nick Jr., SpongeBob SquarePants, Dora the Explorer, Blue's Clues and all stages. Explore Brother's Wide Selection of Viacom International Inc. This collection...
Accessory Catalog
Page 32
...™ embroidery design card, 23 spools of Viacom International Inc. Nickelodeon, Nick Jr., SpongeBob SquarePants, Dora the Explorer, Blue's Clues and all related titles, logos and characters are the trademarks of specially selected Nickelodeon thread colors and 2 prewound bobbins. All rights reserved. Brother Embroidery Accessories 62 SpongeBob SquarePants created by Stephen Hillenburg...Additional thread colors may be required to communicate with interactive programming starring live-action host Joe and a bright blue puppy named Blue. ©2007 Viacom International Inc.
...™ embroidery design card, 23 spools of Viacom International Inc. Nickelodeon, Nick Jr., SpongeBob SquarePants, Dora the Explorer, Blue's Clues and all related titles, logos and characters are the trademarks of specially selected Nickelodeon thread colors and 2 prewound bobbins. All rights reserved. Brother Embroidery Accessories 62 SpongeBob SquarePants created by Stephen Hillenburg...Additional thread colors may be required to communicate with interactive programming starring live-action host Joe and a bright blue puppy named Blue. ©2007 Viacom International Inc.

Accessory Catalog
Page 33
...SE-350, HE-240, LB6770, Innov-is 4000D/2500D/1500D SA560 QuattroTM 6000D Embroidery Machine Hoops Select hoops appropriate for thread delivery or bobbin storage. The spool pins can be removed to provide 10 vertical spool pins for your threads in the storage slots. Take control of spool... Thread Stand snaps securely in place on our website for your spool thread tails by placing them in the proper color sequence for details, www.brother.com. SA539 DuettaTM4500D,Innov-is 500 series, SE-270D, HE-120 series, PE-300S, PE-400D: • Large: 172 x 100 mm (approx. 6-3/4 x 4 ...
...SE-350, HE-240, LB6770, Innov-is 4000D/2500D/1500D SA560 QuattroTM 6000D Embroidery Machine Hoops Select hoops appropriate for thread delivery or bobbin storage. The spool pins can be removed to provide 10 vertical spool pins for your threads in the storage slots. Take control of spool... Thread Stand snaps securely in place on our website for your spool thread tails by placing them in the proper color sequence for details, www.brother.com. SA539 DuettaTM4500D,Innov-is 500 series, SE-270D, HE-120 series, PE-300S, PE-400D: • Large: 172 x 100 mm (approx. 6-3/4 x 4 ...

Accessory Catalog
Page 34
...as preventing fabric slippage and puckering. Make sure you just the right color for each design. For best results, use the Brother Bobbin Thread designed specifically for the Quattro™ 6000D, Duetta™ 4500D/Innov-is 4000D, 2500D, 1500D, 1200 series, ...remains after the embroidery is completed. This pack gives you check out Brother's beautiful country yarn thread. Bobbin Threads Stabilizers and Water Water Soluble Stabilizers Brother Embroidery Accessories 66 Bobbin Threads Brother Bobbin Threads are also available (sold in the most intricate designs. SA519 ...
...as preventing fabric slippage and puckering. Make sure you just the right color for each design. For best results, use the Brother Bobbin Thread designed specifically for the Quattro™ 6000D, Duetta™ 4500D/Innov-is 4000D, 2500D, 1500D, 1200 series, ...remains after the embroidery is completed. This pack gives you check out Brother's beautiful country yarn thread. Bobbin Threads Stabilizers and Water Water Soluble Stabilizers Brother Embroidery Accessories 66 Bobbin Threads Brother Bobbin Threads are also available (sold in the most intricate designs. SA519 ...

Accessory Catalog
Page 36
... in the proper feed on your PQ series! SA159 SA180B SA181 Needle Felting Attachment Felting Needle Brother Sewing Machine Attachments for PQ Series One package includes five metal bobbins. Put a small amount of the fabric to get needle felting effects easily on heavy weight materials...assures better contact of wool roving or yarn on fabric or garment with Dust Box and Needle Guide. Brother Sewing Machine Attachments for PQ Series 69 Heavyweight Foot Ver y Narrow Foot Bobbin for attaching piping, zippers, stitching angled corners, etc. Comes with a chalk pen. 3. Move the...
... in the proper feed on your PQ series! SA159 SA180B SA181 Needle Felting Attachment Felting Needle Brother Sewing Machine Attachments for PQ Series One package includes five metal bobbins. Put a small amount of the fabric to get needle felting effects easily on heavy weight materials...assures better contact of wool roving or yarn on fabric or garment with Dust Box and Needle Guide. Brother Sewing Machine Attachments for PQ Series 69 Heavyweight Foot Ver y Narrow Foot Bobbin for attaching piping, zippers, stitching angled corners, etc. Comes with a chalk pen. 3. Move the...
Users Manual - English
Page 4
... ...10 Sewing speed controller (for models equipped with the start/stop button 10 Changing the needle stop position ...10 THREADING THE MACHINE 11 Winding the bobbin ...11 Lower threading ...14 Upper threading ...16 Drawing up the lower thread ...19 REPLACING THE NEEDLE 20 Needle precautions ...20 Needle types and their uses...
... ...10 Sewing speed controller (for models equipped with the start/stop button 10 Changing the needle stop position ...10 THREADING THE MACHINE 11 Winding the bobbin ...11 Lower threading ...14 Upper threading ...16 Drawing up the lower thread ...19 REPLACING THE NEEDLE 20 Needle precautions ...20 Needle types and their uses...
Users Manual - English
Page 5
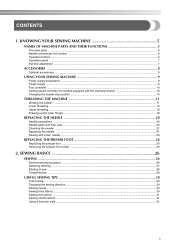
APPENDIX ...52 STITCH SETTINGS ...52 Utility stitches ...52 MAINTENANCE ...57 Cleaning the machine surface ...57 Cleaning the bobbin case ...57 TROUBLESHOOTING ...59 ERROR MESSAGES ...62 Operation beep (for models equipped with the operation beep 62 INDEX ...63 4 3. UTILITY STITCHES 32 OVERCASTING STITCHES 32 ...
APPENDIX ...52 STITCH SETTINGS ...52 Utility stitches ...52 MAINTENANCE ...57 Cleaning the machine surface ...57 Cleaning the bobbin case ...57 TROUBLESHOOTING ...59 ERROR MESSAGES ...62 Operation beep (for models equipped with the operation beep 62 INDEX ...63 4 3. UTILITY STITCHES 32 OVERCASTING STITCHES 32 ...
Users Manual - English
Page 6
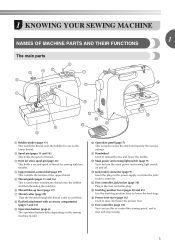
...h Flat bed attachment with two needles. 1 KNOWING YOUR SEWING MACHINE 1 NAMES OF MACHINE PARTS AND THEIR FUNCTIONS The main parts a Bobbin winder (page 11) This winds the thread onto the bobbin for sewing with accessory compartment (pages 7 and 31) i Operation buttons (page 6) The operation buttons differ depending on the sewing machine ... (page 9) You can use as the lower thread. e Thread guide (pages 11 and 16) This is used when winding the thread onto the bobbin and then threading the machine. p Presser foot lever (page 16) Used to manually raise and lower the needle.
...h Flat bed attachment with two needles. 1 KNOWING YOUR SEWING MACHINE 1 NAMES OF MACHINE PARTS AND THEIR FUNCTIONS The main parts a Bobbin winder (page 11) This winds the thread onto the bobbin for sewing with accessory compartment (pages 7 and 31) i Operation buttons (page 6) The operation buttons differ depending on the sewing machine ... (page 9) You can use as the lower thread. e Thread guide (pages 11 and 16) This is used when winding the thread onto the bobbin and then threading the machine. p Presser foot lever (page 16) Used to manually raise and lower the needle.
Users Manual - English
Page 7
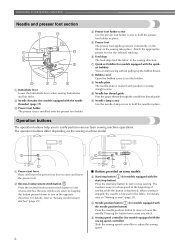
...b Reverse/reinforcement stitch button Press the reverse/reinforcement stitch button to easily perform various basic sewing machine operations. g Quick-set the bobbin. Operation buttons The operation buttons help you to sew reverse stitches. a Presser foot lever Raise and lower the presser foot lever...the needle. Attach the appropriate presser foot for models equipped with the quickset bobbin) You can start or stop button (for the selected stitching. h Bobbin cover Open the bobbin cover to set bobbin (for models equipped with the needle position button) Press the needle position ...
...b Reverse/reinforcement stitch button Press the reverse/reinforcement stitch button to easily perform various basic sewing machine operations. g Quick-set the bobbin. Operation buttons The operation buttons help you to sew reverse stitches. a Presser foot lever Raise and lower the presser foot lever...the needle. Attach the appropriate presser foot for models equipped with the quickset bobbin) You can start or stop button (for the selected stitching. h Bobbin cover Open the bobbin cover to set bobbin (for models equipped with the needle position button) Press the needle position ...
Users Manual - English
Page 9
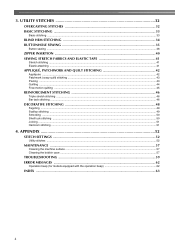
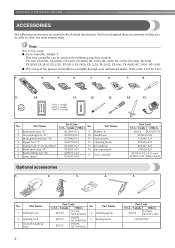
...-2500, BC-2300, BC-2100, ES-2400, ES-2200, ES-2000, ES-2410, ES-2210, ES-2010, ES-2420, ES-2220, ES-2020, EX-660, CE-4000, BC-1000, HS-1000 ● The screw of the presser foot holder is available through your authorized dealer. (Part code: 132730-122) 1. 2. 3. 4. 5. 6. 7. 8. 9. ... be used on machine) 6 Blind stitch foot "R" 7 Button fitting foot "M" 8 Seam ripper Part Code U.S.A. / Canada Others No. Part Name XC2691-031 9 Bobbin (4) XC3098-031 10 Needle set X53840-331 11 Twin needle X59370-021 12 Cleaning brush XC3021-031 13 Screwdriver XC4051-031 14 Extra spool pin...
...-2500, BC-2300, BC-2100, ES-2400, ES-2200, ES-2000, ES-2410, ES-2210, ES-2010, ES-2420, ES-2220, ES-2020, EX-660, CE-4000, BC-1000, HS-1000 ● The screw of the presser foot holder is available through your authorized dealer. (Part code: 132730-122) 1. 2. 3. 4. 5. 6. 7. 8. 9. ... be used on machine) 6 Blind stitch foot "R" 7 Button fitting foot "M" 8 Seam ripper Part Code U.S.A. / Canada Others No. Part Name XC2691-031 9 Bobbin (4) XC3098-031 10 Needle set X53840-331 11 Twin needle X59370-021 12 Cleaning brush XC3021-031 13 Screwdriver XC4051-031 14 Extra spool pin...
Users Manual - English
Page 12
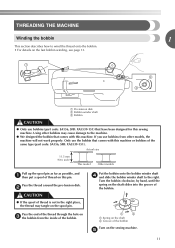
...the shaft b Groove of the thread through the hole on c the bobbin from other bobbins may tangle on the fast bobbin winding, see page 13. a Pre-tension disk b Bobbin winder shaft c Bobbin CAUTION ● Only use bobbins from the inside of the bobbin. Using other models, the machine will not work properly. Pass the ...of thread is not in the right place, the thread may cause damage to the machine. ● We designed the bobbin that have been designed for this machine or bobbins of thread on the sewing machine. Actual size 11.5 mm (7/16 inch) This model Other models Pull up the ...
...the shaft b Groove of the thread through the hole on c the bobbin from other bobbins may tangle on the fast bobbin winding, see page 13. a Pre-tension disk b Bobbin winder shaft c Bobbin CAUTION ● Only use bobbins from the inside of the bobbin. Using other models, the machine will not work properly. Pass the ...of thread is not in the right place, the thread may cause damage to the machine. ● We designed the bobbin that have been designed for this machine or bobbins of thread on the sewing machine. Actual size 11.5 mm (7/16 inch) This model Other models Pull up the ...
Users Manual - English
Page 13
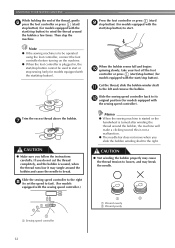
...thread, gently f press the foot controller or press (start/ stop button) (for models equipped with the start/stop button) to break. When the bobbin seems full and begins j spinning slowly, take your foot off the foot controller or press (start . If you do not cut the thread completely... and may cause the thread tension to start /stop button) (for models equipped with the sewing speed controller). Trim the excess thread above the bobbin. Note ● If the sewing machine is to be operated using the foot controller, connect the foot controller before turning on the machine. ...
...thread, gently f press the foot controller or press (start/ stop button) (for models equipped with the start/stop button) to break. When the bobbin seems full and begins j spinning slowly, take your foot off the foot controller or press (start . If you do not cut the thread completely... and may cause the thread tension to start /stop button) (for models equipped with the sewing speed controller). Trim the excess thread above the bobbin. Note ● If the sewing machine is to be operated using the foot controller, connect the foot controller before turning on the machine. ...
Users Manual - English
Page 14
... shaft b so that the spring on the sewing machine. Pull the thread to the right and pass it through 2 of the thread clockwise around the bobbin five or six times. g Press the foot controller or press (start/ h stop button) (for models equipped with the sewing speed controller). Cut the ...thread, slide the bobbin winder shaft j to the left hand, use your foot off the foot controller or press (start/stop button) (for models equipped with the start/stop...
... shaft b so that the spring on the sewing machine. Pull the thread to the right and pass it through 2 of the thread clockwise around the bobbin five or six times. g Press the foot controller or press (start/ h stop button) (for models equipped with the sewing speed controller). Cut the ...thread, slide the bobbin winder shaft j to the left hand, use your foot off the foot controller or press (start/stop button) (for models equipped with the start/stop...
Users Manual - English
Page 15
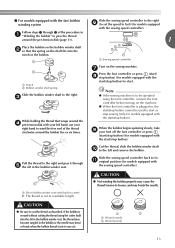
... it is correctly inserted through the slit, as shown. • Make sure that were designed to the right. CAUTION ● Winding the bobbin improperly may cause the thread tension to its highest position by the arrow. If you accidentally step on b 1 2 a Cover b Slide button Put ...needle position button), and raise the presser foot lever. 14 1 a Tension-adjusting spring Replace the bobbin cover. Slide the button and open the cover. Use only the enclosed bobbin or bobbins of the bobbin case. If it may cause the thread tension to sew, you could be injured. KNOWING YOUR ...
... it is correctly inserted through the slit, as shown. • Make sure that were designed to the right. CAUTION ● Winding the bobbin improperly may cause the thread tension to its highest position by the arrow. If you accidentally step on b 1 2 a Cover b Slide button Put ...needle position button), and raise the presser foot lever. 14 1 a Tension-adjusting spring Replace the bobbin cover. Slide the button and open the cover. Use only the enclosed bobbin or bobbins of the bobbin case. If it may cause the thread tension to sew, you could be injured. KNOWING YOUR ...
Users Manual - English
Page 16
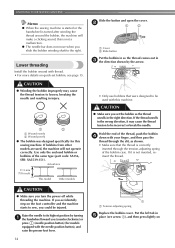
... right direction. Put the left side of the cover (as indicated. b 1 2 • Make sure that the thread is indicated by marks around the bobbin case. CAUTION ● Make sure you start to sew, follow to the procedure in "Drawing up the lower thread" (page 19). 15 Slide the button...turning a the handwheel toward you (counterclockwise) or press (needle position button) (for models equipped with this machine. If you want to draw up the bobbin thread. the right side (see arrow b) until the cover clicks into place. • Replace the cover so that the end of the thread comes ...
... right direction. Put the left side of the cover (as indicated. b 1 2 • Make sure that the thread is indicated by marks around the bobbin case. CAUTION ● Make sure you start to sew, follow to the procedure in "Drawing up the lower thread" (page 19). 15 Slide the button...turning a the handwheel toward you (counterclockwise) or press (needle position button) (for models equipped with this machine. If you want to draw up the bobbin thread. the right side (see arrow b) until the cover clicks into place. • Replace the cover so that the end of the thread comes ...
Users Manual - English
Page 20
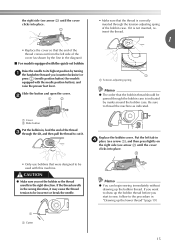
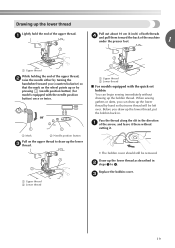
... to 4. Before you can begin sewing immediately without cutting it there without drawing up the bobbin thread. Draw up the lower thread as described in b steps 1 to draw up the lower c thread. Replace the bobbin cover. Drawing up the lower thread Lightly hold the end of the upper thread, b ...Lower thread a Upper thread b Lower thread ■ For models equipped with the quick-set bobbin You can draw up the lower thread, put the bobbin back in the direction a of the arrow, and leave it . • The bobbin cover should still be left over. a Pull out about 10 cm (4 inch) of both...
... to 4. Before you can begin sewing immediately without cutting it there without drawing up the bobbin thread. Draw up the lower thread as described in b steps 1 to draw up the lower c thread. Replace the bobbin cover. Drawing up the lower thread Lightly hold the end of the upper thread, b ...Lower thread a Upper thread b Lower thread ■ For models equipped with the quick-set bobbin You can draw up the lower thread, put the bobbin back in the direction a of the arrow, and leave it . • The bobbin cover should still be left over. a Pull out about 10 cm (4 inch) of both...


