

Accessory Catalog
Page 7
... (3/4'') long in the seam line of fabrics. Selecting a stitch designated for perfect topstitching on the needle plate with all Brother presser feet. SA160 ABCDEFGHJKLMNO Straight Stitch Foot Straight Stitch Foot and Straight Stitch Needle Plate Vertical Stitching Alignment Foot Brother General Sewing Accessories 12 Straight Stitch Foot For precise straight stitching on thin fabrics or on...
... (3/4'') long in the seam line of fabrics. Selecting a stitch designated for perfect topstitching on the needle plate with all Brother presser feet. SA160 ABCDEFGHJKLMNO Straight Stitch Foot Straight Stitch Foot and Straight Stitch Needle Plate Vertical Stitching Alignment Foot Brother General Sewing Accessories 12 Straight Stitch Foot For precise straight stitching on thin fabrics or on...

Accessory Catalog
Page 40
.... Set T1/T2 presser foot. 2. The stitches are always smooth. 1. Attaching 6 mm (approx. 1/4") bias tape: Use the small bias tape sliding plate with the LC1 presser foot included in the machine. 2. Open the seams. 4. Sew as folding them. Align the fabric joint and the groove of fabric...tab on the bias tape attachment into the guide. 4. Set up your machine for a chain stitch, the center needle. 2. Fold fabric and set it is easily set through the holder). 4. Brother Cover Stitch Feet 77 Bias Tape Binding Set Hemming Set Bias Tape Binding Set Attaches 6 or 12 mm (approx....
.... Set T1/T2 presser foot. 2. The stitches are always smooth. 1. Attaching 6 mm (approx. 1/4") bias tape: Use the small bias tape sliding plate with the LC1 presser foot included in the machine. 2. Open the seams. 4. Sew as folding them. Align the fabric joint and the groove of fabric...tab on the bias tape attachment into the guide. 4. Set up your machine for a chain stitch, the center needle. 2. Fold fabric and set it is easily set through the holder). 4. Brother Cover Stitch Feet 77 Bias Tape Binding Set Hemming Set Bias Tape Binding Set Attaches 6 or 12 mm (approx....
Users Manual - English
Page 7
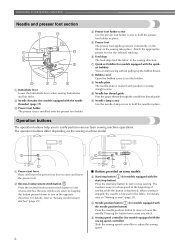
... lever when sewing buttonholes and bar tacks. The operation buttons differ depending on the fabric as the sewing takes place. g Quick-set the bobbin. i Needle plate The needle plate is lowered in place. b Reverse/reinforcement stitch button Press the reverse/reinforcement stitch button to raise and lower the presser foot. e Presser foot The presser...
... lever when sewing buttonholes and bar tacks. The operation buttons differ depending on the fabric as the sewing takes place. g Quick-set the bobbin. i Needle plate The needle plate is lowered in place. b Reverse/reinforcement stitch button Press the reverse/reinforcement stitch button to raise and lower the presser foot. e Presser foot The presser...

Users Manual - English
Page 47
... to sew" (page 28). Attach buttonhole foot "A". Pattern Presser Foot 70 stitches model 60 stitches model 50 stitches model 40 stitches model Twin Needle Walking Foot Reverse/ Reinforcement Stitching Stitch Name Pattern No. c • For details, refer to "Starting to strain, such as sleeve holes,....)] Stitch Length [mm (inch.)] Auto Manual Auto Manual Triple stretch stitch Attaching sleeves, sew- a Select stitch . a Set the button guide plate on buttonhole foot "A" to the desired length. (The distance between the markings on the presser foot scale is described below.
... to sew" (page 28). Attach buttonhole foot "A". Pattern Presser Foot 70 stitches model 60 stitches model 50 stitches model 40 stitches model Twin Needle Walking Foot Reverse/ Reinforcement Stitching Stitch Name Pattern No. c • For details, refer to "Starting to strain, such as sleeve holes,....)] Stitch Length [mm (inch.)] Auto Manual Auto Manual Triple stretch stitch Attaching sleeves, sew- a Select stitch . a Set the button guide plate on buttonhole foot "A" to the desired length. (The distance between the markings on the presser foot scale is described below.
Users Manual - English
Page 58
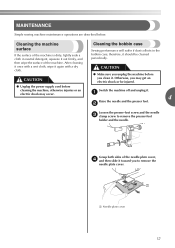
...it . CAUTION ● Make sure you to remove the presser-foot holder and the needle. b Loosen the presser-foot screw and the needle c clamp screw to remove the needle plate cover. Grasp both sides of the needle plate cover, d and then slide it again with a wet cloth, wipe it toward you... shock may get an electric shock or be injured. ● Unplug the power supply cord before you may occur. a 4 Raise the needle and the presser foot. CAUTION Sewing performance will suffer if dust collects in neutral detergent, squeeze it . Otherwise, you clean it should be...
...it . CAUTION ● Make sure you to remove the presser-foot holder and the needle. b Loosen the presser-foot screw and the needle c clamp screw to remove the needle plate cover. Grasp both sides of the needle plate cover, d and then slide it again with a wet cloth, wipe it toward you... shock may get an electric shock or be injured. ● Unplug the power supply cord before you may occur. a 4 Raise the needle and the presser foot. CAUTION Sewing performance will suffer if dust collects in neutral detergent, squeeze it . Otherwise, you clean it should be...
Users Manual - English
Page 59
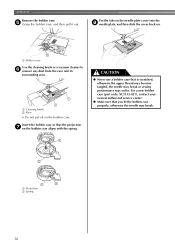
...spring. 1 CAUTION ● Never use a bobbin case that you fit the bobbin case properly, otherwise the needle may suffer. For a new bobbin case (part code: XC3152-021), contact your nearest authorized service center.... ● Make sure that is scratched, otherwise the upper thread may become tangled, the needle may break or sewing performance may break. 2 1 2 a Projection b Spring 58 e Grasp the bobbin case, and... bobbin case. Put the tabs on the needle plate cover into the h needle plate, and then slide the cover back on the bobbin case.
...spring. 1 CAUTION ● Never use a bobbin case that you fit the bobbin case properly, otherwise the needle may suffer. For a new bobbin case (part code: XC3152-021), contact your nearest authorized service center.... ● Make sure that is scratched, otherwise the upper thread may become tangled, the needle may break or sewing performance may break. 2 1 2 a Projection b Spring 58 e Grasp the bobbin case, and... bobbin case. Put the tabs on the needle plate cover into the h needle plate, and then slide the cover back on the bobbin case.
Users Manual - English
Page 60
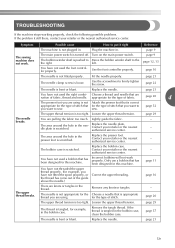
... screw is too tight. Use the screwdriver to the the right. page 52 The upper thread tension is loose. Replace the needle plate. The area around the hole in the presser foot is scratched. Contact your retailer or the nearest authorised service center. authorized service ... possible problems. If the problem it right Reference The machine is not plugged in . page 10 The needle is bent or blunt. Replace the needle. The area around the hole in the needle plate is scratched. Replace the presser foot. You have not fitted the spool properly, or the thread has...
... screw is too tight. Use the screwdriver to the the right. page 52 The upper thread tension is loose. Replace the needle plate. The area around the hole in the presser foot is scratched. Contact your retailer or the nearest authorised service center. authorized service ... possible problems. If the problem it right Reference The machine is not plugged in . page 10 The needle is bent or blunt. Replace the needle. The area around the hole in the needle plate is scratched. Replace the presser foot. You have not fitted the spool properly, or the thread has...

Users Manual - English
Page 61
...not used the right combination of fabric. You have not inserted the needle properly. Replace the needle plate. Incorrect bobbins will not work properly. Fit the spool properly. Choose a thread and needle that has been designed for the type of fabric, thread and needle. Reference page 21 - - - The area around the hole ...page 11 page 20 page 25 page 29 page 11 page 14, 15 page 14, 15, 16 - The area around the hole in the needle plate is set incorrectly. Replace the presser foot. Only use a bobbin that has been designed for this machine. Wind the bobbin thread properly. You ...
...not used the right combination of fabric. You have not inserted the needle properly. Replace the needle plate. Incorrect bobbins will not work properly. Fit the spool properly. Choose a thread and needle that has been designed for the type of fabric, thread and needle. Reference page 21 - - - The area around the hole ...page 11 page 20 page 25 page 29 page 11 page 14, 15 page 14, 15, 16 - The area around the hole in the needle plate is set incorrectly. Replace the presser foot. Only use a bobbin that has been designed for this machine. Wind the bobbin thread properly. You ...
Users Manual - English
Page 62
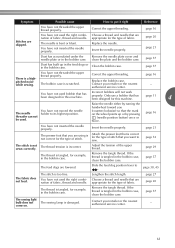
... the mark on . clean the plate and the bobbin case. Correct the upper threading. page 16 - You have not moved the needle The needle holder to . page 11 4 You have not used the right combination of fabric, thread and needle. Adjust the tension of fabric. If the thread is tangled, for example, in ...is tangled in the bobbin case. page 38, 45 The fabric does not feed. page 20 page 21 Dust has accumulated under the Remove the needle plate cover and needle plate or in the bobbin case, clean the bobbin case. Remove the tangle thread. You have not inserted the...
... the mark on . clean the plate and the bobbin case. Correct the upper threading. page 16 - You have not moved the needle The needle holder to . page 11 4 You have not used the right combination of fabric, thread and needle. Adjust the tension of fabric. If the thread is tangled, for example, in ...is tangled in the bobbin case. page 38, 45 The fabric does not feed. page 20 page 21 Dust has accumulated under the Remove the needle plate cover and needle plate or in the bobbin case, clean the bobbin case. Remove the tangle thread. You have not inserted the...
Users Manual - English
Page 64
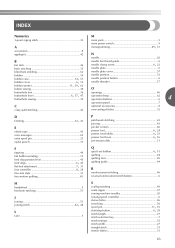
... 14 57 , bobbin cover 6 14 bobbin , winder 11 59, 62 button sewing 38 needle bar thread guide 6 , needle clamp screw 6 22 needle plate 6 needle plate cover 57 needle position 33 needle position button 6 needle threader 17 O buttonhole foot 36 openings 46 buttonhole , lever 6 37, 47 buttonhole sewing ... handwheel 5 heirloom stitching 51 J joining 51 , joining stitch 42 48 L LCD 7 S scallop stitching 49 seam ripper 37 sewing machine needles 20 sewing speed controller 6 sleeve holes 46 smocking 50 , spool pin 11 16 , start/stop button 6 28 stitch length 27 stitch ...
... 14 57 , bobbin cover 6 14 bobbin , winder 11 59, 62 button sewing 38 needle bar thread guide 6 , needle clamp screw 6 22 needle plate 6 needle plate cover 57 needle position 33 needle position button 6 needle threader 17 O buttonhole foot 36 openings 46 buttonhole , lever 6 37, 47 buttonhole sewing ... handwheel 5 heirloom stitching 51 J joining 51 , joining stitch 42 48 L LCD 7 S scallop stitching 49 seam ripper 37 sewing machine needles 20 sewing speed controller 6 sleeve holes 46 smocking 50 , spool pin 11 16 , start/stop button 6 28 stitch length 27 stitch ...

