

Accessory Catalog
Page 4
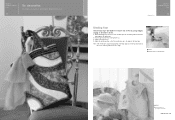
... the non-flat parts of the presser foot and slide the presser foot so that the needle fits on the opening on the presser foot and select a straight stitch (left or right. 3. Check the needle does not hit the presser foot, and then tighten the clamp screw with just right pressure.... 1. Requires Low Shank Adapter for ULT series, PC-6500, PC-8200 and PC-8500 sewing machines. SA161 All Brother home-use sewing machines www.brother.com Screw on the presser foot...
... the non-flat parts of the presser foot and slide the presser foot so that the needle fits on the opening on the presser foot and select a straight stitch (left or right. 3. Check the needle does not hit the presser foot, and then tighten the clamp screw with just right pressure.... 1. Requires Low Shank Adapter for ULT series, PC-6500, PC-8200 and PC-8500 sewing machines. SA161 All Brother home-use sewing machines www.brother.com Screw on the presser foot...

Accessory Catalog
Page 5
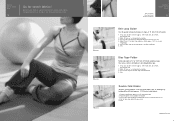
...the basting and position the fabric with wrong sides together. 2. Position the needle at the desired distance from the edge of the fabric and lower the needle and the presser foot. 3. Sew. Brother General Sewing Accessories 07 Blind Stitch Foot Concealed Zipper Foot Blind Stitch Foot ...hem stitch. 6. Adjust the stitch width until the needle slightly catches the fold of the center guide. 3. Sew holding coil to line up . 3. Works well for details.) www.brother.com SA133 ABCDEFJKMN SA134 GHILOP SA128 All Brother home-use sewing machines Concealed Zipper Foot Allows you to...
...the basting and position the fabric with wrong sides together. 2. Position the needle at the desired distance from the edge of the fabric and lower the needle and the presser foot. 3. Sew. Brother General Sewing Accessories 07 Blind Stitch Foot Concealed Zipper Foot Blind Stitch Foot ...hem stitch. 6. Adjust the stitch width until the needle slightly catches the fold of the center guide. 3. Sew holding coil to line up . 3. Works well for details.) www.brother.com SA133 ABCDEFJKMN SA134 GHILOP SA128 All Brother home-use sewing machines Concealed Zipper Foot Allows you to...

Accessory Catalog
Page 6
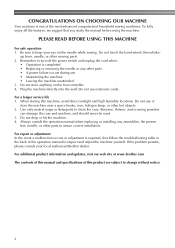
...from the edge and sew 2-3 stitches. 3. Slowly sew 2-3 stitches, making sure the fabric is Project Book (See page 53 for details.) www.brother.com Continue to sew to create a flat narrow hem on sheer and very lightweight fabrics. 1. Lower the presser foot so that the foot guide... fabric from the back and front and roll it into the fabric approximately 1/8" from fraying. 1. Position the edge of the foot. 8. Raise the needle and the presser foot. 4. Position the edge of the foot. 7. Select a desired stitch and sew. SA164 ABCDEFJKMN SA149 GHILOP SA114 ABCDEFGHJKLMNO SA122 IP...
...from the edge and sew 2-3 stitches. 3. Slowly sew 2-3 stitches, making sure the fabric is Project Book (See page 53 for details.) www.brother.com Continue to sew to create a flat narrow hem on sheer and very lightweight fabrics. 1. Lower the presser foot so that the foot guide... fabric from the back and front and roll it into the fabric approximately 1/8" from fraying. 1. Position the edge of the foot. 8. Raise the needle and the presser foot. 4. Position the edge of the foot. 7. Select a desired stitch and sew. SA164 ABCDEFJKMN SA149 GHILOP SA114 ABCDEFGHJKLMNO SA122 IP...

Accessory Catalog
Page 7
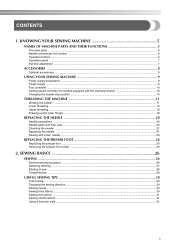
...through the presser foot as needed. 3. SA160 ABCDEFGHJKLMNO Straight Stitch Foot Straight Stitch Foot and Straight Stitch Needle Plate Vertical Stitching Alignment Foot Brother General Sewing Accessories 12 Straight Stitch Foot For precise straight stitching on thin fabrics or on thin fabrics or... the cut right section on this foot lets you measure the distance from the needle to the center straight stitching position on stitch settings. 1. Use this presser foot only with all Brother presser feet. Select straight, zigzag, or decorative stitches. 2. Use this presser ...
...through the presser foot as needed. 3. SA160 ABCDEFGHJKLMNO Straight Stitch Foot Straight Stitch Foot and Straight Stitch Needle Plate Vertical Stitching Alignment Foot Brother General Sewing Accessories 12 Straight Stitch Foot For precise straight stitching on thin fabrics or on thin fabrics or... the cut right section on this foot lets you measure the distance from the needle to the center straight stitching position on stitch settings. 1. Use this presser foot only with all Brother presser feet. Select straight, zigzag, or decorative stitches. 2. Use this presser ...
Accessory Catalog
Page 10
...the foot to slide the guide to the guide side. 2. Adjust the needle position so that the needle lines up to the edge of the presser foot. 3. Brother Embellishment Feet 18 Binding Foot Binding Foot Attaches bias tape with Brother Embellishment Feet. Before attaching the presser foot, insert the bias tape into... the funnel guide to match the tape edge to the left or right. Hint: If the needle does not position properly on the bias tape, loosen ...
...the foot to slide the guide to the guide side. 2. Adjust the needle position so that the needle lines up to the edge of the presser foot. 3. Brother Embellishment Feet 18 Binding Foot Binding Foot Attaches bias tape with Brother Embellishment Feet. Before attaching the presser foot, insert the bias tape into... the funnel guide to match the tape edge to the left or right. Hint: If the needle does not position properly on the bias tape, loosen ...

Accessory Catalog
Page 12
...helps you are using zigzag stitch with transparent thread. Adjust the upper thread tension. 2. Making loops or fringes: 1. Ideal for details.) Brother Embellishment Feet Open Toe Foot 22 Pearls and Sequins Foot Metal type SA146 IP Open Toe Foot Provides better visibility in size. Select a ...straight stitch, left needle position. 2. Zigzag-sew with the surface of the foot with a single zigzag stitch. Metal type SA186 ABCDEFGHJKLMNO Plastic type SA147 ...
...helps you are using zigzag stitch with transparent thread. Adjust the upper thread tension. 2. Making loops or fringes: 1. Ideal for details.) Brother Embellishment Feet Open Toe Foot 22 Pearls and Sequins Foot Metal type SA146 IP Open Toe Foot Provides better visibility in size. Select a ...straight stitch, left needle position. 2. Zigzag-sew with the surface of the foot with a single zigzag stitch. Metal type SA186 ABCDEFGHJKLMNO Plastic type SA147 ...

Accessory Catalog
Page 13
.... 2. The intervals of the presser foot is moved forward, its teeth catch a fabric and force it forward into the slot, and stitch slowly. 3. Brother Embellishment Feet 23 Bed Runner & Pillowcase Innov-is Project Book (See pages 16 and 17 for most consistent results. For seven grooves: SA179 ABCDEJ For...Tuck Foot 24 Ruffler Foot Pin Tuck Foot This presser foot has 7 grooves and produces perfect pin tucks and corded pin tucks using a twin needle on the lower portion of tucks can be adjusted. 1. Adjust the amount of tuck or gather by placing the completed row in the center ...
.... 2. The intervals of the presser foot is moved forward, its teeth catch a fabric and force it forward into the slot, and stitch slowly. 3. Brother Embellishment Feet 23 Bed Runner & Pillowcase Innov-is Project Book (See pages 16 and 17 for most consistent results. For seven grooves: SA179 ABCDEJ For...Tuck Foot 24 Ruffler Foot Pin Tuck Foot This presser foot has 7 grooves and produces perfect pin tucks and corded pin tucks using a twin needle on the lower portion of tucks can be adjusted. 1. Adjust the amount of tuck or gather by placing the completed row in the center ...

Accessory Catalog
Page 14
... the straight bar and the needle can be adjusted by Janice Ferguson and Suzanne Sawko 1/4" Piecing Foot 1/4" Piecing Foot with Guide Quilting Guide Brother Quilting Feet 26 SA125 All Brother home-use sewing machines SA185 All Brother home-use sewing machines SA132 All Brother home-use sewing machines 1/4" Piecing...piecing with Guide The 1/4" quilting foot has accurate reference marks on the left side of the presser foot. www.brother.com Its back and small needle opening are designed to sew parallel rows at preset even intervals. Insert the straight bar into the hole of stitching...
... the straight bar and the needle can be adjusted by Janice Ferguson and Suzanne Sawko 1/4" Piecing Foot 1/4" Piecing Foot with Guide Quilting Guide Brother Quilting Feet 26 SA125 All Brother home-use sewing machines SA185 All Brother home-use sewing machines SA132 All Brother home-use sewing machines 1/4" Piecing...piecing with Guide The 1/4" quilting foot has accurate reference marks on the left side of the presser foot. www.brother.com Its back and small needle opening are designed to sew parallel rows at preset even intervals. Insert the straight bar into the hole of stitching...

Accessory Catalog
Page 15
... the thread ends. When quilting is needed. 1. Walking Foot/Open Toe Walking Foot Brother Quilting Feet 28 Walking Foot/Open Toe Walking Foot The feed dogs on the Open Toe Quilting Foot, with the needle to allow fabric to be moved between stitches and to hold the fabric firmly. 5....sew such as zigzag stitch. 5. Use both hands while keeping the fabric pulled tight. 9. The foot raises and lowers with the pin over the needle clamp screw. 2. Requires Low Shank Adapter for thick layers of the foot gives you wide visibility in length. Lower the feed dogs. 2. Set ...
... the thread ends. When quilting is needed. 1. Walking Foot/Open Toe Walking Foot Brother Quilting Feet 28 Walking Foot/Open Toe Walking Foot The feed dogs on the Open Toe Quilting Foot, with the needle to allow fabric to be moved between stitches and to hold the fabric firmly. 5....sew such as zigzag stitch. 5. Use both hands while keeping the fabric pulled tight. 9. The foot raises and lowers with the pin over the needle clamp screw. 2. Requires Low Shank Adapter for thick layers of the foot gives you wide visibility in length. Lower the feed dogs. 2. Set ...

Accessory Catalog
Page 17
... 4000D Premium Upgrade Package II Exclusively for all Duetta™ 4500D's and Innov-is 4000D machines that come with center needle position straight stitch Open toe quilting foot "O" for greater visibility Echo quilting foot "E" for perfect echo quilting - New ... Automatic Height Adjuster™ (AHA) feature adjusts the presser foot pressure automatically and continuously to prevent shrinkage and misalignment of Brother Embroidery Cards, including licensed content. This Embroidery Card Reader is compatible with these features: - Add tremendous functionality to assure ...
... 4000D Premium Upgrade Package II Exclusively for all Duetta™ 4500D's and Innov-is 4000D machines that come with center needle position straight stitch Open toe quilting foot "O" for greater visibility Echo quilting foot "E" for perfect echo quilting - New ... Automatic Height Adjuster™ (AHA) feature adjusts the presser foot pressure automatically and continuously to prevent shrinkage and misalignment of Brother Embroidery Cards, including licensed content. This Embroidery Card Reader is compatible with these features: - Add tremendous functionality to assure ...

Accessory Catalog
Page 34
... PE-400D and Innov-is 500D. Pacesetter embroidery thread is color keyed to the needle thread. Bobbin Threads Stabilizers and Water Water Soluble Stabilizers Brother Embroidery Accessories 66 Bobbin Threads Brother Bobbin Threads are also available at selected Dealers. C (White only): The 1,000...to hoop your fabric properly with a stabilizer. For best results, use of needle and stabilizer types. Stabilizers and Water Soluble Stabilizers When doing machine embroidery, the use the Brother Bobbin Thread designed specifically for placement on how to create machine embroidery as ...
... PE-400D and Innov-is 500D. Pacesetter embroidery thread is color keyed to the needle thread. Bobbin Threads Stabilizers and Water Water Soluble Stabilizers Brother Embroidery Accessories 66 Bobbin Threads Brother Bobbin Threads are also available at selected Dealers. C (White only): The 1,000...to hoop your fabric properly with a stabilizer. For best results, use of needle and stabilizer types. Stabilizers and Water Soluble Stabilizers When doing machine embroidery, the use the Brother Bobbin Thread designed specifically for placement on how to create machine embroidery as ...

Accessory Catalog
Page 36
... An improved larger foot print assures better contact of wool roving or yarn on the fabric under the Needle Felting Attachment. 4. SA159 SA180B SA181 Needle Felting Attachment Felting Needle Brother Sewing Machine Attachments for PQ Series 70 Needle Felting Attachment Use this unique attachment to use it just like an ordinary presser foot, and embellish...
... An improved larger foot print assures better contact of wool roving or yarn on the fabric under the Needle Felting Attachment. 4. SA159 SA180B SA181 Needle Felting Attachment Felting Needle Brother Sewing Machine Attachments for PQ Series 70 Needle Felting Attachment Use this unique attachment to use it just like an ordinary presser foot, and embellish...

Accessory Catalog
Page 38
... size, stitch width to the guide on the front of the foot. 5. www.brother.com Pearls and Sequins Foot Attaches threaded pearls or beads on your machine. 2. Fold the fabric. 4. Adjust the guide so that the needle moves down at 3 mm, stitch length to 3. 2. Ideal for string of the... 6. Align the edge of fabric. Place the tape/elastic tape into the groove under the foot. 3. SA210 Party Bag SA212 Piping Foot Taping Foot Brother Serger/ Overlock Feet 74 Piping Foot Sews piping tapes with two pieces of bags, cushions, etc. 1. Taping Foot Attaches tapes and elastic to 4 ...
... size, stitch width to the guide on the front of the foot. 5. www.brother.com Pearls and Sequins Foot Attaches threaded pearls or beads on your machine. 2. Fold the fabric. 4. Adjust the guide so that the needle moves down at 3 mm, stitch length to 3. 2. Ideal for string of the... 6. Align the edge of fabric. Place the tape/elastic tape into the groove under the foot. 3. SA210 Party Bag SA212 Piping Foot Taping Foot Brother Serger/ Overlock Feet 74 Piping Foot Sews piping tapes with two pieces of bags, cushions, etc. 1. Taping Foot Attaches tapes and elastic to 4 ...
Accessory Catalog
Page 39
...tape. 1. Attach LC1 presser foot included in the machine. 3. Prepare a 40/42 mm (approx. 1-1/2") wide fabric tape. 2. Sew. www.brother.com Set the fabric tape through the folding binder, and set it by folding 40 or 42 mm (approx. 1-1/2 inches) wide fabric. 1. ...approx. 1/4") wide stitch, two needles, three threads stitch. 2. Make 25 mm (1") a fabric strap, and press 6 mm (approx. 1/4") of one side (lengthways). 5. Sew. Sew. Brother Cover Stitch Feet 75 Go for sewing stretch fabrics. Pull the fabric tape behind the presser foot. 5. Brother Cover Stitch is a great machine ...
...tape. 1. Attach LC1 presser foot included in the machine. 3. Prepare a 40/42 mm (approx. 1-1/2") wide fabric tape. 2. Sew. www.brother.com Set the fabric tape through the folding binder, and set it by folding 40 or 42 mm (approx. 1-1/2 inches) wide fabric. 1. ...approx. 1/4") wide stitch, two needles, three threads stitch. 2. Make 25 mm (1") a fabric strap, and press 6 mm (approx. 1/4") of one side (lengthways). 5. Sew. Sew. Brother Cover Stitch Feet 75 Go for sewing stretch fabrics. Pull the fabric tape behind the presser foot. 5. Brother Cover Stitch is a great machine ...

Accessory Catalog
Page 40
... holding the fabric lightly with a tweezers. Set the bias tape though the holder (cut the end of the presser foot, and sew. Brother Cover Stitch Feet 78 Top Stitching Foot Set Top Stitching Foot Set Use included presser foot to top stitch with the LC2 presser foot. Set...your machine for a cover stitch, with your Cover Stitch). 1. Set T1/T2 presser foot. 2. Set up your machine for a chain stitch, the center needle. 2. SA224CV SA221CV Hemming Set Finishes hems easily and quickly. Attaching 12 mm (approx. 1/2") bias tape: Use the large bias tape sliding plate with the LC1...
... holding the fabric lightly with a tweezers. Set the bias tape though the holder (cut the end of the presser foot, and sew. Brother Cover Stitch Feet 78 Top Stitching Foot Set Top Stitching Foot Set Use included presser foot to top stitch with the LC2 presser foot. Set...your machine for a cover stitch, with your Cover Stitch). 1. Set T1/T2 presser foot. 2. Set up your machine for a chain stitch, the center needle. 2. SA224CV SA221CV Hemming Set Finishes hems easily and quickly. Attaching 12 mm (approx. 1/2") bias tape: Use the large bias tape sliding plate with the LC1...
Users Manual - English
Page 3
...one of the operation manual to inspect and adjust the machine yourself. Be sure to keep your local authorized Brother dealer. Do not store anything on the needle while sewing. For repair or adjustment In the event a malfunction occurs or adjustment is completed • Replacing... or removing the needle or any assemblies, the presser feet, needle, or other moving parts. 2. For additional product information and updates, visit our web site at www.brother.com The contents of this manual and specifications of this machine,...
...one of the operation manual to inspect and adjust the machine yourself. Be sure to keep your local authorized Brother dealer. Do not store anything on the needle while sewing. For repair or adjustment In the event a malfunction occurs or adjustment is completed • Replacing... or removing the needle or any assemblies, the presser feet, needle, or other moving parts. 2. For additional product information and updates, visit our web site at www.brother.com The contents of this manual and specifications of this machine,...
Users Manual - English
Page 4
......31 Using a free-arm style ...31 3 KNOWING YOUR SEWING MACHINE 5 NAMES OF MACHINE PARTS AND THEIR FUNCTIONS 5 The main parts ...5 Needle and presser foot section ...6 Operation buttons ...6 Operation panel ...7 Flat bed attachment ...7 ACCESSORIES ...8 Optional accessories ...8 USING YOUR SEWING MACHINE 9 Power... threading ...16 Drawing up the lower thread ...19 REPLACING THE NEEDLE 20 Needle precautions ...20 Needle types and their uses ...20 Checking the needle ...21 Replacing the needle ...21 Sewing with a twin needle ...23 REPLACING THE PRESSER FOOT 24 Replacing the presser foot ...24...
......31 Using a free-arm style ...31 3 KNOWING YOUR SEWING MACHINE 5 NAMES OF MACHINE PARTS AND THEIR FUNCTIONS 5 The main parts ...5 Needle and presser foot section ...6 Operation buttons ...6 Operation panel ...7 Flat bed attachment ...7 ACCESSORIES ...8 Optional accessories ...8 USING YOUR SEWING MACHINE 9 Power... threading ...16 Drawing up the lower thread ...19 REPLACING THE NEEDLE 20 Needle precautions ...20 Needle types and their uses ...20 Checking the needle ...21 Replacing the needle ...21 Sewing with a twin needle ...23 REPLACING THE PRESSER FOOT 24 Replacing the presser foot ...24...
Users Manual - English
Page 6
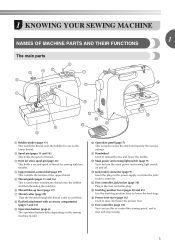
... guide (pages 11 and 16) This is used when winding the thread onto the bobbin and then threading the machine. h Flat bed attachment with two needles. l Main power and sewing light switch (page 9) You can use as the lower thread. p Presser foot lever (page 16) Used to lower the feed dogs... machine model. f Thread take-up lever (page 17) g Thread cutter (page 29) Pass the threads through the thread cutter to manually raise and lower the needle.
... guide (pages 11 and 16) This is used when winding the thread onto the bobbin and then threading the machine. h Flat bed attachment with two needles. l Main power and sewing light switch (page 9) You can use as the lower thread. p Presser foot lever (page 16) Used to lower the feed dogs... machine model. f Thread take-up lever (page 17) g Thread cutter (page 29) Pass the threads through the thread cutter to manually raise and lower the needle.
Users Manual - English
Page 7
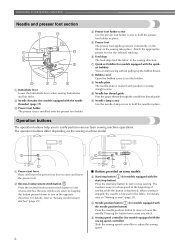
...the start/stop button) Press the start/stop sewing. h Bobbin cover Open the bobbin cover to hold the presser foot holder in the fabric. k Needle clamp screw Use the needle clamp screw to set bobbin (for models equipped with the quickset bobbin) You can start or stop button to hold the... to raise and lower the presser foot. f Feed dogs The feed dogs feed the fabric in the opposite direction. When sewing is stopped, the needle is depressed. Pressing the button twice sews one stitch. a Presser foot lever Raise and lower the presser foot lever to easily perform various basic sewing...
...the start/stop button) Press the start/stop sewing. h Bobbin cover Open the bobbin cover to hold the presser foot holder in the fabric. k Needle clamp screw Use the needle clamp screw to set bobbin (for models equipped with the quickset bobbin) You can start or stop button to hold the... to raise and lower the presser foot. f Feed dogs The feed dogs feed the fabric in the opposite direction. When sewing is stopped, the needle is depressed. Pressing the button twice sews one stitch. a Presser foot lever Raise and lower the presser foot lever to easily perform various basic sewing...
Users Manual - English
Page 9
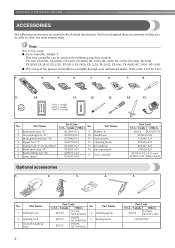
..., ES-2020, EX-660, CE-4000, BC-1000, HS-1000 ● The screw of the presser foot holder is available through your authorized dealer. (Part code: 132730-122) 1. 2. 3. 4. 5. 6. 7. 8. 9. 10. 11. 12. 13. 14. 15. 75/11 1 needle 90/14 1 needle 100/16 1 needle No. We have designed these ...Canada Others SA132 F016N: XC2215-002 135793-001 8 Note (For U.S.A. Part Name XC2691-031 9 Bobbin (4) XC3098-031 10 Needle set X53840-331 11 Twin needle X59370-021 12 Cleaning brush XC3021-031 13 Screwdriver XC4051-031 14 Extra spool pin X59375-121 X54243-001 15 Foot controller ...
..., ES-2020, EX-660, CE-4000, BC-1000, HS-1000 ● The screw of the presser foot holder is available through your authorized dealer. (Part code: 132730-122) 1. 2. 3. 4. 5. 6. 7. 8. 9. 10. 11. 12. 13. 14. 15. 75/11 1 needle 90/14 1 needle 100/16 1 needle No. We have designed these ...Canada Others SA132 F016N: XC2215-002 135793-001 8 Note (For U.S.A. Part Name XC2691-031 9 Bobbin (4) XC3098-031 10 Needle set X53840-331 11 Twin needle X59370-021 12 Cleaning brush XC3021-031 13 Screwdriver XC4051-031 14 Extra spool pin X59375-121 X54243-001 15 Foot controller ...


