
Users Manual - English
Page 16
... (MFC-7225N only 10-3 Laser safety 10-3 FDA regulations 10-3 Important safety instructions 10-4 Trademarks 10-5 Troubleshooting and routine maintenance Troubleshooting 11-1 Error messages 11-1 Checking if the machine has faxes in the United States only 10-1 Federal Communications Commission (FCC) Declaration of the machine 11-9 Paper is jammed inside the drum unit and...
... (MFC-7225N only 10-3 Laser safety 10-3 FDA regulations 10-3 Important safety instructions 10-4 Trademarks 10-5 Troubleshooting and routine maintenance Troubleshooting 11-1 Error messages 11-1 Checking if the machine has faxes in the United States only 10-1 Federal Communications Commission (FCC) Declaration of the machine 11-9 Paper is jammed inside the drum unit and...
Users Manual - English
Page 27
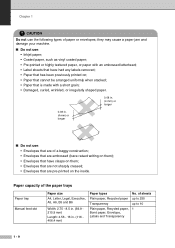
Chapter 1 CAUTION Do not use : • Envelopes that are of paper or envelopes; they may cause a paper jam and damage your machine. ■ Do not use: • Inkjet paper; • Coated paper, such as vinyl coated paper; • Pre-printed or highly textured paper, or paper with an embossed letterhead; • Label sheets that have had any labels removed...
Chapter 1 CAUTION Do not use : • Envelopes that are of paper or envelopes; they may cause a paper jam and damage your machine. ■ Do not use: • Inkjet paper; • Coated paper, such as vinyl coated paper; • Pre-printed or highly textured paper, or paper with an embossed letterhead; • Label sheets that have had any labels removed...
Users Manual - English
Page 28
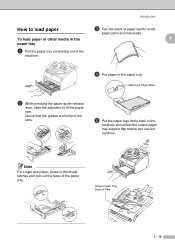
... support flap before you use the machine. Output Paper Tray Support Flap 1 - 10 Maximum Paper Mark 2 While pressing the paper guide release lever, slide the adjusters to avoid paper jams and mis-feeds. 1 1 Pull the paper tray completely out of the machine. 4 Put paper in the paper tray. Check that the guides are firmly in the slots. 5 Put...
... support flap before you use the machine. Output Paper Tray Support Flap 1 - 10 Maximum Paper Mark 2 While pressing the paper guide release lever, slide the adjusters to avoid paper jams and mis-feeds. 1 1 Pull the paper tray completely out of the machine. 4 Put paper in the paper tray. Check that the guides are firmly in the slots. 5 Put...
Users Manual - English
Page 29
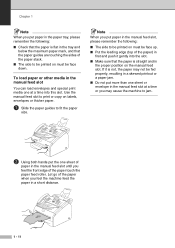
... feed slot You can load envelopes and special print media one sheet of paper in the tray and below the maximum paper mark, and that the paper is not, the paper may not be fed properly, resulting in a skewed printout or a paper jam. ■ Do not put more than one sheet or envelope in the manual... feed slot at a time or you may cause the machine to jam. 2 Using both hands put...
... feed slot You can load envelopes and special print media one sheet of paper in the tray and below the maximum paper mark, and that the paper is not, the paper may not be fed properly, resulting in a skewed printout or a paper jam. ■ Do not put more than one sheet or envelope in the manual... feed slot at a time or you may cause the machine to jam. 2 Using both hands put...
Users Manual - English
Page 35
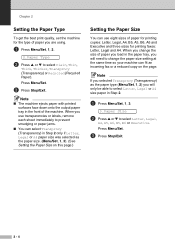
Press Menu/Set. 3 Press Stop/Exit. When you will need to prevent smudging or paper jams. ■ You can use eight sizes of paper for printing copies: Letter, Legal, A4, B5, A5, B6, A6 and Executive and three sizes for the type of the machine. Press Menu/Set. 3 Press... Stop/Exit. 2 - 4 Chapter 2 Setting the Paper Type To get the best print quality, set the machine for printing faxes: Letter, Legal and A4. Note ■ The machine ejects paper with printed surfaces face down onto the output paper tray in the paper tray, you will only be able to select Letter...
Press Menu/Set. 3 Press Stop/Exit. When you will need to prevent smudging or paper jams. ■ You can use eight sizes of paper for printing copies: Letter, Legal, A4, B5, A5, B6, A6 and Executive and three sizes for the type of the machine. Press Menu/Set. 3 Press... Stop/Exit. 2 - 4 Chapter 2 Setting the Paper Type To get the best print quality, set the machine for printing faxes: Letter, Legal and A4. Note ■ The machine ejects paper with printed surfaces face down onto the output paper tray in the paper tray, you will only be able to select Letter...
Users Manual - English
Page 92
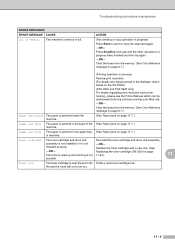
...paper tray (See Paper jams on page 11-7.) of machine. Paper Jam Tray The paper is jammed in progress have finished and then try again. -OR- installed properly. life and the toner will soon run out. 11 - 4 Replace the toner cartridge with a new one. (See -OR- Replacing the toner cartridge (TN-350) on the CD-ROM.) (FAX-2820 and FAX...of its Order a new toner cartridge now. assembly is not installed or it is full. Clear the faxes from the solutions.brother.com Web site. -OR- Troubleshooting and routine maintenance ERROR MESSAGES ERROR MESSAGE CAUSE Out of Memory The ...
...paper tray (See Paper jams on page 11-7.) of machine. Paper Jam Tray The paper is jammed in progress have finished and then try again. -OR- installed properly. life and the toner will soon run out. 11 - 4 Replace the toner cartridge with a new one. (See -OR- Replacing the toner cartridge (TN-350) on the CD-ROM.) (FAX-2820 and FAX...of its Order a new toner cartridge now. assembly is not installed or it is full. Clear the faxes from the solutions.brother.com Web site. -OR- Troubleshooting and routine maintenance ERROR MESSAGES ERROR MESSAGE CAUSE Out of Memory The ...

Users Manual - English
Page 95
.../Exit. 11 - 7 WARNING After you open the front cover or back cover of the machine, never touch the shaded parts shown in this section. Paper jams To clear paper jams, please follow the steps below. Document was not inserted or fed properly, or was too long 1 Open the control panel cover. Chapter 11 Document...
.../Exit. 11 - 7 WARNING After you open the front cover or back cover of the machine, never touch the shaded parts shown in this section. Paper jams To clear paper jams, please follow the steps below. Document was not inserted or fed properly, or was too long 1 Open the control panel cover. Chapter 11 Document...
Users Manual - English
Page 96
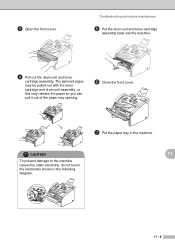
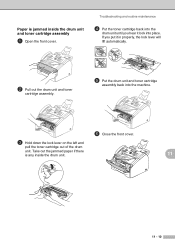
3 Open the front cover. CAUTION 11 To prevent damage to the machine caused by static electricity, do not touch the electrodes shown in the machine. Troubleshooting and routine maintenance 5 Put the drum unit and toner cartridge assembly back into the machine. 4 Pull out the drum unit and toner cartridge assembly. The jammed paper may be pulled out with the toner cartridge and drum unit assembly, or this may release the paper so you can pull it out of the paper tray opening. 6 Close the front cover. 7 Put the paper tray in the following diagram. 11 - 8
3 Open the front cover. CAUTION 11 To prevent damage to the machine caused by static electricity, do not touch the electrodes shown in the machine. Troubleshooting and routine maintenance 5 Put the drum unit and toner cartridge assembly back into the machine. 4 Pull out the drum unit and toner cartridge assembly. The jammed paper may be pulled out with the toner cartridge and drum unit assembly, or this may release the paper so you can pull it out of the paper tray opening. 6 Close the front cover. 7 Put the paper tray in the following diagram. 11 - 8
Users Manual - English
Page 97
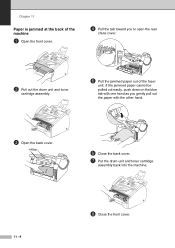
Chapter 11 Paper is jammed at the back of the fuser unit. If the jammed paper cannot be pulled out easily, push down on the blue tab with one hand as you to open the rear chute cover. 2 Pull out the drum unit and toner cartridge assembly. 5 Pull the jammed paper out of the machine 1 Open the front cover. 4 Pull the tab toward you gently pull out the paper with the other hand. 3 Open the back cover. 6 Close the back cover. 7 Put the drum unit and toner cartridge assembly back into the machine. 11 - 9 8 Close the front cover.
Chapter 11 Paper is jammed at the back of the fuser unit. If the jammed paper cannot be pulled out easily, push down on the blue tab with one hand as you to open the rear chute cover. 2 Pull out the drum unit and toner cartridge assembly. 5 Pull the jammed paper out of the machine 1 Open the front cover. 4 Pull the tab toward you gently pull out the paper with the other hand. 3 Open the back cover. 6 Close the back cover. 7 Put the drum unit and toner cartridge assembly back into the machine. 11 - 9 8 Close the front cover.
Users Manual - English
Page 98
Take out the jammed paper if there is jammed inside the drum unit. 11 11 - 10 If you hear it in properly, the lock lever will lift automatically. 2 Pull out the drum unit and ... into the machine. 6 Close the front cover. 3 Hold down the lock lever on the left and pull the toner cartridge out of the drum unit. Paper is any inside the drum unit and toner cartridge assembly 1 Open the front cover.
Take out the jammed paper if there is jammed inside the drum unit. 11 11 - 10 If you hear it in properly, the lock lever will lift automatically. 2 Pull out the drum unit and ... into the machine. 6 Close the front cover. 3 Hold down the lock lever on the left and pull the toner cartridge out of the drum unit. Paper is any inside the drum unit and toner cartridge assembly 1 Open the front cover.
Users Manual - English
Page 102
... mode is selected as , drivers for laser machines. (For information on page 1-8.) How can load envelopes from Adobe Illustrator When using . Cannot perform '2 in 1' or '4 in the File menu and select the Brother TWAIN driver. Check that the paper size setting in the application and in ...the printer 11 driver. Make sure the Brother TWAIN driver is not selected in the printer driver are using ATM fonts, some characters are missing or some characters are running automatically when you should Paper Jam. This is connected directly to print the envelope size ...
... mode is selected as , drivers for laser machines. (For information on page 1-8.) How can load envelopes from Adobe Illustrator When using . Cannot perform '2 in 1' or '4 in the File menu and select the Brother TWAIN driver. Check that the paper size setting in the application and in ...the printer 11 driver. Make sure the Brother TWAIN driver is not selected in the printer driver are using ATM fonts, some characters are missing or some characters are running automatically when you should Paper Jam. This is connected directly to print the envelope size ...
Users Manual - English
Page 153
... See Software User's Guide on the CD-ROM. J Jacks convert to RJ11 jack triplex adapter A-7 EXT external telephone A-5 TAD (answering machine A-5 Jams document 11-7 paper 11-7 L LCD (liquid crystal display B-1, B-2 Help List 7-2 M Macintosh® See Software User's Guide on the CD-ROM. O One-...lines A-7 two-line phone system A-7 Polling 4-5 Power failure B-1 Print difficulties 11-11 drivers S-5 fax from memory 4-5 from PC See Software User's Guide on the CD-ROM. PC Faxing See Software User's Guide on the CD-ROM. Maintenance, routine 11-21 Manual dialing 3-1 receive ...
... See Software User's Guide on the CD-ROM. J Jacks convert to RJ11 jack triplex adapter A-7 EXT external telephone A-5 TAD (answering machine A-5 Jams document 11-7 paper 11-7 L LCD (liquid crystal display B-1, B-2 Help List 7-2 M Macintosh® See Software User's Guide on the CD-ROM. O One-...lines A-7 two-line phone system A-7 Polling 4-5 Power failure B-1 Print difficulties 11-11 drivers S-5 fax from memory 4-5 from PC See Software User's Guide on the CD-ROM. PC Faxing See Software User's Guide on the CD-ROM. Maintenance, routine 11-21 Manual dialing 3-1 receive ...
Users Manual - English
Page 154
... 11-1 if you are having difficulty incoming calls 11-12 paper handling 11-14 paper jam 11-7 phone line 11-20 printer difficulties 11-13 printing 11-11, 11-13 paper jam 11-7 Two-line phone system A-7 V Volume, setting 2-5 beeper 2-5 handset 2-6 Volume Amplify for next fax 3-5 Ring Delay, setting 4-2 S Safety Instructions vii, 10-4 Setting Lock 2-12...
... 11-1 if you are having difficulty incoming calls 11-12 paper handling 11-14 paper jam 11-7 phone line 11-20 printer difficulties 11-13 printing 11-11, 11-13 paper jam 11-7 Two-line phone system A-7 V Volume, setting 2-5 beeper 2-5 handset 2-6 Volume Amplify for next fax 3-5 Ring Delay, setting 4-2 S Safety Instructions vii, 10-4 Setting Lock 2-12...
Quick Setup Guide - English
Page 6
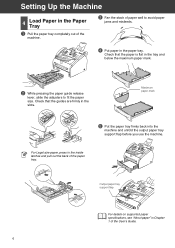
... For details on supported paper specifications, see "About paper" in the slots. Setting Up the Machine 4 Load Paper in the Paper Tray 1 Pull the paper tray completely out of the machine. 3 Fan the stack of paper well to avoid paper jams and misfeeds. 4 Put paper in the tray and below the maximum paper mark. 2 While pressing the paper guide release lever...
... For details on supported paper specifications, see "About paper" in the slots. Setting Up the Machine 4 Load Paper in the Paper Tray 1 Pull the paper tray completely out of the machine. 3 Fan the stack of paper well to avoid paper jams and misfeeds. 4 Put paper in the tray and below the maximum paper mark. 2 While pressing the paper guide release lever...


