
Operating Guide
Page 2
... Digital Theater Systems, Inc. This product incorporates copyright protected technology and other licensing restrictions and protections. Do not incinerate. Confidential Unpublished Works. ©1992-1997 Dolby Laboratories. "DTS" and "DTS Digital Surround" are located on the Important Safety Instructions sheet enclosed in this owner's guide carefully. Use of the U.S. and subject to use with arrowhead symbol, within an equilateral triangle, as lighted...
... Digital Theater Systems, Inc. This product incorporates copyright protected technology and other licensing restrictions and protections. Do not incinerate. Confidential Unpublished Works. ©1992-1997 Dolby Laboratories. "DTS" and "DTS Digital Surround" are located on the Important Safety Instructions sheet enclosed in this owner's guide carefully. Use of the U.S. and subject to use with arrowhead symbol, within an equilateral triangle, as lighted...
Operating Guide
Page 3
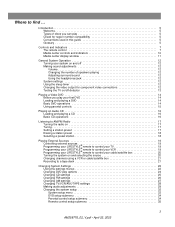
... can play 5 Check for region number compatibility 5 Conventions used in this guide 5 Glossary 5 Controls and Indicators 7 The remote control 7 Media center controls and indicators 10 Media center display window 11 General System Operation 12 Turning your system on and off 12 Making sound adjustments 12 Volume 12 Changing the number of speakers playing 12 Adjusting surround sound 12 Using the headphones jack 12 System settings 12 Using the sleep timer 12 Changing the video output for component video connections 12 Testing the TV on/off detector 13 Playing a Video DVD...
... can play 5 Check for region number compatibility 5 Conventions used in this guide 5 Glossary 5 Controls and Indicators 7 The remote control 7 Media center controls and indicators 10 Media center display window 11 General System Operation 12 Turning your system on and off 12 Making sound adjustments 12 Volume 12 Changing the number of speakers playing 12 Adjusting surround sound 12 Using the headphones jack 12 System settings 12 Using the sleep timer 12 Changing the video output for component video connections 12 Testing the TV on/off detector 13 Playing a Video DVD...

Operating Guide
Page 5
..., "Use the Audio Setup menu to -use system. The shape of the rectangular picture in boldface type with your system. Through proprietary Bose technologies and innovative LIFESTYLE® systems design, it delivers superior performance for purchasing a LIFESTYLE® DVD-based home entertainment system. Technically called a part of buttons on the remote control and on the media center front panel, and menu items appearing on your TV screen...
..., "Use the Audio Setup menu to -use system. The shape of the rectangular picture in boldface type with your system. Through proprietary Bose technologies and innovative LIFESTYLE® systems design, it delivers superior performance for purchasing a LIFESTYLE® DVD-based home entertainment system. Technically called a part of buttons on the remote control and on the media center front panel, and menu items appearing on your TV screen...

Operating Guide
Page 7
... remote control The advanced radio-frequency remote control works from anywhere within most homes. Move the remote a foot or two and try again. Power on/off and mute controls On Off Mute All Mute CD/DVD SOURCE / INPUT FM/AM Tape TV Input TV VCR AUX Power Power Power MENU / NAVIGATION DVD Menu Guide Exit Settings Tune Seek Enter Channel Chapter Preset Track Volume 1 2 3 4 5 6 7 8 9 Previous 0 PLAYBACK Stop Pause Play Shuffle Speakers 2-3-5 Repeat AUDIO Surround -+ On Off Turns the system on . Tape Selects the Tape source...
... remote control The advanced radio-frequency remote control works from anywhere within most homes. Move the remote a foot or two and try again. Power on/off and mute controls On Off Mute All Mute CD/DVD SOURCE / INPUT FM/AM Tape TV Input TV VCR AUX Power Power Power MENU / NAVIGATION DVD Menu Guide Exit Settings Tune Seek Enter Channel Chapter Preset Track Volume 1 2 3 4 5 6 7 8 9 Previous 0 PLAYBACK Stop Pause Play Shuffle Speakers 2-3-5 Repeat AUDIO Surround -+ On Off Turns the system on . Tape Selects the Tape source...
Operating Guide
Page 8
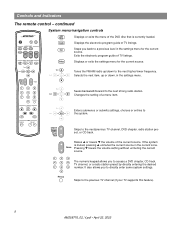
... program guide of the current source. Channel Chapter Preset Track Skips to access a DVD chapter, CD track, TV channel, or a radio station preset by directly entering the desired number. continued System menu/navigation controls On Off Mute All Mute CD/DVD SOURCE / INPUT FM/AM Tape TV Input TV VCR AUX Power Power Power MENU / NAVIGATION DVD Menu Guide Exit Settings Tune Seek Enter Channel Chapter Preset Track Volume 1 2 3 4 5 6 7 8 9 Previous 0 PLAYBACK Stop Pause Play Shuffle Repeat Speakers 2-3-5 AUDIO Surround -+ DVD Menu Guide Exit Settings Tune...
... program guide of the current source. Channel Chapter Preset Track Skips to access a DVD chapter, CD track, TV channel, or a radio station preset by directly entering the desired number. continued System menu/navigation controls On Off Mute All Mute CD/DVD SOURCE / INPUT FM/AM Tape TV Input TV VCR AUX Power Power Power MENU / NAVIGATION DVD Menu Guide Exit Settings Tune Seek Enter Channel Chapter Preset Track Volume 1 2 3 4 5 6 7 8 9 Previous 0 PLAYBACK Stop Pause Play Shuffle Repeat Speakers 2-3-5 AUDIO Surround -+ DVD Menu Guide Exit Settings Tune...

Operating Guide
Page 12
Making sound adjustments Volume System volume can be accessed through the settings menu. Surround- See "Changing System Settings" on page 32. 12 AM259776_02_V.pdf • April 23, 2002 This timer can be raised or lowered using the Volume v w buttons on the remote or the media center button panel. To change the video output setting, see "Using the settings menus" on page 22, and "Changing the system setup" on page 22. Changing the number of speakers playing When you can change the video output setting in...
Making sound adjustments Volume System volume can be accessed through the settings menu. Surround- See "Changing System Settings" on page 32. 12 AM259776_02_V.pdf • April 23, 2002 This timer can be raised or lowered using the Volume v w buttons on the remote or the media center button panel. To change the video output setting, see "Using the settings menus" on page 22, and "Changing the system setup" on page 22. Changing the number of speakers playing When you can change the video output setting in...
Operating Guide
Page 14
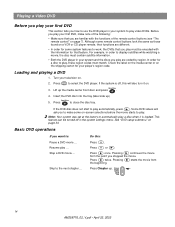
... play. If the DVD disc does not start to play ... Resume play automatically, press . Press twice. Although some remote control buttons look the same as those found on a VCR or CD player remote, their functions are different. • In order for your first DVD, make some system features to work, the DVDs that you are coded by region. Note: Your system was set at the factory to automatically play a disc...
... play. If the DVD disc does not start to play ... Resume play automatically, press . Press twice. Although some remote control buttons look the same as those found on a VCR or CD player remote, their functions are different. • In order for your first DVD, make some system features to work, the DVDs that you are coded by region. Note: Your system was set at the factory to automatically play a disc...
Operating Guide
Page 19
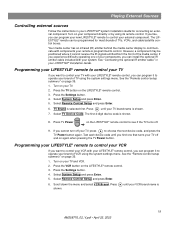
... the TV Power button again. The LIFESTYLE® remote can program it to communicate with your LIFESTYLE® remote control, you find one of TVs, VCRs, and cable/satellite control boxes. Your media center has an infrared (IR) emitter behind the media center display to operate your brand of TV using the system settings menu. Select System Setup and press Enter. 5. The first 4-digit device code is selected fi...
... the TV Power button again. The LIFESTYLE® remote can program it to communicate with your LIFESTYLE® remote control, you find one of TVs, VCRs, and cable/satellite control boxes. Your media center has an infrared (IR) emitter behind the media center display to operate your brand of TV using the system settings menu. Select System Setup and press Enter. 5. The first 4-digit device code is selected fi...
Operating Guide
Page 20
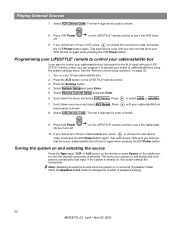
... surround (5-speaker) mode. Select Remote Control Setup and press Enter. 6. Press the Speakers 2-3-5 button to see if the VCR turns 9. The first 4-digit device code is already on the LIFESTYLE® remote control to change the number of cable/satellite box using the system settings menu. AUX Power 9. Select AUX Device Code. Press AUX Power lite box turns off your VCR off and on the LIFESTYLE® remote control. 3. Select VCR Device Code. Select System Setup and press Enter. 5. The first 4-digit device code is shown. 8. Playing...
... surround (5-speaker) mode. Select Remote Control Setup and press Enter. 6. Press the Speakers 2-3-5 button to see if the VCR turns 9. The first 4-digit device code is already on the LIFESTYLE® remote control to change the number of cable/satellite box using the system settings menu. AUX Power 9. Select AUX Device Code. Press AUX Power lite box turns off your VCR off and on the LIFESTYLE® remote control. 3. Select VCR Device Code. Select System Setup and press Enter. 5. The first 4-digit device code is shown. 8. Playing...
Operating Guide
Page 21
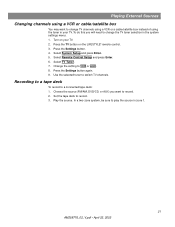
..., DVD/CD, or AUX) you will need to change TV channels using a VCR or a cable/satellite box instead of using a VCR or cable/satellite box You may want to record. 2. Change the setting to play the source in zone 1. 21 AM259776_02_V.pdf • April 23, 2002 Playing External Sources Changing channels using the tuner in your TV. 2. Turn on the LIFESTYLE® remote control. 3. Press the TV button on your TV. Select System Setup and press Enter. 5. Use the selected tuner to switch...
..., DVD/CD, or AUX) you will need to change TV channels using a VCR or a cable/satellite box instead of using a VCR or cable/satellite box You may want to record. 2. Change the setting to play the source in zone 1. 21 AM259776_02_V.pdf • April 23, 2002 Playing External Sources Changing channels using the tuner in your TV. 2. Turn on the LIFESTYLE® remote control. 3. Press the TV button on your TV. Select System Setup and press Enter. 5. Use the selected tuner to switch...

Operating Guide
Page 24
... portion of the available sound tracks on the current DVD. Figure 6 The DVD Play options menu On Off Mute All Mute CD/DVD SOURCE / INPUT FM/AM Tape TV Input TV VCR AUX Power Power Power MENU / NAVIGATION DVD Menu Guide Exit Settings Tune Seek Enter Channel Chapter Preset Track Volume 1 2 3 4 5 6 7 8 9 Previous 0 PLAYBACK Stop Pause Play Shuffle Repeat Speakers 2-3-5 AUDIO Surround -+ Settings Settings (DVD) DVD Play Options Enter Settings: DVD Play Options Title Chapter Title Time Time Display Motion Control Audio Track Camera Angle Subtitle Subtitle...
... portion of the available sound tracks on the current DVD. Figure 6 The DVD Play options menu On Off Mute All Mute CD/DVD SOURCE / INPUT FM/AM Tape TV Input TV VCR AUX Power Power Power MENU / NAVIGATION DVD Menu Guide Exit Settings Tune Seek Enter Channel Chapter Preset Track Volume 1 2 3 4 5 6 7 8 9 Previous 0 PLAYBACK Stop Pause Play Shuffle Repeat Speakers 2-3-5 AUDIO Surround -+ Settings Settings (DVD) DVD Play Options Enter Settings: DVD Play Options Title Chapter Title Time Time Display Motion Control Audio Track Camera Angle Subtitle Subtitle...
Operating Guide
Page 29
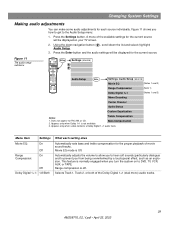
... the Settings button. Figure 11 The audio setup submenu On Off Mute All Mute CD/DVD SOURCE / INPUT FM/AM Tape TV Input TV VCR AUX Power Power Power MENU / NAVIGATION DVD Menu Guide Exit Settings Tune Seek Enter Channel Chapter Preset Track Volume 1 2 3 4 5 6 7 8 9 Previous 0 PLAYBACK Stop Pause Play Shuffle Repeat Speakers 2-3-5 AUDIO Surround -+ Settings Settings (source) Audio Setup Enter Settings: Audio Setup (source) Movie EQ (Notes 1 and 2) Range Compression (Note 1) Dolby Digital 1+1 (Notes 1 and 3) Mono Decoding Center Channel Audio...
... the Settings button. Figure 11 The audio setup submenu On Off Mute All Mute CD/DVD SOURCE / INPUT FM/AM Tape TV Input TV VCR AUX Power Power Power MENU / NAVIGATION DVD Menu Guide Exit Settings Tune Seek Enter Channel Chapter Preset Track Volume 1 2 3 4 5 6 7 8 9 Previous 0 PLAYBACK Stop Pause Play Shuffle Repeat Speakers 2-3-5 AUDIO Surround -+ Settings Settings (source) Audio Setup Enter Settings: Audio Setup (source) Movie EQ (Notes 1 and 2) Range Compression (Note 1) Dolby Digital 1+1 (Notes 1 and 3) Mono Decoding Center Channel Audio...
Operating Guide
Page 30
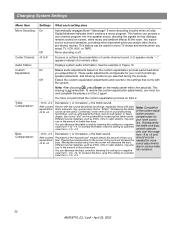
... only be useful. Different source materials, such as DVDs, CDs or radio stations, may sound overly shrill or "bright." Note: Completion of bass you selected during the process. Changing System Settings Menu Item Settings What each setting does Mono Decoding: On Off Center Channel: -8 to +14 Decreases (-) or increases (+) the treble sound. Decreases (-) or increases (+) the bass sound. Automatically engages Bose® Videostage® 5 mono decoding circuitry when a Dolby Digital bitstream...
... only be useful. Different source materials, such as DVDs, CDs or radio stations, may sound overly shrill or "bright." Note: Completion of bass you selected during the process. Changing System Settings Menu Item Settings What each setting does Mono Decoding: On Off Center Channel: -8 to +14 Decreases (-) or increases (+) the treble sound. Decreases (-) or increases (+) the bass sound. Automatically engages Bose® Videostage® 5 mono decoding circuitry when a Dolby Digital bitstream...
Operating Guide
Page 33
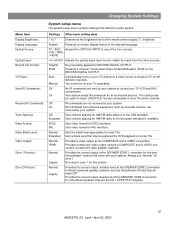
... the correct output (variable level) at the SPEAKER ZONE 1 connector for Bose® powered speaker systems, such as universal remotes, are not received by your TV separately. Auto Manual Automatically turns on -screen display menus in zone 1 for AM/FM radio stations to one of the media center display (7 = brightest). On IR commands from the other sources. European Sets channel spacing for zone 1. Not used in the selected language. VCR / TAPE / NONE -6/-3/0/3/6 Adjusts the optical audio input level to other Bose speakers that affect...
... the correct output (variable level) at the SPEAKER ZONE 1 connector for Bose® powered speaker systems, such as universal remotes, are not received by your TV separately. Auto Manual Automatically turns on -screen display menus in zone 1 for AM/FM radio stations to one of the media center display (7 = brightest). On IR commands from the other sources. European Sets channel spacing for zone 1. Not used in the selected language. VCR / TAPE / NONE -6/-3/0/3/6 Adjusts the optical audio input level to other Bose speakers that affect...

Operating Guide
Page 36
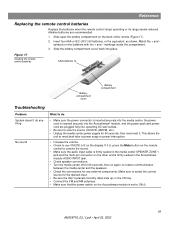
... current setting. Reference Changing the house code settings Each LIFESTYLE® remote control uses a system of matching house codes to communicate with those of the first remote control. If commands given from its corresponding media center. Open the remote control battery cover and locate the miniature switches (Figure 14). 2. The display will appear in the media center display window in the opposite direction from your system and its remote control...
... current setting. Reference Changing the house code settings Each LIFESTYLE® remote control uses a system of matching house codes to communicate with those of the first remote control. If commands given from its corresponding media center. Open the remote control battery cover and locate the miniature switches (Figure 14). 2. The display will appear in the media center display window in the opposite direction from your system and its remote control...
Operating Guide
Page 37
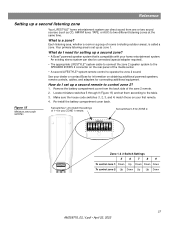
... Bose for information on obtaining additional powered speakers, remote controls, cables, and adapters for ZONE 2. 1 2345 6789 1 2345 6789 Zone 1 & 2 Switch Settings 5 6 7 8 9 To control zone 1: Down Up Down Down Down To control zone 2: Up Down Up Up Down 37 AM259776_02_V.pdf • April 23, 2002 Make sure the house code switches (1, 2, 3, and 4) match those on your home entertainment system. Figure 15 Miniature zone code switches Set switches 1-4 to operate the zone 2 sound. How do I set up a second zone? • A Bose® powered speaker...
... Bose for information on obtaining additional powered speakers, remote controls, cables, and adapters for ZONE 2. 1 2345 6789 1 2345 6789 Zone 1 & 2 Switch Settings 5 6 7 8 9 To control zone 1: Down Up Down Down Down To control zone 2: Up Down Up Up Down 37 AM259776_02_V.pdf • April 23, 2002 Make sure the house code switches (1, 2, 3, and 4) match those on your home entertainment system. Figure 15 Miniature zone code switches Set switches 1-4 to operate the zone 2 sound. How do I set up a second zone? • A Bose® powered speaker...
Operating Guide
Page 39
... is set to unmute the sound. • Make sure the audio input cable is firmly seated in the media center SPEAKER ZONE 1 jack and the multi-pin connector on the other end is firmly seated in the CD tray. • Connect the FM and AM antennas. • Make sure that the power switch on the Acoustimass module is lit on the remote control to ON (I). 39 AM259776_02_V.pdf...
... is set to unmute the sound. • Make sure the audio input cable is firmly seated in the media center SPEAKER ZONE 1 jack and the multi-pin connector on the other end is firmly seated in the CD tray. • Connect the FM and AM antennas. • Make sure that the power switch on the Acoustimass module is lit on the remote control to ON (I). 39 AM259776_02_V.pdf...
Operating Guide
Page 40
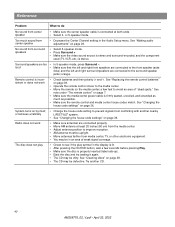
... the Center Channel setting in the display is properly inserted (label side up). • Eject the disc and try loading it again. • The CD may be dirty. See "Making audio adjustments" on page 38. • The CD may be defective. Radio does not work • Check batteries and their polarity (+ and -). Remote control is stereo. The disc does not play symbol in the Audio Setup menu. Reference Problem...
... the Center Channel setting in the display is properly inserted (label side up). • Eject the disc and try loading it again. • The CD may be dirty. See "Making audio adjustments" on page 38. • The CD may be defective. Radio does not work • Check batteries and their polarity (+ and -). Remote control is stereo. The disc does not play symbol in the Audio Setup menu. Reference Problem...
Operating Guide
Page 41
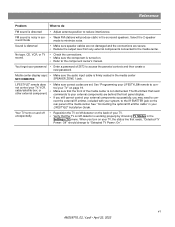
... CONNECTED SPEAKER ZONE 1 jack. Media center display says: • Make sure the audio input cable is distorted • Adjust antenna position to reduce interference. not control your TV, VCR, trol your LIFESTYLE® remote to the media center. Your TV turns on and off unexpectedly. • Reposition the TV on/off detector is distorted • Make sure speaker cables are not damaged and the connections are secure. • Reduce the output level...
... CONNECTED SPEAKER ZONE 1 jack. Media center display says: • Make sure the audio input cable is distorted • Adjust antenna position to reduce interference. not control your TV, VCR, trol your LIFESTYLE® remote to the media center. Your TV turns on and off unexpectedly. • Reposition the TV on/off detector is distorted • Make sure speaker cables are not damaged and the connections are secure. • Reduce the output level...
Operating Guide
Page 42
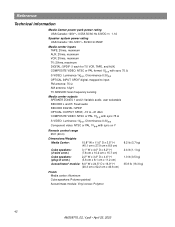
..., and AUX) COMPOSITE VIDEO: NTSC or PAL format 1Vp-p with sync 75 Ω S-VIDEO: Luminance 1Vp-p, Chrominance 0.3Vp-p OPTICAL INPUT: SPDIF digital, mapped to input FM antenna: 75 Ω AM antenna: 12µH TV SENSOR: Scan frequency sensing Media center outputs SPEAKER ZONES 1 and 2: Variable audio, user selectable RECORD L and R: Fixed audio RECORD DIGITAL: SPDIF OPTICAL OUTPUT: SPDIF, -15 to -21 dbm COMPOSITE VIDEO: NTSC or PAL 1Vp-p with sync 75 Ω S-VIDEO: Luminance 1Vp-p, Chrominance 0.3Vp-p Component video...
..., and AUX) COMPOSITE VIDEO: NTSC or PAL format 1Vp-p with sync 75 Ω S-VIDEO: Luminance 1Vp-p, Chrominance 0.3Vp-p OPTICAL INPUT: SPDIF digital, mapped to input FM antenna: 75 Ω AM antenna: 12µH TV SENSOR: Scan frequency sensing Media center outputs SPEAKER ZONES 1 and 2: Variable audio, user selectable RECORD L and R: Fixed audio RECORD DIGITAL: SPDIF OPTICAL OUTPUT: SPDIF, -15 to -21 dbm COMPOSITE VIDEO: NTSC or PAL 1Vp-p with sync 75 Ω S-VIDEO: Luminance 1Vp-p, Chrominance 0.3Vp-p Component video...

