
Operating Guide
Page 3
... center display window 11 General System Operation 12 Turning your system on and off 12 Making sound adjustments 12 Volume 12 Changing the number of speakers playing 12 Adjusting surround sound 12 Using the headphones jack 12 System settings 12 Using the sleep timer 12 Changing the video output for component...
... center display window 11 General System Operation 12 Turning your system on and off 12 Making sound adjustments 12 Volume 12 Changing the number of speakers playing 12 Adjusting surround sound 12 Using the headphones jack 12 System settings 12 Using the sleep timer 12 Changing the video output for component...

Operating Guide
Page 7
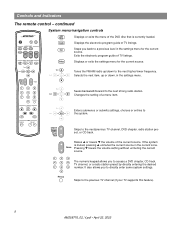
...MENU / NAVIGATION DVD Menu Guide Exit Settings Tune Seek Enter Channel Chapter Preset Track Volume 1 2 3 4 5 6 7 8 9 Previous 0 PLAYBACK Stop Pause Play Shuffle Speakers 2-3-5 Repeat AUDIO Surround -+ On Off Turns the system on . Mute Mutes/unmutes the volume in CD/DVD player and turns the system on and off...turns your cable box and the other to a VCR. TV TV - Note: Some types of which contains the antenna for all connected speakers (all zones and rooms). The bottom of this button turns your TV on and selects your TV. FM/AM Selects the built-in ...
...MENU / NAVIGATION DVD Menu Guide Exit Settings Tune Seek Enter Channel Chapter Preset Track Volume 1 2 3 4 5 6 7 8 9 Previous 0 PLAYBACK Stop Pause Play Shuffle Speakers 2-3-5 Repeat AUDIO Surround -+ On Off Turns the system on . Mute Mutes/unmutes the volume in CD/DVD player and turns the system on and off...turns your cable box and the other to a VCR. TV TV - Note: Some types of which contains the antenna for all connected speakers (all zones and rooms). The bottom of this button turns your TV on and selects your TV. FM/AM Selects the built-in ...
Operating Guide
Page 8
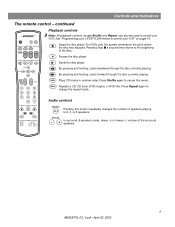
... Power Power Power MENU / NAVIGATION DVD Menu Guide Exit Settings Tune Seek Enter Channel Chapter Preset Track Volume 1 2 3 4 5 6 7 8 9 Previous 0 PLAYBACK Stop Pause Play Shuffle Repeat Speakers 2-3-5 AUDIO Surround -+ DVD Menu Guide Exit Settings Tune Seek Enter Displays or exits the menu of the DVD disc that is muted, pressing v unmutes the...
... Power Power Power MENU / NAVIGATION DVD Menu Guide Exit Settings Tune Seek Enter Channel Chapter Preset Track Volume 1 2 3 4 5 6 7 8 9 Previous 0 PLAYBACK Stop Pause Play Shuffle Repeat Speakers 2-3-5 AUDIO Surround -+ DVD Menu Guide Exit Settings Tune Seek Enter Displays or exits the menu of the DVD disc that is muted, pressing v unmutes the...
Operating Guide
Page 9
..., CD track, DVD chapter, or DVD title. Surround - + In surround (5-speaker) mode, raises (+) or lowers (-) volume of the disc. See "Programming your LIFESTYLE® remote to 2, 3, or 5 speakers. Audio controls Speakers Pressing this mode. Stops the disc player. Pauses the disc player. Channel Chapter ...VCR. By pressing and holding , scans backward through the disc currently playing. Press Shuffle again to the beginning of the surround speakers. 9 AM259776_02_V.pdf • April 23, 2002 For DVDs only, the system remembers the point where the disc was stopped. Press...
..., CD track, DVD chapter, or DVD title. Surround - + In surround (5-speaker) mode, raises (+) or lowers (-) volume of the disc. See "Programming your LIFESTYLE® remote to 2, 3, or 5 speakers. Audio controls Speakers Pressing this mode. Stops the disc player. Pauses the disc player. Channel Chapter ...VCR. By pressing and holding , scans backward through the disc currently playing. Press Shuffle again to the beginning of the surround speakers. 9 AM259776_02_V.pdf • April 23, 2002 For DVDs only, the system remembers the point where the disc was stopped. Press...
Operating Guide
Page 10
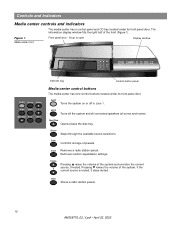
... storage of the front (Figure 1). Open/Close Opens/closes the disc tray. On/Off Turns the system on or off the system and all connected speakers (all zones and rooms). Erase Removes a radio station preset. lift up to open Display window On/Off Source Volume All Off Enter Open/Close Erase...
... storage of the front (Figure 1). Open/Close Opens/closes the disc tray. On/Off Turns the system on or off the system and all connected speakers (all zones and rooms). Erase Removes a radio station preset. lift up to open Display window On/Off Source Volume All Off Enter Open/Close Erase...

Operating Guide
Page 12
...adjusted in small steps using the Surround + / - When you turn it . Adjusting surround sound The sound level of the surround (rear) speakers in your system off automatically after 10 to 90 minutes of component video input signals, and you have connected your TV to your system on... settings menus. Changing the video output for component video connections If your TV or video monitor is automatically determined. Changing the number of speakers playing When you turn on a source, the number of the media center. General System Operation Turning your system on and off You ...
...adjusted in small steps using the Surround + / - When you turn it . Adjusting surround sound The sound level of the surround (rear) speakers in your system off automatically after 10 to 90 minutes of component video input signals, and you have connected your TV to your system on... settings menus. Changing the video output for component video connections If your TV or video monitor is automatically determined. Changing the number of speakers playing When you turn on a source, the number of the media center. General System Operation Turning your system on and off You ...
Operating Guide
Page 20
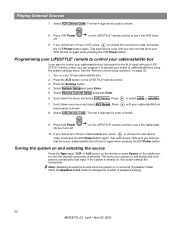
...Press the Settings button. 4. AUX Power 9. on the media center until you find one that turns your cable/satellite box off your brand of speakers playing. 20 AM259776_02_V.pdf • April 23, 2002 Turning the system on and selecting the source Press the Tape (tape), VCR, or AUX button ... lite box turns off . Playing External Sources 7. Turn on again when pressing the AUX Power button. Press the AUX button on in surround (5-speaker) mode. If you cannot turn off and on and selects the component connected to operate your VCR, press to choose the next device code, ...
...Press the Settings button. 4. AUX Power 9. on the media center until you find one that turns your cable/satellite box off your brand of speakers playing. 20 AM259776_02_V.pdf • April 23, 2002 Turning the system on and selecting the source Press the Tape (tape), VCR, or AUX button ... lite box turns off . Playing External Sources 7. Turn on again when pressing the AUX Power button. Press the AUX button on in surround (5-speaker) mode. If you cannot turn off and on and selects the component connected to operate your VCR, press to choose the next device code, ...

Operating Guide
Page 24
... Power Power Power MENU / NAVIGATION DVD Menu Guide Exit Settings Tune Seek Enter Channel Chapter Preset Track Volume 1 2 3 4 5 6 7 8 9 Previous 0 PLAYBACK Stop Pause Play Shuffle Repeat Speakers 2-3-5 AUDIO Surround -+ Settings Settings (DVD) DVD Play Options Enter Settings: DVD Play Options Title Chapter Title Time Time Display Motion Control Audio Track Camera Angle...
... Power Power Power MENU / NAVIGATION DVD Menu Guide Exit Settings Tune Seek Enter Channel Chapter Preset Track Volume 1 2 3 4 5 6 7 8 9 Previous 0 PLAYBACK Stop Pause Play Shuffle Repeat Speakers 2-3-5 AUDIO Surround -+ Settings Settings (DVD) DVD Play Options Enter Settings: DVD Play Options Title Chapter Title Time Time Display Motion Control Audio Track Camera Angle...
Operating Guide
Page 25
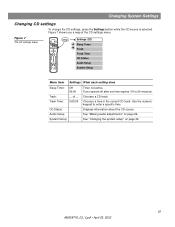
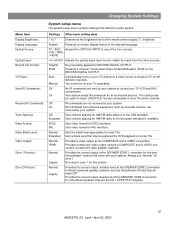
... Power Power Power MENU / NAVIGATION DVD Menu Guide Exit Settings Tune Seek Enter Channel Chapter Preset Track Volume 1 2 3 4 5 6 7 8 9 Previous 0 PLAYBACK Stop Pause Play Shuffle Repeat Speakers 2-3-5 AUDIO Surround -+ Settings Settings (CD) Sleep Timer Track Track Time CD Status Audio Setup System Setup Menu Item Settings What each setting does Sleep Timer...
... Power Power Power MENU / NAVIGATION DVD Menu Guide Exit Settings Tune Seek Enter Channel Chapter Preset Track Volume 1 2 3 4 5 6 7 8 9 Previous 0 PLAYBACK Stop Pause Play Shuffle Repeat Speakers 2-3-5 AUDIO Surround -+ Settings Settings (CD) Sleep Timer Track Track Time CD Status Audio Setup System Setup Menu Item Settings What each setting does Sleep Timer...
Operating Guide
Page 26
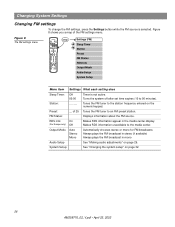
... Power Power Power MENU / NAVIGATION DVD Menu Guide Exit Settings Tune Seek Enter Channel Chapter Preset Track Volume 1 2 3 4 5 6 7 8 9 Previous 0 PLAYBACK Stop Pause Play Shuffle Repeat Speakers 2-3-5 AUDIO Surround -+ Settings Settings (FM) Sleep Timer Station Preset FM Status RDS Info Output Mode Audio Setup System Setup Menu Item Settings What each setting...
... Power Power Power MENU / NAVIGATION DVD Menu Guide Exit Settings Tune Seek Enter Channel Chapter Preset Track Volume 1 2 3 4 5 6 7 8 9 Previous 0 PLAYBACK Stop Pause Play Shuffle Repeat Speakers 2-3-5 AUDIO Surround -+ Settings Settings (FM) Sleep Timer Station Preset FM Status RDS Info Output Mode Audio Setup System Setup Menu Item Settings What each setting...
Operating Guide
Page 27
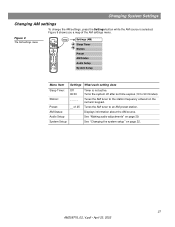
... Power Power Power MENU / NAVIGATION DVD Menu Guide Exit Settings Tune Seek Enter Channel Chapter Preset Track Volume 1 2 3 4 5 6 7 8 9 Previous 0 PLAYBACK Stop Pause Play Shuffle Repeat Speakers 2-3-5 AUDIO Surround -+ Settings Settings (AM) Sleep Timer Station Preset AM Status Audio Setup System Setup Menu Item Settings What each setting does Sleep Timer: Station...
... Power Power Power MENU / NAVIGATION DVD Menu Guide Exit Settings Tune Seek Enter Channel Chapter Preset Track Volume 1 2 3 4 5 6 7 8 9 Previous 0 PLAYBACK Stop Pause Play Shuffle Repeat Speakers 2-3-5 AUDIO Surround -+ Settings Settings (AM) Sleep Timer Station Preset AM Status Audio Setup System Setup Menu Item Settings What each setting does Sleep Timer: Station...
Operating Guide
Page 28
... Power Power Power MENU / NAVIGATION DVD Menu Guide Exit Settings Tune Seek Enter Channel Chapter Preset Track Volume 1 2 3 4 5 6 7 8 9 Previous 0 PLAYBACK Stop Pause Play Shuffle Repeat Speakers 2-3-5 AUDIO Surround -+ Settings Settings (Source) Sleep Timer TV/VCR/AUX/TAPE Status Audio Setup Analog Input Digital Input System Setup Menu Item Settings What each...
... Power Power Power MENU / NAVIGATION DVD Menu Guide Exit Settings Tune Seek Enter Channel Chapter Preset Track Volume 1 2 3 4 5 6 7 8 9 Previous 0 PLAYBACK Stop Pause Play Shuffle Repeat Speakers 2-3-5 AUDIO Surround -+ Settings Settings (Source) Sleep Timer TV/VCR/AUX/TAPE Status Audio Setup Analog Input Digital Input System Setup Menu Item Settings What each...
Operating Guide
Page 29
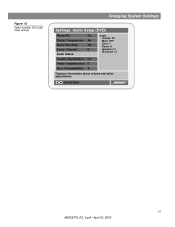
... Power Power Power MENU / NAVIGATION DVD Menu Guide Exit Settings Tune Seek Enter Channel Chapter Preset Track Volume 1 2 3 4 5 6 7 8 9 Previous 0 PLAYBACK Stop Pause Play Shuffle Repeat Speakers 2-3-5 AUDIO Surround -+ Settings Settings (source) Audio Setup Enter Settings: Audio Setup (source) Movie EQ (Notes 1 and 2) Range Compression (Note 1) Dolby Digital 1+1 (Notes 1 and 3) Mono Decoding...
... Power Power Power MENU / NAVIGATION DVD Menu Guide Exit Settings Tune Seek Enter Channel Chapter Preset Track Volume 1 2 3 4 5 6 7 8 9 Previous 0 PLAYBACK Stop Pause Play Shuffle Repeat Speakers 2-3-5 AUDIO Surround -+ Settings Settings (source) Audio Setup Enter Settings: Audio Setup (source) Movie EQ (Notes 1 and 2) Range Compression (Note 1) Dolby Digital 1+1 (Notes 1 and 3) Mono Decoding...
Operating Guide
Page 30
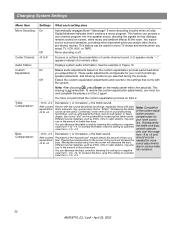
...: Custom On Equalization Off - - Moving the module away from -9 to +6 and should only be needed for your room furnishings, speaker placement, and listening locations you watch older (that come with bare floors and walls, may benefit by lowering this setting... softens the presentation of a numeric value. This erasing is not reversible. Decreases (-) or increases (+) the bass sound. Automatically engages Bose® Videostage® 5 mono decoding circuitry when a Dolby Digital bitstream indicates that dialogue remains locked on the media center within &#...
...: Custom On Equalization Off - - Moving the module away from -9 to +6 and should only be needed for your room furnishings, speaker placement, and listening locations you watch older (that come with bare floors and walls, may benefit by lowering this setting... softens the presentation of a numeric value. This erasing is not reversible. Decreases (-) or increases (+) the bass sound. Automatically engages Bose® Videostage® 5 mono decoding circuitry when a Dolby Digital bitstream indicates that dialogue remains locked on the media center within &#...
Operating Guide
Page 31
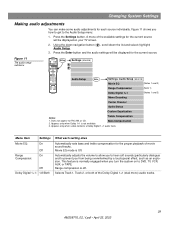
selects item 31 AM259776_02_V.pdf • April 23, 2002 Figure 12 Status example: DVD audio setup settings Changing System Settings Settings: Audio Setup (DVD) Movie EQ: On Range Compression: On Mono Decoding: On Center Channel: 0 Audio Status: Custom Equalization: On Treble Compensation: 0 Bass Compensation: 0 Audio Volume: 55 Mute: OFF Zone: 1 Room: A Speakers: 5 Surround: +3 Displays information about volume and other adjustments.
selects item 31 AM259776_02_V.pdf • April 23, 2002 Figure 12 Status example: DVD audio setup settings Changing System Settings Settings: Audio Setup (DVD) Movie EQ: On Range Compression: On Mono Decoding: On Center Channel: 0 Audio Status: Custom Equalization: On Treble Compensation: 0 Bass Compensation: 0 Audio Volume: 55 Mute: OFF Zone: 1 Room: A Speakers: 5 Surround: +3 Displays information about volume and other adjustments.

Operating Guide
Page 32
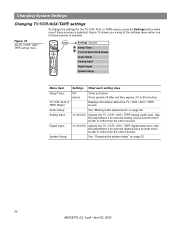
... Power Power Power MENU / NAVIGATION DVD Menu Guide Exit Settings Tune Seek Enter Channel Chapter Preset Track Volume 1 2 3 4 5 6 7 8 9 Previous 0 PLAYBACK Stop Pause Play Shuffle Repeat Speakers 2-3-5 AUDIO Surround -+ Settings Settings (source) System Setup Enter System Setup Display Brightness Display Language DVD Setup Optical Source Optical Input Record Out Format TV Power...
... Power Power Power MENU / NAVIGATION DVD Menu Guide Exit Settings Tune Seek Enter Channel Chapter Preset Track Volume 1 2 3 4 5 6 7 8 9 Previous 0 PLAYBACK Stop Pause Play Shuffle Repeat Speakers 2-3-5 AUDIO Surround -+ Settings Settings (source) System Setup Enter System Setup Display Brightness Display Language DVD Setup Optical Source Optical Input Record Out Format TV Power...
Operating Guide
Page 33
...all connected devices. Normal Sets the black level appropriate for NTSC monitors. Normal YPbPr Provides a video output at the SPEAKER ZONE 2 connector for other Bose speakers that came with your TV, VCR and AUX components. Auto Manual Automatically turns on your TV whenever a video source ...DIGITAL OUTPUT. On IR commands from the other IR remote controls. Normal Legacy Provides the correct output at the SPEAKER ZONE 2 connector for Bose® powered speaker systems, such as universal remotes, are received by your system. Original PCM No processing applied for AM/FM ...
...all connected devices. Normal Sets the black level appropriate for NTSC monitors. Normal YPbPr Provides a video output at the SPEAKER ZONE 2 connector for other Bose speakers that came with your TV, VCR and AUX components. Auto Manual Automatically turns on your TV whenever a video source ...DIGITAL OUTPUT. On IR commands from the other IR remote controls. Normal Legacy Provides the correct output at the SPEAKER ZONE 2 connector for Bose® powered speaker systems, such as universal remotes, are received by your system. Original PCM No processing applied for AM/FM ...
Operating Guide
Page 37
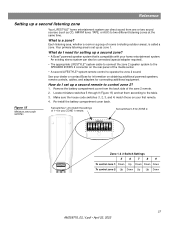
...Bose® powered speaker system that is called a zone. Locate miniature switches 5 through 9 (Figure 15) and set up a second listening zone Your LIFESTYLE® home entertainment system can also be connected (special adapter required). • The appropriate LIFESTYLE® system cable to connect the zone 2 speaker system to the SPEAKER... ZONES 2 connector on obtaining additional powered speakers, remote controls, cables, and adapters for ZONE 2. 1 2345 6789 1 2345 6789...
...Bose® powered speaker system that is called a zone. Locate miniature switches 5 through 9 (Figure 15) and set up a second listening zone Your LIFESTYLE® home entertainment system can also be connected (special adapter required). • The appropriate LIFESTYLE® system cable to connect the zone 2 speaker system to the SPEAKER... ZONES 2 connector on obtaining additional powered speakers, remote controls, cables, and adapters for ZONE 2. 1 2345 6789 1 2345 6789...
Operating Guide
Page 38
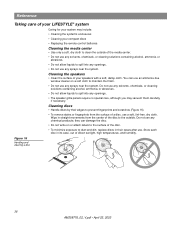
... chemicals, or cleaning solutions containing alcohol, ammonia, or abrasives. • Do not allow liquids to spill into any openings. • The speaker grille panels require no special care, although you may include: • Cleaning the system's enclosures • Cleaning your compact discs • Replacing.... • Do not allow liquids to spill into any openings. • Do not use any sprays near the system. Cleaning the speakers • Clean the surface of direct sunlight, high temperatures, and humidity. Do not use any sprays near the system. Reference Taking care...
... chemicals, or cleaning solutions containing alcohol, ammonia, or abrasives. • Do not allow liquids to spill into any openings. • The speaker grille panels require no special care, although you may include: • Cleaning the system's enclosures • Cleaning your compact discs • Replacing.... • Do not allow liquids to spill into any openings. • Do not use any sprays near the system. Cleaning the speakers • Clean the surface of direct sunlight, high temperatures, and humidity. Do not use any sprays near the system. Reference Taking care...
Operating Guide
Page 39
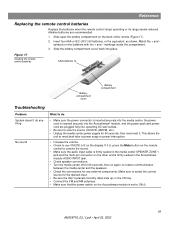
... Mute button on the remote control to unmute the sound. • Make sure the audio input cable is firmly seated in the media center SPEAKER ZONE 1 jack and the multi-pin connector on the other end is placed correctly, label-side up, in the Acoustimass module AUDIO INPUT jack. •.... • Turn the media center off for 60 seconds, then on again, to restore communication between the media center and the speakers. • Check the connections for 60 seconds, then reconnect it. symbols on the back of the remote (Figure 17). 2. This allows the unit to reset ...
... Mute button on the remote control to unmute the sound. • Make sure the audio input cable is firmly seated in the media center SPEAKER ZONE 1 jack and the multi-pin connector on the other end is placed correctly, label-side up, in the Acoustimass module AUDIO INPUT jack. •.... • Turn the media center off for 60 seconds, then on again, to restore communication between the media center and the speakers. • Check the connections for 60 seconds, then reconnect it. symbols on the back of the remote (Figure 17). 2. This allows the unit to reset ...

