

User Manual
Page 1
PB8253/PB8263 Digital Projector Installation Series User's Manual Welcome
PB8253/PB8263 Digital Projector Installation Series User's Manual Welcome

User Manual
Page 3
Table of contents Important safety instructions 5 Introduction 9 Projector features 9 Shipping contents 10 Projector exterior view 11 Controls and functions 13 Positioning your projector 17 Choosing a location 17 Safety instructions for ceiling mounting of the projector 18 Obtaining a preferred projected image size 19 Connection 22 ...image 31 Selecting the aspect ratio 33 Optimizing the image 34 Operating in a high altitude environment 37 Personalizing the projector menu display 37 Hiding the image 38 Remote paging operations 38 Freezing the image 38 Using the laser pointer in ...
Table of contents Important safety instructions 5 Introduction 9 Projector features 9 Shipping contents 10 Projector exterior view 11 Controls and functions 13 Positioning your projector 17 Choosing a location 17 Safety instructions for ceiling mounting of the projector 18 Obtaining a preferred projected image size 19 Connection 22 ...image 31 Selecting the aspect ratio 33 Optimizing the image 34 Operating in a high altitude environment 37 Personalizing the projector menu display 37 Hiding the image 38 Remote paging operations 38 Freezing the image 38 Using the laser pointer in ...

User Manual
Page 4
Temperature information 52 Indicators 53 Troubleshooting 55 Specifications 57 Projector specifications 57 Dimensions 58 Timing chart 58 Warranty 60 Limited Warranty 60 Regulation Statements 61 FCC statement 61 EEC statement 61 MIC statement 61 WEEE directive 61 4 Table of contents
Temperature information 52 Indicators 53 Troubleshooting 55 Specifications 57 Projector specifications 57 Dimensions 58 Timing chart 58 Warranty 60 Limited Warranty 60 Regulation Statements 61 FCC statement 61 EEC statement 61 MIC statement 61 WEEE directive 61 4 Table of contents

User Manual
Page 5
... manual before you think service or repair is required, take the projector only to meet the latest standards for future reference. 4. When you operate your projector. Important safety instructions Your BenQ projector is designed and tested to a suitably qualified technician. 6. Do ...not block the projection lens with any objects when the projector is under operation as this could cause the ...
... manual before you think service or repair is required, take the projector only to meet the latest standards for future reference. 4. When you operate your projector. Important safety instructions Your BenQ projector is designed and tested to a suitably qualified technician. 6. Do ...not block the projection lens with any objects when the projector is under operation as this could cause the ...
User Manual
Page 6
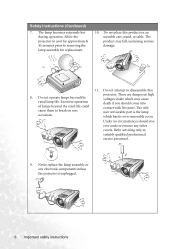
... There are dangerous high voltages inside which may fall, sustaining serious damage. 11. Allow the projector to cool for approximately 45 minutes prior to suitably qualified professional service personnel. 9. projector. Never replace the lamp assembly or any other covers. Do not place this 8. Do not...an unstable cart, stand, or table. The product may cause death if you ever undo or remove any electronic components unless the projector is the lamp which has its own removable cover. The only user serviceable part is unplugged. 6 Important safety instructions Refer servicing ...
... There are dangerous high voltages inside which may fall, sustaining serious damage. 11. Allow the projector to cool for approximately 45 minutes prior to suitably qualified professional service personnel. 9. projector. Never replace the lamp assembly or any other covers. Do not place this 8. Do not...an unstable cart, stand, or table. The product may cause death if you ever undo or remove any electronic components unless the projector is the lamp which has its own removable cover. The only user serviceable part is unplugged. 6 Important safety instructions Refer servicing ...

User Manual
Page 7
...an ambient temperature above 40°C/104°F - If the ventilation holes are higher than 15 degrees front to back. Using the projector when it is poorly ventilated or confined. Space that is not fully horizontal may become excessively high, such as the inside the... than 10 degrees left to , the lamp. 10000 feet Important safety instructions 7 Do not place inflammables near fire alarms - Do not place the projector on a level, horizontal surface during operation. - Do not block the ventilation holes. Locations where excessive humidity, dust, or cigarette smoke may result ...
...an ambient temperature above 40°C/104°F - If the ventilation holes are higher than 15 degrees front to back. Using the projector when it is poorly ventilated or confined. Space that is not fully horizontal may become excessively high, such as the inside the... than 10 degrees left to , the lamp. 10000 feet Important safety instructions 7 Do not place inflammables near fire alarms - Do not place the projector on a level, horizontal surface during operation. - Do not block the ventilation holes. Locations where excessive humidity, dust, or cigarette smoke may result ...
User Manual
Page 8
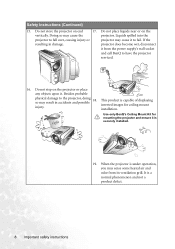
...it is under operation, you may cause the projector. This product is a normal phenomenon and not a product defect. 8 Important safety instructions When the projector is securely installed. 19. If the resulting in accidents and possible 18. Use only BenQ's Ceiling Mount Kit for ceiling mount installation. ...Doing so may sense some heated air and odor from the power supply's wall socket and call BenQ to fall over, causing injury or projector may result in damage. It is capable...
...it is under operation, you may cause the projector. This product is a normal phenomenon and not a product defect. 8 Important safety instructions When the projector is securely installed. 19. If the resulting in accidents and possible 18. Use only BenQ's Ceiling Mount Kit for ceiling mount installation. ...Doing so may sense some heated air and odor from the power supply's wall socket and call BenQ to fall over, causing injury or projector may result in damage. It is capable...
User Manual
Page 9
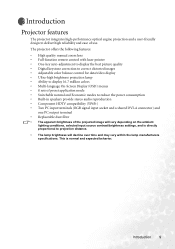
Introduction 9 Introduction Projector features The projector integrates high-performance optical engine projection and a user-friendly design to projection distance. • The lamp brightness will decline over time and may vary within ... of the projected image will vary depending on the ambient lighting conditions, selected input source contrast/brightness settings, and is normal and expected behavior. The projector offers the following features: • High quality manual zoom lens • Full-function remote control with laser pointer • One-key auto-adjustment to display...
Introduction 9 Introduction Projector features The projector integrates high-performance optical engine projection and a user-friendly design to projection distance. • The lamp brightness will decline over time and may vary within ... of the projected image will vary depending on the ambient lighting conditions, selected input source contrast/brightness settings, and is normal and expected behavior. The projector offers the following features: • High quality manual zoom lens • Full-function remote control with laser pointer • One-key auto-adjustment to display...
User Manual
Page 10
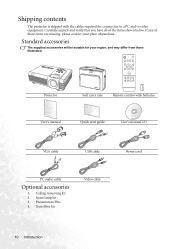
... required for your place of purchase. Standard accessories The supplied accessories will be suitable for connection to a PC and to video equipment. Shipping contents The projector is shipped with batteries User's manual Quick start guide User's manual CD VGA cable USB cable Power cord PC audio cable Optional accessories 1. If any...
... required for your place of purchase. Standard accessories The supplied accessories will be suitable for connection to a PC and to video equipment. Shipping contents The projector is shipped with batteries User's manual Quick start guide User's manual CD VGA cable USB cable Power cord PC audio cable Optional accessories 1. If any...

User Manual
Page 11
... Rear/side view Refer to "Connection" on page 13 for details. 2 9 2. Rear adjuster feet Side filter cover Lower view 17 17. Projector exterior view Front/upper side 1. External control panel 1 See "Projector" on page 22 for details. Front filter grill 7 8. Quick-release buttons 9. Speaker grill 19. Front IR remote sensor 3 10 4. Projection...
... Rear/side view Refer to "Connection" on page 13 for details. 2 9 2. Rear adjuster feet Side filter cover Lower view 17 17. Projector exterior view Front/upper side 1. External control panel 1 See "Projector" on page 22 for details. Front filter grill 7 8. Quick-release buttons 9. Speaker grill 19. Front IR remote sensor 3 10 4. Projection...
User Manual
Page 13
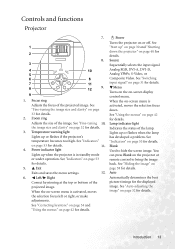
... of the lamp. When the on-screen menu is activated, moves the selection focus down the projector" on page 53 for details. 11. 4. Menu Turns on the on the projector or remote control to hide the screen image. Lamp indicator light Indicates the status of the image...image. Auto Automatically determines the best picture timings for details. 3. the image size and clarity" on page 32 for details. I Power Turns the projector on -screen menu is activated, moves the selection focus left or right, or make adjustments. See "Indicators" on page 31 for details. See...
... of the lamp. When the on-screen menu is activated, moves the selection focus down the projector" on page 53 for details. 11. 4. Menu Turns on the on the projector or remote control to hide the screen image. Lamp indicator light Indicates the status of the image...image. Auto Automatically determines the best picture timings for details. 3. the image size and clarity" on page 32 for details. I Power Turns the projector on -screen menu is activated, moves the selection focus left or right, or make adjustments. See "Indicators" on page 31 for details. See...
User Manual
Page 14
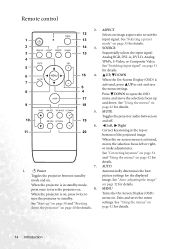
... See "Switching input signal" on page 32 for details. 14 Introduction When the projector is on, press twice to standby. When the projector is in standby mode, press once to turn the projector to turn the projector on page 42 for details. See "Using the menus" on . 8. AUTO ...On-Screen Display (OSD) menu on -screen menu is activated, press UP to suit the input signal. When the on . MUTE Toggles the projector audio between standby mode and on and off. SOURCE Sequentially selects the input signal Analog RGB, DVI-A, DVI-D, Analog YPbPr, S-Video, or Composite ...
... See "Switching input signal" on page 32 for details. 14 Introduction When the projector is on, press twice to standby. When the projector is in standby mode, press once to turn the projector to turn the projector on page 42 for details. See "Using the menus" on . 8. AUTO ...On-Screen Display (OSD) menu on -screen menu is activated, press UP to suit the input signal. When the on . MUTE Toggles the projector audio between standby mode and on and off. SOURCE Sequentially selects the input signal Analog RGB, DVI-A, DVI-D, Analog YPbPr, S-Video, or Composite ...

User Manual
Page 15
... of your display software program (on the back of the screen. Selects a suitable PIP position. LED indicator light Lights red when any buttons on the projector or remote control to press and hold the LASER button for details. 15. To release the function, press FREEZE again. Press BLANK on the remote...
... of your display software program (on the back of the screen. Selects a suitable PIP position. LED indicator light Lights red when any buttons on the projector or remote control to press and hold the LASER button for details. 15. To release the function, press FREEZE again. Press BLANK on the remote...
User Manual
Page 16
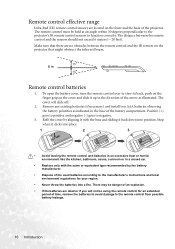
... indicated in the base of the battery compartment. The cover will not be held at an angle within 30 degrees perpendicular to the projector's IR remote control sensors to function correctly. To open the battery cover, turn the remote control over to the remote control from ... leaving the remote control and batteries in an excessive heat or humid environment like the kitchen, bathroom, sauna, sunroom or in the direction of the projector. Make sure that might obstruct the infra-red beam. 6 m Remote control batteries 1. Positive (+) goes to positive and negative (-) goes to the ...
... indicated in the base of the battery compartment. The cover will not be held at an angle within 30 degrees perpendicular to the projector's IR remote control sensors to function correctly. To open the battery cover, turn the remote control over to the remote control from ... leaving the remote control and batteries in an excessive heat or humid environment like the kitchen, bathroom, sauna, sunroom or in the direction of the projector. Make sure that might obstruct the infra-red beam. 6 m Remote control batteries 1. Positive (+) goes to positive and negative (-) goes to the ...

User Manual
Page 17
... your equipment. Ceiling rear Select this location with the projector suspended upside-down from the ceiling in front of your projector on . Floor in front of screen; 3. Positioning your projector Choosing a location Your projector is designed to position the projector for this installation location. Purchase the BenQ Projector Ceiling Mounting Kit from the ceiling behind the screen...
... your equipment. Ceiling rear Select this location with the projector suspended upside-down from the ceiling in front of your projector on . Floor in front of screen; 3. Positioning your projector Choosing a location Your projector is designed to position the projector for this installation location. Purchase the BenQ Projector Ceiling Mounting Kit from the ceiling behind the screen...

User Manual
Page 18
...and safely installed. This will perform the secondary role of restraining the projector should its attachment to the mounting bracket become loose. 18 Positioning your projector You can purchase a BenQ projector ceiling mount kit from the ceiling due to an improper attachment through...screws. BenQ recommends that the projector may fall from the place you purchased your BenQ projector. Safety instructions for ceiling mounting of the projector We want you to have a pleasant experience using your BenQ projector, so we strongly recommend that you use a proper fitting BenQ projector ceiling ...
...and safely installed. This will perform the secondary role of restraining the projector should its attachment to the mounting bracket become loose. 18 Positioning your projector You can purchase a BenQ projector ceiling mount kit from the ceiling due to an improper attachment through...screws. BenQ recommends that the projector may fall from the place you purchased your BenQ projector. Safety instructions for ceiling mounting of the projector We want you to have a pleasant experience using your BenQ projector, so we strongly recommend that you use a proper fitting BenQ projector ceiling ...
User Manual
Page 19
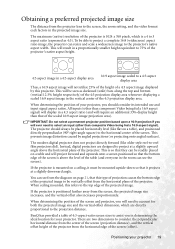
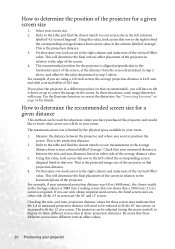
... at a slightly upward angle above the horizontal plane of the projected image. BenQ has provided a table of the screen and projector, you in the room can resize and scale a widescreen image to the projector's native aspect width. All inputs (other than composite Video being fed a 16... dimensions to consider, the perpendicular horizontal distance from the center of the screen (projection distance), and the vertical offset height of the projector from the horizontal edge of a 4:3 aspect image displayed by angled projections (or projecting onto angled surfaces). This will result in a...
... at a slightly upward angle above the horizontal plane of the projected image. BenQ has provided a table of the screen and projector, you in the room can resize and scale a widescreen image to the projector's native aspect width. All inputs (other than composite Video being fed a 16... dimensions to consider, the perpendicular horizontal distance from the center of the screen (projection distance), and the vertical offset height of the projector from the horizontal edge of a 4:3 aspect image displayed by angled projections (or projecting onto angled surfaces). This will result in a...
User Manual
Page 20
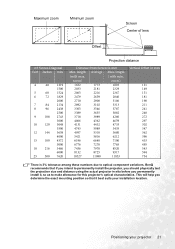
...aware that recommended), you are the 10' and 12' screen. For example, if you will occur. Checking the min. If you place the projector in relation to position the screen. Looking across that the 4.8 m measured projection distance will determine the final placement of the 3.5 m screen are ...like to center the image on these different screen sizes at those projection distances. Use the Keystone function to determine the position of the projector at the distance from screen value in the Average column is the projection distance. 2. Check that a 3500 mm (3.5 m) screen ...
...aware that recommended), you are the 10' and 12' screen. For example, if you will occur. Checking the min. If you place the projector in relation to position the screen. Looking across that the 4.8 m measured projection distance will determine the final placement of the 3.5 m screen are ...like to center the image on these different screen sizes at those projection distances. Use the Keystone function to determine the position of the projector at the distance from screen value in the Average column is the projection distance. 2. Check that a 3500 mm (3.5 m) screen ...
User Manual
Page 21
...7978 8520 8132 8725 9317 10327 11080 11833 Vertical Offset in situ before you should physically test the projection size and distance using the actual projector in mm 121 149 151 181 198 211 241 248 272 297 302 347 362 396 453 495 543 594 754 There is 3% tolerance... among these numbers due to make allowance for this projector's optical characteristics. BenQ recommends that it , so as to optical component variations. length (with max. (with min. Maximum zoom Minimum zoom Screen Center of lens Offset ...
...7978 8520 8132 8725 9317 10327 11080 11833 Vertical Offset in situ before you should physically test the projection size and distance using the actual projector in mm 121 149 151 181 198 211 241 248 272 297 302 347 362 396 453 495 543 594 754 There is 3% tolerance... among these numbers due to make allowance for this projector's optical characteristics. BenQ recommends that it , so as to optical component variations. length (with max. (with min. Maximum zoom Minimum zoom Screen Center of lens Offset ...

User Manual
Page 22
...smaller end to the DVI-I signal input socket on page 45 for each source. 3. Connecting a computer or monitor Connecting a computer The projector provides VGA and DVI input sockets that allow you wish to the PC Audio socket of the VGA 2. output socket of the VGA to ...Turn all equipment off before making any connections. 2. They are firmly inserted. In signal DVI-A cable to the USB socket on the projector. 3. input socket on the projector. 4. If you can perform paging operations of the application on the PC or notebook. (see "Remote paging operations" on page ...
...smaller end to the DVI-I signal input socket on page 45 for each source. 3. Connecting a computer or monitor Connecting a computer The projector provides VGA and DVI input sockets that allow you wish to the PC Audio socket of the VGA 2. output socket of the VGA to ...Turn all equipment off before making any connections. 2. They are firmly inserted. In signal DVI-A cable to the USB socket on the projector. 3. input socket on the projector. 4. If you can perform paging operations of the application on the PC or notebook. (see "Remote paging operations" on page ...


