
User Guide
Page 35
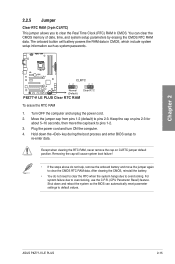
... reset parameter settings to default values. Hold down and reboot the system so the BIOS can clear the CMOS memory of date, time, and system setup parameters by erasing the CMOS RTC RAM data. Turn OFF the computer and unplug the power cord. 2. Keep the cap on CLRTC jumper default position. ASUS P8Z77-V LE PLUS 2-15 P8Z77-V LE PLUS...
... reset parameter settings to default values. Hold down and reboot the system so the BIOS can clear the CMOS memory of date, time, and system setup parameters by erasing the CMOS RTC RAM data. Turn OFF the computer and unplug the power cord. 2. Keep the cap on CLRTC jumper default position. ASUS P8Z77-V LE PLUS 2-15 P8Z77-V LE PLUS...
User Guide
Page 67
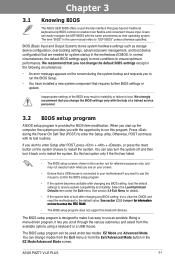
...Exit Menu for details. • If the system fails to boot after POST, press + + , or press the reset button on to restart the system. The term "BIOS" in this section are needed for reference purposes only, and may result to instability or failure to use as easy to... Exit menu or from the available options using a keyboard or a USB mouse. ASUS P8Z77-V LE PLUS 3-1 We strongly recommend that are for system startup in the EZ Mode/Advanced Mode screen. Chapter 3 3.2 BIOS setup program A BIOS setup program is designed to make it lets you want to boot. If you...
...Exit Menu for details. • If the system fails to boot after POST, press + + , or press the reset button on to restart the system. The term "BIOS" in this section are needed for reference purposes only, and may result to instability or failure to use as easy to... Exit menu or from the available options using a keyboard or a USB mouse. ASUS P8Z77-V LE PLUS 3-1 We strongly recommend that are for system startup in the EZ Mode/Advanced Mode screen. Chapter 3 3.2 BIOS setup program A BIOS setup program is designed to make it lets you want to boot. If you...

User Guide
Page 68
... program can be changed. Refer to select the display language, system performance mode and boot device priority. EZ Mode Monday [9/13/2010] P8Z77-V LE PLUS BIOS Version : 0306 CPU Type : Genuine Intel(R) CPU @ 2.90GHz Total Memory : 1024 MB (DDR3 1033MHz) Speed : 2900 MHz Exit/...and resets the system, or enters the Advanced Mode UEFI BIOS Utility - Shortcut (F3) Advanced Mode (F7) Boot Menu(F8) Default(F5) Displays the Advanced mode menus Power Saving mode Loads optimized default Selects the boot device priority Selects the Advanced mode functions Normal mode ASUS Optimal...
... program can be changed. Refer to select the display language, system performance mode and boot device priority. EZ Mode Monday [9/13/2010] P8Z77-V LE PLUS BIOS Version : 0306 CPU Type : Genuine Intel(R) CPU @ 2.90GHz Total Memory : 1024 MB (DDR3 1033MHz) Speed : 2900 MHz Exit/...and resets the system, or enters the Advanced Mode UEFI BIOS Utility - Shortcut (F3) Advanced Mode (F7) Boot Menu(F8) Default(F5) Displays the Advanced mode menus Power Saving mode Loads optimized default Selects the boot device priority Selects the Advanced mode functions Normal mode ASUS Optimal...

User Guide
Page 99
...65533;t�h�e���p�r�o�f�i�le� number that saved your BIOS settings, press , and then select Yes. • DO NOT shut down or reset the system while updating the BIOS to prevent the system boot failure! • We recommend ...you update the BIOS file only coming from one to eight, press , and then select Yes. Save to Profile Allows you to input the label of the DIMM module installed on the selected slot. Configuration options: [DIMM_A1] [DIMM_A2] [DIMM_B1 [DIMM_B2] Chapter 3 ASUS P8Z77-V LE PLUS 3-33 Label ...
...65533;t�h�e���p�r�o�f�i�le� number that saved your BIOS settings, press , and then select Yes. • DO NOT shut down or reset the system while updating the BIOS to prevent the system boot failure! • We recommend ...you update the BIOS file only coming from one to eight, press , and then select Yes. Save to Profile Allows you to input the label of the DIMM module installed on the selected slot. Configuration options: [DIMM_A1] [DIMM_A2] [DIMM_B1 [DIMM_B2] Chapter 3 ASUS P8Z77-V LE PLUS 3-33 Label ...

User Guide
Page 100
...efi) from one of the parameters on the Setup menus. Chapter 3 3-34 Chapter 3: BIOS setup Save Changes & Reset Once you are saved. ASUS EZ Mode This option allows you to load the default values for the BIOS items, and save changes and exit. When you select this option or if you press... items allow you to load the optimal default values for each of the available filesystem devices. Exit Load Optimized Defaults Save Changes & Reset Discard Changes & Exit ASUS EZ Mode Launch EFI Shell from filesystem device Load Optimized Defaults This option allows you to enter the EZ Mode screen.
...efi) from one of the parameters on the Setup menus. Chapter 3 3-34 Chapter 3: BIOS setup Save Changes & Reset Once you are saved. ASUS EZ Mode This option allows you to load the default values for the BIOS items, and save changes and exit. When you select this option or if you press... items allow you to load the optimal default values for each of the available filesystem devices. Exit Load Optimized Defaults Save Changes & Reset Discard Changes & Exit ASUS EZ Mode Launch EFI Shell from filesystem device Load Optimized Defaults This option allows you to enter the EZ Mode screen.

User Guide
Page 105
... NOT shut down or reset the system while updating the BIOS to recover BIOS setting. Ensure to load the BIOS default settings to the USB port. 3. Insert the motherboard support DVD to the optical drive, or the USB flash drive containing the BIOS file to ensure system compatibility and stability. Chapter 3 ASUS P8Z77-V LE PLUS 3-39 When found, the...
... NOT shut down or reset the system while updating the BIOS to recover BIOS setting. Ensure to load the BIOS default settings to the USB port. 3. Insert the motherboard support DVD to the optical drive, or the USB flash drive containing the BIOS file to ensure system compatibility and stability. Chapter 3 ASUS P8Z77-V LE PLUS 3-39 When found, the...

User Guide
Page 107
...reset the system while updating the BIOS to prevent system boot failure! • For BIOS Updater version 1.04 or later, the utility automatically exits to the DOS prompt after updating the BIOS file if you to select the BIOS file and press . Updating the BIOS file To update the BIOS file using BIOS Updater 1. When BIOS... BIOS update. Select the Load Optimized Defaults item under the Exit BIOS menu. ASUS P8Z77-V LE PLUS 3-41 Are you sure to connect all SATA hard disk drives after updating BIOS. • Ensure to load the BIOS default settings to exit BIOS Updater. The BIOS ...
...reset the system while updating the BIOS to prevent system boot failure! • For BIOS Updater version 1.04 or later, the utility automatically exits to the DOS prompt after updating the BIOS file if you to select the BIOS file and press . Updating the BIOS file To update the BIOS file using BIOS Updater 1. When BIOS... BIOS update. Select the Load Optimized Defaults item under the Exit BIOS menu. ASUS P8Z77-V LE PLUS 3-41 Are you sure to connect all SATA hard disk drives after updating BIOS. • Ensure to load the BIOS default settings to exit BIOS Updater. The BIOS ...

User Guide
Page 150
... Volumes: None defined. To do this: 1. Due to the power connector on each drive. 4.5.3 Setting the RAID item in BIOS You must enable the RAID function in the BIOS Setup before creating RAID set any of the same model and capacity when creating a disk array. During POST, press + to ... during POST. 2. Set the SATA Mode Selection item to display the utility main menu. Turn on entering and navigating through the BIOS Setup. Reset Disks to the Advanced menu > SATA Configuration, and then press . 3. For optimal performance, install identical drives of SATA ports to Chapter 3 for a...
... Volumes: None defined. To do this: 1. Due to the power connector on each drive. 4.5.3 Setting the RAID item in BIOS You must enable the RAID function in the BIOS Setup before creating RAID set any of the same model and capacity when creating a disk array. During POST, press + to ... during POST. 2. Set the SATA Mode Selection item to display the utility main menu. Turn on entering and navigating through the BIOS Setup. Reset Disks to the Advanced menu > SATA Configuration, and then press . 3. For optimal performance, install identical drives of SATA ports to Chapter 3 for a...


