
User Guide
Page 6
...devices on a stable surface. • If you encounter technical problems with the package. • Before using , contact your local power company. • If the power supply is set to the correct voltage in any damage, contact your retailer. Contact a qualified service technician or your dealer immediately. •...8226; Place the product on it, carefully read all the manuals that came with the product, contact a qualified service technician or your power supply is broken, do not try to fix it by yourself. Do not place the product in your area. These devices could interrupt ...
...devices on a stable surface. • If you encounter technical problems with the package. • Before using , contact your local power company. • If the power supply is set to the correct voltage in any damage, contact your retailer. Contact a qualified service technician or your dealer immediately. •...8226; Place the product on it, carefully read all the manuals that came with the product, contact a qualified service technician or your power supply is broken, do not try to fix it by yourself. Do not place the product in your area. These devices could interrupt ...
User Guide
Page 17
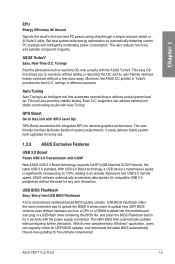
... the ultimate convenience! The UEFI BIOS then automatically updates without the need for every use. 1.3.3 ASUS Exclusive Features USB 3.0 Boost Faster USB 3.0 Transmission with the power supply connected. Tunings Feel the adrenaline rush of real-time OC-now a reality with Auto Tuning! ...USB flash drive containing the BIOS file, and press the BIOS Flashback button for compatible USB 3.0 peripherals without requiring further interaction. ASUS P8Z77-V LE PLUS 1-5 This easy OC tool allows you to an already impressive fast USB 3.0 transfer speed. This also reduces fan noise and ...
... the ultimate convenience! The UEFI BIOS then automatically updates without the need for every use. 1.3.3 ASUS Exclusive Features USB 3.0 Boost Faster USB 3.0 Transmission with the power supply connected. Tunings Feel the adrenaline rush of real-time OC-now a reality with Auto Tuning! ...USB flash drive containing the BIOS file, and press the BIOS Flashback button for compatible USB 3.0 peripherals without requiring further interaction. ASUS P8Z77-V LE PLUS 1-5 This easy OC tool allows you to an already impressive fast USB 3.0 transfer speed. This also reduces fan noise and ...
User Guide
Page 21
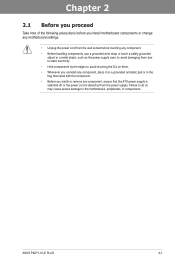
...the motherboard, peripherals, or components. Chapter 2 ASUS P8Z77-V LE PLUS 2-1 Chapter 2: Chapter 2 Hardware information 2.1 Before you proceed Take note of the following precautions before you install motherboard components or change any motherboard settings. • Unplug the power cord from the wall socket before touching any...8226; Before handling components, use a grounded wrist strap or touch a safely grounded object or a metal object, such as the power supply case, to avoid damaging them . • Whenever you uninstall any component, place it on a grounded antistatic pad or in ...
...the motherboard, peripherals, or components. Chapter 2 ASUS P8Z77-V LE PLUS 2-1 Chapter 2: Chapter 2 Hardware information 2.1 Before you proceed Take note of the following precautions before you install motherboard components or change any motherboard settings. • Unplug the power cord from the wall socket before touching any...8226; Before handling components, use a grounded wrist strap or touch a safely grounded object or a metal object, such as the power supply case, to avoid damaging them . • Whenever you uninstall any component, place it on a grounded antistatic pad or in ...
User Guide
Page 47
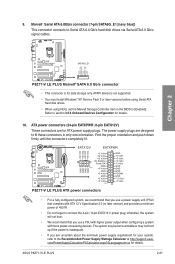
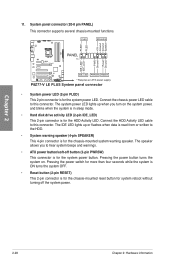
... are for details. Find the proper orientation and push down firmly until the connectors completely fit. ASUS P8Z77-V LE PLUS 2-27 The power supply plugs are uncertain about the minimum power supply requirement for your system, refer to connect the 4-pin / 8-pin EATX12 V power plug; Marvell® Serial ATA 6.0Gb/s connector (7-pin SATA6G_E1 [navy blue]) This connector connects to...
... are for details. Find the proper orientation and push down firmly until the connectors completely fit. ASUS P8Z77-V LE PLUS 2-27 The power supply plugs are uncertain about the minimum power supply requirement for your system, refer to connect the 4-pin / 8-pin EATX12 V power plug; Marvell® Serial ATA 6.0Gb/s connector (7-pin SATA6G_E1 [navy blue]) This connector connects to...
User Guide
Page 48
.... Connect the HDD Activity LED cable to this connector. PWR Ground Reset Ground IDE_LED PWRSW RESET * Requires an ATX power supply P8Z77-V LE PLUS System panel connector • System power LED (2-pin PLED) This 2-pin connector is for the HDD Activity LED. PLED SPEAKER PLED+ PLED+5V Ground Ground Speaker P8Z77-V LE PLUS PANEL PIN 1 IDE_LED+ IDE_LED- Chapter 2 11.
.... Connect the HDD Activity LED cable to this connector. PWR Ground Reset Ground IDE_LED PWRSW RESET * Requires an ATX power supply P8Z77-V LE PLUS System panel connector • System power LED (2-pin PLED) This 2-pin connector is for the HDD Activity LED. PLED SPEAKER PLED+ PLED+5V Ground Ground Speaker P8Z77-V LE PLUS PANEL PIN 1 IDE_LED+ IDE_LED- Chapter 2 11.
User Guide
Page 49
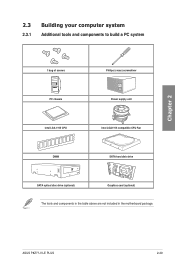
Chapter 2 2.3 Building your computer system 2.3.1 Additional tools and components to build a PC system 1 bag of screws Philips (cross) screwdriver PC chassis Power supply unit Intel LGA 1155 CPU Intel LGA1155 compatible CPU Fan DIMM SATA hard disk drive SATA optical disc drive (optional) Graphics card (optional) The tools and components in the table above are not included in the motherboard package. ASUS P8Z77-V LE PLUS 2-29
Chapter 2 2.3 Building your computer system 2.3.1 Additional tools and components to build a PC system 1 bag of screws Philips (cross) screwdriver PC chassis Power supply unit Intel LGA 1155 CPU Intel LGA1155 compatible CPU Fan DIMM SATA hard disk drive SATA optical disc drive (optional) Graphics card (optional) The tools and components in the table above are not included in the motherboard package. ASUS P8Z77-V LE PLUS 2-29

User Guide
Page 65
...you do not see the BIOS beep codes table below) or additional messages appear on the system front panel case lights up. ASUS P8Z77-V LE PLUS 2-45 Connect the power cord to green after the system LED turns on. BIOS Beep One short beep One continuous beep followed by two short beeps ...1. While the tests are off mode regardless of the system chassis. 4. Pressing the power switch for less than four seconds lets the system enter the soft-off . 3. External SCSI devices (starting with ATX power supplies, the system LED lights up or change from the time you press the ATX...
...you do not see the BIOS beep codes table below) or additional messages appear on the system front panel case lights up. ASUS P8Z77-V LE PLUS 2-45 Connect the power cord to green after the system LED turns on. BIOS Beep One short beep One continuous beep followed by two short beeps ...1. While the tests are off mode regardless of the system chassis. 4. Pressing the power switch for less than four seconds lets the system enter the soft-off . 3. External SCSI devices (starting with ATX power supplies, the system LED lights up or change from the time you press the ATX...

User Guide
Page 91
...goes into on state after an AC power loss. [Power Off] The system goes into either off state after a power failure. This feature requires an ATX power supply that provides at least 1A on state, whatever the system state was before the AC power loss. Mimute / - RTC Alarm Date... with set the time to select RTC alarm time (days). Hour / - Power On By Ring [Disabled] [Disabled] Disables Ring to generate a wake event. [Enabled] Enables Ring to adjust the time. - ASUS P8Z77-V LE PLUS 3-25 Power On By PCIE/PCI [Disabled] [Disabled] Disables the PCIE/PCI devices to...
...goes into on state after an AC power loss. [Power Off] The system goes into either off state after a power failure. This feature requires an ATX power supply that provides at least 1A on state, whatever the system state was before the AC power loss. Mimute / - RTC Alarm Date... with set the time to select RTC alarm time (days). Hour / - Power On By Ring [Disabled] [Disabled] Disables Ring to generate a wake event. [Enabled] Enables Ring to adjust the time. - ASUS P8Z77-V LE PLUS 3-25 Power On By PCIE/PCI [Disabled] [Disabled] Disables the PCIE/PCI devices to...

User Guide
Page 159
For Windows XP, select Add/Remove. For Windows 7, select Uninstall. 5. To uninstall existing graphics card drivers: 1. Select your computer. ASUS P8Z77-V LE PLUS 5-1 For Windows XP, go to Control Panel > Add/Remove Programs. For Windows 7, go to your system. Chapter 5: Chapter 5 Multiple GPU technology ...card that are ATI® certified. • Ensure that your system. See Chapter 2 for details. • We recommend that your power supply unit (PSU) can provide at least the minimum power required by your graphics card driver supports the ATI CrossFireX technology.
For Windows XP, select Add/Remove. For Windows 7, select Uninstall. 5. To uninstall existing graphics card drivers: 1. Select your computer. ASUS P8Z77-V LE PLUS 5-1 For Windows XP, go to Control Panel > Add/Remove Programs. For Windows 7, go to your system. Chapter 5: Chapter 5 Multiple GPU technology ...card that are ATI® certified. • Ensure that your system. See Chapter 2 for details. • We recommend that your power supply unit (PSU) can provide at least the minimum power required by your graphics card driver supports the ATI CrossFireX technology.
User Guide
Page 160
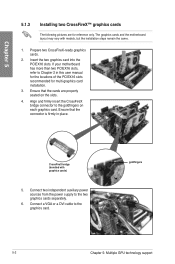
Prepare two CrossFireX-ready graphics cards. 2. Connect two independent auxiliary power sources from the power supply to the graphics card. Ensure that the cards are for multi-graphics card installation. 3. CrossFireX bridge (bundled with models, but the installation steps remain the ...
Prepare two CrossFireX-ready graphics cards. 2. Connect two independent auxiliary power sources from the power supply to the graphics card. Ensure that the cards are for multi-graphics card installation. 3. CrossFireX bridge (bundled with models, but the installation steps remain the ...
User Guide
Page 162
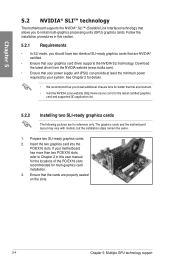
... SLI-ready graphics cards The following pictures are for details. • We recommend that you should have two identical SLI-ready graphics cards that your power supply unit (PSU) can provide at least the minimum power required by your graphics card driver supports the NVIDIA SLI technology. See Chapter 2 for reference only.
... SLI-ready graphics cards The following pictures are for details. • We recommend that you should have two identical SLI-ready graphics cards that your power supply unit (PSU) can provide at least the minimum power required by your graphics card driver supports the NVIDIA SLI technology. See Chapter 2 for reference only.
User Guide
Page 163
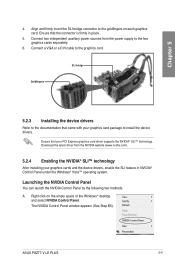
...the following two methods. ASUS P8Z77-V LE PLUS 5-5 Ensure that came with your PCI Express graphics card driver supports the NVIDIA® SLI™ technology. The NVIDIA Control Panel window appears (See Step B5). Chapter 5 4. Connect two independent auxiliary power sources from the NVIDIA ...website (www.nvidia.com). 5.2.4 Enabling the NVIDIA® SLI™ technology After installing your graphics cards and the device drivers, enable the SLI feature in place. 5. Download the latest driver from the power supply to the ...
...the following two methods. ASUS P8Z77-V LE PLUS 5-5 Ensure that came with your PCI Express graphics card driver supports the NVIDIA® SLI™ technology. The NVIDIA Control Panel window appears (See Step B5). Chapter 5 4. Connect two independent auxiliary power sources from the NVIDIA ...website (www.nvidia.com). 5.2.4 Enabling the NVIDIA® SLI™ technology After installing your graphics cards and the device drivers, enable the SLI feature in place. 5. Download the latest driver from the power supply to the ...


