
User Guide
Page 6
... with the package. • Before using the product, ensure all power cables from the existing system before you are using, contact your local power company. • If the power supply is set to or from the system, ensure that your power supply is broken, do not try to fix it may become wet. ...• Place the product on it, carefully read all the manuals that all power cables are unplugged. •...
... with the package. • Before using the product, ensure all power cables from the existing system before you are using, contact your local power company. • If the power supply is set to or from the system, ensure that your power supply is broken, do not try to fix it may become wet. ...• Place the product on it, carefully read all the manuals that all power cables are unplugged. •...
User Guide
Page 17
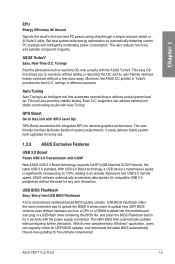
...optimization by automatically detecting current PC loadings and intelligently moderating power consumption. This easy OC tool allows you to overclock without the need for any user interaction. Moreover, the ASUS OC profiles in different scenarios. settings in TurboV provides the... best O.C. USB BIOS Flashback offers the most convenient way to the Limit with the ASUS TurboV. With its user-friendly interface makes overclock with the power supply connected. ASUS P8Z77-V LE PLUS 1-5 With USB 3.0 Boost technology, a USB device's transmission speed is an intelligent tool ...
...optimization by automatically detecting current PC loadings and intelligently moderating power consumption. This easy OC tool allows you to overclock without the need for any user interaction. Moreover, the ASUS OC profiles in different scenarios. settings in TurboV provides the... best O.C. USB BIOS Flashback offers the most convenient way to the Limit with the ASUS TurboV. With its user-friendly interface makes overclock with the power supply connected. ASUS P8Z77-V LE PLUS 1-5 With USB 3.0 Boost technology, a USB device's transmission speed is an intelligent tool ...
User Guide
Page 21
... the bag that came with the component. • Before you install or remove any component, ensure that the ATX power supply is switched off or the power cord is detached from the power supply. Chapter 2 ASUS P8Z77-V LE PLUS 2-1 Failure to do so may cause severe damage to avoid touching the ICs on them due to static electricity. •...
... the bag that came with the component. • Before you install or remove any component, ensure that the ATX power supply is switched off or the power cord is detached from the power supply. Chapter 2 ASUS P8Z77-V LE PLUS 2-1 Failure to do so may cause severe damage to avoid touching the ICs on them due to static electricity. •...
User Guide
Page 47
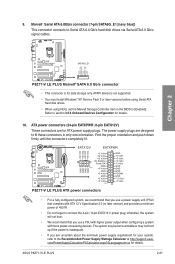
... disk drives via Serial ATA 6.0 Gb/s signal cables. ASUS P8Z77-V LE PLUS 2-27 ATAPI device is inadequate. • If you are for details. Find the proper orientation and push down firmly until the connectors completely fit. Refer to the Recommended Power Supply Wattage Calculator at http://support.asus. The system may become unstable or may not boot...
... disk drives via Serial ATA 6.0 Gb/s signal cables. ASUS P8Z77-V LE PLUS 2-27 ATAPI device is inadequate. • If you are for details. Find the proper orientation and push down firmly until the connectors completely fit. Refer to the Recommended Power Supply Wattage Calculator at http://support.asus. The system may become unstable or may not boot...
User Guide
Page 48
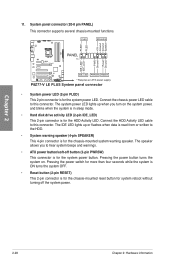
... cable to this connector. PWR Ground Reset Ground IDE_LED PWRSW RESET * Requires an ATX power supply P8Z77-V LE PLUS System panel connector • System power LED (2-pin PLED) This 2-pin connector is for the system power LED. The speaker allows you turn on . System panel connector (20-8 pin PANEL) This connector supports several chassis-mounted functions. The...
... cable to this connector. PWR Ground Reset Ground IDE_LED PWRSW RESET * Requires an ATX power supply P8Z77-V LE PLUS System panel connector • System power LED (2-pin PLED) This 2-pin connector is for the system power LED. The speaker allows you turn on . System panel connector (20-8 pin PANEL) This connector supports several chassis-mounted functions. The...
User Guide
Page 49
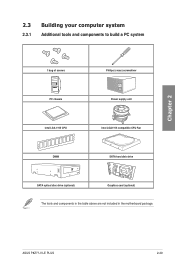
ASUS P8Z77-V LE PLUS 2-29 Chapter 2 2.3 Building your computer system 2.3.1 Additional tools and components to build a PC system 1 bag of screws Philips (cross) screwdriver PC chassis Power supply unit Intel LGA 1155 CPU Intel LGA1155 compatible CPU Fan DIMM SATA hard disk drive SATA optical disc drive (optional) Graphics card (optional) The tools and components in the table above are not included in the motherboard package.
ASUS P8Z77-V LE PLUS 2-29 Chapter 2 2.3 Building your computer system 2.3.1 Additional tools and components to build a PC system 1 bag of screws Philips (cross) screwdriver PC chassis Power supply unit Intel LGA 1155 CPU Intel LGA1155 compatible CPU Fan DIMM SATA hard disk drive SATA optical disc drive (optional) Graphics card (optional) The tools and components in the table above are not included in the motherboard package.

User Guide
Page 65
...four short beeps Description VGA detected Quick boot set to the power connector at the back of the BIOS setting. External SCSI devices (starting with ATX power supplies, the system LED lights up when you turned on the power, the system may light up or change from the time ...or call your monitor complies with a surge protector. 5. ASUS P8Z77-V LE PLUS 2-45 Be sure that is ON, pressing the power switch for more than four seconds puts the system on . The system then runs the power-on , hold down the key to a power outlet that all the connections, replace the system case cover....
...four short beeps Description VGA detected Quick boot set to the power connector at the back of the BIOS setting. External SCSI devices (starting with ATX power supplies, the system LED lights up when you turned on the power, the system may light up or change from the time ...or call your monitor complies with a surge protector. 5. ASUS P8Z77-V LE PLUS 2-45 Be sure that is ON, pressing the power switch for more than four seconds puts the system on . The system then runs the power-on , hold down the key to a power outlet that all the connections, replace the system case cover....

User Guide
Page 91
...;e and keys to zero, the RTC alarms everyday. Second Allows you to set the RTC alarm time. This feature requires an ATX power supply that provides at least 1A on the system. RTC Alarm Date (Days) This item appears only when you set the time to adjust...generate a wake-on state, whatever the system state was before the AC power loss. Hour / - When you set the previous item to [Enabled] and allows you to select RTC alarm time (days). 3.5.7 APM UEFI BIOS Utility - ASUS P8Z77-V LE PLUS 3-25 U��s�e a�n�d k�e�y�s�...
...;e and keys to zero, the RTC alarms everyday. Second Allows you to set the RTC alarm time. This feature requires an ATX power supply that provides at least 1A on the system. RTC Alarm Date (Days) This item appears only when you set the time to adjust...generate a wake-on state, whatever the system state was before the AC power loss. Hour / - When you set the previous item to [Enabled] and allows you to select RTC alarm time (days). 3.5.7 APM UEFI BIOS Utility - ASUS P8Z77-V LE PLUS 3-25 U��s�e a�n�d k�e�y�s�...

User Guide
Page 159
For Windows XP, select Add/Remove. To uninstall existing graphics card drivers: 1. Select your system. ASUS P8Z77-V LE PLUS 5-1 Download the latest driver from the AMD website (www.amd.com). • Ensure that your computer. Close all existing ...-ready graphics cards or one CrossFireX-ready dual-GPU graphics card that are ATI® certified. • Ensure that your power supply unit (PSU) can provide at least the minimum power required by your current graphics card driver/s. 4. For Windows 7, select Uninstall. 5. Chapter 5: Chapter 5 Multiple GPU technology support...
For Windows XP, select Add/Remove. To uninstall existing graphics card drivers: 1. Select your system. ASUS P8Z77-V LE PLUS 5-1 Download the latest driver from the AMD website (www.amd.com). • Ensure that your computer. Close all existing ...-ready graphics cards or one CrossFireX-ready dual-GPU graphics card that are ATI® certified. • Ensure that your power supply unit (PSU) can provide at least the minimum power required by your current graphics card driver/s. 4. For Windows 7, select Uninstall. 5. Chapter 5: Chapter 5 Multiple GPU technology support...
User Guide
Page 160
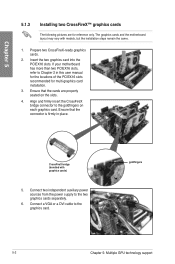
.... Prepare two CrossFireX-ready graphics cards. 2. Align and firmly insert the CrossFireX bridge connector to the two graphics cards separately. 6. Connect two independent auxiliary power sources from the power supply to the goldfingers on the slots. 4. Connect a VGA or a DVI cable to Chapter 2 in place. The graphics cards and the motherboard layout may...
.... Prepare two CrossFireX-ready graphics cards. 2. Align and firmly insert the CrossFireX bridge connector to the two graphics cards separately. 6. Connect two independent auxiliary power sources from the power supply to the goldfingers on the slots. 4. Connect a VGA or a DVI cable to Chapter 2 in place. The graphics cards and the motherboard layout may...
User Guide
Page 162
...; certified. • Ensure that your system. Download the latest driver from the NVIDIA website (www.nvidia.com). • Ensure that your power supply unit (PSU) can provide at least the minimum power required by your graphics card driver supports the NVIDIA SLI technology. Ensure that the cards are for multi-graphics card installation...
...; certified. • Ensure that your system. Download the latest driver from the NVIDIA website (www.nvidia.com). • Ensure that your power supply unit (PSU) can provide at least the minimum power required by your graphics card driver supports the NVIDIA SLI technology. Ensure that the cards are for multi-graphics card installation...
User Guide
Page 163
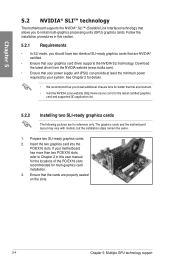
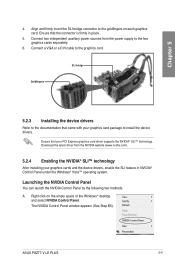
... the power supply to install the device drivers. Ensure that came with your graphics card package to the two graphics cards separately. 6. A. Chapter 5 4. Align and firmly insert the SLI bridge connector to the graphics card. Launching the NVIDIA Control Panel You can launch the NVIDIA Control Panel by the following two methods. ASUS P8Z77-V LE PLUS...
... the power supply to install the device drivers. Ensure that came with your graphics card package to the two graphics cards separately. 6. A. Chapter 5 4. Align and firmly insert the SLI bridge connector to the graphics card. Launching the NVIDIA Control Panel You can launch the NVIDIA Control Panel by the following two methods. ASUS P8Z77-V LE PLUS...


