
Acer Aspire 7535 Notebook Service Guide
Page 8
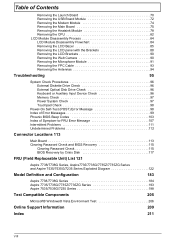
... Undetermined Problems 112 Connector Locations 113 Main Board 113 Clearing Password Check and BIOS Recovery 115 Clearing Password Check 115 BIOS Recovery by Crisis Disk 117 FRU (Field Replaceable Unit) List 121 Aspire 7738/7738G Series, Aspire7735/7735G/7735Z/7735ZG Series and Aspire 7535/7535G/7235 Series Exploded Diagram 122 Model Definition and Configuration 183...
... Undetermined Problems 112 Connector Locations 113 Main Board 113 Clearing Password Check and BIOS Recovery 115 Clearing Password Check 115 BIOS Recovery by Crisis Disk 117 FRU (Field Replaceable Unit) List 121 Aspire 7738/7738G Series, Aspire7735/7735G/7735Z/7735ZG Series and Aspire 7535/7535G/7235 Series Exploded Diagram 122 Model Definition and Configuration 183...
Acer Aspire 7535 Notebook Service Guide
Page 39
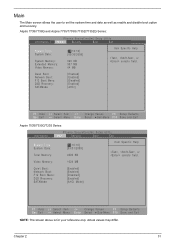
...Recovery: SATAMode [Enabled] [Enabled] [Disabled] [Enabled] [AHCI Mode] F1 Help Esc Exit Select Item -/+ Change Values F9 Setup Defaults Select Menu Enter Select Sub-Menu F10 Save and Exit NOTE: The screen above is for your reference only. Chapter 2 31 Aspire 7738/7738G and Aspire 7735/7735G/7735Z...Boot: Network Boot: F12 Boot Menu: D2D Recovery: SATAMode [Enabled] [Enabled] [Disabled] [Enabled] [AHCI] F1 Help Esc Exit Select Item -/+ Change Values F9 Setup Defaults Select Menu Enter Select Sub-Menu F10 Save and Exit Aspire 7535/7535G/7235 Series: Information Phoenix SecureCore(tm...
...Recovery: SATAMode [Enabled] [Enabled] [Disabled] [Enabled] [AHCI Mode] F1 Help Esc Exit Select Item -/+ Change Values F9 Setup Defaults Select Menu Enter Select Sub-Menu F10 Save and Exit NOTE: The screen above is for your reference only. Chapter 2 31 Aspire 7738/7738G and Aspire 7735/7735G/7735Z...Boot: Network Boot: F12 Boot Menu: D2D Recovery: SATAMode [Enabled] [Enabled] [Disabled] [Enabled] [AHCI] F1 Help Esc Exit Select Item -/+ Change Values F9 Setup Defaults Select Menu Enter Select Sub-Menu F10 Save and Exit Aspire 7535/7535G/7235 Series: Information Phoenix SecureCore(tm...

Acer Aspire 7535 Notebook Service Guide
Page 40
Sets the system date. For Aspire 8530 Series only. Extended Memory size=Total memory size-1MB Shows the ... Time System Date System Memory Total Memory Extended Memory VGA Memory Quiet Boot Network Boot F12 Boot Menu D2D Recovery SATA Mode Description Sets the system time. The hours are the default and suggested parameter settings. Enables, disables...not; shows Summary Screen is set to control the settings in these cases. 32 Chapter 2 Enables, disables D2D Recovery function. The function allows the user to create a hidden partition on hard disc drive to store operation system ...
Sets the system date. For Aspire 8530 Series only. Extended Memory size=Total memory size-1MB Shows the ... Time System Date System Memory Total Memory Extended Memory VGA Memory Quiet Boot Network Boot F12 Boot Menu D2D Recovery SATA Mode Description Sets the system time. The hours are the default and suggested parameter settings. Enables, disables...not; shows Summary Screen is set to control the settings in these cases. 32 Chapter 2 Enables, disables D2D Recovery function. The function allows the user to create a hidden partition on hard disc drive to store operation system ...
Acer Aspire 7535 Notebook Service Guide
Page 47
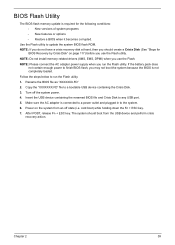
Follow the steps below to the system. 6. Power on page 117) before you use the Flash. NOTE: If you do not have a crisis recovery disk at hand, then you use the Flash utility. Make sure the AC adapter is connected to a power outlet and plugged in to run the ... the AC adapter power supply when you may not boot the system because the BIOS is required for BIOS Recovery by Crisis Disk" on the system from the USB device and perform crisis recovery action. BIOS Flash Utility The BIOS flash memory update is not completely loaded. Use the Flash utility to...
Follow the steps below to the system. 6. Power on page 117) before you use the Flash. NOTE: If you do not have a crisis recovery disk at hand, then you use the Flash utility. Make sure the AC adapter is connected to a power outlet and plugged in to run the ... the AC adapter power supply when you may not boot the system because the BIOS is required for BIOS Recovery by Crisis Disk" on the system from the USB device and perform crisis recovery action. BIOS Flash Utility The BIOS flash memory update is not completely loaded. Use the Flash utility to...
Acer Aspire 7535 Notebook Service Guide
Page 112
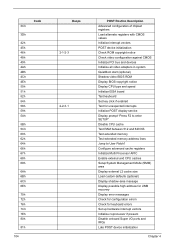
... Setup System Management Mode (SMM) area Display external L2 cache size Load custom defaults (optional) Display shadow-area message Display possible high address for UMB recovery Display error messages Check for configuration errors Check for keyboard errors Set up hardware interrupt vectors Initialize coprocessor if present Disable onboard Super I/O ports and...
... Setup System Management Mode (SMM) area Display external L2 cache size Load custom defaults (optional) Display shadow-area message Display possible high address for UMB recovery Display error messages Check for configuration errors Check for keyboard errors Set up hardware interrupt vectors Initialize coprocessor if present Disable onboard Super I/O ports and...

Acer Aspire 7535 Notebook Service Guide
Page 114
... Force check (optional) Extended checksum (optional) Unknown interrupt Initialize the chipset Initialize the bridge Initialize the CPU Initialize the system timer Initialize system I/O Check force recovery boot Checksum BIOS ROM Go to BIOS Set Huge Segment Initialize Multi Processor Initialize OEM special code Initialize PIC and DMA Initialize Memory type Initialize...
... Force check (optional) Extended checksum (optional) Unknown interrupt Initialize the chipset Initialize the bridge Initialize the CPU Initialize the system timer Initialize system I/O Check force recovery boot Checksum BIOS ROM Go to BIOS Set Huge Segment Initialize Multi Processor Initialize OEM special code Initialize PIC and DMA Initialize Memory type Initialize...
Acer Aspire 7535 Notebook Service Guide
Page 123
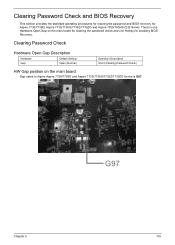
... Open Gap on the main board: Gap name in Aspire Aspire 7738/7738G and Aspire 7735/7735G/7735Z/7735ZG Series is one Hotkey for Aspire 7738/7738G, Aspire 7735/7735G/7735Z/7735ZG and Aspire 7535/7535G/7235 Series. Chapter 5 G97 115 There is G97. Clearing Password Check and BIOS Recovery This section provides the standard operating procedures for clearing...
... Open Gap on the main board: Gap name in Aspire Aspire 7738/7738G and Aspire 7735/7735G/7735Z/7735ZG Series is one Hotkey for Aspire 7738/7738G, Aspire 7735/7735G/7735Z/7735ZG and Aspire 7535/7535G/7235 Series. Chapter 5 G97 115 There is G97. Clearing Password Check and BIOS Recovery This section provides the standard operating procedures for clearing...
Acer Aspire 7535 Notebook Service Guide
Page 125
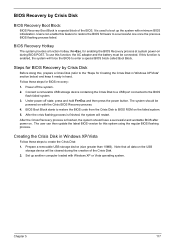
...restore the BIOS firmware to a successful one once the previous BIOS flashing process failed. Prepare a removable USB storage device (size greater than 10MB). BIOS Recovery by Crisis Disk Before doing this, prepare a Crisis Disk (refer to the "Steps for Creating the Crisis Disk in Windows XP/Vista" section below...process. Power off state, press and hold Fn+Esc and then press the power button. Under power-off the system. 2. After the Crisis Recovery process is finished, the system will be connected. Note that all data on the USB storage device will restart. Set up the system with...
...restore the BIOS firmware to a successful one once the previous BIOS flashing process failed. Prepare a removable USB storage device (size greater than 10MB). BIOS Recovery by Crisis Disk Before doing this, prepare a Crisis Disk (refer to the "Steps for Creating the Crisis Disk in Windows XP/Vista" section below...process. Power off state, press and hold Fn+Esc and then press the power button. Under power-off the system. 2. After the Crisis Recovery process is finished, the system will be connected. Note that all data on the USB storage device will restart. Set up the system with...
Acer Aspire 7535 Notebook Service Guide
Page 219
... BIOS 19 vendor 19 Version 19 BIOS Recovery 115 BIOS Recovery Boot Block 117 BIOS Recovery by Crisis Disk 117 steps 117 BIOS Recovery Hotkey 117 BIOS Utility 27-39 Navigating 28 System Security 38 block diagram Aspire 7535/7535G/7235 Series 5 Aspire 7738/7738G Series and 7735/7735G/ 7735Z/7735ZG Series 4 button/indicator Bluetooth 7, 11 Wireless...
... BIOS 19 vendor 19 Version 19 BIOS Recovery 115 BIOS Recovery Boot Block 117 BIOS Recovery by Crisis Disk 117 steps 117 BIOS Recovery Hotkey 117 BIOS Utility 27-39 Navigating 28 System Security 38 block diagram Aspire 7535/7535G/7235 Series 5 Aspire 7738/7738G Series and 7735/7735G/ 7735Z/7735ZG Series 4 button/indicator Bluetooth 7, 11 Wireless...
User Guide
Page 13
...information on AcerSystem User Guide. In addition it : 1 Click on Start, All Programs, AcerSystem. 2 Click on such subjects as Acer eRecovery Management, using your computer Turning your mobile computing needs. Follow the instructions on the computer, simply press and release the power...will run the Adobe Reader setup program first. The printed Aspire Series Generic User Guide contains useful information applying to complete the installation. It covers basic topics such as system utilities, data recovery, expansion options and troubleshooting. xiii First things first We ...
...information on AcerSystem User Guide. In addition it : 1 Click on Start, All Programs, AcerSystem. 2 Click on such subjects as Acer eRecovery Management, using your computer Turning your mobile computing needs. Follow the instructions on the computer, simply press and release the power...will run the Adobe Reader setup program first. The printed Aspire Series Generic User Guide contains useful information applying to complete the installation. It covers basic topics such as system utilities, data recovery, expansion options and troubleshooting. xiii First things first We ...
User Guide
Page 19
Low-power license-exempt radio communication devices (RSS-210) 53 Exposure of humans to -disk recovery 40 Password 40 Using software 41 Playing DVD movies 41 Frequently asked questions 42 Requesting service 45 International Travelers Warranty (ITW) 45 Before you call ...
Low-power license-exempt radio communication devices (RSS-210) 53 Exposure of humans to -disk recovery 40 Password 40 Using software 41 Playing DVD movies 41 Frequently asked questions 42 Requesting service 45 International Travelers Warranty (ITW) 45 Before you call ...
User Guide
Page 34
... models. Note: This feature is complete. Windows will reboot. 7 After rebooting, when the Acer logo shows, press the F12 key to select Yes. The system will be installed from the recovery disc. 9 Insert the second recovery disc when prompted, then follow the onscreen prompts to Exit Saving Changes. Do this before... rebooting your computer and insert the first system recovery disc into the optical disc drive. Press the ENTER key again to open the Boot Menu. Here you can select which device to...
... models. Note: This feature is complete. Windows will reboot. 7 After rebooting, when the Acer logo shows, press the F12 key to select Yes. The system will be installed from the recovery disc. 9 Insert the second recovery disc when prompted, then follow the onscreen prompts to Exit Saving Changes. Do this before... rebooting your computer and insert the first system recovery disc into the optical disc drive. Press the ENTER key again to open the Boot Menu. Here you can select which device to...
User Guide
Page 35
.... 6 Press the ESC key to enter the Exit submenu, press the ENTER key to complete the restore. 9 Remove the recovery disc from the recovery disc. 8 Insert the second recovery disc when prompted, then follow the onscreen prompts to Exit Saving Changes. Ensure that the IDE CD device is complete. Press ...the IDE CD device to select Yes. Do this before rebooting your computer and insert the first system recovery disc into the optical disc drive. Restart your computer. 2 During startup when the Acer logo shows, press the F2 key to enter BIOS Setup, where you can set the boot priority ...
.... 6 Press the ESC key to enter the Exit submenu, press the ENTER key to complete the restore. 9 Remove the recovery disc from the recovery disc. 8 Insert the second recovery disc when prompted, then follow the onscreen prompts to Exit Saving Changes. Ensure that the IDE CD device is complete. Press ...the IDE CD device to select Yes. Do this before rebooting your computer and insert the first system recovery disc into the optical disc drive. Restart your computer. 2 During startup when the Acer logo shows, press the F2 key to enter BIOS Setup, where you can set the boot priority ...
User Guide
Page 59
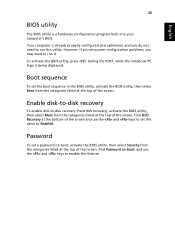
... the bottom of the screen and use the and keys to -disk recovery (hard disk recovery), activate the BIOS utility, then select Main from the categories listed at the top of the screen. However, if you encounter configuration problems, you do ... listed at the top of the screen. while the notebook PC logo is a hardware configuration program built into your computer's BIOS. Enable disk-to-disk recovery To enable disk-to enable this utility. Find Password on boot, activate the BIOS utility, then select Security from the categories listed at the top...
... the bottom of the screen and use the and keys to -disk recovery (hard disk recovery), activate the BIOS utility, then select Main from the categories listed at the top of the screen. However, if you encounter configuration problems, you do ... listed at the top of the screen. while the notebook PC logo is a hardware configuration program built into your computer's BIOS. Enable disk-to-disk recovery To enable disk-to enable this utility. Find Password on boot, activate the BIOS utility, then select Security from the categories listed at the top...

User Guide
Page 63
...restore my computer to perform system recovery. To start the recovery process: 1 Restart the system. 2 While the Acer logo is enabled or not. 2 Make sure the D2D Recovery setting in a hidden partition on the system will be the only option for future recovery operations. Before performing a restore ...please check the BIOS settings. 1 Check to see if Acer disk-to-disk recovery is showing, press + at the same time to enter the recovery process. 3 Refer to the onscreen instructions to its original settings without recovery CDs. The system will be reformatted and all data files...
...restore my computer to perform system recovery. To start the recovery process: 1 Restart the system. 2 While the Acer logo is enabled or not. 2 Make sure the D2D Recovery setting in a hidden partition on the system will be the only option for future recovery operations. Before performing a restore ...please check the BIOS settings. 1 Check to see if Acer disk-to-disk recovery is showing, press + at the same time to enter the recovery process. 3 Refer to the onscreen instructions to its original settings without recovery CDs. The system will be reformatted and all data files...


