Acer Aspire 7535 Notebook Service Guide
Page 7
... Special Key (only for certain models 15 Windows Mobility Center 16 Using the System Utilities 17 Acer Bio-Protection (only for certain models 17 Acer GridVista (dual-display compatible 18 Hardware Specifications and Configurations 19 System Utilities 27 BIOS Setup Utility...Disassembly and Replacement 41 Disassembly Requirements 41 General Information 42 Pre-disassembly Instructions 42 Disassembly Process 42 External Module Disassembly Process 43 External Modules Disassembly Flowchart 43 Removing the Battery Pack 44 Removing the SD Dummy Card 45 Removing the Hard Disk Drive 2 ...
... Special Key (only for certain models 15 Windows Mobility Center 16 Using the System Utilities 17 Acer Bio-Protection (only for certain models 17 Acer GridVista (dual-display compatible 18 Hardware Specifications and Configurations 19 System Utilities 27 BIOS Setup Utility...Disassembly and Replacement 41 Disassembly Requirements 41 General Information 42 Pre-disassembly Instructions 42 Disassembly Process 42 External Module Disassembly Process 43 External Modules Disassembly Flowchart 43 Removing the Battery Pack 44 Removing the SD Dummy Card 45 Removing the Hard Disk Drive 2 ...
Acer Aspire 7535 Notebook Service Guide
Page 102
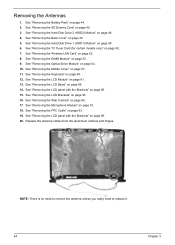
.... 15. See "Removing the LCD Module" on page 88. 20. See "Removing the LCD panel with the Brackets" on page 90. 17. See "Removing the Hard Disk Drive 2 (HDD2) Module" on page 60. 12. See "Removing the Keyboard" on page 46. 4. See "Removing the LCD Brackets" on page 52. 8. See ".... 14. Release the antenna cables from the aluminium notches and hinges. NOTE: There is no need to remove the antenna unless you really need to replace it. 94 Chapter 3 See "Removing the LCD Bezel" on page 57. 11. See "Removing the FPC Cable" on page 53. 9. See "Removing the ...
.... 15. See "Removing the LCD Module" on page 88. 20. See "Removing the LCD panel with the Brackets" on page 90. 17. See "Removing the Hard Disk Drive 2 (HDD2) Module" on page 60. 12. See "Removing the Keyboard" on page 46. 4. See "Removing the LCD Brackets" on page 52. 8. See ".... 14. Release the antenna cables from the aluminium notches and hinges. NOTE: There is no need to remove the antenna unless you really need to replace it. 94 Chapter 3 See "Removing the LCD Bezel" on page 57. 11. See "Removing the FPC Cable" on page 53. 9. See "Removing the ...
Acer Aspire 7535 Notebook Service Guide
Page 108
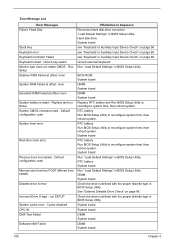
...- BIOS ROM System board DIMM System board DIMM System board Replace RTC battery and Run BIOS Setup Utility to reconfigure system time, then reboot system. System board Run "Load Default Settings" in Sequence Reconnect hard disk drive connector. Error Message List Error Messages Failure Fixed Disk Stuck Key... diskette type in BIOS Setup Utility. Cache disabled CPU ID: DMA Test Failed Software NMI Failed FRU/Action in BIOS Setup Utility. Hard disk drive System board see "Keyboard or Auxiliary Input Device Check" on page 96. see "Keyboard or Auxiliary Input Device Check" on page ...
...- BIOS ROM System board DIMM System board DIMM System board Replace RTC battery and Run BIOS Setup Utility to reconfigure system time, then reboot system. System board Run "Load Default Settings" in Sequence Reconnect hard disk drive connector. Error Message List Error Messages Failure Fixed Disk Stuck Key... diskette type in BIOS Setup Utility. Cache disabled CPU ID: DMA Test Failed Software NMI Failed FRU/Action in BIOS Setup Utility. Hard disk drive System board see "Keyboard or Auxiliary Input Device Check" on page 96. see "Keyboard or Auxiliary Input Device Check" on page ...

Acer Aspire 7535 Notebook Service Guide
Page 120
If the problem remains, replace the following devices: • Non-Acer devices • Printer, mouse, and other external devices • Battery pack • Hard disk drive • DIMM • CD-ROM/Diskette drive Module • PC Cards 4. Power-off the computer. 2. If the problem does not ...failing FRU. 7. Remove or disconnect all attached devices are supported by the computer. Determine if the problem has changed. 6. Do not replace a non-defective FRU: • System board • LCD assembly 112 Chapter 4 NOTE: Verify that all of the failure is inoperative...
If the problem remains, replace the following devices: • Non-Acer devices • Printer, mouse, and other external devices • Battery pack • Hard disk drive • DIMM • CD-ROM/Diskette drive Module • PC Cards 4. Power-off the computer. 2. If the problem does not ...failing FRU. 7. Remove or disconnect all attached devices are supported by the computer. Determine if the problem has changed. 6. Do not replace a non-defective FRU: • System board • LCD assembly 112 Chapter 4 NOTE: Verify that all of the failure is inoperative...
Acer Aspire 7535 Notebook Service Guide
Page 219
... Disk 117 steps 117 BIOS Recovery Hotkey 117 BIOS Utility 27-39 Navigating 28 System Security 38 block diagram Aspire 7535/7535G/7235 Series 5 Aspire 7738/7738G Series and 7735/7735G/ 7735Z/7735ZG Series 4 button/indicator Bluetooth 7, 11 Wireless LAN 7, 11 buttons easy-launch 11 C caps lock ...DIMM module removing 53 E Environment Test 206 Euro 15 External CD-ROM Drive Check 96 External Module Disassembly Flowchart 43 F Fingerprint/button and touchpad boards removing 68 Flash Utility 39 FRU (Field Replaceable Unit) List 121 H Hard disk 21 HDD 21 HDD activity indicator 6 HDD1 module removing 48 ...
... Disk 117 steps 117 BIOS Recovery Hotkey 117 BIOS Utility 27-39 Navigating 28 System Security 38 block diagram Aspire 7535/7535G/7235 Series 5 Aspire 7738/7738G Series and 7735/7735G/ 7735Z/7735ZG Series 4 button/indicator Bluetooth 7, 11 Wireless LAN 7, 11 buttons easy-launch 11 C caps lock ...DIMM module removing 53 E Environment Test 206 Euro 15 External CD-ROM Drive Check 96 External Module Disassembly Flowchart 43 F Fingerprint/button and touchpad boards removing 68 Flash Utility 39 FRU (Field Replaceable Unit) List 121 H Hard disk 21 HDD 21 HDD activity indicator 6 HDD1 module removing 48 ...


