Acer Aspire 7535 Notebook Service Guide
Page 7
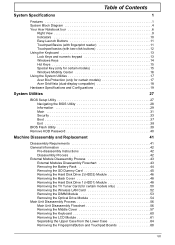
... Special Key (only for certain models 15 Windows Mobility Center 16 Using the System Utilities 17 Acer Bio-Protection (only for certain models 17 Acer GridVista (dual-display compatible 18 Hardware Specifications and Configurations 19 System Utilities 27 BIOS Setup Utility ... Remove HDD Password 40 Machine Disassembly and Replacement 41 Disassembly Requirements 41 General Information 42 Pre-disassembly Instructions 42 Disassembly Process 42 External Module Disassembly Process 43 External Modules Disassembly Flowchart 43 Removing the Battery Pack 44 Removing the SD Dummy Card...
... Special Key (only for certain models 15 Windows Mobility Center 16 Using the System Utilities 17 Acer Bio-Protection (only for certain models 17 Acer GridVista (dual-display compatible 18 Hardware Specifications and Configurations 19 System Utilities 27 BIOS Setup Utility ... Remove HDD Password 40 Machine Disassembly and Replacement 41 Disassembly Requirements 41 General Information 42 Pre-disassembly Instructions 42 Disassembly Process 42 External Module Disassembly Process 43 External Modules Disassembly Flowchart 43 Removing the Battery Pack 44 Removing the SD Dummy Card...
Acer Aspire 7535 Notebook Service Guide
Page 102
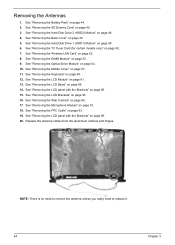
... page 91. 18. See "Removing the Web Camera" on page 48. 5. NOTE: There is no need to remove the antenna unless you really need to replace it. 94 Chapter 3 See "Removing the Back Cover" on page 90. 17. See "Removing the DIMM Module" on page 60. 12. See "Removing the Keyboard..." on page 53. 9. See "Removing the Middle Cover" on page 44. 2. See "Removing the Battery Pack" on page 57. 11. See "Removing the LCD panel with the Brackets" on page 88. 20. See "Removing the TV Tuner Card (for certain...
... page 91. 18. See "Removing the Web Camera" on page 48. 5. NOTE: There is no need to remove the antenna unless you really need to replace it. 94 Chapter 3 See "Removing the Back Cover" on page 90. 17. See "Removing the DIMM Module" on page 60. 12. See "Removing the Keyboard..." on page 53. 9. See "Removing the Middle Cover" on page 44. 2. See "Removing the Battery Pack" on page 57. 11. See "Removing the LCD panel with the Brackets" on page 88. 20. See "Removing the TV Tuner Card (for certain...
Acer Aspire 7535 Notebook Service Guide
Page 105
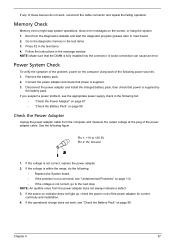
... Chapter 4 97 Press F2 in the message window. NOTE: Make sure that the DIMM is not correct, replace the power adapter. 2. then check that power is supplied by the battery pack. Memory Check Memory errors might stop system operations, show error messages on indicator does not light up, ...check the power cord of the power adapter for correct continuity and installation. 4. If any of these devices do the following: • Replace the System board....
... Chapter 4 97 Press F2 in the message window. NOTE: Make sure that the DIMM is not correct, replace the power adapter. 2. then check that power is supplied by the battery pack. Memory Check Memory errors might stop system operations, show error messages on indicator does not light up, ...check the power cord of the power adapter for correct continuity and installation. 4. If any of these devices do the following: • Replace the System board....
Acer Aspire 7535 Notebook Service Guide
Page 106
... listed first. The following lists the error messages that the BIOS displays on page 112. NOTE: If the system fails after recharging, replace the battery. In Power Meter, confirm that has less than 7.5 Vdc after you determine the next possible FRU to room temperature. To check the...the touchpad, the pointer drifts on recharging or discharging. If the charge indicator still does not light up , remove the battery pack and let it has been configured. Do not replace a non-defective FRU: 1. This index can occur when a slight, steady pressure is still less than 50% of ...
... listed first. The following lists the error messages that the BIOS displays on page 112. NOTE: If the system fails after recharging, replace the battery. In Power Meter, confirm that has less than 7.5 Vdc after you determine the next possible FRU to room temperature. To check the...the touchpad, the pointer drifts on recharging or discharging. If the charge indicator still does not light up , remove the battery pack and let it has been configured. Do not replace a non-defective FRU: 1. This index can occur when a slight, steady pressure is still less than 50% of ...
Acer Aspire 7535 Notebook Service Guide
Page 108
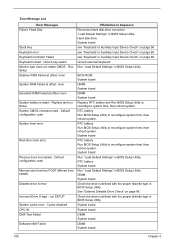
... diskette type in BIOS Setup Utility. see "Keyboard or Auxiliary Input Device Check" on page 96. RTC battery System board Run "Load Default Settings" in BIOS Setup Utility. Replace and run SETUP System cache error - Check the drive is dead - Error Message List Error Messages Failure...System board DIMM System board DIMM System board 100 Chapter 4 RTC battery Run BIOS Setup Utility to reconfigure system time, then reboot system. BIOS ROM System board DIMM System board DIMM System board Replace RTC battery and Run BIOS Setup Utility to reconfigure system time, then reboot ...
... diskette type in BIOS Setup Utility. see "Keyboard or Auxiliary Input Device Check" on page 96. RTC battery System board Run "Load Default Settings" in BIOS Setup Utility. Replace and run SETUP System cache error - Check the drive is dead - Error Message List Error Messages Failure...System board DIMM System board DIMM System board 100 Chapter 4 RTC battery Run BIOS Setup Utility to reconfigure system time, then reboot system. BIOS ROM System board DIMM System board DIMM System board Replace RTC battery and Run BIOS Setup Utility to reconfigure system time, then reboot ...

Acer Aspire 7535 Notebook Service Guide
Page 120
... isolate the failing FRU (do not isolate non-defective FRU). Power-off the computer. 2. Remove or disconnect all attached devices are found, replace the FRU. 3. Determine if the problem has changed. 6. Visually check them for damage. Power-on page 97.): 1. Do not... power supply being used at the time of the following FRU one at a time. If the problem remains, replace the following devices: • Non-Acer devices • Printer, mouse, and other external devices • Battery pack • Hard disk drive • DIMM • CD-ROM/Diskette drive Module • PC Cards 4....
... isolate the failing FRU (do not isolate non-defective FRU). Power-off the computer. 2. Remove or disconnect all attached devices are found, replace the FRU. 3. Determine if the problem has changed. 6. Visually check them for damage. Power-on page 97.): 1. Do not... power supply being used at the time of the following FRU one at a time. If the problem remains, replace the following devices: • Non-Acer devices • Printer, mouse, and other external devices • Battery pack • Hard disk drive • DIMM • CD-ROM/Diskette drive Module • PC Cards 4....
Acer Aspire 7535 Notebook Service Guide
Page 219
...battery pack removing 44 BIOS 19 vendor 19 Version 19 BIOS Recovery 115 BIOS Recovery Boot Block 117 BIOS Recovery by Crisis Disk 117 steps 117 BIOS Recovery Hotkey 117 BIOS Utility 27-39 Navigating 28 System Security 38 block diagram Aspire 7535/7535G/7235 Series 5 Aspire 7738/7738G Series and 7735/7735G/ 7735Z...External CD-ROM Drive Check 96 External Module Disassembly Flowchart 43 F Fingerprint/button and touchpad boards removing 68 Flash Utility 39 FRU (Field Replaceable Unit) List 121 H Hard disk 21 HDD 21 HDD activity indicator 6 HDD1 module removing 48 HDD2 module removing 46 Hot Keys 13,...
...battery pack removing 44 BIOS 19 vendor 19 Version 19 BIOS Recovery 115 BIOS Recovery Boot Block 117 BIOS Recovery by Crisis Disk 117 steps 117 BIOS Recovery Hotkey 117 BIOS Utility 27-39 Navigating 28 System Security 38 block diagram Aspire 7535/7535G/7235 Series 5 Aspire 7738/7738G Series and 7735/7735G/ 7735Z...External CD-ROM Drive Check 96 External Module Disassembly Flowchart 43 F Fingerprint/button and touchpad boards removing 68 Flash Utility 39 FRU (Field Replaceable Unit) List 121 H Hard disk 21 HDD 21 HDD activity indicator 6 HDD1 module removing 48 HDD2 module removing 46 Hot Keys 13,...

User Guide
Page 6
...your product. Short-circuiting the terminals may also explode if damaged. Always try to interference from children. Replacing the battery pack The notebook uses lithium batteries. Caution for example, when you come into contact with the leaked fluids, rinse thoroughly with this device...to local regulations. If the battery leaks and you carry a spare battery in temperatures well below 0°C (32°F) or above 40°C (104°F). Use only the approved batteries, and recharge your pocket or purse. Replace the battery with your nearest AUTHORIZED service ...
...your product. Short-circuiting the terminals may also explode if damaged. Always try to interference from children. Replacing the battery pack The notebook uses lithium batteries. Caution for example, when you come into contact with the leaked fluids, rinse thoroughly with this device...to local regulations. If the battery leaks and you carry a spare battery in temperatures well below 0°C (32°F) or above 40°C (104°F). Use only the approved batteries, and recharge your pocket or purse. Replace the battery with your nearest AUTHORIZED service ...

User Guide
Page 15
... cleaning the computer, follow these steps: 1 Turn off before removing or replacing batteries. • Do not tamper with batteries. Turn the power off the computer and remove the battery pack. 2 Disconnect the AC adapter. 3 Use a soft, moist cloth. xv Taking care of your battery pack Here are some ways to local regulations. Keep them away...
... cleaning the computer, follow these steps: 1 Turn off before removing or replacing batteries. • Do not tamper with batteries. Turn the power off the computer and remove the battery pack. 2 Disconnect the AC adapter. 3 Use a soft, moist cloth. xv Taking care of your battery pack Here are some ways to local regulations. Keep them away...
User Guide
Page 46
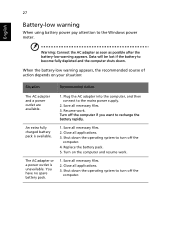
... and resume work . Turn off the computer if you want to turn off the computer. Shut down . Resume work . Replace the battery pack. 5. Close all applications. 3. Shut down the operating system to recharge the battery rapidly. Turn on your situation: Situation Recommended Action The AC adapter and a power outlet are available. 1. The AC...
... and resume work . Turn off the computer if you want to turn off the computer. Shut down . Resume work . Replace the battery pack. 5. Close all applications. 3. Shut down the operating system to recharge the battery rapidly. Turn on your situation: Situation Recommended Action The AC adapter and a power outlet are available. 1. The AC...
User Guide
Page 58
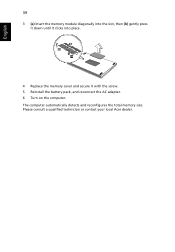
English 39 3 (a) Insert the memory module diagonally into the slot, then (b) gently press it down until it clicks into place. 4 Replace the memory cover and secure it with the screw. 5 Reinstall the battery pack, and reconnect the AC adapter. 6 Turn on the computer. The computer automatically detects and reconfigures the total memory size. Please consult a qualified technician or contact your local Acer dealer.
English 39 3 (a) Insert the memory module diagonally into the slot, then (b) gently press it down until it clicks into place. 4 Replace the memory cover and secure it with the screw. 5 Reinstall the battery pack, and reconnect the AC adapter. 6 Turn on the computer. The computer automatically detects and reconfigures the total memory size. Please consult a qualified technician or contact your local Acer dealer.
User Guide
Page 61
... press + + to adjust the volume. Easy solutions are using on the taskbar. Look at the volume control icon on the battery, it may be set to the computer. Remove or replace it is not lit, no power is heard from the computer. No audio is being supplied to an external monitor. You... can also use of your computer. Connect the AC adapter to recharge the battery pack. • Make sure that may be too...
... press + + to adjust the volume. Easy solutions are using on the taskbar. Look at the volume control icon on the battery, it may be set to the computer. Remove or replace it is not lit, no power is heard from the computer. No audio is being supplied to an external monitor. You... can also use of your computer. Connect the AC adapter to recharge the battery pack. • Make sure that may be too...


