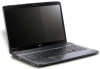
Acer Aspire 7535 Notebook Service Guide
Page 7
...Specifications 1 Features 1 System Block Diagram 4 Your Acer Notebook tour 6 Right View 9 Indicators 10 Easy-Launch Buttons 11 Touchpad Basics (with fingerprint reader 11 Touchpad basics (with two-click buttons 12 Using the Keyboard 13 Lock Keys and numeric keypad 13 Windows Keys...Acer GridVista (dual-display compatible 18 Hardware Specifications and Configurations 19 System Utilities 27 BIOS Setup Utility 27 Navigating the BIOS Utility 28 Information 29 Main 31 Security 33 Boot 37 Exit 38 BIOS Flash Utility 39 Remove HDD Password 40 Machine Disassembly and Replacement...
...Specifications 1 Features 1 System Block Diagram 4 Your Acer Notebook tour 6 Right View 9 Indicators 10 Easy-Launch Buttons 11 Touchpad Basics (with fingerprint reader 11 Touchpad basics (with two-click buttons 12 Using the Keyboard 13 Lock Keys and numeric keypad 13 Windows Keys...Acer GridVista (dual-display compatible 18 Hardware Specifications and Configurations 19 System Utilities 27 BIOS Setup Utility 27 Navigating the BIOS Utility 28 Information 29 Main 31 Security 33 Boot 37 Exit 38 BIOS Flash Utility 39 Remove HDD Password 40 Machine Disassembly and Replacement...
Acer Aspire 7535 Notebook Service Guide
Page 8
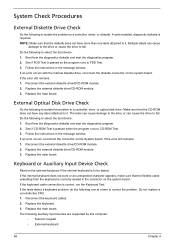
...Removing the Antennas 94 Troubleshooting 95 System Check Procedures 96 External Diskette Drive Check 96 External Optical Disk Drive Check 96 Keyboard or Auxiliary Input Device Check 96 Memory Check 97 Power System Check 97 Touchpad Check 98 Power-On Self-Test (POST... Disk 117 FRU (Field Replaceable Unit) List 121 Aspire 7738/7738G Series, Aspire7735/7735G/7735Z/7735ZG Series and Aspire 7535/7535G/7235 Series Exploded Diagram 122 Model Definition and Configuration 183 Aspire 7738/7738G Series 184 Aspire 7735/7735G/7735Z/7735ZG Series 193 Aspire 7535/7535G/7235 Series 198...
...Removing the Antennas 94 Troubleshooting 95 System Check Procedures 96 External Diskette Drive Check 96 External Optical Disk Drive Check 96 Keyboard or Auxiliary Input Device Check 96 Memory Check 97 Power System Check 97 Touchpad Check 98 Power-On Self-Test (POST... Disk 117 FRU (Field Replaceable Unit) List 121 Aspire 7738/7738G Series, Aspire7735/7735G/7735Z/7735ZG Series and Aspire 7535/7535G/7235 Series Exploded Diagram 122 Model Definition and Configuration 183 Aspire 7738/7738G Series 184 Aspire 7735/7735G/7735Z/7735ZG Series 193 Aspire 7535/7535G/7235 Series 198...
Acer Aspire 7535 Notebook Service Guide
Page 102
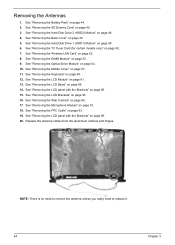
... antenna cables from the aluminium notches and hinges. NOTE: There is no need to remove the antenna unless you really need to replace it. 94 Chapter 3 See "Removing the Keyboard" on page 54. 10. See "Removing the Optical Drive Module" on page 60. 12. Removing the Antennas 1. See "Removing the DIMM Module...
... antenna cables from the aluminium notches and hinges. NOTE: There is no need to remove the antenna unless you really need to replace it. 94 Chapter 3 See "Removing the Keyboard" on page 54. 10. See "Removing the Optical Drive Module" on page 60. 12. Removing the Antennas 1. See "Removing the DIMM Module...
Acer Aspire 7535 Notebook Service Guide
Page 104
... character appears, make sure that the flexible cable extending from the keyboard is required. If the keyboard cable connection is passed as the program runs to FDD Test. 3. Reconnect the keyboard cables. 2. Replace the keyboard. 3. If an error occurs with the internal diskette drive, reconnect... the diskette connector on the System board. Replace the main board. The following to select the test device. 1. ...
... character appears, make sure that the flexible cable extending from the keyboard is required. If the keyboard cable connection is passed as the program runs to FDD Test. 3. Reconnect the keyboard cables. 2. Replace the keyboard. 3. If an error occurs with the internal diskette drive, reconnect... the diskette connector on the System board. Replace the main board. The following to select the test device. 1. ...
Acer Aspire 7535 Notebook Service Guide
Page 108
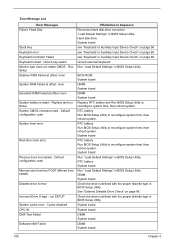
...ID: DMA Test Failed Software NMI Failed FRU/Action in BIOS Setup Utility. BIOS ROM System board DIMM System board DIMM System board Replace RTC battery and Run BIOS Setup Utility to reconfigure system time, then reboot system. System board Run "Load Default Settings" in Sequence... Reconnect hard disk drive connector. Replace and run SETUP System cache error - see "Keyboard or Auxiliary Input Device Check" on page 96. System board RTC battery Run BIOS Setup Utility to reconfigure system time...
...ID: DMA Test Failed Software NMI Failed FRU/Action in BIOS Setup Utility. BIOS ROM System board DIMM System board DIMM System board Replace RTC battery and Run BIOS Setup Utility to reconfigure system time, then reboot system. System board Run "Load Default Settings" in Sequence... Reconnect hard disk drive connector. Replace and run SETUP System cache error - see "Keyboard or Auxiliary Input Device Check" on page 96. System board RTC battery Run BIOS Setup Utility to reconfigure system time...


