
Installation Guide
Page 5
Table of Contents Welcome What's in the Box 1 The Xerox DocuMate 520 Scanner 2 What You Need 4 Documentation 4 Installation Step 1: Assemble the Scanner 5 Step 2: Install the Software 8 Step 3: Connect and Power On the Scanner 11 Step 4: Connect the USB Cable 12 Check Out the Scanner 14 Scanning from Buttons Loading Documents to Scan 16 Scanning ... Setting the Scan Area 39 Reversing the Image 41 Adjusting Color and Gray Images 42 Adjusting Color Settings 45 Adjusting the Scanner's Power Saving Time 51 Scanning from Windows ME or XP 51 DocuMate 520 Scanner Installation Guide v
Table of Contents Welcome What's in the Box 1 The Xerox DocuMate 520 Scanner 2 What You Need 4 Documentation 4 Installation Step 1: Assemble the Scanner 5 Step 2: Install the Software 8 Step 3: Connect and Power On the Scanner 11 Step 4: Connect the USB Cable 12 Check Out the Scanner 14 Scanning from Buttons Loading Documents to Scan 16 Scanning ... Setting the Scan Area 39 Reversing the Image 41 Adjusting Color and Gray Images 42 Adjusting Color Settings 45 Adjusting the Scanner's Power Saving Time 51 Scanning from Windows ME or XP 51 DocuMate 520 Scanner Installation Guide v

Installation Guide
Page 6
Maintenance Clearing Paper Jams 56 Care and Maintenance 57 Cleaning the Scanner Glass 57 Cleaning the Automatic Document Feeder 57 Replacing the ADF Pad Assembly 58 Troubleshooting 59 Uninstalling Your Scanner 61 Step 1: Uninstalling the DocuMate Software 61 Step 2: Uninstalling the PaperPort Software 62 DocuMate 520 Scanner Specifications 63 Xerox DocuMate 520 Parts List 64 Index 65 DocuMate 520 Scanner Installation Guide vi
Maintenance Clearing Paper Jams 56 Care and Maintenance 57 Cleaning the Scanner Glass 57 Cleaning the Automatic Document Feeder 57 Replacing the ADF Pad Assembly 58 Troubleshooting 59 Uninstalling Your Scanner 61 Step 1: Uninstalling the DocuMate Software 61 Step 2: Uninstalling the PaperPort Software 62 DocuMate 520 Scanner Specifications 63 Xerox DocuMate 520 Parts List 64 Index 65 DocuMate 520 Scanner Installation Guide vi

Installation Guide
Page 7
... where you have installed the software. WARNING: Do not plug in the USB cable until after you purchased the scanner. DocuMate 520 Scanner USB Cable AC Power Cable Paper Guide Paper Guide Extension Paper Stop Power Supply Replaceable ADF Pad Installation CD Installation Guide... and Quick Install Card DocuMate 520 Scanner Installation Guide 1 Carefully follow the steps and sequence described in the Box Before proceeding, check the contents of items or single items, and place their images on page 5. Welcome Your new Xerox DocuMate 520 scanner can scan stacks of the...
... where you have installed the software. WARNING: Do not plug in the USB cable until after you purchased the scanner. DocuMate 520 Scanner USB Cable AC Power Cable Paper Guide Paper Guide Extension Paper Stop Power Supply Replaceable ADF Pad Installation CD Installation Guide... and Quick Install Card DocuMate 520 Scanner Installation Guide 1 Carefully follow the steps and sequence described in the Box Before proceeding, check the contents of items or single items, and place their images on page 5. Welcome Your new Xerox DocuMate 520 scanner can scan stacks of the...

Installation Guide
Page 8
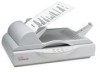
Welcome The Xerox DocuMate 520 Scanner Document Cover Document Pad Glass Reference Frame Paper Stop Paper Guide Extension Paper Guide Automatic Document Feeder DocuMate Buttons and Status Light USB Port ADF port Power jack Power On/Off Switch ADF Cable 2 DocuMate 520 Scanner Installation Guide
Welcome The Xerox DocuMate 520 Scanner Document Cover Document Pad Glass Reference Frame Paper Stop Paper Guide Extension Paper Guide Automatic Document Feeder DocuMate Buttons and Status Light USB Port ADF port Power jack Power On/Off Switch ADF Cable 2 DocuMate 520 Scanner Installation Guide

Installation Guide
Page 10
...PC with the following documentation: • Quick Install Card-abbreviated installation instructions. • DocuMate 520 Scanner Installation Guide-on the Installation CD; To set your monitor are as many colors as ...double-click Display, and then click the Settings tab. Set the resolution to at least 800 by 600 pixels. Your scanner is delivered with : • A CD-ROM drive • An available Universal Serial Bus (USB) port; 1.1...VGA or SVGA Monitor Recommended settings for the scanner, Scan Manager, and PaperPort software applications. 4 DocuMate 520 Scanner Installation Guide
...PC with the following documentation: • Quick Install Card-abbreviated installation instructions. • DocuMate 520 Scanner Installation Guide-on the Installation CD; To set your monitor are as many colors as ...double-click Display, and then click the Settings tab. Set the resolution to at least 800 by 600 pixels. Your scanner is delivered with : • A CD-ROM drive • An available Universal Serial Bus (USB) port; 1.1...VGA or SVGA Monitor Recommended settings for the scanner, Scan Manager, and PaperPort software applications. 4 DocuMate 520 Scanner Installation Guide

Installation Guide
Page 11
.... Installation is a quick, four-step process: 1. Assemble the scanner 2. Connect and power on the scanner 4. Connect the USB cable to your computer Step 1: Assemble the Scanner All the components to assemble the scanner are included in the USB cable until after you have installed the software. DocuMate 520 Scanner Installation Guide 5 Install the software 3. Complete the installation...
.... Installation is a quick, four-step process: 1. Assemble the scanner 2. Connect and power on the scanner 4. Connect the USB cable to your computer Step 1: Assemble the Scanner All the components to assemble the scanner are included in the USB cable until after you have installed the software. DocuMate 520 Scanner Installation Guide 5 Install the software 3. Complete the installation...

Installation Guide
Page 12
... (A) on the Paper Guide onto their tabs (B) on the bottom of the assembled parts. The scanner will not scan when locked. 3. The catch tabs (C) snap into place. A B C 6 DocuMate 520 Scanner Installation Guide Installation 2. Slide the locking tab on the scanner and slide the Guide down into place. Unlocked position NOTE: The locking tab protects the...
... (A) on the Paper Guide onto their tabs (B) on the bottom of the assembled parts. The scanner will not scan when locked. 3. The catch tabs (C) snap into place. A B C 6 DocuMate 520 Scanner Installation Guide Installation 2. Slide the locking tab on the scanner and slide the Guide down into place. Unlocked position NOTE: The locking tab protects the...

Installation Guide
Page 13
DocuMate 520 Scanner Installation Guide 7 Insert the Paper Stop onto the back of the scanner and slide it downward to "Step 2: Install the Software". Installation 4. Insert the Paper Guide Extension into the Paper Guide and snap its tabs into place. 5. Proceed to snap its tabs into place. 6.
DocuMate 520 Scanner Installation Guide 7 Insert the Paper Stop onto the back of the scanner and slide it downward to "Step 2: Install the Software". Installation 4. Insert the Paper Guide Extension into the Paper Guide and snap its tabs into place. 5. Proceed to snap its tabs into place. 6.

Installation Guide
Page 14
... and make sure that no other software files. In the list of files on your desktop. The CD automatically starts. The next installation screen appears. 8 DocuMate 520 Scanner Installation Guide NOTE: If the CD does not automatically start, check the following: • Make sure the CD drive's door is completely shut. • Click...
... and make sure that no other software files. In the list of files on your desktop. The CD automatically starts. The next installation screen appears. 8 DocuMate 520 Scanner Installation Guide NOTE: If the CD does not automatically start, check the following: • Make sure the CD drive's door is completely shut. • Click...

Installation Guide
Page 16
Leave the window open and proceed to the next section,"Step 3: Connect and Power On the Scanner". 10 DocuMate 520 Scanner Installation Guide Installation 15. Serial Number 16. When you see the Connect Scanner window, STOP. On the Xerox Scanner Registration window, complete the required information, and then click Register. Note that the serial number for your scanner is located on the side of the scanner body. Do NOT click Finish.
Leave the window open and proceed to the next section,"Step 3: Connect and Power On the Scanner". 10 DocuMate 520 Scanner Installation Guide Installation 15. Serial Number 16. When you see the Connect Scanner window, STOP. On the Xerox Scanner Registration window, complete the required information, and then click Register. Note that the serial number for your scanner is located on the side of the scanner body. Do NOT click Finish.

Installation Guide
Page 17
Plug the power cord into the power supply and then into its power port on : 1. DocuMate 520 Scanner Installation Guide 11 Plug the ADF cable into the ADF port on . Installation Step 3: Connect and Power On the Scanner Connect the ADF cable, connect the scanner to a power source, and turn the power on the scanner. 3. Plug the power supply into a wall outlet. To connect the scanner and turn the power on the body of the scanner. 2.
Plug the power cord into the power supply and then into its power port on : 1. DocuMate 520 Scanner Installation Guide 11 Plug the ADF cable into the ADF port on . Installation Step 3: Connect and Power On the Scanner Connect the ADF cable, connect the scanner to a power source, and turn the power on the scanner. 3. Plug the power supply into a wall outlet. To connect the scanner and turn the power on the body of the scanner. 2.

Installation Guide
Page 18
...of the power port. Check your computer when connecting the scanner to connect the scanner. 12 DocuMate 520 Scanner Installation Guide Plug the USB cable into the USB port on the computer, keyboard, or into a USB port on the scanner. Plug the USB cable into a USB hub. The USB...is complete, a message tells you have to shut off the power to any available USB port. Step 4: Connect the USB Cable Your DocuMate 520 scanner connects to your computer's manual for the USB port locations. When the software installation is identified by its USB symbol. 2. Installation 4....
...of the power port. Check your computer when connecting the scanner to connect the scanner. 12 DocuMate 520 Scanner Installation Guide Plug the USB cable into the USB port on the computer, keyboard, or into a USB port on the scanner. Plug the USB cable into a USB hub. The USB...is complete, a message tells you have to shut off the power to any available USB port. Step 4: Connect the USB Cable Your DocuMate 520 scanner connects to your computer's manual for the USB port locations. When the software installation is identified by its USB symbol. 2. Installation 4....

Installation Guide
Page 20
... Windows taskbar (at the bottom right corner of the computer screen). Check for more information. 14 DocuMate 520 Scanner Installation Guide If you tried to the unlocked position. If you didn't restart the computer, it , the scanner is properly connected, the scanner icon looks like the one of the software files. Installation Check Out the...
... Windows taskbar (at the bottom right corner of the computer screen). Check for more information. 14 DocuMate 520 Scanner Installation Guide If you tried to the unlocked position. If you didn't restart the computer, it , the scanner is properly connected, the scanner icon looks like the one of the software files. Installation Check Out the...

Installation Guide
Page 21
...try all the above and in the Readme file, and the scanner icon still has a red X through it, and you may have a red X through it . The software finds the scanner and makes the connection. DocuMate 520 Scanner Installation Guide 15 Visit our Web site at www.xeroxscanners.com for... all the troubleshooting procedures described above problems, right-click the scanner icon with the red X over it , you 're ...
...try all the above and in the Readme file, and the scanner icon still has a red X through it, and you may have a red X through it . The software finds the scanner and makes the connection. DocuMate 520 Scanner Installation Guide 15 Visit our Web site at www.xeroxscanners.com for... all the troubleshooting procedures described above problems, right-click the scanner icon with the red X over it , you 're ...

Installation Guide
Page 22
Loading Documents to scan documents using the buttons on your DocuMate 520 scanner and the button panel on the Stop for legal-sized pages. You can also adjust the Paper Stop at the back of the scanner for the size of the paper. Push it in the Automatic Document Feeder: 1....Document Feeder. NOTE: Remove any staples or paper clips from Buttons This chapter explains how to Scan Your scanner can jam the feed mechanism and scratch the glass. 16 DocuMate 520 Scanner Installation Guide Staples and paper clips can scan a stack of documents in for lettersized pages. Unfold the ...
Loading Documents to scan documents using the buttons on your DocuMate 520 scanner and the button panel on the Stop for legal-sized pages. You can also adjust the Paper Stop at the back of the scanner for the size of the paper. Push it in the Automatic Document Feeder: 1....Document Feeder. NOTE: Remove any staples or paper clips from Buttons This chapter explains how to Scan Your scanner can jam the feed mechanism and scratch the glass. 16 DocuMate 520 Scanner Installation Guide Staples and paper clips can scan a stack of documents in for lettersized pages. Unfold the ...

Installation Guide
Page 23
To load a single item: 1. Align the item with their tops into the Automatic Document Feeder. DocuMate 520 Scanner Installation Guide 17 Place the item on the reference frame. 3. Load the stack of 5 x 7 inches (12.7 x 17.8 cm). Scanning from Buttons 2. IMPORTANT: Items scanned using the Automatic Document Feeder must be a minimum of documents face up, with the arrow on the scanner glass, face down. 2. Close the cover.
To load a single item: 1. Align the item with their tops into the Automatic Document Feeder. DocuMate 520 Scanner Installation Guide 17 Place the item on the reference frame. 3. Load the stack of 5 x 7 inches (12.7 x 17.8 cm). Scanning from Buttons 2. IMPORTANT: Items scanned using the Automatic Document Feeder must be a minimum of documents face up, with the arrow on the scanner glass, face down. 2. Close the cover.
Installation Guide
Page 25
..., the Configuration dialog box opens on your computer screen so you click the button on page 16 for each button. DocuMate 520 Scanner Installation Guide 19 The scanner scans the item and then sends the image to the printer or a destination application on your printer/copier at various ... Scans the item as a color photo and attaches it in the Automatic Document Feeder, or place an item face-down on the Scanner The scanner buttons are preconfigured to a preselected destination software application. To scan from Buttons About the Buttons on the glass. Scanning from the Button...
..., the Configuration dialog box opens on your computer screen so you click the button on page 16 for each button. DocuMate 520 Scanner Installation Guide 19 The scanner scans the item and then sends the image to the printer or a destination application on your printer/copier at various ... Scans the item as a color photo and attaches it in the Automatic Document Feeder, or place an item face-down on the Scanner The scanner buttons are preconfigured to a preselected destination software application. To scan from Buttons About the Buttons on the glass. Scanning from the Button...
Installation Guide
Page 26
...have an application that corresponds to that meet your scanner to a computer, the scanner's software configures each button on the scanner and screen panel. Messages about the scanning appear above , the icon on the scanner. 20 DocuMate 520 Scanner Installation Guide About the Buttons on the Button Panel ... the Windows taskbar and the progress window shows the image as it . For example, in the destination application. Configuring the Scanner and Screen Buttons When you first connect your specific scanning requirements. The tabs across the top of the scan buttons. Clicking ...
...have an application that corresponds to that meet your scanner to a computer, the scanner's software configures each button on the scanner and screen panel. Messages about the scanning appear above , the icon on the scanner. 20 DocuMate 520 Scanner Installation Guide About the Buttons on the Button Panel ... the Windows taskbar and the progress window shows the image as it . For example, in the destination application. Configuring the Scanner and Screen Buttons When you first connect your specific scanning requirements. The tabs across the top of the scan buttons. Clicking ...

Installation Guide
Page 27
.... Select format and page(s) options for the button See "Setting Preferences" on page 29 for the Scan button because the Scan tab is set preferences. DocuMate 520 Scanner Installation Guide 21 IMPORTANT: To get additional help with the configuration named Scan Document (OCR Quality), and then open PaperPort to send the scanned image...
.... Select format and page(s) options for the button See "Setting Preferences" on page 29 for the Scan button because the Scan tab is set preferences. DocuMate 520 Scanner Installation Guide 21 IMPORTANT: To get additional help with the configuration named Scan Document (OCR Quality), and then open PaperPort to send the scanned image...

Installation Guide
Page 28
... for the scan button you clicked is selected for you. 22 DocuMate 520 Scanner Installation Guide The Configuration dialog box opens. To open the Configuration dialog box from the scanner's shortcut menu, or the Button Panel on the shortcut menu. Right-click the scanner icon. Scanner icon The shortcut menu appears. 2. The Configuration dialog box opens...
... for the scan button you clicked is selected for you. 22 DocuMate 520 Scanner Installation Guide The Configuration dialog box opens. To open the Configuration dialog box from the scanner's shortcut menu, or the Button Panel on the shortcut menu. Right-click the scanner icon. Scanner icon The shortcut menu appears. 2. The Configuration dialog box opens...
