User Guide
Page 4
... Cartridge 2.5 Loading Paper 2.7 Connecting Telephone Line 2.11 Connecting a Printer Cable 2.12 For Local Printing 2.12 For Network Printing (WorkCentre PE120i only) ......... 2.14 Turning the Machine On 2.14 Changing the Display Language 2.16 Setting the Machine ID 2.16 Entering Characters...Lamp Save Mode 2.26 Xerox Driver CD contains 2.28 Xerox Postscript Driver CD contains 2.28 Installing Xerox drivers in Windows 2.29 System Requirements 2.29 Installing Xerox Drivers in Microsoft Windows XP or Windows 2000 using the USB port 2.29 Installing Xerox Drivers in Microsoft Windows XP...
... Cartridge 2.5 Loading Paper 2.7 Connecting Telephone Line 2.11 Connecting a Printer Cable 2.12 For Local Printing 2.12 For Network Printing (WorkCentre PE120i only) ......... 2.14 Turning the Machine On 2.14 Changing the Display Language 2.16 Setting the Machine ID 2.16 Entering Characters...Lamp Save Mode 2.26 Xerox Driver CD contains 2.28 Xerox Postscript Driver CD contains 2.28 Installing Xerox drivers in Windows 2.29 System Requirements 2.29 Installing Xerox Drivers in Microsoft Windows XP or Windows 2000 using the USB port 2.29 Installing Xerox Drivers in Microsoft Windows XP...
User Guide
Page 6
... Default Settings 5.14 Setting the Time Out Option 5.15 Chapter 6: SCANNING Scanning Basics 6.2 Scanning From the Control Panel to an Application 6.3 Scanning Using the WIA Driver 6.4 Scanning to USB Flash Drive 6.5 Chapter 7: FAXING Changing the Fax Setup options 7.2 Available Fax Setup Options 7.3 Loading a Document 7.6 Selecting the Paper Tray 7.9 Adjusting the Document...
... Default Settings 5.14 Setting the Time Out Option 5.15 Chapter 6: SCANNING Scanning Basics 6.2 Scanning From the Control Panel to an Application 6.3 Scanning Using the WIA Driver 6.4 Scanning to USB Flash Drive 6.5 Chapter 7: FAXING Changing the Fax Setup options 7.2 Available Fax Setup Options 7.3 Loading a Document 7.6 Selecting the Paper Tray 7.9 Adjusting the Document...

User Guide
Page 8
... A.12 Printing Files A.13 Scanning a Document A.14 Using the Image Editor A.17 Appendix B: USING WINDOWS POSTSCRIPT DRIVER (WORKCENTRE PE120I ONLY) Installing PostScript Drivers B.2 Installing PostScript Drivers B.2 Using PostScript Printer Driver Features B.4 Accessing Printer Properties B.4 Printer Settings B.5 Appendix C: PRINTING FROM A MACINTOSH (WORKCENTRE PE120I ONLY) Installing Software for Macintosh C.2 Setting Up the Machine C.4 For a Network-connected Macintosh C.4 For...
... A.12 Printing Files A.13 Scanning a Document A.14 Using the Image Editor A.17 Appendix B: USING WINDOWS POSTSCRIPT DRIVER (WORKCENTRE PE120I ONLY) Installing PostScript Drivers B.2 Installing PostScript Drivers B.2 Using PostScript Printer Driver Features B.4 Accessing Printer Properties B.4 Printer Settings B.5 Appendix C: PRINTING FROM A MACINTOSH (WORKCENTRE PE120I ONLY) Installing Software for Macintosh C.2 Setting Up the Machine C.4 For a Network-connected Macintosh C.4 For...
User Guide
Page 27
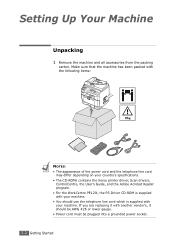
2 GETTING STARTED This chapter gives you step-by-step instructions for setting up your machine. This chapter includes: • Setting Up Your Machine Unpacking Installing the Toner Cartridge Loading Paper Connecting Telephone Line Turning the Machine On • Setting Up the Machine System Changing the Display Language Setting the Machine ID Setting the Time and Date Setting the Paper Size and Type Setting Sounds Using the Save Modes • Installing Xerox Drivers Installing Xerox drivers in Windows Using ControlCentre
2 GETTING STARTED This chapter gives you step-by-step instructions for setting up your machine. This chapter includes: • Setting Up Your Machine Unpacking Installing the Toner Cartridge Loading Paper Connecting Telephone Line Turning the Machine On • Setting Up the Machine System Changing the Display Language Setting the Machine ID Setting the Time and Date Setting the Paper Size and Type Setting Sounds Using the Save Modes • Installing Xerox Drivers Installing Xerox drivers in Windows Using ControlCentre
User Guide
Page 28
... telephone line cord may differ depending on your country's specifications. • The CD-ROMs contains the Xerox printer driver, Scan drivers, ControlCentre, the User's Guide, and the Adobe Acrobat Reader program. • For the WorkCentre PE120i, the PS Driver CD-ROM is supplied with your machine. • You should be AWG #26 or lower gauge...
... telephone line cord may differ depending on your country's specifications. • The CD-ROMs contains the Xerox printer driver, Scan drivers, ControlCentre, the User's Guide, and the Adobe Acrobat Reader program. • For the WorkCentre PE120i, the PS Driver CD-ROM is supplied with your machine. • You should be AWG #26 or lower gauge...

User Guide
Page 34
The settings made from the printer driver override the settings on both inside walls of the tray. 4 Pay attention to set up your machine for PC-printing. NOTE: After you load paper, you loaded. Paper overloading may cause paper jams. 5 Insert and slide the paper tray back into the machine. See page 2.21 for copying and faxing, or page 4.6 for the paper type and size you need to the paper limit mark on the control panel. 2.8 Getting Started
The settings made from the printer driver override the settings on both inside walls of the tray. 4 Pay attention to set up your machine for PC-printing. NOTE: After you load paper, you loaded. Paper overloading may cause paper jams. 5 Insert and slide the paper tray back into the machine. See page 2.21 for copying and faxing, or page 4.6 for the paper type and size you need to the paper limit mark on the control panel. 2.8 Getting Started

User Guide
Page 54
... B.2. 2.28 Getting Started For more information about using your computer. Xerox Postscript Driver CD contains: • PS Printer driver- Xerox Driver CD contains: • PCL Printer driver- Use this driver provides postscript printing functionality, see page 2.37. • Linux Printer Driver- TWAIN and Windows Image Acquisition (WIA) driver are available for scanning documents on your printer's features. Use in...
... B.2. 2.28 Getting Started For more information about using your computer. Xerox Postscript Driver CD contains: • PS Printer driver- Xerox Driver CD contains: • PCL Printer driver- Use this driver provides postscript printing functionality, see page 2.37. • Linux Printer Driver- TWAIN and Windows Image Acquisition (WIA) driver are available for scanning documents on your printer's features. Use in...
User Guide
Page 55
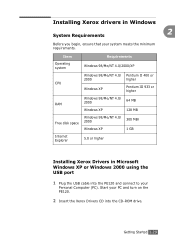
...98/Me/NT 4.0/ 2000 Windows XP 300 MBr 1 GB Internet Explorer 5.0 or higher Installing Xerox Drivers in Windows 2 System Requirements Before you begin, ensure that your Personal Computer (PC). Installing Xerox drivers in Microsoft Windows XP or Windows 2000 using the USB port 1 Plug the USB cable into... the CD-ROM drive. Start your PC and turn on the PE120. 2 Insert the Xerox Drivers CD into the PE120 and connect to your system meets the...
...98/Me/NT 4.0/ 2000 Windows XP 300 MBr 1 GB Internet Explorer 5.0 or higher Installing Xerox Drivers in Windows 2 System Requirements Before you begin, ensure that your Personal Computer (PC). Installing Xerox drivers in Microsoft Windows XP or Windows 2000 using the USB port 1 Plug the USB cable into... the CD-ROM drive. Start your PC and turn on the PE120. 2 Insert the Xerox Drivers CD into the PE120 and connect to your system meets the...
User Guide
Page 56
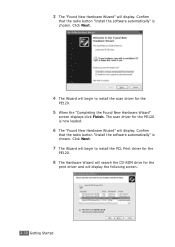
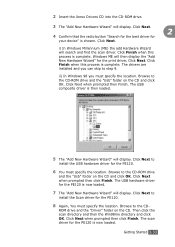
The scan driver for the print driver and will display. Confirm that the radio button "Install the software automatically" is chosen. Confirm that the radio button "Install the software automatically" is now ... Click Next. 7 The Wizard will begin to install the PCL Print driver for the PE120. 8 The Hardware Wizard will search the CD-ROM drive for the PE120 is chosen. 3 The "Found New Hardware Wizard" will begin to install the scan driver for the PE120. 5 When the "Completing the Found New Hardware Wizard" screen displays click...
The scan driver for the print driver and will display. Confirm that the radio button "Install the software automatically" is chosen. Confirm that the radio button "Install the software automatically" is now ... Click Next. 7 The Wizard will begin to install the PCL Print driver for the PE120. 8 The Hardware Wizard will search the CD-ROM drive for the PE120 is chosen. 3 The "Found New Hardware Wizard" will begin to install the scan driver for the PE120. 5 When the "Completing the Found New Hardware Wizard" screen displays click...
User Guide
Page 57
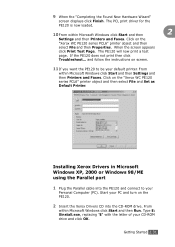
... Start and then Run. The PE120 will now print a test page. If the PE120 does not print then click Troubleshoot... Click on screen. 11 If you want the PE120 to your CD-ROM drive and click OK. Click on the PE120. 2 Insert the Xerox Drivers CD into the PE120 and connect to be your PC... and turn on the "Xerox WC PE120 series PCL6" printer object and then select File and then Properties...
... Start and then Run. The PE120 will now print a test page. If the PE120 does not print then click Troubleshoot... Click on screen. 11 If you want the PE120 to your CD-ROM drive and click OK. Click on the PE120. 2 Insert the Xerox Drivers CD into the PE120 and connect to be your PC... and turn on the "Xerox WC PE120 series PCL6" printer object and then select File and then Properties...

User Guide
Page 58
Installing Xerox Drivers in Microsoft Windows 98 or Windows Millennium using the USB port 1 Plug the USB cable into the PE120 and connect to install and then click Continue. 5 Click Continue. 6 Click Finish. Start your Personal Computer (PC). The driver installation is now complete. 3 When the language selection window appears, select the appropriate language and then click Continue. 4 Choose the components you want to your PC and turn on the PE120. 2.32 Getting Started
Installing Xerox Drivers in Microsoft Windows 98 or Windows Millennium using the USB port 1 Plug the USB cable into the PE120 and connect to install and then click Continue. 5 Click Continue. 6 Click Finish. Start your Personal Computer (PC). The driver installation is now complete. 3 When the language selection window appears, select the appropriate language and then click Continue. 4 Choose the components you want to your PC and turn on the PE120. 2.32 Getting Started
User Guide
Page 59
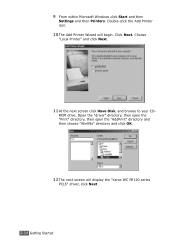
... The "Add New Hardware Wizard" will display. ii) In Windows 98 you can skip to install the USB hardware driver for the PE120 is chosen. The scan driver for the PE120. 6 You must specify the location. Click Next when prompted then Finish. Click Next when prompted then click Finish. ...2 Insert the Xerox Drivers CD into the CD-ROM drive. 3 The "Add New Hardware Wizard" will display. Browse to install the Scan driver for the PE120 is complete. Browse to the CD- Click Next when prompted then click ...
... The "Add New Hardware Wizard" will display. ii) In Windows 98 you can skip to install the USB hardware driver for the PE120 is chosen. The scan driver for the PE120. 6 You must specify the location. Click Next when prompted then Finish. Click Next when prompted then click Finish. ...2 Insert the Xerox Drivers CD into the CD-ROM drive. 3 The "Add New Hardware Wizard" will display. Browse to install the Scan driver for the PE120 is complete. Browse to the CD- Click Next when prompted then click ...
User Guide
Page 60
Open the "driver" directory, then open the "Print" directory, then open the "AddPrint" directory and then choose "Win98x" directory and click OK. 12 The next screen will begin. Choose "Local Printer" and click Next. 11 At the next screen click Have Disk, and browse to your CD- ROM drive. 9 From within Microsoft Windows click Start and then Settings and then Printers. Double-click the Add Printer icon. 10 The Add Printer Wizard will display the "Xerox WC PE120 series PCL6" driver, click Next. 2.34 Getting Started Click Next.
Open the "driver" directory, then open the "Print" directory, then open the "AddPrint" directory and then choose "Win98x" directory and click OK. 12 The next screen will begin. Choose "Local Printer" and click Next. 11 At the next screen click Have Disk, and browse to your CD- ROM drive. 9 From within Microsoft Windows click Start and then Settings and then Printers. Double-click the Add Printer icon. 10 The Add Printer Wizard will display the "Xerox WC PE120 series PCL6" driver, click Next. 2.34 Getting Started Click Next.
User Guide
Page 61
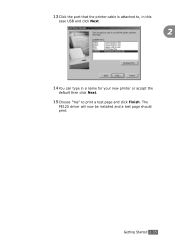
The PE120 driver will now be installed and a test page should print. Getting Started 2.35 13 Click the port that the printer cable is attached to, in this case USB and click Next. 2 14 You can type in a name for your new printer or accept the default then click Next. 15 Choose "Yes" to print a test page and click Finish.
The PE120 driver will now be installed and a test page should print. Getting Started 2.35 13 Click the port that the printer cable is attached to, in this case USB and click Next. 2 14 You can type in a name for your new printer or accept the default then click Next. 15 Choose "Yes" to print a test page and click Finish.
User Guide
Page 62
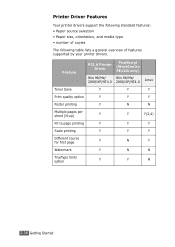
... • Paper size, orientation, and media type • number of copies The following table lists a general overview of features supported by your printer drivers. Feature PCL 6 Printer Driver PostScript (WorkCentre PE120i only) Win 98/Me/ Win 98/Me/ 2000/XP/NT4.0 2000/XP/NT4.0 Linux Toner Save Y Y Y Print quality option Y Y Y Poster printing Y N N Multiple...
... • Paper size, orientation, and media type • number of copies The following table lists a general overview of features supported by your printer drivers. Feature PCL 6 Printer Driver PostScript (WorkCentre PE120i only) Win 98/Me/ Win 98/Me/ 2000/XP/NT4.0 2000/XP/NT4.0 Linux Toner Save Y Y Y Print quality option Y Y Y Poster printing Y N N Multiple...
User Guide
Page 63
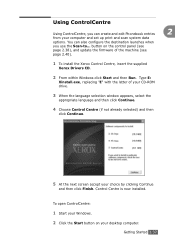
... Start button on the control panel (see page 2.38), and update the firmware of the machine (see page 2.40). 1 To install the Xerox Control Centre, insert the supplied Xerox Drivers CD. 2 From within Windows click Start and then Run. Using ControlCentre Using ControlCentre, you can also configure the destination launches when you use...
... Start button on the control panel (see page 2.38), and update the firmware of the machine (see page 2.40). 1 To install the Xerox Control Centre, insert the supplied Xerox Drivers CD. 2 From within Windows click Start and then Run. Using ControlCentre Using ControlCentre, you can also configure the destination launches when you use...
User Guide
Page 73
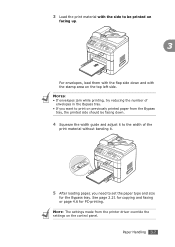
... printed on facing up. 3 For envelopes, load them with the flap side down and with the stamp area on previously printed paper from the printer driver override the settings on the control panel. Paper Handling 3.7 NOTE: The settings made from the Bypass tray, the printed side should be facing down. 4 Squeeze...
... printed on facing up. 3 For envelopes, load them with the flap side down and with the stamp area on previously printed paper from the printer driver override the settings on the control panel. Paper Handling 3.7 NOTE: The settings made from the Bypass tray, the printed side should be facing down. 4 Squeeze...
User Guide
Page 82
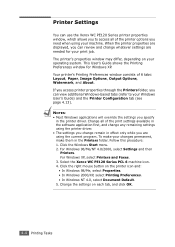
...any remaining settings using the current program. This User's Guide shows the Printing Preferences window for your print job. Select the Xerox WC PE120 Series PCL 6 machine icon. 4. Follow this procedure: 1. NOTES: • Most Windows applications will override the settings you ...change whatever settings are using the printer driver. • The settings you specify in the printer driver. The printer's properties window may differ, depending on...
...any remaining settings using the current program. This User's Guide shows the Printing Preferences window for your print job. Select the Xerox WC PE120 Series PCL 6 machine icon. 4. Follow this procedure: 1. NOTES: • Most Windows applications will override the settings you ...change whatever settings are using the printer driver. • The settings you specify in the printer driver. The printer's properties window may differ, depending on...
User Guide
Page 87
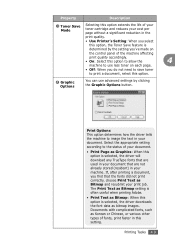
.... The Print Text as Bitmap setting is often useful when printing Adobe. • Print Text as Bitmap: When this option is selected, the driver downloads the font data as Korean or Chinese, or various other types of fonts, print faster in the print quality. • Use Printer's ...Setting: When you select this option, the Toner Save feature is selected, the driver will download any TrueType fonts that are not already stored (resident) in your document. Select the appropriate setting according to use less toner on each...
.... The Print Text as Bitmap setting is often useful when printing Adobe. • Print Text as Bitmap: When this option is selected, the driver downloads the font data as Korean or Chinese, or various other types of fonts, print faster in the print quality. • Use Printer's ...Setting: When you select this option, the Toner Save feature is selected, the driver will download any TrueType fonts that are not already stored (resident) in your document. Select the appropriate setting according to use less toner on each...
User Guide
Page 88
Print All Text Black When the Print All Text Black option is not checked, colored text prints in shades of the color it appears on the screen. When printing documents with high graphic content and relatively few TrueType fonts, printing performance (speed) may be enhanced in solid black, regardless of gray. 4.10 Printing Tasks When this option is checked, all text in your document prints in this option is selected, the driver downloads any fonts as graphics. Property 4 Graphic Options (continued) Description • Print Page as Bitmap: When this setting.
Print All Text Black When the Print All Text Black option is not checked, colored text prints in shades of the color it appears on the screen. When printing documents with high graphic content and relatively few TrueType fonts, printing performance (speed) may be enhanced in solid black, regardless of gray. 4.10 Printing Tasks When this option is checked, all text in your document prints in this option is selected, the driver downloads any fonts as graphics. Property 4 Graphic Options (continued) Description • Print Page as Bitmap: When this setting.


