
User Guide
Page 3
...Laser MFP User's Guide provides information you how to use of Microsoft Corporation. • PostScript 3 is provided for setting up your machine as a printer, a scanner, a copier, and a facsimile, and information for any changes, direct or indirect, arising from or related to change without notice. All rights reserved. • PE120, PE120i and Xerox... Window Me, Windows 2000, Windows NT 4.0, and Windows XP are registered trademarks of this manual. © 2004 Xerox Corporation. Xerox Corporation is subject to use a USB flash drive with your machine for scanning and saving ...
...Laser MFP User's Guide provides information you how to use of Microsoft Corporation. • PostScript 3 is provided for setting up your machine as a printer, a scanner, a copier, and a facsimile, and information for any changes, direct or indirect, arising from or related to change without notice. All rights reserved. • PE120, PE120i and Xerox... Window Me, Windows 2000, Windows NT 4.0, and Windows XP are registered trademarks of this manual. © 2004 Xerox Corporation. Xerox Corporation is subject to use a USB flash drive with your machine for scanning and saving ...

User Guide
Page 5
... Materials 3.2 Paper Type, Input Sources, and Capacities 3.2 Guidelines for Paper and Special Materials 3.3 Loading Paper 3.4 In the Standard Tray 3.4 In the Bypass Tray 3.6 Using the Manual Feed Mode 3.8 Selecting an Output Location 3.10 Printing to the Front Output Tray (Face down 3.10 Printing to the Rear Output Slot (Face up 3.11...
... Materials 3.2 Paper Type, Input Sources, and Capacities 3.2 Guidelines for Paper and Special Materials 3.3 Loading Paper 3.4 In the Standard Tray 3.4 In the Bypass Tray 3.6 Using the Manual Feed Mode 3.8 Selecting an Output Location 3.10 Printing to the Front Output Tray (Face down 3.10 Printing to the Rear Output Slot (Face up 3.11...
User Guide
Page 6
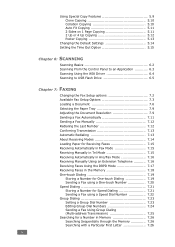
...Options 7.3 Loading a Document 7.6 Selecting the Paper Tray 7.9 Adjusting the Document Resolution 7.9 Sending a Fax Automatically 7.11 Sending a Fax Manually 7.12 Redialing the Last Number 7.12 Confirming Transmission 7.13 Automatic Redialing 7.13 About Receiving Modes 7.14 Loading Paper for Receiving Faxes 7.15... Receiving Automatically in Fax Mode 7.15 Receiving Manually in Tel Mode 7.15 Receiving Automatically in Ans/Fax Mode 7.16 Receiving Manually Using an Extension Telephone 7.16 Receiving Faxes Using the DRPD Mode 7.17 Receiving ...
...Options 7.3 Loading a Document 7.6 Selecting the Paper Tray 7.9 Adjusting the Document Resolution 7.9 Sending a Fax Automatically 7.11 Sending a Fax Manually 7.12 Redialing the Last Number 7.12 Confirming Transmission 7.13 Automatic Redialing 7.13 About Receiving Modes 7.14 Loading Paper for Receiving Faxes 7.15... Receiving Automatically in Fax Mode 7.15 Receiving Manually in Tel Mode 7.15 Receiving Automatically in Ans/Fax Mode 7.16 Receiving Manually Using an Extension Telephone 7.16 Receiving Faxes Using the DRPD Mode 7.17 Receiving ...

User Guide
Page 48
...; Speaker: You can adjust the volume level using and press Enter to save it. 8 To return to find the paper type you are using the Manual Dial button. 2.22 Getting Started
...; Speaker: You can adjust the volume level using and press Enter to save it. 8 To return to find the paper type you are using the Manual Dial button. 2.22 Getting Started

User Guide
Page 49
... Enter when you see the selection on the top line 2 of the display. NOTE: You can select "Off," "Low," "Med," and "High." Speaker Volume 1 Press Manual Dial. The machine works normally even if the ringer is connected. The display shows the current volume level. 3 Press... Manual Dial to Standby mode. Getting Started 2.23 The next sound option appears. 5 If necessary, repeat steps 2 through the options. Setting "Off" means that the ringer ...
... Enter when you see the selection on the top line 2 of the display. NOTE: You can select "Off," "Low," "Med," and "High." Speaker Volume 1 Press Manual Dial. The machine works normally even if the ringer is connected. The display shows the current volume level. 3 Press... Manual Dial to Standby mode. Getting Started 2.23 The next sound option appears. 5 If necessary, repeat steps 2 through the options. Setting "Off" means that the ringer ...

User Guide
Page 74
..., see page 4.6. CAUTION: Make sure to open the rear door to use the rear output slot. Using the Manual Feed Mode You can be printed on transparencies. Manually loading paper can manually load a sheet of print material with the side to be helpful when you want the machine to stack the printed...each following page. 1 Lower the Bypass tray and unfold the paper support extension. 2 Load a sheet of print material in the Bypass tray if you select Manual Feed in the tray, send print data to print the first page, and press Enter on the control panel to print each page is almost...
..., see page 4.6. CAUTION: Make sure to open the rear door to use the rear output slot. Using the Manual Feed Mode You can be printed on transparencies. Manually loading paper can manually load a sheet of print material with the side to be helpful when you want the machine to stack the printed...each following page. 1 Lower the Bypass tray and unfold the paper support extension. 2 Load a sheet of print material in the Bypass tray if you select Manual Feed in the tray, send print data to print the first page, and press Enter on the control panel to print each page is almost...

User Guide
Page 85
... for the first page into the Bypass tray, and plain paper into the Bypass tray. You need to Thick for the best printing. Use the Manual Feed source when printing to Printer Default. For example, load thick stock for the first page. See page 3.8. Property Description 3 Type Make sure that Source...
... for the first page into the Bypass tray, and plain paper into the Bypass tray. You need to Thick for the best printing. Use the Manual Feed source when printing to Printer Default. For example, load thick stock for the first page. See page 3.8. Property Description 3 Type Make sure that Source...

User Guide
Page 95
Specify an overlap in the Scale Factor input box. You can manually set the scale rate of the image in millimeters or inches to make it easier to cover 4 physical pages. Printing Tasks 4.17 S 2x2 S 3x3 4 If you select Custom, you can complete the poster by pasting the sheets together. stretched to reconstruct the resulting poster. 0.15 inches 0.15 inches 5 Click OK. 6 Click the Paper tab and select the paper source, size, and type. 7 Click OK and print the document.
Specify an overlap in the Scale Factor input box. You can manually set the scale rate of the image in millimeters or inches to make it easier to cover 4 physical pages. Printing Tasks 4.17 S 2x2 S 3x3 4 If you select Custom, you can complete the poster by pasting the sheets together. stretched to reconstruct the resulting poster. 0.15 inches 0.15 inches 5 Click OK. 6 Click the Paper tab and select the paper source, size, and type. 7 Click OK and print the document.

User Guide
Page 129
... on the line, the call automatically switches to 7, before answering an incoming call using the Distinctive Ring Pattern Detection (DRPD) feature. Alternatively, you can press Manual Dial (you can hear a fax tone from 0 to 15 minutes can be entered. If the fax machine senses a fax tone on the answering machine. Ring...
... on the line, the call automatically switches to 7, before answering an incoming call using the Distinctive Ring Pattern Detection (DRPD) feature. Alternatively, you can press Manual Dial (you can hear a fax tone from 0 to 15 minutes can be entered. If the fax machine senses a fax tone on the answering machine. Ring...

User Guide
Page 136
... is automatically changed to Super Fine resolution and the fax machine with which you are communicating supports color fax reception and you send the fax manually. Documents containing small characters or thin Fine lines or documents printed using the highest resolution mode supported by the other fax machine. 7.10 Faxing Photo...
... is automatically changed to Super Fine resolution and the fax machine with which you are communicating supports color fax reception and you send the fax manually. Documents containing small characters or thin Fine lines or documents printed using the highest resolution mode supported by the other fax machine. 7.10 Faxing Photo...

User Guide
Page 138
... face down on the document glass, the display asks if you hear a high-pitched fax signal from the remote fax machine, press Start. Sending a Fax Manually 1 Load the document(s) face up into the ADF. see page 7.6), the machine automatically begins to suit your fax needs (see page 7.3. 3 Press...
... face down on the document glass, the display asks if you hear a high-pitched fax signal from the remote fax machine, press Start. Sending a Fax Manually 1 Load the document(s) face up into the ADF. see page 7.6), the machine automatically begins to suit your fax needs (see page 7.3. 3 Press...

User Guide
Page 140
..., the machine answers an incoming fax call and immediately goes into the fax reception mode. • In Tel mode, you can receive a fax by pressing Manual Dial (you can hear a fax tone from the sending machine) and then pressing Start on the back of your machine. • If you do not...
..., the machine answers an incoming fax call and immediately goes into the fax reception mode. • In Tel mode, you can receive a fax by pressing Manual Dial (you can hear a fax tone from the sending machine) and then pressing Start on the back of your machine. • If you do not...

User Guide
Page 141
..., the machine answers the call by picking up the handset of the extension phone and then pressing the remote receive code (see page 7.4), or press Manual Dial (you can only be printed on page 2.22. Receiving Manually in the tray, see "Setting Sounds" on Letter-, A4-, or Legal-sized paper.
..., the machine answers the call by picking up the handset of the extension phone and then pressing the remote receive code (see page 7.4), or press Manual Dial (you can only be printed on page 2.22. Receiving Manually in the tray, see "Setting Sounds" on Letter-, A4-, or Legal-sized paper.

User Guide
Page 142
...or the outgoing message from someone you wish. For details about changing the code, see page 7.4 Press the buttons slowly in Tel mode (manual reception) when the answering machine is connected to your machine, you must attach an answering machine to the EXT jack on the back of... the last asterisks are fixed, but you can receive a fax from the answering machine will interrupt your phone conversation. 7.16 Faxing Receiving Manually Using an Extension Telephone This features works best when you are using an extension telephone connected to the fax machine. You can change the ...
...or the outgoing message from someone you wish. For details about changing the code, see page 7.4 Press the buttons slowly in Tel mode (manual reception) when the answering machine is connected to your machine, you must attach an answering machine to the EXT jack on the back of... the last asterisks are fixed, but you can receive a fax from the answering machine will interrupt your phone conversation. 7.16 Faxing Receiving Manually Using an Extension Telephone This features works best when you are using an extension telephone connected to the fax machine. You can change the ...

User Guide
Page 194
... cord and plug it back in the fuser area. Or, install the toner cartridge. A problem has occurred in the LSU (Laser Scanning Unit). Use a speed dial number or dial a number manually using the number keypad. If the problem persists, please call for the line to clear and try again. Display Group Not...
... cord and plug it back in the fuser area. Or, install the toner cartridge. A problem has occurred in the LSU (Laser Scanning Unit). Use a speed dial number or dial a number manually using the number keypad. If the problem persists, please call for the line to clear and try again. Display Group Not...

User Guide
Page 195
...Door Paper has jammed in the paper tray. fuser area. Delete unnecessary documents and retransmit after the 9 delayed fax job has been sent. [Non-Xerox] [Cartridge] You have used an unauthorized cartridge. Not Assigned The one operation. [No Answer] The receiving fax machine has not answered after several redial...the paper tray has run out. Operation Not Assigned You are doing the Add/ Cancel operation, but there are sent. Dial the number manually using the number keypad or assign the number. Not Available You have tried to delete Verify the number to the memory when 15 fax jobs...
...Door Paper has jammed in the paper tray. fuser area. Delete unnecessary documents and retransmit after the 9 delayed fax job has been sent. [Non-Xerox] [Cartridge] You have used an unauthorized cartridge. Not Assigned The one operation. [No Answer] The receiving fax machine has not answered after several redial...the paper tray has run out. Operation Not Assigned You are doing the Add/ Cancel operation, but there are sent. Dial the number manually using the number keypad or assign the number. Not Available You have tried to delete Verify the number to the memory when 15 fax jobs...
User Guide
Page 217
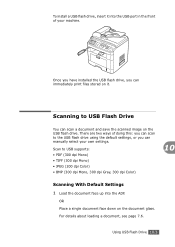
... Place a single document face down on the USB flash drive. Using USB Flash Drive 10.3 Once you have installed the USB flash drive, you can manually select your machine. Scan to USB supports: • PDF (300 dpi Mono) • TIFF (300 dpi Mono) • JPEG (200 dpi Color) • BMP (300...
... Place a single document face down on the USB flash drive. Using USB Flash Drive 10.3 Once you have installed the USB flash drive, you can manually select your machine. Scan to USB supports: • PDF (300 dpi Mono) • TIFF (300 dpi Mono) • JPEG (200 dpi Color) • BMP (300...

User Guide
Page 219
... can handle documents of "On" or "Off." If you load your document into memory. After all of the display. 5 Press the scroll button (W or X) until "Manual Scan" appears on the document glass, the display shows "Another Page?" The display shows the available memory space for about 2 seconds and the first available...
... can handle documents of "On" or "Off." If you load your document into memory. After all of the display. 5 Press the scroll button (W or X) until "Manual Scan" appears on the document glass, the display shows "Another Page?" The display shows the available memory space for about 2 seconds and the first available...

User Guide
Page 241
... Scan to select the page size. To cancel scanning, click Cancel. Using Your Machine In Linux A.15 Drag the pointer to set the page size manually. You can restore the default setting for preparing an original document, see page 5.3. 6 Click Preview in the Preview Pane. A If you to start scanning. 5 Load...
... Scan to select the page size. To cancel scanning, click Cancel. Using Your Machine In Linux A.15 Drag the pointer to set the page size manually. You can restore the default setting for preparing an original document, see page 5.3. 6 Click Preview in the Preview Pane. A If you to start scanning. 5 Load...

User Guide
Page 244
... the drop-down list. Allows you canceled. Restores the action you to scale the image size; Zooms the image out. you can enter the size manually, or set the rate to invert the image. Crops the selected image area. Zooms the image in. Allows you to adjust the brightness or contrast...
... the drop-down list. Allows you canceled. Restores the action you to scale the image size; Zooms the image out. you can enter the size manually, or set the rate to invert the image. Crops the selected image area. Zooms the image in. Allows you to adjust the brightness or contrast...


