User Guide
Page 4
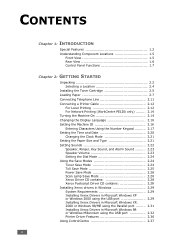
... Line 2.11 Connecting a Printer Cable 2.12 For Local Printing 2.12 For Network Printing (WorkCentre PE120i only) ......... 2.14 Turning the Machine On 2.14 Changing the Display Language 2.16 ...Xerox Driver CD contains 2.28 Xerox Postscript Driver CD contains 2.28 Installing Xerox drivers in Windows 2.29 System Requirements 2.29 Installing Xerox Drivers in Microsoft Windows XP or Windows 2000 using the USB port 2.29 Installing Xerox Drivers in Microsoft Windows XP, 2000 or Windows 98/ME using the Parallel port ......... 2.31 Installing Xerox Drivers in Microsoft Windows 98 or Windows...
... Line 2.11 Connecting a Printer Cable 2.12 For Local Printing 2.12 For Network Printing (WorkCentre PE120i only) ......... 2.14 Turning the Machine On 2.14 Changing the Display Language 2.16 ...Xerox Driver CD contains 2.28 Xerox Postscript Driver CD contains 2.28 Installing Xerox drivers in Windows 2.29 System Requirements 2.29 Installing Xerox Drivers in Microsoft Windows XP or Windows 2000 using the USB port 2.29 Installing Xerox Drivers in Microsoft Windows XP, 2000 or Windows 98/ME using the Parallel port ......... 2.31 Installing Xerox Drivers in Microsoft Windows 98 or Windows...

User Guide
Page 8
... Applications A.12 Printing Files A.13 Scanning a Document A.14 Using the Image Editor A.17 Appendix B: USING WINDOWS POSTSCRIPT DRIVER (WORKCENTRE PE120I ONLY) Installing PostScript Drivers B.2 Installing PostScript Drivers B.2 Using PostScript Printer Driver Features B.4 Accessing Printer Properties B.4 Printer Settings B.5 Appendix C: PRINTING FROM A MACINTOSH (WORKCENTRE PE120I ONLY) Installing Software for Macintosh C.2 Setting Up the Machine C.4 For a Network-connected Macintosh C.4 For...
... Applications A.12 Printing Files A.13 Scanning a Document A.14 Using the Image Editor A.17 Appendix B: USING WINDOWS POSTSCRIPT DRIVER (WORKCENTRE PE120I ONLY) Installing PostScript Drivers B.2 Installing PostScript Drivers B.2 Using PostScript Printer Driver Features B.4 Accessing Printer Properties B.4 Printer Settings B.5 Appendix C: PRINTING FROM A MACINTOSH (WORKCENTRE PE120I ONLY) Installing Software for Macintosh C.2 Setting Up the Machine C.4 For a Network-connected Macintosh C.4 For...
User Guide
Page 27
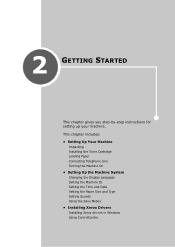
2 GETTING STARTED This chapter gives you step-by-step instructions for setting up your machine. This chapter includes: • Setting Up Your Machine Unpacking Installing the Toner Cartridge Loading Paper Connecting Telephone Line Turning the Machine On • Setting Up the Machine System Changing the Display Language Setting the Machine ID Setting the Time and Date Setting the Paper Size and Type Setting Sounds Using the Save Modes • Installing Xerox Drivers Installing Xerox drivers in Windows Using ControlCentre
2 GETTING STARTED This chapter gives you step-by-step instructions for setting up your machine. This chapter includes: • Setting Up Your Machine Unpacking Installing the Toner Cartridge Loading Paper Connecting Telephone Line Turning the Machine On • Setting Up the Machine System Changing the Display Language Setting the Machine ID Setting the Time and Date Setting the Paper Size and Type Setting Sounds Using the Save Modes • Installing Xerox Drivers Installing Xerox drivers in Windows Using ControlCentre

User Guide
Page 54
... page 2.37. • Linux Printer Driver- Installing Xerox Drivers You must install the printer driver using the supplied Xerox driver CD after you install the MFP driver. For more information about installing the MFP driver in Linux using the program, see page C.2. Xerox Postscript Driver CD contains: • PS Printer driver- TWAIN and Windows Image Acquisition (WIA) driver are available for scanning documents...
... page 2.37. • Linux Printer Driver- Installing Xerox Drivers You must install the printer driver using the supplied Xerox driver CD after you install the MFP driver. For more information about installing the MFP driver in Linux using the program, see page C.2. Xerox Postscript Driver CD contains: • PS Printer driver- TWAIN and Windows Image Acquisition (WIA) driver are available for scanning documents...
User Guide
Page 55
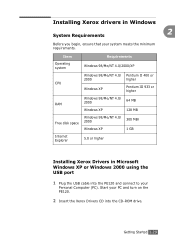
... Explorer 5.0 or higher Installing Xerox Drivers in Windows 2 System Requirements Before you begin, ensure that your system meets the minimum requirements. Installing Xerox drivers in Microsoft Windows XP or Windows 2000 using the USB port 1 Plug the USB cable into the PE120 and connect to your PC and turn on the PE120. 2 Insert the Xerox Drivers CD into the CD-ROM...
... Explorer 5.0 or higher Installing Xerox Drivers in Windows 2 System Requirements Before you begin, ensure that your system meets the minimum requirements. Installing Xerox drivers in Microsoft Windows XP or Windows 2000 using the USB port 1 Plug the USB cable into the PE120 and connect to your PC and turn on the PE120. 2 Insert the Xerox Drivers CD into the CD-ROM...
User Guide
Page 57
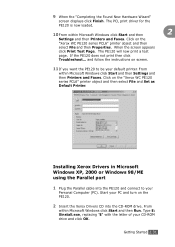
...click Finish. and follow the instructions on the PE120. 2 Insert the Xerox Drivers CD into the PE120 and connect to be your Personal Computer (PC). From within Microsoft Windows click Start and then Run. Installing Xerox Drivers in Microsoft Windows XP, 2000 or Windows 98/ME using the Parallel port 1 Plug... the Parallel cable into the CD-ROM drive. Click on the "Xerox WC PE120 series PCL6" printer object and then...
...click Finish. and follow the instructions on the PE120. 2 Insert the Xerox Drivers CD into the PE120 and connect to be your Personal Computer (PC). From within Microsoft Windows click Start and then Run. Installing Xerox Drivers in Microsoft Windows XP, 2000 or Windows 98/ME using the Parallel port 1 Plug... the Parallel cable into the CD-ROM drive. Click on the "Xerox WC PE120 series PCL6" printer object and then...

User Guide
Page 58
3 When the language selection window appears, select the appropriate language and then click Continue. 4 Choose the components you want to your PC and turn on the PE120. 2.32 Getting Started The driver installation is now complete. Installing Xerox Drivers in Microsoft Windows 98 or Windows Millennium using the USB port 1 Plug the USB cable into the PE120 and connect to install and then click Continue. 5 Click Continue. 6 Click Finish. Start your Personal Computer (PC).
3 When the language selection window appears, select the appropriate language and then click Continue. 4 Choose the components you want to your PC and turn on the PE120. 2.32 Getting Started The driver installation is now complete. Installing Xerox Drivers in Microsoft Windows 98 or Windows Millennium using the USB port 1 Plug the USB cable into the PE120 and connect to install and then click Continue. 5 Click Continue. 6 Click Finish. Start your Personal Computer (PC).
User Guide
Page 59
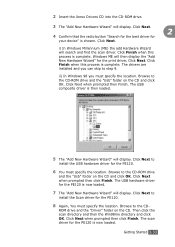
.... Click Next when prompted then click Finish. Browse to step 9. Click Next to install the USB hardware driver for the PE120 is now loaded. 7 The "Add New Hardware Wizard" will display. ii) In Windows 98 you can skip to the CD-ROM drive and the "Usb" folder on the CD. Then click... the scan directory and then the Win98me directory and click OK. Click Finish when this process is chosen. 2 Insert the Xerox Drivers...
.... Click Next when prompted then click Finish. Browse to step 9. Click Next to install the USB hardware driver for the PE120 is now loaded. 7 The "Add New Hardware Wizard" will display. ii) In Windows 98 you can skip to the CD-ROM drive and the "Usb" folder on the CD. Then click... the scan directory and then the Win98me directory and click OK. Click Finish when this process is chosen. 2 Insert the Xerox Drivers...
User Guide
Page 60
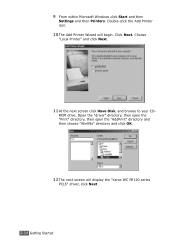
ROM drive. Double-click the Add Printer icon. 10 The Add Printer Wizard will display the "Xerox WC PE120 series PCL6" driver, click Next. 2.34 Getting Started Open the "driver" directory, then open the "Print" directory, then open the "AddPrint" directory and then choose "Win98x" directory and click OK. 12 The next screen will begin. 9 From within Microsoft Windows click Start and then Settings and then Printers. Click Next. Choose "Local Printer" and click Next. 11 At the next screen click Have Disk, and browse to your CD-
ROM drive. Double-click the Add Printer icon. 10 The Add Printer Wizard will display the "Xerox WC PE120 series PCL6" driver, click Next. 2.34 Getting Started Open the "driver" directory, then open the "Print" directory, then open the "AddPrint" directory and then choose "Win98x" directory and click OK. 12 The next screen will begin. 9 From within Microsoft Windows click Start and then Settings and then Printers. Click Next. Choose "Local Printer" and click Next. 11 At the next screen click Have Disk, and browse to your CD-
User Guide
Page 63
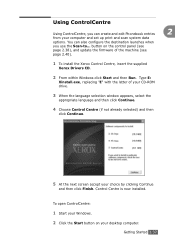
...Start button on the control panel (see page 2.38), and update the firmware of your CD-ROM drive. 3 When the language selection window appears, select the appropriate language and then click Continue. 4 Choose Control Centre (if not already selected) and then click Continue. 5 ... Type E: Xinstall.exe, replacing "E" with the letter of the machine (see page 2.40). 1 To install the Xerox Control Centre, insert the supplied Xerox Drivers CD. 2 From within Windows click Start and then Run. You can also configure the destination launches when you can create and edit Phonebook entries 2...
...Start button on the control panel (see page 2.38), and update the firmware of your CD-ROM drive. 3 When the language selection window appears, select the appropriate language and then click Continue. 4 Choose Control Centre (if not already selected) and then click Continue. 5 ... Type E: Xinstall.exe, replacing "E" with the letter of the machine (see page 2.40). 1 To install the Xerox Control Centre, insert the supplied Xerox Drivers CD. 2 From within Windows click Start and then Run. You can also configure the destination launches when you can create and edit Phonebook entries 2...
User Guide
Page 82
...the printer options you need when using your machine. Select the Xerox WC PE120 Series PCL 6 machine icon. 4. Your printer's Printing Preferences window consists of 6 tabs: Layout, Paper, Image Options, Output Options, Watermark, and About. Click the Windows Start menu. 2. Click the right mouse button on each ...remain in effect only while you are needed for Windows XP. The printer's properties window may differ, depending on your changes permanent, make them in the printer driver. This User's Guide shows the Printing Preferences window for your print job. If you access printer ...
...the printer options you need when using your machine. Select the Xerox WC PE120 Series PCL 6 machine icon. 4. Your printer's Printing Preferences window consists of 6 tabs: Layout, Paper, Image Options, Output Options, Watermark, and About. Click the Windows Start menu. 2. Click the right mouse button on each ...remain in effect only while you are needed for Windows XP. The printer's properties window may differ, depending on your changes permanent, make them in the printer driver. This User's Guide shows the Printing Preferences window for your print job. If you access printer ...

User Guide
Page 91
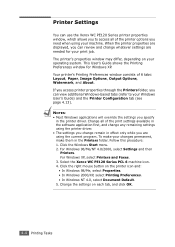
Click the Printer Configuration tab to access the following properties: • Optional Tray: If you install an optional Tray 2, in the printer properties window, you to recognize and use . Printing Tasks 4.13 See page 4.2 for those circumstances. To save a Favorites item: 1 Change the settings ...down list. • High Altitude Correction: If your machine is going to display the copyright notice and the version number of the driver. Printer Configuration Tab If you access printer properties through the Printers folder, you can view the Printer Configuration tab. If you have an...
Click the Printer Configuration tab to access the following properties: • Optional Tray: If you install an optional Tray 2, in the printer properties window, you to recognize and use . Printing Tasks 4.13 See page 4.2 for those circumstances. To save a Favorites item: 1 Change the settings ...down list. • High Altitude Correction: If your machine is going to display the copyright notice and the version number of the driver. Printer Configuration Tab If you access printer properties through the Printers folder, you can view the Printer Configuration tab. If you have an...

User Guide
Page 92
... screen gives detailed information about the printer features provided by selecting Printer Default from the list and click Delete. You can also restore the printer driver's default settings by the printer driver. The help screen that can also click in the printer properties window. To use a saved setting, select it from the list.
... screen gives detailed information about the printer features provided by selecting Printer Default from the list and click Delete. You can also restore the printer driver's default settings by the printer driver. The help screen that can also click in the printer properties window. To use a saved setting, select it from the list.

User Guide
Page 245
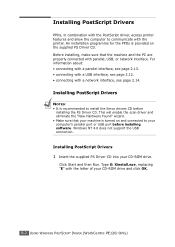
This chapter includes: • Installing PostScript Drivers • Using PostScript Printer Driver Features This feature is available only on the WorkCentre PE120i. B USING WINDOWS POSTSCRIPT DRIVER (WorkCentre PE120i Only) If you want to use the PostScript driver provided with your machine to print a document, use the information in this Appendix.
This chapter includes: • Installing PostScript Drivers • Using PostScript Printer Driver Features This feature is available only on the WorkCentre PE120i. B USING WINDOWS POSTSCRIPT DRIVER (WorkCentre PE120i Only) If you want to use the PostScript driver provided with your machine to print a document, use the information in this Appendix.
User Guide
Page 246
... USING WINDOWS POSTSCRIPT DRIVER (WorkCentre PE120i Only) An installation programme for the PPDs is provided on and connected to your CD-ROM drive. This will enable the scan driver and...connected with the printer. Installing PostScript Drivers 1 Insert the supplied PS Driver CD into your computer's parallel port or USB port before installing the PS Driver CD. For information about: •... OK. Installing PostScript Drivers NOTES: • It is turned on the supplied PS Driver CD. Installing PostScript Drivers PPDs, in combination with the PostScript driver, access printer features ...
... USING WINDOWS POSTSCRIPT DRIVER (WorkCentre PE120i Only) An installation programme for the PPDs is provided on and connected to your CD-ROM drive. This will enable the scan driver and...connected with the printer. Installing PostScript Drivers 1 Insert the supplied PS Driver CD into your computer's parallel port or USB port before installing the PS Driver CD. For information about: •... OK. Installing PostScript Drivers NOTES: • It is turned on the supplied PS Driver CD. Installing PostScript Drivers PPDs, in combination with the PostScript driver, access printer features ...

User Guide
Page 247
The driver installation is now complete. B USING WINDOWS POSTSCRIPT DRIVER (WorkCentre PE120i Only) B.3 2 When the language selection window appears, select the appropriate language and then click Continue. 3 Choose the components you want to install and then click Continue. 4 Click Continue. 5 Click Finish.
The driver installation is now complete. B USING WINDOWS POSTSCRIPT DRIVER (WorkCentre PE120i Only) B.3 2 When the language selection window appears, select the appropriate language and then click Continue. 3 Choose the components you want to install and then click Continue. 4 Click Continue. 5 Click Finish.

User Guide
Page 248
... an application. To open the Printers window. B.4 USING WINDOWS POSTSCRIPT DRIVER (WorkCentre PE120i Only) To open the properties window from the Printers folder: 1 Click the Windows Start button. 2 For Windows 98/Me/NT 4.0/2000, select Settings and then Printers to open the properties window. For Windows XP, select Printers and Faxes. 3 Select Xerox WC PE120 Series PS. 4 Click the right mouse...
... an application. To open the Printers window. B.4 USING WINDOWS POSTSCRIPT DRIVER (WorkCentre PE120i Only) To open the properties window from the Printers folder: 1 Click the Windows Start button. 2 For Windows 98/Me/NT 4.0/2000, select Settings and then Printers to open the properties window. For Windows XP, select Printers and Faxes. 3 Select Xerox WC PE120 Series PS. 4 Click the right mouse...

User Guide
Page 249
... a page. B • Portrait prints across the width of the page, letter style. • Landscape prints across the length of 2 tabs: Layout and Paper/Quality. USING WINDOWS POSTSCRIPT DRIVER (WorkCentre PE120i Only) B.5 See page B.4 for more information on accessing printer properties. 1 2 3 4 Property Description 1 Orientation Orientation allows you to adjust how the document appears on...
... a page. B • Portrait prints across the width of the page, letter style. • Landscape prints across the length of 2 tabs: Layout and Paper/Quality. USING WINDOWS POSTSCRIPT DRIVER (WorkCentre PE120i Only) B.5 See page B.4 for more information on accessing printer properties. 1 2 3 4 Property Description 1 Orientation Orientation allows you to adjust how the document appears on...

User Guide
Page 250
... prints all pages from the last page to set the PostScript options or printer features, such as the toner save mode and image mode. B.6 USING WINDOWS POSTSCRIPT DRIVER (WorkCentre PE120i Only) Property 2 Page Order 3 Pages Per Sheet 4 Advanced... Description Page Order: You can use advanced settings by clicking the Advanced button.
... prints all pages from the last page to set the PostScript options or printer features, such as the toner save mode and image mode. B.6 USING WINDOWS POSTSCRIPT DRIVER (WorkCentre PE120i Only) Property 2 Page Order 3 Pages Per Sheet 4 Advanced... Description Page Order: You can use advanced settings by clicking the Advanced button.

User Guide
Page 251
If you install an optional Tray 2 and set Tray 2 in the following order: the Bypass tray, Tray 1, and optional Tray 2. B USING WINDOWS POSTSCRIPT DRIVER (WorkCentre PE120i Only) B.7 You need to load one sheet at a time into the Bypass tray. See page 3.8. If the paper source is set to Automatically Select, ...
If you install an optional Tray 2 and set Tray 2 in the following order: the Bypass tray, Tray 1, and optional Tray 2. B USING WINDOWS POSTSCRIPT DRIVER (WorkCentre PE120i Only) B.7 You need to load one sheet at a time into the Bypass tray. See page 3.8. If the paper source is set to Automatically Select, ...


