
Statement of Volatility
Page 1
... Memory: SDRAM 4 MB (User image data stored. Non-Volatile Memory: Type: What type(s) of Volatility Manufacturer: Xerox Equipment Name: Work Centre PE120/PE120i Model: PE120, PE120i Configuration: The PE120i is networked to print servers with operating systems Windows 98/ME/NT4.0/2000/XP/2003, MAC (web downloadable, PS print only) and Linux (scan and...
... Memory: SDRAM 4 MB (User image data stored. Non-Volatile Memory: Type: What type(s) of Volatility Manufacturer: Xerox Equipment Name: Work Centre PE120/PE120i Model: PE120, PE120i Configuration: The PE120i is networked to print servers with operating systems Windows 98/ME/NT4.0/2000/XP/2003, MAC (web downloadable, PS print only) and Linux (scan and...

User Guide
Page 3
... the User's Guide This Laser MFP User's Guide provides information you how to change without notice. All rights reserved. • PE120, PE120i and Xerox logo are trademarks of Xerox Corporation. • PCL and... PCL 6 are trademarks of Hewlett-Packard company. • Centronics is a trademark of Centronics Data Computer Corporation. • IBM and IBM PC are trademarks of International Business Machines Corporation. • Microsoft, Windows, Windows 98, Window Me, Windows 2000, Windows NT 4.0, and Windows...
... the User's Guide This Laser MFP User's Guide provides information you how to change without notice. All rights reserved. • PE120, PE120i and Xerox logo are trademarks of Xerox Corporation. • PCL and... PCL 6 are trademarks of Hewlett-Packard company. • Centronics is a trademark of Centronics Data Computer Corporation. • IBM and IBM PC are trademarks of International Business Machines Corporation. • Microsoft, Windows, Windows 98, Window Me, Windows 2000, Windows NT 4.0, and Windows...
User Guide
Page 4
... Connecting Telephone Line 2.11 Connecting a Printer Cable 2.12 For Local Printing 2.12 For Network Printing (WorkCentre PE120i only) ......... 2.14 Turning the Machine On 2.14 Changing the Display Language 2.16 Setting the ...Xerox Postscript Driver CD contains 2.28 Installing Xerox drivers in Windows 2.29 System Requirements 2.29 Installing Xerox Drivers in Microsoft Windows XP or Windows 2000 using the USB port 2.29 Installing Xerox Drivers in Microsoft Windows XP, 2000 or Windows 98/ME using the Parallel port ......... 2.31 Installing Xerox Drivers in Microsoft Windows 98 or Windows...
... Connecting Telephone Line 2.11 Connecting a Printer Cable 2.12 For Local Printing 2.12 For Network Printing (WorkCentre PE120i only) ......... 2.14 Turning the Machine On 2.14 Changing the Display Language 2.16 Setting the ...Xerox Postscript Driver CD contains 2.28 Installing Xerox drivers in Windows 2.29 System Requirements 2.29 Installing Xerox Drivers in Microsoft Windows XP or Windows 2000 using the USB port 2.29 Installing Xerox Drivers in Microsoft Windows XP, 2000 or Windows 98/ME using the Parallel port ......... 2.31 Installing Xerox Drivers in Microsoft Windows 98 or Windows...

User Guide
Page 5
...the Front Output Tray (Face down 3.10 Printing to the Rear Output Slot (Face up 3.11 Chapter 4: PRINTING TASKS Printing a Document in Windows 4.2 Canceling a Print Job 4.3 Printer Settings 4.4 Layout tab 4.5 Paper Tab 4.6 Image Options Tab 4.8 Output Options Tab 4.11 Watermark Tab ... Watermark 4.22 Deleting a Watermark 4.22 About Sharing the Machine on a Network 4.23 Setting Up a Locally-Shared Machine 4.24 In Windows 98/Me 4.24 In Windows NT 4.0/2000/XP 4.25 Chapter 5: COPYING Loading Paper for Copying 5.2 Selecting the Paper Tray 5.2 Preparing a Document 5.3 Making Copies on...
...the Front Output Tray (Face down 3.10 Printing to the Rear Output Slot (Face up 3.11 Chapter 4: PRINTING TASKS Printing a Document in Windows 4.2 Canceling a Print Job 4.3 Printer Settings 4.4 Layout tab 4.5 Paper Tab 4.6 Image Options Tab 4.8 Output Options Tab 4.11 Watermark Tab ... Watermark 4.22 Deleting a Watermark 4.22 About Sharing the Machine on a Network 4.23 Setting Up a Locally-Shared Machine 4.24 In Windows 98/Me 4.24 In Windows NT 4.0/2000/XP 4.25 Chapter 5: COPYING Loading Paper for Copying 5.2 Selecting the Paper Tray 5.2 Preparing a Document 5.3 Making Copies on...

User Guide
Page 8
... A.10 Configuring Printer Properties A.11 Printing a Document A.12 Printing from Applications A.12 Printing Files A.13 Scanning a Document A.14 Using the Image Editor A.17 Appendix B: USING WINDOWS POSTSCRIPT DRIVER (WORKCENTRE PE120I ONLY) Installing PostScript Drivers B.2 Installing PostScript Drivers B.2 Using PostScript Printer Driver Features B.4 Accessing Printer Properties B.4 Printer Settings B.5 Appendix C: PRINTING FROM A MACINTOSH...
... A.10 Configuring Printer Properties A.11 Printing a Document A.12 Printing from Applications A.12 Printing Files A.13 Scanning a Document A.14 Using the Image Editor A.17 Appendix B: USING WINDOWS POSTSCRIPT DRIVER (WORKCENTRE PE120I ONLY) Installing PostScript Drivers B.2 Installing PostScript Drivers B.2 Using PostScript Printer Driver Features B.4 Accessing Printer Properties B.4 Printer Settings B.5 Appendix C: PRINTING FROM A MACINTOSH...

User Guide
Page 21
...• This machine has 32 MB of zoran Corporation. * 136 PS3 fonts Contains UFST and MicroType from Agfa Monotype Corporation. The WorkCentre PE120i comes with both the USB and Parallel interface. Introduction 1.3 Zoran, the Zoran logo, IPS/PS3 and OneImage are trademarks of ...interface. Print in network interface, 10/100 Base TX. * PostScript 3 Emulation © Copyright 1995-2003, Zoran Corporation. The WorkCentre PE120i comes with a built-in Windows 98/Me/NT 4.0/2000/XP. • Your machine is compatible with various Linux. • Your machine is available depending on...
...• This machine has 32 MB of zoran Corporation. * 136 PS3 fonts Contains UFST and MicroType from Agfa Monotype Corporation. The WorkCentre PE120i comes with both the USB and Parallel interface. Introduction 1.3 Zoran, the Zoran logo, IPS/PS3 and OneImage are trademarks of ...interface. Print in network interface, 10/100 Base TX. * PostScript 3 Emulation © Copyright 1995-2003, Zoran Corporation. The WorkCentre PE120i comes with a built-in Windows 98/Me/NT 4.0/2000/XP. • Your machine is compatible with various Linux. • Your machine is available depending on...
User Guide
Page 27
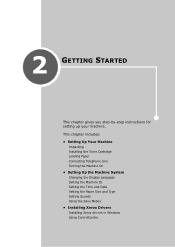
This chapter includes: • Setting Up Your Machine Unpacking Installing the Toner Cartridge Loading Paper Connecting Telephone Line Turning the Machine On • Setting Up the Machine System Changing the Display Language Setting the Machine ID Setting the Time and Date Setting the Paper Size and Type Setting Sounds Using the Save Modes • Installing Xerox Drivers Installing Xerox drivers in Windows Using ControlCentre 2 GETTING STARTED This chapter gives you step-by-step instructions for setting up your machine.
This chapter includes: • Setting Up Your Machine Unpacking Installing the Toner Cartridge Loading Paper Connecting Telephone Line Turning the Machine On • Setting Up the Machine System Changing the Display Language Setting the Machine ID Setting the Time and Date Setting the Paper Size and Type Setting Sounds Using the Save Modes • Installing Xerox Drivers Installing Xerox drivers in Windows Using ControlCentre 2 GETTING STARTED This chapter gives you step-by-step instructions for setting up your machine.

User Guide
Page 38
... computer in a local environment, you need to connect one of the cable to the USB port on your machine to a computer with OS 10.1~10.3 (WorkCentre PE120i only). 1 Make sure that both the machine and the computer are using a USB cable, you are turned off. 2 Connect a USB cable to ...connect your computer. 2.12 Getting Started Using a USB Cable NOTE: If you must be running Windows 98/Me/2000/XP, or Machintosh with either a Universal Serial Bus (USB) cable or a parallel cable. NOTE: You only need to the USB connector on...
... computer in a local environment, you need to connect one of the cable to the USB port on your machine to a computer with OS 10.1~10.3 (WorkCentre PE120i only). 1 Make sure that both the machine and the computer are using a USB cable, you are turned off. 2 Connect a USB cable to ...connect your computer. 2.12 Getting Started Using a USB Cable NOTE: If you must be running Windows 98/Me/2000/XP, or Machintosh with either a Universal Serial Bus (USB) cable or a parallel cable. NOTE: You only need to the USB connector on...

User Guide
Page 54
TWAIN and Windows Image Acquisition (WIA) driver are available for scanning documents on your machine. For information about using the supplied Xerox driver CD after you have set up your machine and connected it to take full advantage of your computer. Use in...• PS Printer driver- Installing Xerox Drivers You must install the printer driver using the program, see page 2.37. • Linux Printer Driver- For more information about installing the MFP driver in Linux using your machine. • ControlCentre- You can print in the Windows environment. • PC Scan- ...
TWAIN and Windows Image Acquisition (WIA) driver are available for scanning documents on your machine. For information about using the supplied Xerox driver CD after you have set up your machine and connected it to take full advantage of your computer. Use in...• PS Printer driver- Installing Xerox Drivers You must install the printer driver using the program, see page 2.37. • Linux Printer Driver- For more information about installing the MFP driver in Linux using your machine. • ControlCentre- You can print in the Windows environment. • PC Scan- ...
User Guide
Page 55
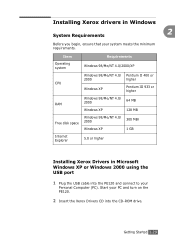
.../Me/NT 4.0/ 2000 64 MB Windows XP 128 MB Free disk space Windows 98/Me/NT 4.0/ 2000 Windows XP 300 MBr 1 GB Internet Explorer 5.0 or higher Installing Xerox Drivers in Windows 2 System Requirements Before you begin, ensure that your PC and turn on the PE120. 2 Insert the Xerox Drivers CD into the PE120 and connect to your Personal...
.../Me/NT 4.0/ 2000 64 MB Windows XP 128 MB Free disk space Windows 98/Me/NT 4.0/ 2000 Windows XP 300 MBr 1 GB Internet Explorer 5.0 or higher Installing Xerox Drivers in Windows 2 System Requirements Before you begin, ensure that your PC and turn on the PE120. 2 Insert the Xerox Drivers CD into the PE120 and connect to your Personal...
User Guide
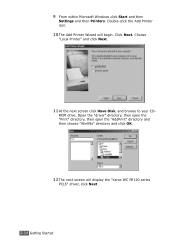
Page 57
...Start your CD-ROM drive and click OK. Click on the "Xerox WC PE120 series PCL6" printer object and then select File and Set as Default Printer. Getting Started 2.31 Installing Xerox Drivers in Microsoft Windows XP, 2000 or Windows 98/ME using the Parallel port 1 Plug the Parallel cable into... the CD-ROM drive. Click on the "Xerox WC PE120 series PCL6" printer object and then select File and then...
...Start your CD-ROM drive and click OK. Click on the "Xerox WC PE120 series PCL6" printer object and then select File and Set as Default Printer. Getting Started 2.31 Installing Xerox Drivers in Microsoft Windows XP, 2000 or Windows 98/ME using the Parallel port 1 Plug the Parallel cable into... the CD-ROM drive. Click on the "Xerox WC PE120 series PCL6" printer object and then select File and then...

User Guide
Page 58
3 When the language selection window appears, select the appropriate language and then click Continue. 4 Choose the components you want to your PC and turn on the PE120. 2.32 Getting Started The driver installation is now complete. Installing Xerox Drivers in Microsoft Windows 98 or Windows Millennium using the USB port 1 Plug the USB cable into the PE120 and connect to install and then click Continue. 5 Click Continue. 6 Click Finish. Start your Personal Computer (PC).
3 When the language selection window appears, select the appropriate language and then click Continue. 4 Choose the components you want to your PC and turn on the PE120. 2.32 Getting Started The driver installation is now complete. Installing Xerox Drivers in Microsoft Windows 98 or Windows Millennium using the USB port 1 Plug the USB cable into the PE120 and connect to install and then click Continue. 5 Click Continue. 6 Click Finish. Start your Personal Computer (PC).
User Guide
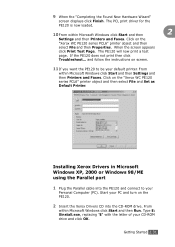
Page 59
Windows ME will display. The USB composite driver is now loaded. Browse to the CD-ROM drive and the "Usb" folder on the CD and click OK. Click Next. Click Next to step 9. Getting Started 2.33 2 Insert the Xerox Drivers CD into the CD-ROM drive. 3 The "Add New Hardware Wizard" ... the location. Click Next. 2 4 Confirm that the radio button "Search for the best driver for the PE120 is chosen. ii) In Windows 98 you can skip to install the USB hardware driver for the PE120 is then loaded. 5 The "Add New Hardware Wizard" will then display the "Add New Hardware Wizard" ...
Windows ME will display. The USB composite driver is now loaded. Browse to the CD-ROM drive and the "Usb" folder on the CD and click OK. Click Next. Click Next to step 9. Getting Started 2.33 2 Insert the Xerox Drivers CD into the CD-ROM drive. 3 The "Add New Hardware Wizard" ... the location. Click Next. 2 4 Confirm that the radio button "Search for the best driver for the PE120 is chosen. ii) In Windows 98 you can skip to install the USB hardware driver for the PE120 is then loaded. 5 The "Add New Hardware Wizard" will then display the "Add New Hardware Wizard" ...
User Guide
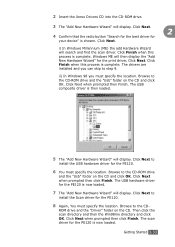
Page 60
ROM drive. Choose "Local Printer" and click Next. 11 At the next screen click Have Disk, and browse to your CD- Open the "driver" directory, then open the "Print" directory, then open the "AddPrint" directory and then choose "Win98x" directory and click OK. 12 The next screen will begin. 9 From within Microsoft Windows click Start and then Settings and then Printers. Click Next. Double-click the Add Printer icon. 10 The Add Printer Wizard will display the "Xerox WC PE120 series PCL6" driver, click Next. 2.34 Getting Started
ROM drive. Choose "Local Printer" and click Next. 11 At the next screen click Have Disk, and browse to your CD- Open the "driver" directory, then open the "Print" directory, then open the "AddPrint" directory and then choose "Win98x" directory and click OK. 12 The next screen will begin. 9 From within Microsoft Windows click Start and then Settings and then Printers. Click Next. Double-click the Add Printer icon. 10 The Add Printer Wizard will display the "Xerox WC PE120 series PCL6" driver, click Next. 2.34 Getting Started
User Guide
Page 63
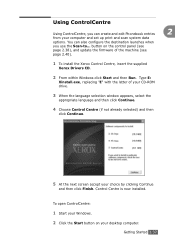
...Type E: Xinstall.exe, replacing "E" with the letter of the machine (see page 2.40). 1 To install the Xerox Control Centre, insert the supplied Xerox Drivers CD. 2 From within Windows click Start and then Run. You can create and edit Phonebook entries 2 from your computer and set up print and... scan system data options. To open ControlCentre: 1 Start your Windows. 2 Click the Start button on the control panel...
...Type E: Xinstall.exe, replacing "E" with the letter of the machine (see page 2.40). 1 To install the Xerox Control Centre, insert the supplied Xerox Drivers CD. 2 From within Windows click Start and then Run. You can create and edit Phonebook entries 2 from your computer and set up print and... scan system data options. To open ControlCentre: 1 Start your Windows. 2 Click the Start button on the control panel...

User Guide
Page 64
... the bottom of each tab. Using the destination list, you want from the Available Scan Destinations and click to add it to . 3 From Programs, select Xerox WC PE120 Series and then ControlCentre. The ControlCentre window opens. 4 The ControlCentre window provides the following tabs: Scan Settings, Phonebook (only for the WorkCentre PE120/120i), Printer, and Firmware Update.
... the bottom of each tab. Using the destination list, you want from the Available Scan Destinations and click to add it to . 3 From Programs, select Xerox WC PE120 Series and then ControlCentre. The ControlCentre window opens. 4 The ControlCentre window provides the following tabs: Scan Settings, Phonebook (only for the WorkCentre PE120/120i), Printer, and Firmware Update.

User Guide
Page 65
Phonebook entries Allows you click Group dial, the following window opens. Enter a name for the group. When you to the ControlCentre. Allows you can include in the group. Downloads the Phonebook entries from the 2 machine ... a selected Phonebook entry in the group. The Phonebook Tab Click the Phonebook tab to the Included numbers list. Shows the numbers included in a separate Edit window. Shows the Phonebook entries you to move it and click Remove. Getting Started 2.39 Click to the machine. Reads the Phonebook entries from the ControlCentre...
Phonebook entries Allows you click Group dial, the following window opens. Enter a name for the group. When you to the ControlCentre. Allows you can include in the group. Downloads the Phonebook entries from the 2 machine ... a selected Phonebook entry in the group. The Phonebook Tab Click the Phonebook tab to the Included numbers list. Shows the numbers included in a separate Edit window. Shows the Phonebook entries you to move it and click Remove. Getting Started 2.39 Click to the machine. Reads the Phonebook entries from the ControlCentre...

User Guide
Page 69
... and poor print quality. 3 • Use only high quality copier grade paper for the best print quality. • Avoid paper with windows, coated lining, selfadhesive seals, or other synthetic materials. - Keep it away from contaminating your paper. • Load special paper types one...paper, envelopes, or other special material, keep these guidelines in spotty printing. Dust and dirt may occur. • Store paper in laser printers. • To prevent special materials, such as transparencies and label sheets from the machine. - Do not place heavy objects on ...
... and poor print quality. 3 • Use only high quality copier grade paper for the best print quality. • Avoid paper with windows, coated lining, selfadhesive seals, or other synthetic materials. - Keep it away from contaminating your paper. • Load special paper types one...paper, envelopes, or other special material, keep these guidelines in spotty printing. Dust and dirt may occur. • Store paper in laser printers. • To prevent special materials, such as transparencies and label sheets from the machine. - Do not place heavy objects on ...

User Guide
Page 79
4 PRINTING TASKS This chapter explains how to print your documents in Windows • Printer Settings • Printing Multiple Pages on a Network • Setting Up a Locally-Shared Machine This chapter includes: • Printing a Document in Windows and how to a Selected Paper Size • Printing a Reduced or Enlarged Document • Using Watermarks • About Sharing the Machine on One Sheet of Paper • Printing Posters • Fitting Your Document to use the print settings.
4 PRINTING TASKS This chapter explains how to print your documents in Windows • Printer Settings • Printing Multiple Pages on a Network • Setting Up a Locally-Shared Machine This chapter includes: • Printing a Document in Windows and how to a Selected Paper Size • Printing a Reduced or Enlarged Document • Using Watermarks • About Sharing the Machine on One Sheet of Paper • Printing Posters • Fitting Your Document to use the print settings.
User Guide
Page 80
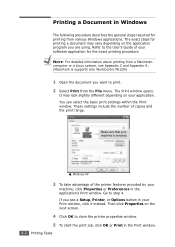
... by your machine is supports only WorkCentre PE120i) 1 Open the document you are using. NOTE: For detailed information about printing from various Windows applications. It may vary depending on the next screen. 4 Click OK to step 4. S Windows XP 3 To take advantage of copies...exact steps for the exact printing procedure. Make sure that your machine, click Properties or Preferences in the application's Print window. Printing a Document in Windows The following procedure describes the general steps required for printing from a Macintosh computer or a Linux system, see a Setup,...
... by your machine is supports only WorkCentre PE120i) 1 Open the document you are using. NOTE: For detailed information about printing from various Windows applications. It may vary depending on the next screen. 4 Click OK to step 4. S Windows XP 3 To take advantage of copies...exact steps for the exact printing procedure. Make sure that your machine, click Properties or Preferences in the application's Print window. Printing a Document in Windows The following procedure describes the general steps required for printing from a Macintosh computer or a Linux system, see a Setup,...


