
Statement of Volatility
Page 2
.... Accessibility: Is it is accessible, describe location and purpose. If "YES, it accessible by accidental/intentional keystroke, or software malfunction? required for this have , or to have on SUNs); Removal consequences: If device memory chip is required for ... and system configuration, boot, and initialization parameters, for future design needs, internal depot repair, clock circuit, "nice" to flag unauthorized software, etc. Purpose: typical uses for non-volatile memory location are other non volatile memory devices in for example (battery-backed NVRAM on operation...
.... Accessibility: Is it is accessible, describe location and purpose. If "YES, it accessible by accidental/intentional keystroke, or software malfunction? required for this have , or to have on SUNs); Removal consequences: If device memory chip is required for ... and system configuration, boot, and initialization parameters, for future design needs, internal depot repair, clock circuit, "nice" to flag unauthorized software, etc. Purpose: typical uses for non-volatile memory location are other non volatile memory devices in for example (battery-backed NVRAM on operation...
Statement of Volatility
Page 3
... for storing Multifunction Device application settings and is compared against a value stored in the device itself. Loss would require reverse engineering the software. 10. Method of access: How is required and essential for operation and normal function of data required for additional information to the... software developers' memory maps, determining the location of the internal disk drive will void the warranty. There is no user access to the...
... for storing Multifunction Device application settings and is compared against a value stored in the device itself. Loss would require reverse engineering the software. 10. Method of access: How is required and essential for operation and normal function of data required for additional information to the... software developers' memory maps, determining the location of the internal disk drive will void the warranty. There is no user access to the...

User Guide
Page 3
... subject to change without notice. i All rights reserved. • PE120, PE120i and Xerox logo are trademarks of Xerox Corporation. • PCL and PCL 6 are trademarks of Hewlett-Packard company. • Centronics is a trademark of Centronics Data Computer Corporation. ... Corporation. • PostScript 3 is provided for using your machine and installing the supplied software. About the User's Guide This Laser MFP User's Guide provides information you how to use of this manual. © 2004 Xerox Corporation. This manual is a trademark of Adobe System, Inc. • UFST®...
... subject to change without notice. i All rights reserved. • PE120, PE120i and Xerox logo are trademarks of Xerox Corporation. • PCL and PCL 6 are trademarks of Hewlett-Packard company. • Centronics is a trademark of Centronics Data Computer Corporation. ... Corporation. • PostScript 3 is provided for using your machine and installing the supplied software. About the User's Guide This Laser MFP User's Guide provides information you how to use of this manual. © 2004 Xerox Corporation. This manual is a trademark of Adobe System, Inc. • UFST®...

User Guide
Page 8
... Scanning a Document A.14 Using the Image Editor A.17 Appendix B: USING WINDOWS POSTSCRIPT DRIVER (WORKCENTRE PE120I ONLY) Installing PostScript Drivers B.2 Installing PostScript Drivers B.2 Using PostScript Printer Driver Features B.4 Accessing Printer Properties B.4 Printer Settings B.5 Appendix C: PRINTING FROM A MACINTOSH (WORKCENTRE PE120I ONLY) Installing Software for Macintosh C.2 Setting Up the Machine C.4 For a Network-connected Macintosh C.4 For a USB...
... Scanning a Document A.14 Using the Image Editor A.17 Appendix B: USING WINDOWS POSTSCRIPT DRIVER (WORKCENTRE PE120I ONLY) Installing PostScript Drivers B.2 Installing PostScript Drivers B.2 Using PostScript Printer Driver Features B.4 Accessing Printer Properties B.4 Printer Settings B.5 Appendix C: PRINTING FROM A MACINTOSH (WORKCENTRE PE120I ONLY) Installing Software for Macintosh C.2 Setting Up the Machine C.4 For a Network-connected Macintosh C.4 For a USB...

User Guide
Page 14
...public switched telephone network (PSTN) in the first instance. xii Regulations - Modification, connection to external control software or to external control apparatus not authorized by Xerox for use either loop disconnect (pulse) or DTMF (tone) signaling it is recommended that it needs ... Kingdom France Ireland Portugal Finland Italy Spain Czech Republic Poland Bulgaria Romania In the event of problems, you should contact your Xerox representative if it is compliant with TBR21, a technical specification for terminal equipment for pan-European single terminal connection to another...
...public switched telephone network (PSTN) in the first instance. xii Regulations - Modification, connection to external control software or to external control apparatus not authorized by Xerox for use either loop disconnect (pulse) or DTMF (tone) signaling it is recommended that it needs ... Kingdom France Ireland Portugal Finland Italy Spain Czech Republic Poland Bulgaria Romania In the event of problems, you should contact your Xerox representative if it is compliant with TBR21, a technical specification for terminal equipment for pan-European single terminal connection to another...

User Guide
Page 25
... pages on when the toner cartridge is inserted into the USB port of your PC software programs that an image can be scanned to. 2 You must create the scan list using the Xerox S software (ControlCentre) provided with the touch of your machine. O P Allows you to scan... and save documents in N a USB flash drive, and manage it when it is empty. 5 Uses to the numbers 21 through the available options for the current copy job. Control Panel Functions 1 WorkCentre PE120...
... pages on when the toner cartridge is inserted into the USB port of your PC software programs that an image can be scanned to. 2 You must create the scan list using the Xerox S software (ControlCentre) provided with the touch of your machine. O P Allows you to scan... and save documents in N a USB flash drive, and manage it when it is empty. 5 Uses to the numbers 21 through the available options for the current copy job. Control Panel Functions 1 WorkCentre PE120...
User Guide
Page 56
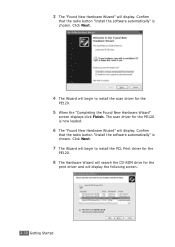
...will search the CD-ROM drive for the PE120 is now loaded. 6 The "Found New Hardware Wizard" will display the following screen. 2.30 Getting Started Click Next. 4 The Wizard will display. Confirm that the radio button "Install the software automatically" is chosen. 3 The "Found ...New Hardware Wizard" will begin to install the scan driver for the PE120. 5 When the "Completing the Found New Hardware Wizard" screen displays click Finish.
...will search the CD-ROM drive for the PE120 is now loaded. 6 The "Found New Hardware Wizard" will display the following screen. 2.30 Getting Started Click Next. 4 The Wizard will display. Confirm that the radio button "Install the software automatically" is chosen. 3 The "Found ...New Hardware Wizard" will begin to install the scan driver for the PE120. 5 When the "Completing the Found New Hardware Wizard" screen displays click Finish.

User Guide
Page 64
...the destination list, you can select a software program that appears on the control panel. Select the program you press Scan-to restore the default settings. To delete the selected program, click . 3 From Programs, select Xerox WC PE120 Series and then ControlCentre. The Scan ... type and resolution. The ControlCentre window opens. 4 The ControlCentre window provides the following tabs: Scan Settings, Phonebook (only for the WorkCentre PE120/120i), Printer, and Firmware Update. Click to ... Downloads the settings made in the ControlCentre to your machine. 2.38 Getting Started...
...the destination list, you can select a software program that appears on the control panel. Select the program you press Scan-to restore the default settings. To delete the selected program, click . 3 From Programs, select Xerox WC PE120 Series and then ControlCentre. The Scan ... type and resolution. The ControlCentre window opens. 4 The ControlCentre window provides the following tabs: Scan Settings, Phonebook (only for the WorkCentre PE120/120i), Printer, and Firmware Update. Click to ... Downloads the settings made in the ControlCentre to your machine. 2.38 Getting Started...
User Guide
Page 80
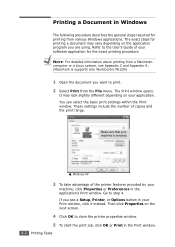
...Printing a Document in the Print window. 4.2 Printing Tasks The exact steps for printing a document may look slightly different depending on your software application for printing from a Macintosh computer or a Linux system, see a Setup, Printer, or Options button in your machine, click Properties... The following procedure describes the general steps required for the exact printing procedure. Make sure that your machine is supports only WorkCentre PE120i) 1 Open the document you are using. NOTE: For detailed information about printing from various Windows applications. Then click...
...Printing a Document in the Print window. 4.2 Printing Tasks The exact steps for printing a document may look slightly different depending on your software application for printing from a Macintosh computer or a Linux system, see a Setup, Printer, or Options button in your machine, click Properties... The following procedure describes the general steps required for the exact printing procedure. Make sure that your machine is supports only WorkCentre PE120i) 1 Open the document you are using. NOTE: For detailed information about printing from various Windows applications. Then click...
User Guide
Page 82
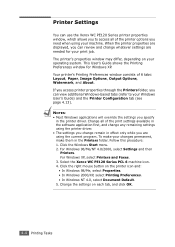
...through the Printers folder, you can view additional Windows-based tabs (refer to access all of the print settings available in the software application first, and change any remaining settings using the printer driver. • The settings you change whatever settings are using your ...print job. Select the Xerox WC PE120 Series PCL 6 machine icon. 4. Printer Settings You can use the Xerox WC PE120 Series printer properties window, which allows you to your changes permanent, make your Windows User's Guide...
...through the Printers folder, you can view additional Windows-based tabs (refer to access all of the print settings available in the software application first, and change any remaining settings using the printer driver. • The settings you change whatever settings are using your ...print job. Select the Xerox WC PE120 Series PCL 6 machine icon. 4. Printer Settings You can use the Xerox WC PE120 Series printer properties window, which allows you to your changes permanent, make your Windows User's Guide...

User Guide
Page 93
... Border are reduced in size and arranged in the order you want to print per sheet (1, 2, 4, 6, 9, or 16) on the Pages per Side from your software application, 4 access printer properties. You can select the number of pages to print on the sheet.
... Border are reduced in size and arranged in the order you want to print per sheet (1, 2, 4, 6, 9, or 16) on the Pages per Side from your software application, 4 access printer properties. You can select the number of pages to print on the sheet.

User Guide
Page 94
..., 3x3, 4x4, or Custom. If you select 2x2, the image is automatically 4.16 Printing Tasks Printing Posters You can select the page layout from your software application, access printer properties.
..., 3x3, 4x4, or Custom. If you select 2x2, the image is automatically 4.16 Printing Tasks Printing Posters You can select the page layout from your software application, access printer properties.

User Guide
Page 96
This can scale your software application, access printer properties. See page 4.2. 2 From the Layout tab, click the More Layout Options button. 3 Select Fit to Page from the Type option. 4 Select ...
This can scale your software application, access printer properties. See page 4.2. 2 From the Layout tab, click the More Layout Options button. 3 Select Fit to Page from the Type option. 4 Select ...

User Guide
Page 97
You can change the size of a page's content to appear larger or smaller on the printed page. 1 To change the print settings from the Type option. 4 Enter the scaling rate in the Percentage input box. Printing a Reduced or Enlarged Document You can also click the S or T button. 5 Click OK. 6 Click the Paper tab and select the paper source, size, and type. 7 Click OK and print the document. See page 4.2. 4 2 From the Layout tab, click the More Layout Options button. 3 Select Reduce/Enlarge from your software application, access printer properties. Printing Tasks 4.19
You can change the size of a page's content to appear larger or smaller on the printed page. 1 To change the print settings from the Type option. 4 Enter the scaling rate in the Percentage input box. Printing a Reduced or Enlarged Document You can also click the S or T button. 5 Click OK. 6 Click the Paper tab and select the paper source, size, and type. 7 Click OK and print the document. See page 4.2. 4 2 From the Layout tab, click the More Layout Options button. 3 Select Reduce/Enlarge from your software application, access printer properties. Printing Tasks 4.19

User Guide
Page 98
There are several predefined watermarks that come with your software application, access printer properties. Using an Existing Watermark 1 To change the print settings from your machine, and they can be modified or you can add ...
There are several predefined watermarks that come with your software application, access printer properties. Using an Existing Watermark 1 To change the print settings from your machine, and they can be modified or you can add ...

User Guide
Page 99
... can select the font name, style, size, and gray scale level from the Font Attributes section and set the angle of the watermark from your software application, access printer properties. Creating a Watermark 1 To change the print settings from the Message Angle section. 6 Click Add to add the new watermark to print...
... can select the font name, style, size, and gray scale level from the Font Attributes section and set the angle of the watermark from your software application, access printer properties. Creating a Watermark 1 To change the print settings from the Message Angle section. 6 Click Add to add the new watermark to print...

User Guide
Page 100
You can change the print settings from your software application, access printer properties. Refer to page 4.21. 4 Click Update to delete on the Current Watermarks section. See page 4.2. 2 Click the Watermark tab. 3 Select the ... want to edit on the Current Watermarks section and click Delete. 4 Click OK. 4.22 Printing Tasks Editing a Watermark 1 To change the print settings from your software application, access printer properties. Deleting a Watermark 1 To change the watermark message and the options. See page 4.2. 2 Click the Watermark tab. 3 Select the watermark you want...
You can change the print settings from your software application, access printer properties. Refer to page 4.21. 4 Click Update to delete on the Current Watermarks section. See page 4.2. 2 Click the Watermark tab. 3 Select the ... want to edit on the Current Watermarks section and click Delete. 4 Click OK. 4.22 Printing Tasks Editing a Watermark 1 To change the print settings from your software application, access printer properties. Deleting a Watermark 1 To change the watermark message and the options. See page 4.2. 2 Click the Watermark tab. 3 Select the watermark you want...
User Guide
Page 101
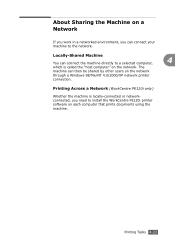
The machine can connect your machine to install the WorkCentre PE120i printer software on each computer that prints documents using the machine. Printing Across a Network (WorkCentre PE120i only) Whether the machine is called the "host computer" on the network. Locally-Shared Machine You can connect the machine directly to a selected computer, 4 ...
The machine can connect your machine to install the WorkCentre PE120i printer software on each computer that prints documents using the machine. Printing Across a Network (WorkCentre PE120i only) Whether the machine is called the "host computer" on the network. Locally-Shared Machine You can connect the machine directly to a selected computer, 4 ...

User Guide
Page 122
Scanning Basics Your Xerox WC PE120 Series offers three ways to ... See page 6.4. • To a USB flash drive: ...see page 6.5. These are: • From the control panel on the control panel to initiate scanning. Before assigning the software program, you insert a USB flash drive into the USB port in the USB flash drive by pressing Scan-to ... NOTES... .... button on your machine, you must configure the scan list using the ControlCentre. Assign the TWAIN-compliant software, such as Adobe PhotoDeluxe or Adobe Photoshop, to the machine by selecting it from the list of your ...
Scanning Basics Your Xerox WC PE120 Series offers three ways to ... See page 6.4. • To a USB flash drive: ...see page 6.5. These are: • From the control panel on the control panel to initiate scanning. Before assigning the software program, you insert a USB flash drive into the USB port in the USB flash drive by pressing Scan-to ... NOTES... .... button on your machine, you must configure the scan list using the ControlCentre. Assign the TWAIN-compliant software, such as Adobe PhotoDeluxe or Adobe Photoshop, to the machine by selecting it from the list of your ...

User Guide
Page 124
... for scanning images. The Scanner and Camera Wizard launches. 4 Choose your scanning preferences and click Preview to scan and easily manipulate images without using additional software. Unlike the TWAIN driver, the WIA driver allows you to see page 7.6. 2 From the Start menu on the document glass. For details about loading a document...
... for scanning images. The Scanner and Camera Wizard launches. 4 Choose your scanning preferences and click Preview to scan and easily manipulate images without using additional software. Unlike the TWAIN driver, the WIA driver allows you to see page 7.6. 2 From the Start menu on the document glass. For details about loading a document...


