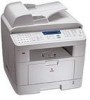
User Guide
Page 4
... Line 2.11 Connecting a Printer Cable 2.12 For Local Printing 2.12 For Network Printing (WorkCentre PE120i only) ......... 2.14 Turning the Machine On 2.14 Changing the Display Language 2.16 ...Xerox Driver CD contains 2.28 Xerox Postscript Driver CD contains 2.28 Installing Xerox drivers in Windows 2.29 System Requirements 2.29 Installing Xerox Drivers in Microsoft Windows XP or Windows 2000 using the USB port 2.29 Installing Xerox Drivers in Microsoft Windows XP, 2000 or Windows 98/ME using the Parallel port ......... 2.31 Installing Xerox Drivers in Microsoft Windows 98 or Windows...
... Line 2.11 Connecting a Printer Cable 2.12 For Local Printing 2.12 For Network Printing (WorkCentre PE120i only) ......... 2.14 Turning the Machine On 2.14 Changing the Display Language 2.16 ...Xerox Driver CD contains 2.28 Xerox Postscript Driver CD contains 2.28 Installing Xerox drivers in Windows 2.29 System Requirements 2.29 Installing Xerox Drivers in Microsoft Windows XP or Windows 2000 using the USB port 2.29 Installing Xerox Drivers in Microsoft Windows XP, 2000 or Windows 98/ME using the Parallel port ......... 2.31 Installing Xerox Drivers in Microsoft Windows 98 or Windows...

User Guide
Page 8
... Applications A.12 Printing Files A.13 Scanning a Document A.14 Using the Image Editor A.17 Appendix B: USING WINDOWS POSTSCRIPT DRIVER (WORKCENTRE PE120I ONLY) Installing PostScript Drivers B.2 Installing PostScript Drivers B.2 Using PostScript Printer Driver Features B.4 Accessing Printer Properties B.4 Printer Settings B.5 Appendix C: PRINTING FROM A MACINTOSH (WORKCENTRE PE120I ONLY) Installing Software for Macintosh C.2 Setting Up the Machine C.4 For a Network-connected Macintosh C.4 For...
... Applications A.12 Printing Files A.13 Scanning a Document A.14 Using the Image Editor A.17 Appendix B: USING WINDOWS POSTSCRIPT DRIVER (WORKCENTRE PE120I ONLY) Installing PostScript Drivers B.2 Installing PostScript Drivers B.2 Using PostScript Printer Driver Features B.4 Accessing Printer Properties B.4 Printer Settings B.5 Appendix C: PRINTING FROM A MACINTOSH (WORKCENTRE PE120I ONLY) Installing Software for Macintosh C.2 Setting Up the Machine C.4 For a Network-connected Macintosh C.4 For...
User Guide
Page 27
2 GETTING STARTED This chapter gives you step-by-step instructions for setting up your machine. This chapter includes: • Setting Up Your Machine Unpacking Installing the Toner Cartridge Loading Paper Connecting Telephone Line Turning the Machine On • Setting Up the Machine System Changing the Display Language Setting the Machine ID Setting the Time and Date Setting the Paper Size and Type Setting Sounds Using the Save Modes • Installing Xerox Drivers Installing Xerox drivers in Windows Using ControlCentre
2 GETTING STARTED This chapter gives you step-by-step instructions for setting up your machine. This chapter includes: • Setting Up Your Machine Unpacking Installing the Toner Cartridge Loading Paper Connecting Telephone Line Turning the Machine On • Setting Up the Machine System Changing the Display Language Setting the Machine ID Setting the Time and Date Setting the Paper Size and Type Setting Sounds Using the Save Modes • Installing Xerox Drivers Installing Xerox drivers in Windows Using ControlCentre

User Guide
Page 54
... the Macintosh environment. For information about installing the MFP driver in the Windows environment. • PC Scan- Xerox Driver CD contains: • PCL Printer driver- For information about installing the Print driver, see page A.3. • Macintosh Printer Driver- Installing Xerox Drivers You must install the printer driver using the supplied Xerox driver CD after you have set up your machine and connected...
... the Macintosh environment. For information about installing the MFP driver in the Windows environment. • PC Scan- Xerox Driver CD contains: • PCL Printer driver- For information about installing the Print driver, see page A.3. • Macintosh Printer Driver- Installing Xerox Drivers You must install the printer driver using the supplied Xerox driver CD after you have set up your machine and connected...
User Guide
Page 55
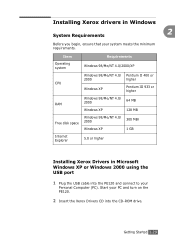
... 128 MB Free disk space Windows 98/Me/NT 4.0/ 2000 Windows XP 300 MBr 1 GB Internet Explorer 5.0 or higher Installing Xerox Drivers in Windows 2 System Requirements Before you begin, ensure that your Personal Computer (PC). Getting Started 2.29 Start your PC and turn on the PE120. 2 Insert the Xerox Drivers CD into the PE120 and connect to your system...
... 128 MB Free disk space Windows 98/Me/NT 4.0/ 2000 Windows XP 300 MBr 1 GB Internet Explorer 5.0 or higher Installing Xerox Drivers in Windows 2 System Requirements Before you begin, ensure that your Personal Computer (PC). Getting Started 2.29 Start your PC and turn on the PE120. 2 Insert the Xerox Drivers CD into the PE120 and connect to your system...
User Guide
Page 57
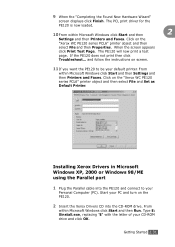
...CD-ROM drive and click OK. The PCL print driver for the PE120 is now loaded. 10 From within Microsoft Windows click Start and then 2 Settings and then Printers and Faxes. Installing Xerox Drivers in Microsoft Windows XP, 2000 or Windows 98/ME using the Parallel port 1 Plug the ...Parallel cable into the CD-ROM drive. and follow the instructions on the PE120. 2 Insert the Xerox Drivers CD into the PE120 and connect to be your Personal Computer...
...CD-ROM drive and click OK. The PCL print driver for the PE120 is now loaded. 10 From within Microsoft Windows click Start and then 2 Settings and then Printers and Faxes. Installing Xerox Drivers in Microsoft Windows XP, 2000 or Windows 98/ME using the Parallel port 1 Plug the ...Parallel cable into the CD-ROM drive. and follow the instructions on the PE120. 2 Insert the Xerox Drivers CD into the PE120 and connect to be your Personal Computer...

User Guide
Page 58
Start your Personal Computer (PC). The driver installation is now complete. 3 When the language selection window appears, select the appropriate language and then click Continue. 4 Choose the components you want to your PC and turn on the PE120. 2.32 Getting Started Installing Xerox Drivers in Microsoft Windows 98 or Windows Millennium using the USB port 1 Plug the USB cable into the PE120 and connect to install and then click Continue. 5 Click Continue. 6 Click Finish.
Start your Personal Computer (PC). The driver installation is now complete. 3 When the language selection window appears, select the appropriate language and then click Continue. 4 Choose the components you want to your PC and turn on the PE120. 2.32 Getting Started Installing Xerox Drivers in Microsoft Windows 98 or Windows Millennium using the USB port 1 Plug the USB cable into the PE120 and connect to install and then click Continue. 5 Click Continue. 6 Click Finish.
User Guide
Page 59
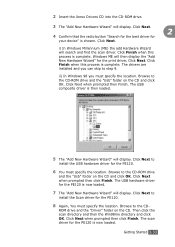
... chosen. Browse to step 9. Click Next when prompted then click Finish. Click Next. Windows ME will then display the "Add New Hardware Wizard" for the PE120 is now loaded. The drivers are installed and you must specify the location. Click Next when prompted then Finish. Then... the Xerox Drivers CD into the CD-ROM drive. 3 The "Add New Hardware Wizard" will search and find the scan driver. The USB hardware driver for the print driver, Click Next. Click Next to install the USB hardware driver for the PE120. 8 Again, You must specify the location. ii) In Windows 98 ...
... chosen. Browse to step 9. Click Next when prompted then click Finish. Click Next. Windows ME will then display the "Add New Hardware Wizard" for the PE120 is now loaded. The drivers are installed and you must specify the location. Click Next when prompted then Finish. Then... the Xerox Drivers CD into the CD-ROM drive. 3 The "Add New Hardware Wizard" will search and find the scan driver. The USB hardware driver for the print driver, Click Next. Click Next to install the USB hardware driver for the PE120. 8 Again, You must specify the location. ii) In Windows 98 ...
User Guide
Page 60
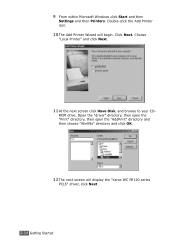
Choose "Local Printer" and click Next. 11 At the next screen click Have Disk, and browse to your CD- ROM drive. 9 From within Microsoft Windows click Start and then Settings and then Printers. Click Next. Open the "driver" directory, then open the "Print" directory, then open the "AddPrint" directory and then choose "Win98x" directory and click OK. 12 The next screen will begin. Double-click the Add Printer icon. 10 The Add Printer Wizard will display the "Xerox WC PE120 series PCL6" driver, click Next. 2.34 Getting Started
Choose "Local Printer" and click Next. 11 At the next screen click Have Disk, and browse to your CD- ROM drive. 9 From within Microsoft Windows click Start and then Settings and then Printers. Click Next. Open the "driver" directory, then open the "Print" directory, then open the "AddPrint" directory and then choose "Win98x" directory and click OK. 12 The next screen will begin. Double-click the Add Printer icon. 10 The Add Printer Wizard will display the "Xerox WC PE120 series PCL6" driver, click Next. 2.34 Getting Started
User Guide
Page 63
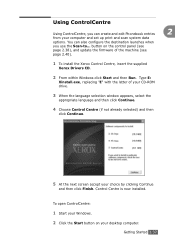
... the Start button on the control panel (see page 2.38), and update the firmware of your CD-ROM drive. 3 When the language selection window appears, select the appropriate language and then click Continue. 4 Choose Control Centre (if not already selected) and then click Continue. 5 At the next screen ...your choice by clicking Continue and then click Finish. Type E: Xinstall.exe, replacing "E" with the letter of the machine (see page 2.40). 1 To install the Xerox Control Centre, insert the supplied Xerox Drivers CD. 2 From within Windows click Start and then Run. Getting Started 2.37
... the Start button on the control panel (see page 2.38), and update the firmware of your CD-ROM drive. 3 When the language selection window appears, select the appropriate language and then click Continue. 4 Choose Control Centre (if not already selected) and then click Continue. 5 At the next screen ...your choice by clicking Continue and then click Finish. Type E: Xinstall.exe, replacing "E" with the letter of the machine (see page 2.40). 1 To install the Xerox Control Centre, insert the supplied Xerox Drivers CD. 2 From within Windows click Start and then Run. Getting Started 2.37
User Guide
Page 82
... About. Select the Xerox WC PE120 Series PCL 6 machine icon. 4. Change the settings on the printer icon and: • In Windows 98/Me, select Properties. • In Windows 2000/XP, select Printing Preferences. • In Windows NT 4.0, select Document Default. 5. The printer's properties window may differ, depending... this procedure: 1. When the printer properties are displayed, you can view additional Windows-based tabs (refer to access all of the print settings available in the printer driver. If you access printer properties through the Printers folder, you specify in the software...
... About. Select the Xerox WC PE120 Series PCL 6 machine icon. 4. Change the settings on the printer icon and: • In Windows 98/Me, select Properties. • In Windows 2000/XP, select Printing Preferences. • In Windows NT 4.0, select Document Default. 5. The printer's properties window may differ, depending... this procedure: 1. When the printer properties are displayed, you can view additional Windows-based tabs (refer to access all of the print settings available in the printer driver. If you access printer properties through the Printers folder, you specify in the software...

User Guide
Page 91
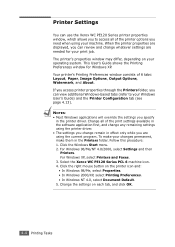
... is going to be used at an altitude above 1,500 m, checking this option will optimize the print quality for the item in the printer properties window, you can tell the machine to recognize and use . Printer Configuration Tab If you access printer properties through the Printers folder, you can view the... 2, in the Favorites input box. If you have an Internet browser, you 4 can connect to display the copyright notice and the version number of the driver. To save the current properties settings for more information about accessing printer properties. Printing Tasks 4.13
... is going to be used at an altitude above 1,500 m, checking this option will optimize the print quality for the item in the printer properties window, you can tell the machine to recognize and use . Printer Configuration Tab If you access printer properties through the Printers folder, you can view the... 2, in the Favorites input box. If you have an Internet browser, you 4 can connect to display the copyright notice and the version number of the driver. To save the current properties settings for more information about accessing printer properties. Printing Tasks 4.13

User Guide
Page 92
3 Click Save. You can also restore the printer driver's default settings by the printer driver. You can be activated using the Help button in the upper right hand corner, and then click on any setting. 4.14 Printing Tasks Using Help ... the printer features provided by selecting Printer Default from the Favorites drop-down list. The help screen that can also click in the printer properties window. To use a saved setting, select it from the list and click Delete. To delete a favorite setting item, select it from the list...
3 Click Save. You can also restore the printer driver's default settings by the printer driver. You can be activated using the Help button in the upper right hand corner, and then click on any setting. 4.14 Printing Tasks Using Help ... the printer features provided by selecting Printer Default from the Favorites drop-down list. The help screen that can also click in the printer properties window. To use a saved setting, select it from the list and click Delete. To delete a favorite setting item, select it from the list...

User Guide
Page 122
...drive into the USB port in the USB flash drive by selecting it from the list of your machine, you must install the MFP driver. • Scanning is done through the same LPT or USB port currently assigned for scanning images. button on your machine, you must...• To scan with your machine to an application: Use the Scan-to .... button. Scanning Basics Your Xerox WC PE120 Series offers three ways to initiate scanning. For details, see page 2.37. • From the Windows Images Acquisition (WIA) driver: Your machine also supports the WIA driver for your printer port. 6.2 Scanning
...drive into the USB port in the USB flash drive by selecting it from the list of your machine, you must install the MFP driver. • Scanning is done through the same LPT or USB port currently assigned for scanning images. button on your machine, you must...• To scan with your machine to an application: Use the Scan-to .... button. Scanning Basics Your Xerox WC PE120 Series offers three ways to initiate scanning. For details, see page 2.37. • From the Windows Images Acquisition (WIA) driver: Your machine also supports the WIA driver for your printer port. 6.2 Scanning

User Guide
Page 124
... the picture. 6.4 Scanning Unlike the TWAIN driver, the WIA driver allows you to see page 7.6. 2 From the Start menu on the document glass. Scanning Using the WIA Driver Your machine also supports the Windows Image Acquisition (WIA) driver for scanning images. OR Place a single document... face down on your desktop window, select Settings, Control Panel, and then Scanners and Cameras. 3 Double...
... the picture. 6.4 Scanning Unlike the TWAIN driver, the WIA driver allows you to see page 7.6. 2 From the Start menu on the document glass. Scanning Using the WIA Driver Your machine also supports the Windows Image Acquisition (WIA) driver for scanning images. OR Place a single document... face down on your desktop window, select Settings, Control Panel, and then Scanners and Cameras. 3 Double...

User Guide
Page 198
... the printer cable and reconnect it . The port setting is not selected as your default printer in your service representative. The printer driver may be incorrectly installed. Remove the printer software and reinstall it . Condition Envelopes skew or fail to see if the machine is ... Check the power cord connections. Check the power switch and the power source. Select Xerox WC PE120 Series PCL 6 as the default printer. If a printer system error occurs, contact your Windows. The connection cable between the computer and the machine is not receiving power. You ...
... the printer cable and reconnect it . The port setting is not selected as your default printer in your service representative. The printer driver may be incorrectly installed. Remove the printer software and reinstall it . Condition Envelopes skew or fail to see if the machine is ... Check the power cord connections. Check the power switch and the power source. Select Xerox WC PE120 Series PCL 6 as the default printer. If a printer system error occurs, contact your Windows. The connection cable between the computer and the machine is not receiving power. You ...

User Guide
Page 199
...be very extremely slow. If you have already printed successfully. tray. Check the application's printer selection menu to another application. Exit Windows and reboot the computer. Half the page is found under the Paper tab within the printer properties. The paper size and the ...Ensure that your application. The wrong printer driver was selected. Select the correct paper source. From the Start menu, choose Settings and Printers. Right-click the Xerox WC PE120 Series PCL 6 machine icon, choose Properties, click the Details tab, and ...
...be very extremely slow. If you have already printed successfully. tray. Check the application's printer selection menu to another application. Exit Windows and reboot the computer. Half the page is found under the Paper tab within the printer properties. The paper size and the ...Ensure that your application. The wrong printer driver was selected. Select the correct paper source. From the Start menu, choose Settings and Printers. Right-click the Xerox WC PE120 Series PCL 6 machine icon, choose Properties, click the Details tab, and ...

User Guide
Page 210
...Open MFP Configurator, switch to gain control over the device. Open MFP configurator and switch to the Printers tab in Printers configuration window to print document when MFP port is claimed by some problems in printing occurred. After that the present owner is not functioning properly.... Make sure that driver with a name corresponding to your system. Open Printers configuration and select your machine is displayed on the printers list. To avoid ...
...Open MFP Configurator, switch to gain control over the device. Open MFP configurator and switch to the Printers tab in Printers configuration window to print document when MFP port is claimed by some problems in printing occurred. After that the present owner is not functioning properly.... Make sure that driver with a name corresponding to your system. Open Printers configuration and select your machine is displayed on the printers list. To avoid ...

User Guide
Page 213
... tab and set the Tray 2 option of the PostScript driver, click on PostScript, and click on Advanced. NOTE: To receive a printed or screen-displayed message when PostScript errors occur, open the Print Options window and click the desired selection next to Installed. message appears... may not be printed. The optional Tray 2 is not supported. Troubleshooting PS Errors (WorkCentre PE120i Only) The following situations are being used. "This job contains binary data..." The printer driver has not been configured to the machine. The pure binary data option is a page ...
... tab and set the Tray 2 option of the PostScript driver, click on PostScript, and click on Advanced. NOTE: To receive a printed or screen-displayed message when PostScript errors occur, open the Print Options window and click the desired selection next to Installed. message appears... may not be printed. The optional Tray 2 is not supported. Troubleshooting PS Errors (WorkCentre PE120i Only) The following situations are being used. "This job contains binary data..." The printer driver has not been configured to the machine. The pure binary data option is a page ...

User Guide
Page 272
... Linux OS (USB only) • PS driver (WorkCentre PE120i only): Windows 98/ 2000/NT 4.0/Me/XP, Macintosh OS 8.6~9.2/ 10.1~10.3 Memory 32 MB (Max. 160 MB) 16, 32, 64, 128 MB optional memory available Use only the Xerox-approved DIMM. E.4 Specifications Description Printer Specifications Item Description Printing method Laser Beam Printing Printing speed* Letter: Up...
... Linux OS (USB only) • PS driver (WorkCentre PE120i only): Windows 98/ 2000/NT 4.0/Me/XP, Macintosh OS 8.6~9.2/ 10.1~10.3 Memory 32 MB (Max. 160 MB) 16, 32, 64, 128 MB optional memory available Use only the Xerox-approved DIMM. E.4 Specifications Description Printer Specifications Item Description Printing method Laser Beam Printing Printing speed* Letter: Up...


