Quick Use Guide
Page 16
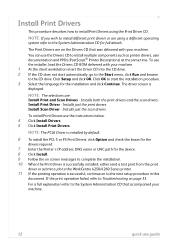
... Option and check the boxes for the drivers required. 7 Enter the Printer's IP address, DNS name or UNC path for the device. 8 Click Install. 9 Follow the on screen messages to complete the installation. 10 When the Print Driver is successfully installed, either send a test print from the print driver or submit a job to the WorkCentre 4250/4260 Series printer. 11 If the printing operation is displayed. If the print operation failed, refer to Troubleshooting on to install different print drivers or are : Install Print and Scan Drivers...
... Option and check the boxes for the drivers required. 7 Enter the Printer's IP address, DNS name or UNC path for the device. 8 Click Install. 9 Follow the on screen messages to complete the installation. 10 When the Print Driver is successfully installed, either send a test print from the print driver or submit a job to the WorkCentre 4250/4260 Series printer. 11 If the printing operation is displayed. If the print operation failed, refer to Troubleshooting on to install different print drivers or are : Install Print and Scan Drivers...
Quick Use Guide
Page 18
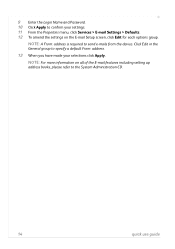
NOTE: A From: address is required to specify a default From: address. 13 When you have made your settings. 11 From the Properties menu, click Services > E-mail Settings > Defaults. 12 To amend the settings on all of the E-mail features including setting up address books, please refer to the System Administration CD. 14 quick use guide 9 Enter the Login Name and Password. 10 Click Apply to confirm your selections click Apply. Click Edit in the General group to send e-mails from the device. NOTE: For more information on the E-mail Setup screen, click Edit for each options group.
NOTE: A From: address is required to specify a default From: address. 13 When you have made your settings. 11 From the Properties menu, click Services > E-mail Settings > Defaults. 12 To amend the settings on all of the E-mail features including setting up address books, please refer to the System Administration CD. 14 quick use guide 9 Enter the Login Name and Password. 10 Click Apply to confirm your selections click Apply. Click Edit in the General group to send e-mails from the device. NOTE: For more information on the E-mail Setup screen, click Edit for each options group.
Quick Use Guide
Page 26
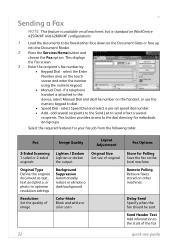
... displays the Fax screen. 3 Enter the recipient's fax number by: • Keypad Dial - This button provides access to dial. • Speed Dial - Select the required features for your fax job from the following table: Fax 2-Sided Scanning 1-sided or 2-sided originals Original Type Define the original document as text, text and photo, or photo to optimise resolution settings Resolution Set the quality of image Image Quality Layout Adjustment Lighten / Darken Lighten or darken the output Original Size Set size of the fax 22 quick use...
... displays the Fax screen. 3 Enter the recipient's fax number by: • Keypad Dial - This button provides access to dial. • Speed Dial - Select the required features for your fax job from the following table: Fax 2-Sided Scanning 1-sided or 2-sided originals Original Type Define the original document as text, text and photo, or photo to optimise resolution settings Resolution Set the quality of image Image Quality Layout Adjustment Lighten / Darken Lighten or darken the output Original Size Set size of the fax 22 quick use...

Quick Use Guide
Page 35
... the device. Default settings for the Address Book can be either the Machine Status, Job Status or one of the Services. If configured, your machine is accessed from your web browser and enter the IP address of the machine, media it contains, jobs in handy when you walk up a list of your own requirements such as speed dial codes. The various tabs on the web page contain different options to save on paper. Simply open your web browser. Remote Administration...
... the device. Default settings for the Address Book can be either the Machine Status, Job Status or one of the Services. If configured, your machine is accessed from your web browser and enter the IP address of the machine, media it contains, jobs in handy when you walk up a list of your own requirements such as speed dial codes. The various tabs on the web page contain different options to save on paper. Simply open your web browser. Remote Administration...
Quick Use Guide
Page 37
... light on page 15. If after rebooting your machine is connected to ON (I). • Ensure that E-mail is correct. quick use guide 33 Touch the User Interface screen to re-activate. • Check to see that the Network Setup is enabled. The documentation and the fault messages on the machine help you to Fax Setup on the Control Panel. Refer to E-mail Setup on page 13. • Load the paper in the paper trays with the seam side...
... light on page 15. If after rebooting your machine is connected to ON (I). • Ensure that E-mail is correct. quick use guide 33 Touch the User Interface screen to re-activate. • Check to see that the Network Setup is enabled. The documentation and the fault messages on the machine help you to Fax Setup on the Control Panel. Refer to E-mail Setup on page 13. • Load the paper in the paper trays with the seam side...
System Administration Guide
Page 3
... 1 Machine Models 1 Xerox WorkCentre 4250/4260 Series 2 Control Panel Overview 3 2 Machine Connection ...5 Connection Ports 5 Front View 5 Side View 6 Interface Ports 6 Front 6 Left Side 7 Initial Connection 7 Administrator Access 8 Configure Ethernet Settings 8 Setting the Ethernet speed at the machine 9 Printing a Configuration Report 9 CentreWare Internet Services 9 System Configuration 9 Access CentreWare Internet Services 10 Setup HTTP 10 Change the Administrator Password 11 3 Network Installation ...13 TCP/IP 13 Configure Static IPv4 Addressing using the Machine User...
... 1 Machine Models 1 Xerox WorkCentre 4250/4260 Series 2 Control Panel Overview 3 2 Machine Connection ...5 Connection Ports 5 Front View 5 Side View 6 Interface Ports 6 Front 6 Left Side 7 Initial Connection 7 Administrator Access 8 Configure Ethernet Settings 8 Setting the Ethernet speed at the machine 9 Printing a Configuration Report 9 CentreWare Internet Services 9 System Configuration 9 Access CentreWare Internet Services 10 Setup HTTP 10 Change the Administrator Password 11 3 Network Installation ...13 TCP/IP 13 Configure Static IPv4 Addressing using the Machine User...

System Administration Guide
Page 47
... Print Services for Unix is loaded 3. Xerox WorkCentre 4250/4260 Series System Administration Guide 35 4 Print Drivers This chapter explains how to your CD drive. Click on your Apple Mac Print Driver on page 52 • UNIX on page 53 • Print Driver Options: Enable/Disable the Banner Sheet on page 54 Windows Printing LPR Printing Ensure Print Services for Unix is enabled Follow the relevant steps below that are covered: • LPR Printing on page 35 • Internet Printing Protocol (IPP) Port on page...
... Print Services for Unix is loaded 3. Xerox WorkCentre 4250/4260 Series System Administration Guide 35 4 Print Drivers This chapter explains how to your CD drive. Click on your Apple Mac Print Driver on page 52 • UNIX on page 53 • Print Driver Options: Enable/Disable the Banner Sheet on page 54 Windows Printing LPR Printing Ensure Print Services for Unix is enabled Follow the relevant steps below that are covered: • LPR Printing on page 35 • Internet Printing Protocol (IPP) Port on page...
System Administration Guide
Page 54
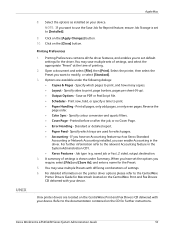
... [Finish] button. 4 Print Drivers i) Click on the [Next] button. 18. Click on the [Next] button. The printer driver will be sharing this to support AppleTalk®. Information Checklist 1. If the CD autoruns, click [Exit]. 11. Select the model of your machine. 42 Xerox WorkCentre 4250/4260 Series System Administration Guide The Printer Sharing Screen appears. Click on the machine. 2. Enter the [Location] (Add a Comment if necessary.) 24. The AppleTalk settings must be...
... [Finish] button. 4 Print Drivers i) Click on the [Next] button. 18. Click on the [Next] button. The printer driver will be sharing this to support AppleTalk®. Information Checklist 1. If the CD autoruns, click [Exit]. 11. Select the model of your machine. 42 Xerox WorkCentre 4250/4260 Series System Administration Guide The Printer Sharing Screen appears. Click on the machine. 2. Enter the [Location] (Add a Comment if necessary.) 24. The AppleTalk settings must be...

System Administration Guide
Page 62
... [Test Page] window. 9. Click on the [OK] button to your operating system: Windows Vista a) Right-click on the printer in the [Start] menu, then click on [Start], followed by [Control Panel]. Verify that are installed on [Settings] then [Printers]. Locate the CentreWare Print and Fax Drivers CD delivered with your CD drive. 2. Load the CentreWare Print and Fax Drivers CD into your machine. 4 Print Drivers Manual Print Driver Configuration To configure the printer driver without using Bi-Directional communication: 1. b) Right-click on [Installable Options]. 4. Click on the machine...
... [Test Page] window. 9. Click on the [OK] button to your operating system: Windows Vista a) Right-click on the printer in the [Start] menu, then click on [Start], followed by [Control Panel]. Verify that are installed on [Settings] then [Printers]. Locate the CentreWare Print and Fax Drivers CD delivered with your CD drive. 2. Load the CentreWare Print and Fax Drivers CD into your machine. 4 Print Drivers Manual Print Driver Configuration To configure the printer driver without using Bi-Directional communication: 1. b) Right-click on [Installable Options]. 4. Click on the machine...
System Administration Guide
Page 65
... - saved job or fax), 2 sided, output destination. 4. Xerox WorkCentre 4250/4260 Series System Administration Guide 53 Options are located on your device. Job type (e.g. When you have an Accounting feature such as PDF or PostScript file. • Scheduler - NOTE: If you want to use the Save Job for the Preset. 5. You may save multiple sets of settings, and select the appropriate "Preset" at the time of printing. 2. Select the printer, then select the Preset you want to [Installed]. 9. Print...
... - saved job or fax), 2 sided, output destination. 4. Xerox WorkCentre 4250/4260 Series System Administration Guide 53 Options are located on your device. Job type (e.g. When you have an Accounting feature such as PDF or PostScript file. • Scheduler - NOTE: If you want to use the Save Job for the Preset. 5. You may save multiple sets of settings, and select the appropriate "Preset" at the time of printing. 2. Select the printer, then select the Preset you want to [Installed]. 9. Print...

System Administration Guide
Page 85
... instructions. 9. NOTE: Microsoft office documents with the following file formats can be printed: .TIFF, .TIF, .PDF, .JPG, .JPEG, .TXT, .PRN, .PS, .PCL and .TFX. Ensure that you select a file, a pop-up menu will appear. 6. If you wish to the file name. 6. Touch [Add]. Touch [Add]. Xerox WorkCentre 4250/4260 Series System Administration Guide 73 Print Files Print file from the machine (stored on a USB flash drive) NOTE: Only files and jobs which can change the [Output Color], [2-sided Scanning...
... instructions. 9. NOTE: Microsoft office documents with the following file formats can be printed: .TIFF, .TIF, .PDF, .JPG, .JPEG, .TXT, .PRN, .PS, .PCL and .TFX. Ensure that you select a file, a pop-up menu will appear. 6. If you wish to the file name. 6. Touch [Add]. Touch [Add]. Xerox WorkCentre 4250/4260 Series System Administration Guide 73 Print Files Print file from the machine (stored on a USB flash drive) NOTE: Only files and jobs which can change the [Output Color], [2-sided Scanning...
System Administration Guide
Page 104
... Xerox WorkCentre 4250/4260 Series System Administration Guide Procedure 1. Click on the [Fax Repository Setup] link. 7. Click on the [Properties] tab. 4. Select the [Select to Optional Step: Configure Defaults - If prompted, enter the Administrator's User ID [admin] and Password [1111], and click on the [Apply] button to accept the changes. NOTE: If you cannot do the steps above, check the access rights for the machine with the User Account and Password: a) Create a new folder...
... Xerox WorkCentre 4250/4260 Series System Administration Guide Procedure 1. Click on the [Fax Repository Setup] link. 7. Click on the [Properties] tab. 4. Select the [Select to Optional Step: Configure Defaults - If prompted, enter the Administrator's User ID [admin] and Password [1111], and click on the [Apply] button to accept the changes. NOTE: If you cannot do the steps above, check the access rights for the machine with the User Account and Password: a) Create a new folder...
System Administration Guide
Page 117
... use . Xerox WorkCentre 4250/4260 Series System Administration Guide 105 Shared Phonebook The Shared Phonebook is a list of fax numbers, click on the [Dialling Prefix] checkbox and enter the prefix in the box. If you add fax numbers on the [Always Use Current Recipient List] checkbox. 42. Click on the required resolution from the [Default Phonebook] menu. Personal Phonebook The Personal Phonebook is automatically saved to your fax at a specific time...
... use . Xerox WorkCentre 4250/4260 Series System Administration Guide 105 Shared Phonebook The Shared Phonebook is a list of fax numbers, click on the [Dialling Prefix] checkbox and enter the prefix in the box. If you add fax numbers on the [Always Use Current Recipient List] checkbox. 42. Click on the required resolution from the [Default Phonebook] menu. Personal Phonebook The Personal Phonebook is automatically saved to your fax at a specific time...
System Administration Guide
Page 119
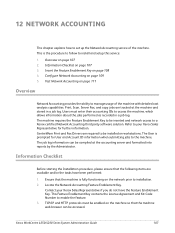
... to your Xerox Sales Representative if you do not have been performed: 1. Print, Scan, Server Fax, and copy jobs are tracked at the accounting server and formatted into reports by the Administrator. Users must be enabled on the machine so that the machine is the procedure to follow to install and setup this service: 1. The User is prompted for further information. Locate the Network Accounting Feature Enablement Key. This Feature Enablement Key contains the...
... to your Xerox Sales Representative if you do not have been performed: 1. Print, Scan, Server Fax, and copy jobs are tracked at the accounting server and formatted into reports by the Administrator. Users must be enabled on the machine so that the machine is the procedure to follow to install and setup this service: 1. The User is prompted for further information. Locate the Network Accounting Feature Enablement Key. This Feature Enablement Key contains the...

System Administration Guide
Page 177
... default is installed, then enter your print job being deleted. 9. Select the required Paper options for TIFF Color Compression. The options selected in the Image Settings screen impact the transmission time and size of the machine in the Address bar. 2. Select the required Printing options for jobs that do not already contain different settings already. 8. When finished with the Network Scanning feature. 1. Image Settings 4. Click on your Workstation, open the web browser, enter the TCP/IP Address of documents that...
... default is installed, then enter your print job being deleted. 9. Select the required Paper options for TIFF Color Compression. The options selected in the Image Settings screen impact the transmission time and size of the machine in the Address bar. 2. Select the required Printing options for jobs that do not already contain different settings already. 8. When finished with the Network Scanning feature. 1. Image Settings 4. Click on your Workstation, open the web browser, enter the TCP/IP Address of documents that...
User Guide
Page 74
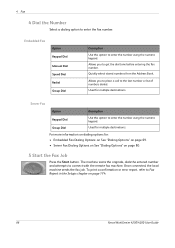
... machine sends the fax job. Server Fax Option Description Keypad Dial Use this option to Fax Report in the Setups chapter on page 80. 5 Start the Fax Job Press the Start button. 4 Fax 4 Dial the Number Select a dialing option to enter the fax number. Quickly select stored numbers from the Address Book. Group Dial Used for multiple destinations. For more information on dialing options for: • Embedded Fax Dialing Options: on See "Dialing Options" on page 69. • Server Fax Dialing Options on See "Dialing Options" on page 174. 66 Xerox WorkCentre 4250/4260 User Guide...
... machine sends the fax job. Server Fax Option Description Keypad Dial Use this option to Fax Report in the Setups chapter on page 80. 5 Start the Fax Job Press the Start button. 4 Fax 4 Dial the Number Select a dialing option to enter the fax number. Quickly select stored numbers from the Address Book. Group Dial Used for multiple destinations. For more information on dialing options for: • Embedded Fax Dialing Options: on See "Dialing Options" on page 69. • Server Fax Dialing Options on See "Dialing Options" on page 174. 66 Xerox WorkCentre 4250/4260 User Guide...
User Guide
Page 86
... machine. Group Address Book is not available when using the control panel, or select the Group Dial button and select the recipient from the pre-set list. 78 Xerox WorkCentre 4250/4260 User Guide Fax Sending Features Allows jobs to be prioritized and reports to be entered at a time. Priority Send Allows you to prioritize your job and send it before all the documents stored within the selected mailbox will only be printed or deleted. 1. Press Start...
... machine. Group Address Book is not available when using the control panel, or select the Group Dial button and select the recipient from the pre-set list. 78 Xerox WorkCentre 4250/4260 User Guide Fax Sending Features Allows jobs to be prioritized and reports to be entered at a time. Priority Send Allows you to prioritize your job and send it before all the documents stored within the selected mailbox will only be printed or deleted. 1. Press Start...

User Guide
Page 151
... the Windows printer driver options for the WorkCentre 4250S/4260S, 4250X/4260X and 4250XF/4260XF machines that accompany the printer drivers. The following pages contain an overview of options. The PCL printer driver screens are compatible with your PC by installing the appropriate printer driver. NOTE: More detailed information about printing is contained either in the printer driver screens or in the electronic user guides that are similar to the Drivers CD or download the...
... the Windows printer driver options for the WorkCentre 4250S/4260S, 4250X/4260X and 4250XF/4260XF machines that accompany the printer drivers. The following pages contain an overview of options. The PCL printer driver screens are compatible with your PC by installing the appropriate printer driver. NOTE: More detailed information about printing is contained either in the printer driver screens or in the electronic user guides that are similar to the Drivers CD or download the...
User Guide
Page 224
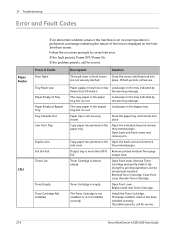
... Load paper in the paper tray. If the problem persists, call for service. 216 Xerox WorkCentre 4250/4260 User Guide Open front cover. The Toner Cartridge is not installed, or is more than 90% Remove printed material from Tray Duplex Jam Out Bin Full Toner Low Toner Empty Toner Cartridge Not Installed Paper supply in tray has run low Load paper in the Open the back covers and remove side cover. Open the indicated tray and remove the jammed paper. Remove Toner Cartridge and gently shake it. Copy paper has jammed in the tray indicated by the warning message...
... Load paper in the paper tray. If the problem persists, call for service. 216 Xerox WorkCentre 4250/4260 User Guide Open front cover. The Toner Cartridge is not installed, or is more than 90% Remove printed material from Tray Duplex Jam Out Bin Full Toner Low Toner Empty Toner Cartridge Not Installed Paper supply in tray has run low Load paper in the Open the back covers and remove side cover. Open the indicated tray and remove the jammed paper. Remove Toner Cartridge and gently shake it. Copy paper has jammed in the tray indicated by the warning message...

User Guide
Page 228
... Fax, Fax Receive Settings 172 L Layout / Watermark, Print 151 Lighten / Darken, Faxing 73, 83 Line Configuration, Fax Settings 174 M Machine Configurations Accessibility 204 Copier Speed 204 First Copy Out Time 204 Hardware 204 Machine Size 204 Models and Components 23 Warm Up Time 204 Machine Tests Image Quality 189 UI Test Application Checksum Verification 191 Audio Tone 190 Communications Self Test 190 220 Display Pixel 190 LED Indicator 190 Reset UI 190 Touch Area 189 UI Button 189 Video Memory...
... Fax, Fax Receive Settings 172 L Layout / Watermark, Print 151 Lighten / Darken, Faxing 73, 83 Line Configuration, Fax Settings 174 M Machine Configurations Accessibility 204 Copier Speed 204 First Copy Out Time 204 Hardware 204 Machine Size 204 Models and Components 23 Warm Up Time 204 Machine Tests Image Quality 189 UI Test Application Checksum Verification 191 Audio Tone 190 Communications Self Test 190 220 Display Pixel 190 LED Indicator 190 Reset UI 190 Touch Area 189 UI Button 189 Video Memory...


